Advertisement
Available languages
Available languages
Quick Links
Important: Read entire instruction sheet before
assembling or installing mantel kit.
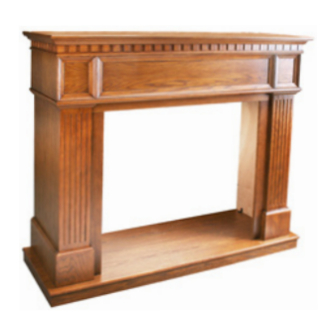
the W32lt mantel is only approved for use with
any DESA Heating, LLC 32" fireplace system and
universal fireplace. Do not use mantel with any
other product.
This mantel kit contains the following:
• Mantel pieces - unassembled and marked as follows:
#1 Base
#2 Right Side with arrow
#3 Right Front Leg with arrow
#4 Left Side with arrow
#5 Left Front Leg with arrow
#6 Header with arrow
#6A Header Extension
#7 Top
• Hardware Kit*
16 - Metal Brackets
32 - Screws M6 x 12 mm (1/2")
20 - Screws M6 x 30 mm (1
20 - Washers M6
1 - Allen Wrench
* Extra hardware may be included.
If any wood pieces are missing or damaged, contact the
dealer where you purchased this mantel for replacement. If
hardware is missing or damaged, contact DESA Heating, LLC
at 1-866-672-6040 for referral information. You can also visit
DESA Heating, LLC's web site at www.desatech.com.
W32LT WaLL ManTeL and Base
asseMBLY and InsTaLLaTIOn InsTRUCTIOns
118937-01
121149-01
/
")
121335-01
1
4
121336-01
121337-01
Note: Gather all mantel pieces together before assembling
mantel.
WARNING: Use only 1/2" screws to attach metal
angle brackets. Damage to mantel will result if other
screws are used for this purpose.
AssemblING mANtel
ImPORtANt: more than one person is required to as-
semble and lift mantel.
Estimated assembly time: 45 minutes.
When assembling mantel do not tighten screws completely
until told to do so. There should be some play in the pieces
to allow for proper alignment and best possible fit. It is very
important that more than one person assemble mantel together.
Panels must be held in proper alignment to each other while
tightening screws to assure fewer gaps and proper surface
alignment. When tightening screws, do not over tighten. This
may cause threads to strip. For this reason, the supplied Al-
len wrench should be used rather than a power screwdriver.
Panels have threaded inserts installed at screw locations.
Screws should start and turn easily in threaded holes when
assembled according to instructions. Do not force screws
into holes.
IMPORTANT: There is a serial number label inside of right
side panel and on outside package. When calling to request
technical assistance or for replacement parts please have
that number ready.
www.desatech.com
Advertisement

Related Manuals for Desa Wall Mantel and Base W32LT


Summary of Contents for Desa Wall Mantel and Base W32LT
-
Page 1: Assembly And Installation Instructions
If any wood pieces are missing or damaged, contact the dealer where you purchased this mantel for replacement. If hardware is missing or damaged, contact DESA Heating, LLC at 1-866-672-6040 for referral information. You can also visit DESA Heating, LLC’s web site at www.desatech.com. -
Page 2: Leg Assembly
leG Assembly 1. Lay right side panel (#2) face down on a soft surface to avoid marking finish. Attach three brackets with 1/2" screws to bottom of right front leg (#3) leaving screws slightly loose. Face brackets out toward tongued side (see Figure 1). -
Page 3: Gas Fireplace Installation
3. Place header assembly into position on top of leg as- semblies with arrow pointing up. Bottom of header will slide in behind upper portion of leg front panels and rest on shoulders (see Figure 4). Align bracket holes with threaded inserts in leg assemblies. - Page 4 7. Repeat steps 2 through 6 for other corner. Set Screws Adjusting Plate Shim Slot Figure 7 - assembling trim DESA Heating, LLC 2701 Industrial Drive Bowling Green, KY 42101 www.desatech.com 1-866-672-6040 (If supplied Slot Top Trim Mitered Edge...
- Page 5 La repisa de chimenea W32LT ha sido aprobada para ser usada exclusivamente con cualquier sistema de chimenea de 32" de DESA Heating, LLC y chimeneas universales. No utilice la repisa de chimenea con ningún otro producto. Este paquete de repisa de chimenea contiene lo siguiente: •...
- Page 6 EnSamblE dE cOlumna 1. Apoye el panel lateral derecho (nº 2) hacia abajo sobre una superficie suave para no dejar marcas en el acabado. Fije tres soportes con tornillos de 1/2" a la parte inferior de la columna anterior derecha (nº 3) dejando los tornillos un poco sueltos.
- Page 7 3. Coloque el ensamble de la cabecera en su sitio, sobre la parte superior de los ensambles de columnas, con la flecha apuntando hacia arriba. La parte inferior de la cabecera entrará haciéndola deslizar por detrás de la porción superior de los paneles anteriores frontales y se apoyará...
- Page 8 7. Repita los pasos 2 a 6 para la otra esquina. Tornillos de fijación Placa de ajuste Base para nivelar Figura 7 - armado del adorno DESA Heating, LLC 2701 Industrial Drive Bowling Green, KY 42101, EE.UU. www.desatech.com 1-866-672-6040 Ranura Parte superior...
- Page 9 S'il manque des pièces de quincaillerie ou si des pièces de quincaillerie sont endommagées, contactez DESA Heating, LLC au 1 866 672 6040 pour plus de renseignements. Vous pouvez aussi visiter le site web de DESA Heating, LLC à...
- Page 10 Assemblage des supports latéraux 1. Placez le panneau du côté droit (n sur une surface coussinée pour éviter toute égratignure du fini. Montez les trois équerres de fixation de 12 mm (1/2 po) sur la partie inférieure du support latéral avant droit (n 3) en laissant les vis un peu desserrées.
- Page 11 3. Placez l'assemblage du linteau au-dessus des assem- blages des supports latéraux avec les flèches pointant vers le haut. La base du linteau va se glisser dans la portion supérieure arrière des panneaux avant des supports latéraux et se positionner sur les épaulements (voir figure 4).
- Page 12 7. Répétez les étapes 2 à 6 pour l'autre coin. Vis de fixation Équerre d'assemblage Cale Figure 7 - assemblage de la finition DESA Heating, LLC 2701 Industrial Drive Bowling Green, KY 42101, États-Unis www.desatech.com 1-866-672-6040 (SI fouRNIE AVEC LE foyER Fente...