HP Mp3130 - Digital Projector XGA DLP User Manual
Hp mp3130 series digital projector - user's guide
Hide thumbs
Also See for Mp3130 - Digital Projector XGA DLP:
- User manual (84 pages) ,
- Quick setup manual (9 pages) ,
- Manual (8 pages)
Table of Contents
Advertisement
Quick Links
Advertisement
Table of Contents

Related Manuals for HP Mp3130 - Digital Projector XGA DLP


Summary of Contents for HP Mp3130 - Digital Projector XGA DLP
- Page 1 mp3130 series digital projector user’s guide...
- Page 2 Hewlett-Packard Company shall not be liable for any errors or for incidental or consequential damages in connection with the furnishing, performance, or use of this manual or the examples herein.
-
Page 3: Table Of Contents
Contents 1 Setting Up What’s in the Box?............8 Identifying Common Features . - Page 4 Contents 3 Adjusting the Projector Adjusting the Picture and Sound ..........35 To adjust the shape of the picture .
- Page 5 Contents 6 Fixing Problems Troubleshooting Suggestions..........59 Start-up problems .
- Page 6 Contents User’s Guide...
- Page 7 Setting Up The chapter explains how to install and set up the HP digital projector. ■ “What’s in the Box?” on page 8 ■ “Identifying Common Features” on page 9 ■ “Setting Up the Projector” on page 16 ■ “Turning On and Off” on page 27 ■...
-
Page 8: Setting Up
Setting Up What’s in the Box? Before setting up your projector, be sure your shipping box includes the following items. If the shipping box does not contain any of the following items, contact HP. Identifying the contents of the box Symbol Item Function... -
Page 9: Identifying Common Features
Setting Up (continued) Identifying the contents of the box Symbol Item Function Composite RCA video cable Connects device with RCA composite video output. Mini-phone audio cable Connects audio source to projector. Identifying Common Features This section identifies common features and functions of the projector. ■... -
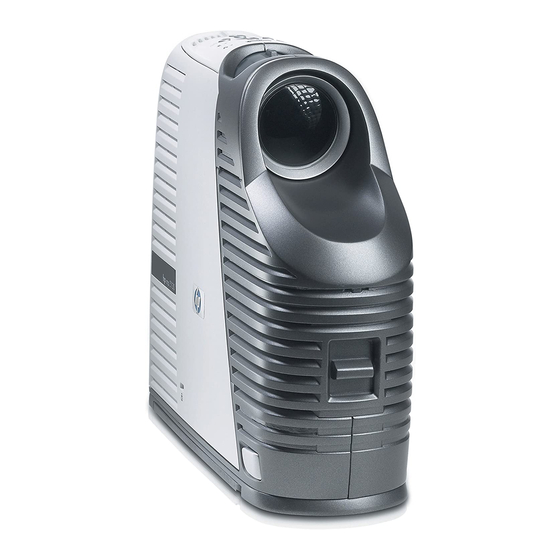
Page 10: Projector At A Glance
Setting Up Projector at a glance Identifying the projector Symbol Item Function Button panel Contains buttons and lights. Zoom ring Enlarges picture size 100–120%. Focus ring Focuses at distances of 1.2 to 12 m (4 to 40 ft). Lens cover Protects lens. -
Page 11: Projector Buttons And Lights
Setting Up Projector buttons and lights Identifying buttons and lights on the projector Symbol Item Function Enter button, back button, Change projector settings using the on-screen and directional arrows menu. Source button Switches to the next input source. Theater video button Optimizes the picture for video input. -
Page 12: Back Panel
Setting Up Back panel Identifying the back panel Symbol Item Function M1 input Connects various equipment with analog- and digital-video output, including computers. Also supports USB-device output for controlling a mouse. S-video input Connects video input from devices like VCRs and DVD players. -
Page 13: Remote Control
Setting Up Remote control ✎ Before using the remote control, install two AAA batteries. See “To replace the battery in the remote control” on page 50. Identifying the remote control with case closed Symbol Item Function Page-up and page-down Scroll up and down through pages on a down connected computer. - Page 14 Setting Up Å WARNING: To reduce the risk of injury to the eyes, do not look directly into the remote control laser light, and do not point the laser light into anyone’s eyes. Identifying remote control with case open Symbol Item Function Theater video button...
-
Page 15: Accessories
Setting Up Accessories HP offers accessories that can enhance the operation of your HP projector. See your projector dealer or visit http://www.hp.com to purchase accessories such as these: ■ Smart attachment module (connect a computer through your local network, add an optional 802.11b card for wireless computer connections, and more) ■... -
Page 16: Setting Up The Projector
Setting Up Setting Up the Projector This section describes how to set up, plan, and connect the projector. ■ “To position projector” on page 17 ■ “To set up on a table” on page 19 ■ “To connect power” on page 19 ■... -
Page 17: To Position Projector
Setting Up To position projector The following tables show you where to position the projector in relation to the screen. Identifying image size relative to distance from screen Image size (diagonal) Image size (width) Distance (lens to screen) 30 in. 0.8 m 24 in. - Page 18 Setting Up If you do not want to use the distance table, you can use the following equations to help determine where to install the projector relative to the screen. Calculating projection dimensions distance from lens to screen = A × width of screen minimum and maximum distance from screen = B width of screen = 0.8 ×...
-
Page 19: To Set Up On A Table
Setting Up To set up on a table 1. Place the projector on a stable platform located 1.2 to 12 m (4 to 40 ft) in front of the screen. Ideally, the platform should be lower than the bottom of the screen. 2. -
Page 20: To Connect A Computer
Setting Up To connect a computer Computer with VGA port 1. Connect the M1-to-VGA/USB cable between the M1 port on the projector the VGA port on the computer 2. (Optional) To allow the remote control to function as the computer mouse, connect the USB plug of the M1-to-VGA/USB cable into the USB port on the computer 3. - Page 21 Setting Up Computer with DVI port The connections are similiar to the VGA computer connection. For a visual aid, see the previous image. 1. Connect an M1-to-DVI/USB cable (available from HP) between the M1 port on the projector and the DVI port on the computer 2.
-
Page 22: To Connect A Handheld Organizer
Setting Up To connect a handheld organizer 1. Be sure the handheld organizer has a VGA-out port. If necessary, install a VGA-out accessory card into the organizer. ✎ Not all handhelds come with VGA-out ports. For example, the iPAQ Pocket PC requires a VGA-out PC Card with 15-pin connector. -
Page 23: To Connect Video Sources
Setting Up To connect video sources S-video connection Many DVD players and VCRs have S-video output. 1. Connect the S-video cable between the S-video port on the projector and the video device 2. (Optional) To get audio, connect the mini-phone audio cable between the audio port on the projector and the video device . - Page 24 Setting Up Composite video connection Many VCRs and other video equipment have composite video output, a single RCA video output connector. 1. Connect the composite video cable (RCA connector) between the composite video port on the projector and RCA video port on the video device 2.
- Page 25 Setting Up Component video connection Many DVD players and other high-quality video devices provide component video output, usually three RCA connectors labeled YPbPr or YCbCr. 1. Connect an M1-to-component-video cable (available from HP) between the M1 port on the projector and YPbPr or YCbCr port on the video device 2.
- Page 26 Setting Up SCART connection Several types of video devices provide a SCART video connection. 1. Connect an M1-to-SCART adapter cable (available from HP) to the M1 port on the projector , then connect a SCART cable from the adapter to the SCART device 2.
-
Page 27: Turning On And Off
Setting Up Turning On and Off This section provides instructions on turning the projector on and off. ■ “To turn the projector on” on page 27 ■ “To turn the projector off” on page 28 ■ “To reset the projector” on page 28 To turn the projector on 1. -
Page 28: To Turn The Projector Off
Setting Up To turn the projector off 1. Press the power button on the projector or remote control to turn off the projector. The power button blinks during the cool-down period, then the projector turns off. 2. You can disconnect video and audio equipment from the projector during the cool-down period, but not the power cord. -
Page 29: Making Basic Adjustments
Setting Up Making Basic Adjustments This section provides instructions on making basic adjustments to the projector. ■ “To aim the projector” on page 29 ■ “To adjust the focus and zoom” on page 30 To aim the projector ✎ Whenever you press the tilt button to aim the projector, the supports pop out from the base and provide extra stability. -
Page 30: To Adjust The Focus And Zoom
Setting Up To adjust the focus and zoom 1. Rotate the focus ring until the image becomes clear. The projector can be focused at distances of 1.2 to 12 m (4 to 40 ft). 2. Rotate the zoom ring to adjust the picture size from 100 to 120%. If the picture does not fit the screen, you might have to move the projector closer to the screen. -
Page 31: Giving Presentations
Giving Presentations The chapter explains how to give presentations with the projector. ■ “Using the Remote Control” on page 31 ■ “Showing Presentations” on page 33 Using the Remote Control ■ To turn the project on or off, press the power button ■... - Page 32 Giving Presentations ■ To control page-up and page-down on a computer, press the page-up page-down buttons. This feature requires a USB connection between the projector and computer. ■ Slide the remote control case open to use additional buttons. ❏ To optimize the picture for the type of input signal, press the business graphics or the theater video button.
-
Page 33: Showing Presentations
Giving Presentations Showing Presentations This section describes several things you can do during presentations. ■ “To present from a computer” on page 33 ■ “To change the source” on page 34 ■ “To hide or show the display” on page 34 To present from a computer 1. -
Page 34: To Change The Source
Giving Presentations To change the source To change the source, either: ■ Press the source button on the projector or remote control. ■ Open the on-screen menu, select Input, and select the port to which the input source is connected. To hide or show the display You can hide the display from your audience temporarily. -
Page 35: Adjusting The Projector
Adjusting the Projector This chapter describes how to make adjustments to the projector. ■ “Adjusting the Picture and Sound” on page 35 ■ “Using the On-Screen Menu” on page 38 Adjusting the Picture and Sound This section provides the following instructions on adjusting the picture and sound. ■... -
Page 36: To Adjust The Image According To The Type Of Picture
Adjusting the Projector ❏ If you want to turn on automatic vertical keystone correction, press the enter button until this option is enabled. ❏ If you want to disable the automatic correction, press the enter button until the option is disabled. 3. -
Page 37: To Adjust Other Image Settings
Adjusting the Projector To adjust other image settings The on-screen menu provides many settings that allow you to fine-tune the picture. 1. Open the on-screen menu and select Adjust Picture. 2. Change the picture adjustments as needed. From the Adjust Picture menu, you can change basic and advanced picture options, such as brightness, contrast, aspect ratio, and keystone correction. -
Page 38: Using The On-Screen Menu
Adjusting the Projector Using the On-Screen Menu This section explains how to navigate the on-screen menu and provides function definitions. The tables in this section describe all the functions available in the on-screen menu for the firmware version at publication. If your firmware is a different version, some menus might differ from those shown. -
Page 39: To Change Settings Using The On-Screen Menu
Adjusting the Projector To change settings using the on-screen menu You can change the on-screen menu settings with either the buttons on the projector or on the remote control. 1. Press enter on the projector or the remote control to open the on-screen menu. 2. -
Page 40: Quick Choice Menu
Adjusting the Projector Quick choice menu This menu provides quick access to commonly used functions from other menus. The menu in your projector might differ from the menu shown below. Quick choice Keystone correction Corrects the slanted edges of an image. This function compensates for of an image that is not automatically corrected by the projector. -
Page 41: Input Menu
Adjusting the Projector Input menu For a visual aid, see “Back panel” on page 12. Input Digital/analog graphics (M1) Shows the digital or analog input to the M1 port. This port connects to several types of devices, including analog VGA and SCART devices and digital Digital Video Interface (DVI) devices. -
Page 42: Adjust Picture Menu
Adjusting the Projector Adjust picture menu Adjust picture Picture mode Adjusts the color settings for the type of picture. You can optimize the picture for computer presentations or video output. The remote control and projector have buttons to change the picture mode. Brightness Brightens or darkens the image. - Page 43 Adjusting the Projector Adjust picture (continued) Reset keystone correction Resets keystone correction to zero. Aspect ratio Selects the proportions of the image that is not automatically corrected by the projector. • To automatically adapt to most inputs, select Best Fit. •...
-
Page 44: Audio Menu
Adjusting the Projector Audio menu Audio Mute Stops the audio output. Volume Changes the loudness of the audio. Treble Changes the loudness of the higher frequencies. Bass Changes the loudness of the lower frequencies. Reset audio settings Resets this menu to the default values. Setup menu Setup Language... -
Page 45: Help Menu
Adjusting the Projector Help menu Help About this projector Displays information and status for the projector. Diagnostics Show tests for checking the operation of the projector and the remote control. User’s Guide... - Page 46 Adjusting the Projector User’s Guide...
-
Page 47: Maintaining The Projector
Maintaining the Projector This chapter explains how to maintain the projector. ■ “Performing Routine Maintenance” on page 47 ■ “Upgrading the Projector” on page 51 Performing Routine Maintenance This section provides instructions on performing routing maintenance. ■ “To get the projector status” on page 47 ■... -
Page 48: To Replace The Lamp Module
Maintaining the Projector Ä CAUTION: Cleaning requires special consideration: ■ Do not spray any type of fluid or cleaner directly on the lens surface. Cleaners might damage the lens. ■ Do not use fabric softener when washing a cleaning cloth or softener sheets when drying the cloth. - Page 49 Maintaining the Projector 6. Turn on the projector. If the lamp does not turn on after the warm-up period, try reinstalling the lamp again. 7. Open the on-screen menu and select Setup > Reset lamp hours. Å WARNING: The lamp contains a small amount of mercury. If the lamp breaks, adequately ventilate the area where the breakage occurred.
-
Page 50: To Replace The Battery In The Remote Control
Maintaining the Projector To replace the battery in the remote control 1. Slide the remote control case open to reveal the battery compartment. 2. On the back of the remote control remove the battery cover to reveal the batteries. 3. Remove the old batteries and install two new AAA batteries 4. -
Page 51: Upgrading The Projector
Maintaining the Projector Upgrading the Projector To update the firmware HP might periodically release updated versions of the projector firmware to enhance the projector performance. The projector firmware version is shown in the on-screen menu at Help > About this projector. Check for updated versions at http://www.hp.com/go/proj_firmware. - Page 52 Maintaining the Projector User’s Guide...
-
Page 53: Installing Permanently
Installing Permanently This chapter explains how to permanently install the digital projector. Installing the Projector This section provides instructions on how to permanently install the projector. ■ “To mount the projector on a tripod” on page 53 ■ “To install on a table” on page 54 ■... -
Page 54: To Install On A Table
Installing Permanently 3. Attach the tripod mounting block to the tripod mount hole on the bottom of the projector. 4. Attach the projector and tripod mounting block to the tripod according to the tripod manufacturer’s instructions. To install on a table This installation is covered in detail in Chapter 1. -
Page 55: To Install On The Ceiling
Installing Permanently To install on the ceiling Å WARNING: To minimize the risk of injury from improperly installed equipment, it is recommended that a professional installer performs the ceiling installation. 1. Align the end of the ceiling-mount bracket with the center hole in the lower-mount bracket, and firmly secure it with a washer and bolt. -
Page 56: To Install For Rear Projection
Installing Permanently To install for rear projection 1. Place the projector 1.2 to 12 m (4 to 40 ft) behind a translucent screen that is designed for rear projection. See “To set up on a table” on page 19 or “To install on the ceiling” on page 55 for more instructions. -
Page 57: To Lock The Projector
Installing Permanently To lock the projector The projector includes a built-in slot to secure the projector with a cable and a lock (such as the Kensington MicroSaver lock system, available at many computer stores). 1. Wrap the cable around a secure object, such as a table leg. Loop the cable to create a slip knot around the stationary object, and be sure it cannot slip off. - Page 58 Installing Permanently User’s Guide...
-
Page 59: Fixing Problems
Fixing Problems This chapter describes potential problems and offers suggestions to help correct them. ■ “Troubleshooting Suggestions” on page 59 ■ “Testing the Projector” on page 67 Troubleshooting Suggestions To use this section, find the problem statement that is closest to your problem, then try each bulleted item one at a time until your problem is fixed. -
Page 60: Start-Up Problems
Fixing Problems Start-up problems If no lights or sounds turn on: ❏ Be sure that the power cable is securely connected to the projector and the other end is plugged into an outlet with power. ❏ Press the power button again. If nothing is projected but the projector seems to start up: ❏... -
Page 61: Picture Problems
Fixing Problems Picture problems If the image is not displayed on the screen, but the HP startup screen is displayed: ❏ Press the source button on the projector or remote control. ❏ Turn off or disable the notebook or desktop computer screen saver function. - Page 62 Fixing Problems If the image is out of focus: ❏ Be sure the lens cap is removed. ❏ While displaying the on-screen menu, adjust the focus ring. (The image size should not change; if it does, you are adjusting the zoom not the focus.) ❏...
- Page 63 Fixing Problems If a scrolling or cut-off image is displayed: ❏ Press the auto sync button on the projector or remote control. ❏ If digital magnification is activated, press enter to cancel it. ❏ For a computer connection, turn everything off, then power on the projector first and power on the notebook or desktop computer second.
- Page 64 Fixing Problems ❏ Open the on-screen menu and select Adjust picture > Color space. Change the selection. ❏ Open the on-screen menu and select Help > Diagnostics. Run color tests. If the projected colors seem completely wrong: ❏ For a YPbPr or RGB input device, be sure all the video connectors are correctly matched.
-
Page 65: Sound Problems
Fixing Problems Sound problems If no sound is coming out of the projector: ❏ Be sure you have an audio cable securely connected between the projector and the input device. ❏ Be sure that the mute and volume settings are correct on the input device, such as a computer, DVD player, or camcorder. -
Page 66: Remote Control Problems
Fixing Problems If the lamp shuts off during a presentation: ❏ A minor power surge might cause the lamp to shut off. Wait a few minutes, then power on the projector. ❏ The lamp module might have burned out. Replace the lamp module. -
Page 67: Testing The Projector
Fixing Problems Testing the Projector The on-screen menu contains diagnostic tests you can use to verify the proper operation of the projector and the remote control. To run the projector diagnostics 1. Open the on-screen menu and select Help > Diagnostics. 2. - Page 68 Fixing Problems User’s Guide...
-
Page 69: Reference
Reference This chapter lists the specifications, safety information, and regulatory information for the projector. ■ “Specifications” on page 69 ■ “Safety Information” on page 75 ■ “Regulatory Information” on page 77 Specifications Because HP continually improves its products, the following specifications are subject to change. - Page 70 Reference (continued) Identifying the projector specifications IR receivers On left and right sides of projector Size 197 mm x 78 mm x 231 mm (7.8 in. × 3.0 in. × 9.1 in.) Weight 1.7 kg (3.8 lb) Lens 2.02 to 1.68 throw ratio (distance/width) Optical zoom 1.2:1 Digital zoom...
- Page 71 Reference (continued) Identifying the projector specifications Noise level 37 dBA Environment Operating: Temperature: 10 to 35°C (50 to 95°F) Humidity: 80% RH max, non-condensing Altitude: up to 3,000 m (10,000 ft), up to 25°C (77°F) Storage: Temperature: -20 to 55°C (-4 to 131°F) Humidity: 80% RH max, non-condensing Altitude: up to 12,000 m (40,000 ft) User’s Guide...
- Page 72 Reference Analog Video Mode Compatibility Compatibility Resolution V-Sync (Hz) H-Sync (kHz) 640 x 350 31.5 640 x 350 37.9 640 x 400 37.9 640 x 480 31.5 640 x 480 37.9 640 x 480 37.5 640 x 480 43.3 720 x 400 31.5 720 x 400 37.9...
- Page 73 Reference (continued) Analog Video Mode Compatibility Compatibility Resolution V-Sync (Hz) H-Sync (kHz) MAC 16 832 x 624 74.55 49.725 MAC 19 1024 x 768 60.24 1152 x 870 75.06 68.68 MAC G4 640 x 480 31.35 MAC G4 640 x 480 68.03 MAC G4 1024 x 768...
- Page 74 Reference Digital Video Mode Compatibility Compatibility Resolution V-Sync (Hz) H-Sync (kHz) 640 x 350 31.5 640 x 350 37.9 640 x 400 37.9 640 x 480 31.5 640 x 480 37.9 640 x 480 37.5 640 x 480 43.3 720 x 400 31.5 720 x 400 37.9...
-
Page 75: Safety Information
Reference Safety Information Safety precautions Å WARNING: Observe the following precautions to reduce the risk of injury. ■ To prevent eye injury, do not look directly into the lens when the lamp is on. Do not point the laser light into anyone’s eyes. ■... -
Page 76: Led Safety
Reference LED safety The infrared ports located on the digital projector and remote control are classified as Class 1 LED devices according to International Standard IEC 825-1 (EN60825-1). This device is not considered harmful, but the following precautions are recommended: ■... -
Page 77: Regulatory Information
Reference Regulatory Information This section presents information that shows how your digital projector complies with regulations in certain regions. Any modifications to your digital projector not expressly approved by HP could void the authority to operate the digital projector in these regions. -
Page 78: Japan
Reference Japan Korea User’s Guide... -
Page 79: International
Reference International For regulatory identification purposes, your product is assigned a regulatory model number. The regulatory model number for your product is listed in the declaration of conformity. This regulatory number is different from the marketing name and product number. DECLARATION OF CONFORMITY According to ISO/IEC Guide 22 and EN 45014 Manufacturer's Name:... - Page 80 Reference User’s Guide...
-
Page 81: Index
Index composite video connection 24 computer with DVI port 21 accessories computer with VGA port 20 listing 15 handheld organizer 22 adjust picture 37 SCART connection 26 aiming the projector with S-video 23 raising and lowering 29 connections analog video mode see back panel compatibility 72 contents... - Page 82 Index image maintenance adjusting 37 routine maintenance 47 input/output connectors menu see back panel see on-screen menu installation mercury 49 see ceiling installation see rear projection installation on-screen menu see table installation about menu definitions 45 adjust picture menu definitions 42 Kensington lock 57 audio menu definitions 44 keystone correction...
- Page 83 Index status of projector 47 rear panel S-video connection see back panel connecting video source 23 rear projection installation setting up 56 remote control table installation battery replacement 50 setting up 19 identifying with doors closed 13 testing identifying with doors open 14 diagnostics 67 using 31 theater video mode...
- Page 84 Index Index 84 User’s Guide...