
Related Manuals for EUTECH INSTRUMENTS CYBERSCAN PH 1500 PHION METER


Summary of Contents for EUTECH INSTRUMENTS CYBERSCAN PH 1500 PHION METER
- Page 1 Instruction Manual CyberScan pH 1500 Bench pH/mV Meter Technology Made Easy ... 68X292327 Rev 0 12/02...
- Page 2 PREFACE Thank you for selecting the Eutech Instruments CyberScan pH 1500 bench meter. The instruction manual serves to explain the use of the CyberScan pH 1500 bench meter as a step-by-step operational guide to help you familiarize with the meter’s features and functions. It is structured sequentially with illustration of diagrams that explains the various functions and setup menus available.
-
Page 3: Table Of Contents
TABLE OF CONTENTS 1 INTRODUCTION Introducing the CyberScan Series 2 GETTING STARTED Meter Overview CONNECTORS 3 USING THE METER Electrodes Temperature Probe Display / Keys Screen Display 4 SETUP MENUS Using the Meter 4.1.1 P1.0 View pH Electrode Offset 4.1.2 P2.0 View pH Electrode Slope 4.1.3 P3.0 pH Buffer Group... -
Page 4: Introduction
CyberScan pH1500 INTRODUCTION 1.1 Introducing the CyberScan Series Thank you for selecting the Eutech Instruments CyberScan pH1500 bench-top meter. This instruction manual describes the operation of the meter. The state-of-art meter that you have purchased is easy to operate and will guide you through the various functions by displaying easy to understand prompts. -
Page 5: Getting Started
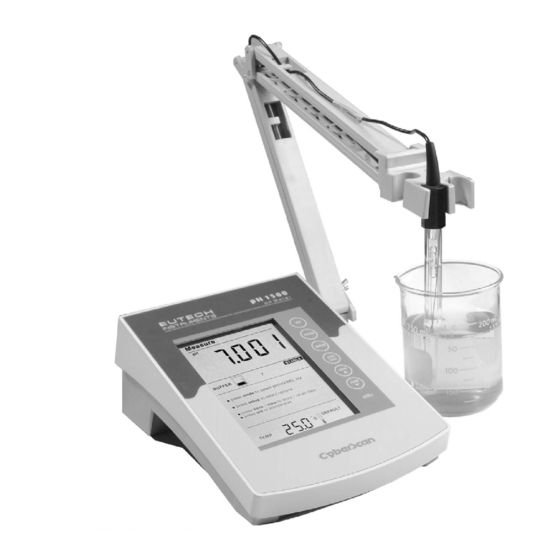
Instruction Manual CyberScan pH1500 GETTING STARTED 2.1 Meter Overview... -
Page 6: Connectors
Instruction Manual CyberScan pH1500 2.2 CONNECTORS Review the layout and arrangement of the rear connector panel. - Page 7 Instruction Manual CyberScan pH1500 Connect the electrode arm to the base. Connect the power cable to the connector cable to the rear connector panel power jack and to a power source.
-
Page 8: Using The Meter
Also, install the ATC probe into the ATC jack. Option: install the optional FET electrode by plugging it into the FET jack on the back meter panel. Allow the Eutech Instruments electrode to warm up five minutes before use. - Page 9 Instruction Manual CyberScan pH1500 Do not discard the BNC shorting cap. Rinse and blot-dry (don’t wipe) electrodes between each measurement. Rinse electrodes with distilled or deionised water, or a portion of the next solution to be measured. Between measurements, store conventional pH electrodes storage solution, pH 4 buffer, or KCI solution.
-
Page 10: Temperature Probe
Instruction Manual CyberScan pH1500 3.2 Temperature Probe For more accurate pH measurement, a temperature probe (supplied with the meter) is used for Automatic Temperature Compensation (ATC). Once the temperature probe is connected into its socket (located at the back of meter), the ATC icon is displayed on the screen to indicate that the meter is in ATC Measure mode. -
Page 11: Display / Keys
Instruction Manual CyberScan pH1500 3.3 Display / Keys Overview of the meter screen display and function key layout. Press std key to initiate standardization. Or press std key at the Standardize mode allows you to exit and return to Measure mode. Press mode to select pH, mV and Relative mV. -
Page 12: Screen Display
Instruction Manual CyberScan pH1500 3.4 Screen Display Familiarise yourself with the layout of the digital screen display. -
Page 13: Setup Menus
Instruction Manual CyberScan pH1500 SETUP MENUS 4.1 Using the Meter The setup button brings you to the setup menus of the various parameters. Press setup while in measurement OR standardization to access to the setup menus. The ▲ and ▼ keys allow you to change several operating parameters. - Page 14 Instruction Manual CyberScan pH1500 In the setup mode, there are 12 setup menus for you to change the operating parameters to suit your individual preference as well as to configure RS232 communication interface protocol for printing. While you are in each parameter Measure mode, pressing setup key allows you to access all 12 setup menus (P1.0 to P12.0) in the pH mode and other setup menus for mV and Relative mV modes.
-
Page 15: P1.0 View Ph Electrode Offset
Instruction Manual CyberScan pH1500 4.1.1 P1.0 View pH Electrode Offset This setup menu allows you to view the pH electrode offset in mV after 1-point standardization is successfully done. View press to set value press enter to accept ELECTRODE To view pH electrode offset 1. -
Page 16: P2.0 View Ph Electrode Slope
Instruction Manual CyberScan pH1500 4.1.2 P2.0 View pH Electrode Slope This setup menu allows you to view the pH electrode slope in % after 2-point standardization is successfully done. % SLOPE View press to set value press enter to accept ELECTRODE To View pH Electrode Slope 1. -
Page 17: P3.0 Ph Buffer Group
Instruction Manual CyberScan pH1500 4.1.3 P3.0 pH Buffer Group This setup option allows you to select from 3 different buffer groups, each containing 5 buffers, for auto buffer recognition. The 3 buffer groups are: USA buffers: 2, 4, 7, 10 and 12 European buffers: 1, 3, 6, 8 and 10 NIST buffers:... - Page 18 Instruction Manual CyberScan pH1500 3. Press enter to make a selection.. BUFFER select view save BUFFER select 1.68 4.01 6.86 9.18 12.46 view save 6 8 10 13 BUFFER select 4. To make a change or selection to the desired buffer group, press print enter key.
-
Page 19: P4.0 Ph Resolution
Instruction Manual CyberScan pH1500 4.1.4 P4.0 pH Resolution This setup option allows you to select various pH resolution either 0.1, 0.01 or 0.001. To Select pH Resolution 1. Access the Select pH Resolution menu from the pH Measure screen by pressing the setup key. 2. - Page 20 Instruction Manual CyberScan pH1500 3. Press enter key to make selection and use the ▲ or ▼ key to choose either 0.1 (one decimal place), 0.01 (two decimal place) or 0.001 (three decimal place). view save view save print 4. Press enter key to confirm selection OR press std to exit from enter this page.
-
Page 21: P5.0 Temperature Unit
Instruction Manual CyberScan pH1500 4.1.5 P5.0 Temperature Unit This setup option allows you to select unit of measure for Temperature either in °C or °F. To Select Temperature Unit 1. Access the Select Temperature Unit menu from any parameter Measure screen by pressing the setup key. 2. - Page 22 Instruction Manual CyberScan pH1500 3. Press enter key to make selection and use the ▲ or ▼ key to choose either °C or °F. s e l e c t °C view save s e l e c t °F print 4.
-
Page 23: P6.0 Stability Indicator
Instruction Manual CyberScan pH1500 4.1.6 P6.0 Stability Indicator This setup option allows you to set the stability indicator to be displayed on the screen whenever reading has stabilized, thus minimizes guesswork. To Set Stability Indicator 1. Access the Set Stability Indicator menu from any Measure screen by pressing the setup key. -
Page 24: P7.0 Baud Rate
Instruction Manual CyberScan pH1500 4.1.7 P7.0 Baud Rate This setup option allows you to set the baud rate (bits per second) of the communication protocol interface. To Set Baud Rate Print press to set value press enter to accept 1. Access the Set Baud Rate menu from any Measure screen by pressing the setup key. - Page 25 Instruction Manual CyberScan pH1500 3. Press enter key to make selection and use the ▲ or ▼ key to toggle between 4800, 9600, 19200 and 38400. view save Print Print press to set value press to set value press enter to accept press enter...
-
Page 26: P8.0 Parity Bit
Instruction Manual CyberScan pH1500 4.1.8 P8.0 Parity Bit This setup option allows you to set the parity bit of the communication protocol interface. To Set Parity Bit 1. Access the Set Parity Bit menu from any Measure screen by pressing the setup key. 2. - Page 27 Instruction Manual CyberScan pH1500 3. Press enter key to make selection and use the ▲ or ▼ key to toggle between 0 (none), 1 (odd) or 2 (even). save view view save 4. Press enter key to confirm selection OR press std to exit from this page.
-
Page 28: P9.0 Stop Bit
Instruction Manual CyberScan pH1500 4.1.9 P9.0 Stop Bit This setup option allows you to set the stop bit of the communication protocol interface. To Set Stop Bit 1. Access the Set Stop Bit menu from any Measure screen by pressing the setup key. 2. - Page 29 Instruction Manual CyberScan pH1500 3. Press enter key to make selection and use the ▲ or ▼ key to toggle between 1 or 2. save view view save 4. Press enter key to confirm selection OR press std to exit from this page.
-
Page 30: P10.0 Print Data
Instruction Manual CyberScan pH1500 4.1.10 P10.0 Print Data This setup option allows you to print current displayed data or data stored in the meter’s memory to a computer or printer via its RS232 interface port. Note all the communication protocol for both the meter and computer/printer must match before successful printing can be performed. -
Page 31: P11.0 Clear Stored Data
Instruction Manual CyberScan pH1500 4.1.11 P11.0 Clear Stored Data This setup option allows you to clear all stored data sets (from previous measurements) in the meter’s memory for new data to be stored. Note old data sets will be overwritten by any new data sets in the event when the stored locations have exceeded. - Page 32 Instruction Manual CyberScan pH1500 3. Press enter key to make selection and use the ▲ or ▼ key to toggle between NO or YES. Select YES to clear all stored data sets or NO if no change is made. view save print 4.
-
Page 33: P12.0 Clear Buffer Values
Instruction Manual CyberScan pH1500 4.1.12 P12.0 Clear Buffer Values This setup option allows you to clear the standardized buffer values. To Clear Buffer Values 1. Access the Clear Buffer Values menu from the pH Measure screen by pressing the setup key. 2. -
Page 34: P13.0 View Mv Offset
Instruction Manual CyberScan pH1500 4.1.13 P13.0 View mV offset This setup option allows you to view the standardized mV offset values. To view mV offset values 1. Access the View mV offset values menu from the REL mV Measure screen by pressing the setup key. 2. -
Page 35: P14.0 Clear Mv Offset
Instruction Manual CyberScan pH1500 4.1.14 P14.0 Clear mV offset This setup option allows you to clear the standardized mV offset values. To Clear mV offset Values 1. Access the Clear mV offset values menu from the REL mV Measure screen by pressing the setup key. 2. -
Page 36: Ph Operation
Instruction Manual CyberScan pH1500 PH OPERATION 5.1 Standardization Because electrodes vary in their response, you must standardize or calibrate your pH meter and electrode to compensate for electrode variation. The more frequently you standardize or calibrate, the more accurate your measurements. Standardize at least daily, or more often, for accurate results. - Page 37 Instruction Manual CyberScan pH1500 Press std key to begin standardization. Similarly pressing std key again at the Standardize mode exits and returns to the Measure mode. Press mode key to toggle between different modes until the pH Measure mode is displayed. Immerse the rinsed electrode(s) into a buffer from the selected buffer group.
- Page 38 Instruction Manual CyberScan pH1500 Using Standard Buffer Group a. Press std key to access the standardize mode while you are in the pH Measure mode. b. Meter starts scanning the buffer from the already selected buffer group. Proceed to step c to begin standardization. Press setup key if you need to select other buffer group.
- Page 39 Instruction Manual CyberScan pH1500 Repeat the above step c through e for the second and subsequent calibration points. Meter automatically returns to the Measure mode after the last 5 calibration point has been performed. In the pH Measure mode, the screen shows all the buffer values being standardized.
- Page 40 Instruction Manual CyberScan pH1500 B. Using Custom Buffer Values a. Press std to access the standardize mode while you are in the pH Measure mode. b. Proceed to step c to begin standardization. Press setup key if you need to select other buffer group. Use ▲ or ▼ key to select desired buffer group and press enter key to confirm selection.
-
Page 41: Ph Electrode Diagnosis Indicator
Instruction Manual CyberScan pH1500 5.2 pH Electrode Diagnosis Indicator There is an electrode diagnosis icon that indicates the condition of pH electrode being used. The STABLE icon will appear once the reading is stabilised. If the meter is calibrated with 2 or more points, then meter displays the electrode characteristic indicator bar with appropriate segments. -
Page 42: Mv Or Relative Mv Operation
Instruction Manual CyberScan pH1500 mV OR RELATIVE mV OPERATION 6.1 Absolute mV Millivolts (mV) measurement is used primarily for measuring redox potential (also known as ORP, oxidation reduction potential). You will normally use a platinum ORP electrode, combined with a reference electrode, to measure redox potential (ORP) of a test sample. -
Page 43: Relative Mv
Instruction Manual CyberScan pH1500 6.2 Relative mV The Relative mV mode helps you to standardize certain analytical and monitoring activities such as filtrations. Press mode until your meter displays the Relative mV mode. mode Immerse the electrode in a sample solution. Press std and use the keys to adjust the mV value to the std solution value. -
Page 44: Temperature Calibration
Instruction Manual CyberScan pH1500 6.3 Temperature Calibration Press mode to go to the absolute mV measure screen Press std. this will take you to the temperature calibration (MTC or ATC) Press p or q to adjust the temperature. Press enter to confirm the reading. Note: Maximum adjustable temperature offset is ±5°C/ 9°F. -
Page 45: Measurement
Instruction Manual CyberScan pH1500 MEASUREMENT 1. Immerse the electrode (along with temperature probe if available for the measurement of pH) into the sample solution. Stir moderately. Make sure that the meter is in the Measure mode. 2. When the meter senses that the reading has stabilized, the stable icon will appear under the reading. -
Page 46: Memory
Instruction Manual CyberScan pH1500 MEMORY 8.1 Store Value Into Memory In any Measure mode, press ▲ save key to store the displayed save reading into the meter’s non-volatile memory. A memory location is shown momentarily and the meter returns to the Measure mode. 8.2 Recall Value From Memory In any Measure mode, pressing ▼... -
Page 47: Print Data
Instruction Manual CyberScan pH1500 PRINT DATA 9.1 Printing Data Depending on the print option in the meter setup, pressing print key allows you to print either current displayed reading or stored data from meter to a PC or printing device via a RS232 communication print cable. -
Page 48: Ph Theory
Instruction Manual CyberScan pH1500 pH THEORY The measurement of pH plays an important role in quantifying and controlling acidity and alkalinity levels for industry and research. pH is a measure of the acidity or alkalinity of a solution and can be represented by this equation: pH= -log [H+] With [H+] representing the concentration of hydrogen ions in the... -
Page 49: Measuring Ph
Instruction Manual CyberScan pH1500 10.1 Measuring pH To measure pH, the meter receives a millivolts signal from a glass bulb electrode that is sensitive to hydrogen ions. Therefore the potential developed at the glass bulb is directly related to the pH of the solution. -
Page 50: Cleaning
This meter requires no regular maintenance, but it is recommended to occasionally wipe down the front with a damp cloth from time to time. If there are any further questions regarding maintenance, call the Eutech Instruments Technical Support hotline at (+65) 6778 6876. TROUBLESHOOTING Most troubles arise out of a problem with the electrode, not the meter. -
Page 51: Meter Specifications
Instruction Manual CyberScan pH1500 METER SPECIFICATIONS Display Custom LCD Screen Size 7.2 x 10.6 cm Measurement display height 5.5 cm Temp./others display height 1.6 cm Keypad controls 7 keys (membrane) Memory Internal Diagnostics pH Mode Range -1.999 to 19.999 Resolution 0.1/0.01/0.001 Relative Accuracy ±... -
Page 52: Accessories
Instruction Manual CyberScan pH1500 ACCESSORIES Consult your Authorized Distributors for these items and other range of specialized pH electrodes or Ion Selective Electrodes. Replacement Meter & Meter Accessories EC-FG73504-01B Refillable Glass-body combination pH electrode with 1m cable length and BNC connector EC-FC72522-01B Sealed polymer gel plastic-body combination double junction pH electrode with 1m cable length and BNC... - Page 53 10.01 buffer sachets (20 x 20 ml per box) EC-RIN-WT Deionised water rinse sachets (20 x 20 ml per box) EC-PH-ELSTDC Electrode Stand for bench meter For a complete selection of electrodes and accessories, please contact your Eutech Instruments nearest distributor or sales representative for details.
-
Page 54: Warranty
Instruction Manual CyberScan pH1500 WARRANTY Eutech Instruments supplies this bench meter with a 3-year warranty and 6-month warranty for electrode against manufacturing defects from the date of purchase. If repair or adjustment is necessary and has not been the result of abuse or misuse within the warranty period, please return, freight prepaid, and correction will be made without charge. -
Page 55: Notice Of Compliance
Warning! To meet or exceed FCC regulations and comply with CE requirements, the Eutech Instruments supplied power supply must be used. Use of a power supply that is not approved by Eutech Instruments may cause safety hazards and/or cause unit to exceed EMC limits and/or damage unit. - Page 56 For more information on Eutech Instruments products, contact your nearest Eutech Instruments distributor or visit our website listed below: Manufactured by: Distributed by: Eutech Instruments Pte Ltd. Blk 55, Ayer Rajah Crescent, #04-16/24 Singapore 139949 Tel: (65) 6778 6876 Fax: (65) 6773 0863 E-mail: marketing@eutechinst.com...