Lexicon MPX R1 User Manual
Midi remote controller
Hide thumbs
Also See for MPX R1:
- Datasheet (2 pages) ,
- Update instructions (4 pages) ,
- User manual (37 pages)
Table of Contents
Advertisement
Advertisement
Table of Contents

Related Manuals for Lexicon MPX R1


Summary of Contents for Lexicon MPX R1
- Page 1 MPX R1 MIDI Remote Controller User Guide...
- Page 2 Unpacking and Inspection After unpacking the MPX R1, save all packing materials in case you ever need to ship the unit. Thoroughly inspect the unit and packing materials for signs of damage. Report any shipment damage to the carrier at once; report equipment malfunction to your dealer.
-
Page 3: Table Of Contents
Changing Programs vs. Bypassing Effects in a Guitar Rig ....2-4 Using the MPX 1 and the MPX R1 in a Guitar Amp Effects Loop ..2-4 Using the MPX 1 and the MPX R1 in a Preamp/Power Amp Rig or a Dry/Wet (3-way) Rig .............. - Page 4 Overheating ..................6-1 Common MIDI Problems ..............6-1 Adjusting Pedal Tension ..............6-2 Reinitialization ..................6-3 Reinitialization of the MPX R1 ............6-3 Reinitialization of the MPX 1 and the MPX R1 ......6-3 Specifications Specifications ..................7-1 MIDI Implementation ................7-2...
-
Page 5: Product Overview
Introduction The MPX R1 MIDI Remote Controller performs as a dedicated MIDI controller for the Lexicon MPX 1, or as a stand-alone MIDI control unit. Either way you use it, you'll appreciate its rugged, road-worthy construction and straightforward control surface. -
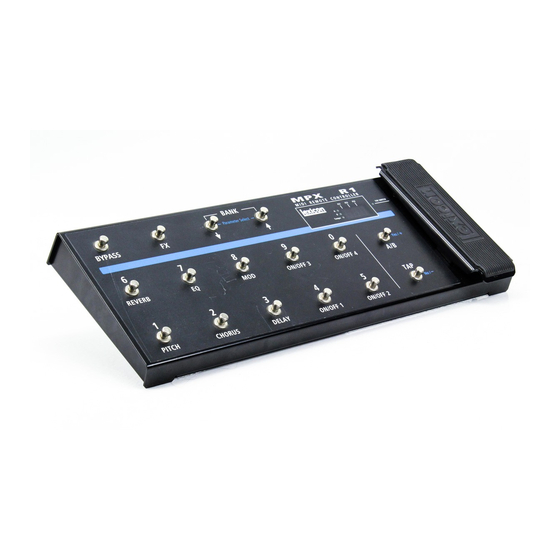
Page 6: The Front Panel
MPX R1 User Guide Lexicon The Front Panel Toggles between Program and FX Display Modes. LED off indicates Program FS1, FS2 and FS3 LEDs light to indicate state of Mode is active. LED on indicates FX external foot switches. Mode is active. -
Page 7: The Rear Panel
Use Lexicon MSA power adapter, or provided for foot pedal with 10k 9 VAC 1 amp equivalent. Jack is to 50k impedance. unused when powering the MPX R1 with the 7-pin DIN connector. Relay Foot Switch 1/4" Tip/Ring/Sleeve phone jack 1/4"... -
Page 8: Installation Notes
AC Power Switch Source to Lexicon MSA Adapter Connect a 7-pin DIN cable between the MPX 1 and the MPX R1. Connect the MPX 1 to the MSA adapter provided with the MPX R1. Stand-alone Relay Configuration (Amp Channel Select) -
Page 9: The Mpx R1 As A Dedicated Mpx 1 Controller
For example, if you load a program set to 100 beats per minute (BPM), the MPX R1 will flash at 100 BPM, just as the MPX 1 does. If you then load a program set to 120 BPM, the Tempo LED on the MPX R1 will increase from 100 to 120 BPM when the new program loads. -
Page 10: Loading Programs
Direct Access Mode is active. Now you can select programs by directly entering their program numbers. For example, to load MPX 1 Program 135, press 1, then 3, then 5 on the MPX R1. In this mode, the BANK buttons increment and decrement the program numbers in consecutive steps. -
Page 11: Fx Mode
Storing a Relay State The relay state can be stored with each MIDI Program Change message. To do this, select the desired MIDI program on the MPX R1 and press the MPX R1 FX button to enter FX mode The relay states are assigned to the following buttons as factory defaults. -
Page 12: Changing Programs Vs. Bypassing Effects In A Guitar Rig
Press the button assigned to the desired relay state and hold the button down for two seconds. The relay state (for example, CH1) will flash three times on the MPX R1 display to indicate that it has been stored with the program. Clearing a Relay State To clear a relay state, press and hold any button not assigned to a relay channel. -
Page 13: Using The Mpx 1 And The Mpx R1 In A Preamp/Power Amp Rig Or A Dry/Wet (3-Way) Rig
The MPX R1 as a Dedicated MPX 1 Controller Using the MPX 1 and If you are using the MPX 1 between a guitar preamp and power amp, refer to the following section on using a series effect loop. the MPX R1 in a... -
Page 14: Using A Parallel Loop
MPX R1 User Guide Lexicon • Bring up the amp master volume to a point corresponding to a reasonable listening level. (You won’t hear anything yet.) • Turn the MPX 1 Output Level control a little more than halfway up (at about 1:00 o’clock). -
Page 15: Using The Mpx R1 With Other Midi Devices
THRU ports of each preceding device. Working in When the MPX 1 powers up, it will default to Program Mode. The MPX R1 should also power up in Program Mode. (FX button LED should be off.) In this mode,... -
Page 16: Fx Mode
Press the FX button once to exit to FX Mode, twice to exit to Program Mode. FX Mode FX Mode allows you to use the MPX R1 buttons numbered 0-9 as MIDI Controllers. To access FX Mode, press the MPX R1 FX button. The LED next to the button will light to indicate you are in FX Mode. - Page 17 Storing a Relay State The relay state can be stored with each MIDI Program Change message. To do this, select the desired MIDI program on the MPX R1 and press the MPX R1 FX button to enter FX mode. The relay states are assigned to the following buttons as factory defaults.
- Page 18 MPX R1 User Guide Lexicon...
- Page 19 Parameter values are adjusted with the front panel YES/+ and NO/– buttons. Changes made to parameter values are immediate. The following pages list all of the editable parameters in the MPX R1. An Edit Summary showing this information in abbreviated form, is provided on an...
- Page 20 MPX R1 User Guide Lexicon Edit Mode Program Parameters MIDI System Channel Assign Default: Assigns the MIDI transmit channel (1-16) for all buttons (except TOE). MIDI Internal Pedal Channel Assign Default: Assigns the MIDI transmit channel (1-16) for the onboard foot pedal.
-
Page 21: Editing
Bank Limit Select Default: When the MPX R1 is not connected to an MPX 1 (which forces 25 banks), a maximum bank number can be selected here to limit the total number of accessible banks. The available range is 0-99. - Page 22 MPX R1 User Guide Lexicon External Pedal Calibration Default: Calibrates the pedal when Yes/+ is selected. Moving the pedal through its entire range of travel will re-calibrate the range of the pedal (i.e. 0 for minimum value, 127 for maximum value).
-
Page 23: Edit Mode Fx Parameters
Editing Note: When the relay state is assigned to a selected button the relay will Edit Mode automatically change to reflect the current state of the button. Relays with dual FX Parameters states will default to the first state. Note: In this mode, pressing any button will transmit the currently assigned controller. -
Page 24: The Relays
MPX R1 User Guide Lexicon The Relays Two MPX R1 relays can operate in one of three modes: latching, momentary normally open, and momentary normally closed. The Edit: Program parameter rel allows you to select one of these options. The relays are activated by pressing a button assigned to the tip relay, the ring Relay Tip relay, or to one of four channels. -
Page 25: Relay State Programming
MIDI program on the MPX R1. Press the MPX R1 FX button to enter FX mode. In the MPX R1 the relay states are assigned to the following buttons as factory defaults. ON/OFF 1 = Relay state 1... -
Page 26: Transmitting Multiple Program Changes On Separate Midi Channels
A Setup consists of as many as eight MIDI Program Change messages and one Setups relay state. The MPX R1 can be programmed with as many as 100 Setups. To activate Setups or Direct Device Control from Program mode you must select Activating Setups and Direct 4, 5 or 6 as a setting for the PL (Program Load) parameter in Edit mode. -
Page 27: Setup Parameters
The front panel Yes/+ and No/- buttons allow you to select a Setup number (1- 100) for programming. This number is assigned to the 1/PITCH button. Each of the MPX R1 front panel buttons numbered 2-9 is now available to memorize Program Change messages. (Button 0/ON/OFF 4 is available for storing a relay state.) -
Page 28: Direct Device Control
Advanced Applications Example Press the button for the desired device. The LED will blink green. The first parameter (Program Change) will be indicated by PC on the display. Use the Yes/+ and No/– buttons to select a Program Change number. Use the BANK buttons to select the next parameter, MIDI Channel. -
Page 29: 5-Pin Connection
5- pin connection If you have a 5-pin MIDI cable which has all five pins wired, connect it between the MPX R1 rear panel OUT/REMOTE jack and the MPX 1 rear panel MIDI IN/ (1 cable for two-way REMOTE jack. -
Page 30: Troubleshooting
This chapter is intended primarily to help you recognize some common error states which can be corrected from the MPX R1 front panel, or by simple means such as cable replacement. Any error states that are not covered here should be referred to your local dealer or Lexicon Customer Service. -
Page 31: Adjusting Pedal Tension
(as viewed from the top). Reinitialization Reinitialization of the On the MPX R1, press the 0 (ON/OFF 4) button while powering up. When all of MPX R1 the LEDs begin blinking, release the 0 button and press FX to initialize the foot controller. -
Page 32: Specifications
Specifications Specifications Dimensions: 23 in x 8 in x 3 in (WHD) (58.42 cm x 20.32 cm x 7.62 cm) Weight: 9.5 lbs (4.3 kg) Construction: All metal chassis, switches and expression pedal External control inputs: 1 1/4" TRS jack supports up to 3 on/off switches 1 1/4"... -
Page 33: Midi Implementation
MPX R1 User Guide Lexicon MIDI Implementation Chart Lexicon MPX R1 MIDI Remote Controller Function Transmitted Recognized Remarks Basic Default Channel Changed 1-16 Mode Default Messages Altered Note Velocity Note ON Note OFF After Keys Touch Channel Pitch Bend Control... - Page 34 Lexicon Inc. 3 Oak Park Bedford MA 01730-1441 USA Telephone 781-280-0300 Fax 781-280-0490 www.lexicon.com Lexicon Part # 070-12712...