Table of Contents
Advertisement
Advertisement
Table of Contents

Related Manuals for DigiTech VOCALISTPERF


Summary of Contents for DigiTech VOCALISTPERF
- Page 1 Version 1.1...
- Page 2 Peter George, Vice President of Engineering EMC: EN 55022 (1987): European Contact: Your local DigiTech Sales and Service Office or CISPR 22 (1993) Class B International Sales Office EN 50082-1 (1992) 3 Overlook Drive Unit #4...
-
Page 3: Table Of Contents
The reverb effect............7 The Harmony options ..........7 Choosing key and scale ...........8 Part A and B.............9 Stereo voice panning..........10 Storing your programs ...........10 The optional footswitch and micstand mount ..10 Specifications ..............11 DigiTech Vocalist Performer User’s Manual v1.1, April 7, 1997... - Page 4 The warranty registration card must be mailed within ten days after purchase date to validate the warranty. DigiTech warrants this product, when used solely within the U.S., to be free from defects in materi- als and workmanship under normal use and service.
-
Page 5: Introduction
Introduction Thank you and congratulations on your purchase of the Digitech Vocalist Performer. This vocal har- mony product is a breakthrough in ease-of-use, sound quality and affordability. Whether you sing for your own entertainment or for the entertainment of others, Performer can be your “singing part- ner”... -
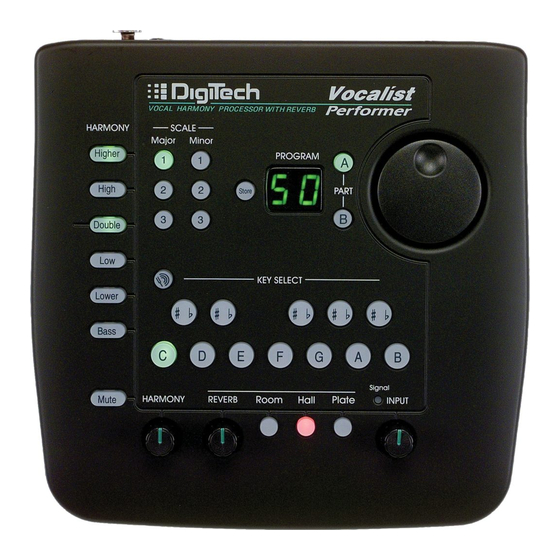
Page 6: Front Panel Description
Front Panel 1) Harmony buttons These allow you to turn on and off up to two harmony voices at a time. The High and Higher but- tons produce harmonies above your voice. the Double button produces slightly detuned copies of your voice on the same note. - Page 7 3) Store button This is used when you want to save the settings you have chosen. In each program you may store the Key, Harmony voicing and Scale settings. When pressed, the number in the program window will flash. The flashing indicates that you have a choice of program number in which to store your new program.
- Page 8 10) Harmony level control This knob allows you to control the blend between your voice and the harmony voices. Turning this control to the right adds progressively more harmony voice level to the mix while keeping the vol- ume of your voice constant. Your voice and the harmonies are equal volume at approximately one o’clock.
-
Page 9: Back Panel Description
Insert the plug from the supplied adaptor here. This turns the unit on and off. 2) Footswitch jack You may connect a standard momentary footswitch for harmony muting only or a DigiTech FS300 footswitch for extra features. The three switches on the FS300 do the following:... -
Page 10: Connections
Connections Live performance The graphic below shows the typical connection scheme. Your voice is fed through the microphone directly into Performer where it is harmonized and sent to your mixer/power amp. The output from Performer can be either mono (one cable) or stereo (two cables). Studio or alternate live setup The graphic below shows how you can drive Performer with an effects send from your mixer. -
Page 11: Operation
Operation Setting the input level Adjust the input level control until only the loudest notes you sing cause the Signal LED to turn orange briefly. The LED shows green when it hears a signal, orange at 3 dB below clipping (distor- tion) and red when the input signal has clipped. -
Page 12: Choosing Key And Scale
Bass (Octave down). This setting produces the same melody as your input voice but in the octave below. Adding the Bass harmony to your voice produces a sound reminiscent of gospel music. Adding one of the other harmony choices produces an even bigger sound. If you want to be the Bass singer in your group but you just can’t sing that low, try adjusting the Harmony level control all the way to the right. -
Page 13: Part A And B
To give you an example of the difference between the three Major scales, let’s try with a song every- body knows called “Louie Louie”. Set the key to E, pick the Major 3 scale and enable only the High voice. Push the cue button for a moment if you need a starting note. Now sing: “Louie Louie (pro- nounced Lou-eye), Whoa Baby I said we gotta go now.”... -
Page 14: Stereo Voice Panning
To create a program with unique settings for the A and B parts, press the Part A button and select settings that will work for the main part of your song. Now press the Part B button and do the same for the alternate harmony. -
Page 15: Specifications
SPECIFICATIONS Microphone Input Balanced XLR, 1 KOhm Line Input Unbalanced 1/4 TS, -10 dBV level, 2.2 KOhm Microphone Input Range -39 dBV minimum to -17 dBV maximum Line Input Range -29 dBV minimum to -7 dBV maximum Line Outputs Unbalanced 1/4” stereo or mono, -10 dBV nominal Sampling 16 bit A/D conversion @ 48 KHz Frequency Response (dry) - Page 16 18-2209-A...