Roland Edirol M-16DX Owner's Manual
16 channel digital mixer 24bit 96khz
Hide thumbs
Also See for Edirol M-16DX:
- Workshop manual (8 pages) ,
- Workshop (4 pages) ,
- Workshop manual (4 pages)
Table of Contents
Advertisement
Owner's Manual
Before using this unit, carefully read the sections entitled: "USING THE UNIT SAFELY" and "IMPORTANT
NOTES" (p. 3–4; p. 5–6).
These sections provide important information concerning the proper operation of the unit.
Additionally, in order to feel assured that you have gained a good grasp of every feature provided by your
new unit, Owner's manual should be read in its entirety. The manual should be saved and kept on hand as a
convenient reference.
Copyright © 2007 ROLAND CORPORATION
All rights reserved. No part of this publication may be reproduced in any form without the written permission of
ROLAND CORPORATION.
Advertisement
Table of Contents

Related Manuals for Roland Edirol M-16DX


Summary of Contents for Roland Edirol M-16DX
- Page 1 Owner’s manual should be read in its entirety. The manual should be saved and kept on hand as a convenient reference. Copyright © 2007 ROLAND CORPORATION All rights reserved. No part of this publication may be reproduced in any form without the written permission of...
- Page 2 Cet appareil numérique de la classe B respecte toutes les exigences du Règlement sur le matériel brouilleur du Canada. For the USA DECLARATION OF CONFORMITY Compliance Information Statement M-16DX Model Name : Digital Mixer Type of Equipment : Responsible Party : Roland Corporation U.S. Address : 5100 S.Eastern Avenue, Los Angeles, CA 90040-2938 Telephone : (323) 890-3700...
-
Page 3: Using The Unit Safely
Refer • This unit, either alone or in combination with an all servicing to your retailer, the nearest Roland amplifier and headphones or speakers, may be Service Center, or an authorized Roland capable of producing sound levels that could cause distributor, as listed on the “Information”... - Page 4 ....................118c • Always keep the following parts including with the M-16DX and small components that may be removed out of the reach of small children to avoid accidental ingestion of the parts. • Ground terminal (screw) • Screws used in attaching the rack mount adaptor •...
-
Page 5: Important Notes
• This device may interfere with radio and television that it may not be possible to restore the data, and Roland reception. Do not use this device in the vicinity of such assumes no liability concerning such loss of data. - Page 6 When the unit is grounded, a slight hum may occur, depending on the particulars of your installation. If you are unsure of the connection method, contact the nearest Roland Service Center, or an authorized Roland distributor, as listed on the “Information” page. Unsuitable places for connection •...
-
Page 7: Table Of Contents
Basic operation ......................26 [SOLO] (PRE FADER) switches ..................27 [MUTE] (ALT) switches ....................27 [SEL] buttons ........................27 Using the M-16DX with your computer ..............28 What is a driver? ........................ 28 Advanced use..............29 Making detailed equalizer settings................29 Using the dedicated vocal/narration effect (Insert Effect) ........30 Editing the effect settings.................... - Page 8 Changing the system settings (UTILITY)..............44 Basic procedure ........................44 Adjusting the brightness of the screen (LCD Contrast) ..........45 Specifying the M-16DX’s sampling frequency (Sample Freq)........45 Outputting the CONTROL ROOM jacks signal from ALT OUT jacks (CTRL to ALT) ...... 45 Selecting the output to which Room Acoustic Control and Finalize will apply (RAC - FINALIZE) ..
-
Page 9: Main Features
The M-16DX can be readily integrated with your computer. A total of eighteen channels—sixteen input channels plus the main output—can be recorded simultaneously on your computer. This capability takes the M-16DX beyond the realm of a simple mixer, letting you mix and record on your computer-based system. -
Page 10: Block Diagram
Block diagram... -
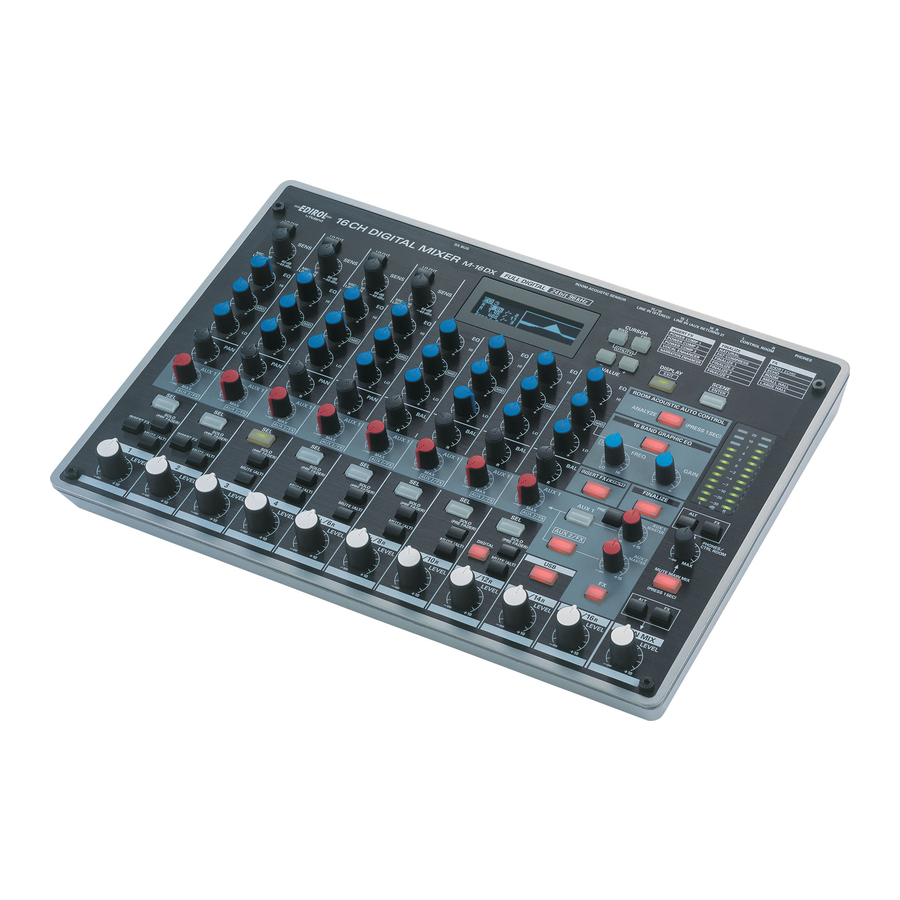
Page 12: Names Of Things And What They Do
Names of things and what they do Mix controller Channel control section fig.Cpanel-1 1. LO CUT Switches When you turn the SENS knob, it may seem as though the Switch on/off the low cut filters. change does not occur smoothly, but this is not a malfunction. When a switch is pressed ( ), the low-cut filter is turned on, and the range of frequencies below 75 Hz are cut. -
Page 13: Sel Buttons
Names of things and what they do 8. AUX 2 Button You can change the center frequency of the high, mid, and low frequency ranges, and the width of the mid-frequency range If you press this button so it’s lit, the AUX knobs will function (MID Q). - Page 14 * The current sampling frequency is shown in the utility screen (p. 44). Caution when using a USB connection * You can’t change the sampling frequency while the M-16DX 12. INSERT FX Switch (channels 1, 2) is connected via USB.
-
Page 15: Output Section
Names of things and what they do Output section 21. FX to PHONES/CTRL ROOM Switch fig.Cpanel-3 If you turn this switch on ( ), the signal from FX will be sent via the PHONES/CTRL ROOM knob and output from the PHONES jack and CONTROL ROOM jacks. If you turn the FX to MAIN MIX switch off and this switch on, the sound with FX (echo, reverb) applied will be output to the PHONES jack and CONTROL ROOM jacks, and the sound... -
Page 16: Gain Knob
FWD button simultaneously. ROOM ACOUSTIC AUTO CONTROL Button 36. VALUE Buttons (-/+) The output from the M-16DX’s MAIN OUT jacks or CONTROL ROOM jacks can be automatically adjusted to When editing parameters shown in the screen, use these optimize the frequency response for your acoustical buttons to modify the value. -
Page 17: Rear Panel
Names of things and what they do 37. DISPLAY Button 38. SCENE Button When you press this button, the level meter screen will Press this when you want to register the current settings as a appear, indicating the input levels (pre EQ) of all input “scene”... -
Page 18: I/O Module
* You can’t use the optical and coaxial inputs simultaneously. The channel simultaneously. Connect only one or the other. M-16DX will use the first signal that it detects after you pressed 3. Hi-Z Switches (channels 1, 2) the DIGITAL button. -
Page 19: Rear Panel
You can use ALT OUT jacks as CONTROL ROOM outputs. Use a USB cable to connect this to your computer. ➝ “Outputting the CONTROL ROOM jacks signal from ALT ➝ “Specifying the M-16DX’s sampling frequency (Sample OUT jacks (CTRL to ALT)” (p. 45) Freq)” (p. 45) 15. -
Page 20: Signal Flow
Names of things and what they do Signal flow The overall flow of audio signals in the M-16DX is shown in the following diagram. For a more detailed illustration of signal flow, refer to “Block diagram” (p. 10). fig.02-SignalFlow MAIN OUT... -
Page 21: Basic Use
If you use any other cable, it may cause deterioration of sound quality. Main connections The M-16DX provides a large number of connectors, making it possible for a wide variety of equipment to be connected. Here, we will explain how to connect the M-16DX to speakers, mics, audio equipment, and a computer. -
Page 22: Example 1) Home Studio
If you’ve digitally connected a device to the DIGITAL IN jack, turn the [DIGITAL] button on (lit). You’ll need to match the sampling frequency of the connected device and the M-16DX (p. 45). The audio signals from your computer are input to channels 13/14. Press the [USB] button so it’s lit. -
Page 23: Example 2) Simple Pa
If you’ve digitally connected a device to the DIGITAL IN jack, turn the [DIGITAL] button on (lit). You’ll need to match the sampling frequency of the connected device and the M-16DX (p. 45). If you’ve connected a dynamic mic, turn the [PHANTOM] switch off. -
Page 24: Example 3) Computer Music
If you’ve digitally connected a device to the DIGITAL IN jack, turn the [DIGITAL] button on (lit). You’ll need to match the sampling frequency of the connected device and the M-16DX (p. 45). The audio signals from your computer are input to channels 13/14. Press the [USB] button so it’s lit. -
Page 25: Turning The Power On
CTRL ROOM knob to the “-∞” position. turn off the power. * Minimize the MAIN MIX LEVEL and PHONES/CTRL • The M-16DX’s MAIN MIX LEVEL knob has been set to ROOM volume controls before you turn the power on. Even if the “-∞” position. -
Page 26: Basic Operation
Basic use Basic operation fig.Basic Operation 1, 6 fig.03-EQ-e Slowly turn the MAIN MIX LEVEL knob toward Center frequency the right to an appropriate position. Use the SENS knobs to adjust the input sensitivity of channels 1–4. * In order to mix with the least possible noise and distortion, Width of the mid-range band adjust the SENS knob so that the top “... -
Page 27: [Solo] (Pre Fader) Switches
Basic use [SOLO] (PRE FADER) switches [SEL] buttons If you turn this switch on ( ), the pre-fader signal (from If you press this button (lit), the “parameter screen” of the before it passes through the channel volume) of the selected channel will appear in the display. -
Page 28: Using The M-16Dx With Your Computer
MAIN OUT (a total of eighteen channels of signals) to be sent to your computer. * If the M-16DX is connected to your computer when operating at the 24-bit/96 Hz setting, you won’t be able to use Finalize (p. 41). -
Page 29: Advanced Use
Advanced use Making detailed equalizer settings In addition to adjusting the equalizer’s high, mid, and low-frequency levels, you can also change its Mid Q and the center frequency of each band. fig.EQ-01 Press the [SEL] button several times for the channel whose equalizer settings you want to edit, until the equalizer screen appears. -
Page 30: Using The Dedicated Vocal/Narration Effect (Insert Effect)
Advanced use Using the dedicated vocal/narration effect (Insert Effect) The M-16DX provides five types of dedicated vocal/narration insert effects based on COSM technology. These effects can be applied directly to channels 1 and 2. You can edit the settings of the insert effect to obtain the result that’s appropriate for your input source or situation. -
Page 31: List Of Effects
Advanced use List of effects ■ Power Cmp1 This controls a COSM effect that simulates a vacuum tube amp, and a compressor. It boosts thin sounds that are lacking in low range, giving them greater weight and power. ■ Power Cmp2 This controls a COSM effect that simulates a vacuum tube amp, and a compressor. - Page 32 Advanced use ■ Vocal Enh. (Vocal Enhancer) This effect controls a four-band equalizer to give the voice brightness and clarity. It works on the basic components of a voice as well as the components that define its character, boosting or reducing these components.
-
Page 33: Applying Echo/Reverb (Fx)
Advanced use Applying echo/reverb (FX) As effects that process the output signal, the M-16DX provides two types of echo and five types of reverb. You can edit the parameters of the echo/reverb effect to your needs and taste. Use the AUX 2/FX knobs to adjust the depth of echo/reverb for each input (p. 13). -
Page 34: List Of Effects
Advanced use List of effects ■ SHORT ECHO This is an echo effect that repeats the sound at short intervals. Parameter Range Explanation DELY 10–200 (ms) Adjusts the spacing of the repetitions. REPT 0.0–6.0 (s) Adjusts the length (time) of the repetitions. ■... -
Page 35: Adjusting The Output Signal Appropriately For Your Environment (Room Acoustic Control)
At the touch of a single button, this function performs the following operations: (1) Outputs a test signal from the M-16DX, and plays this signal through the connected monitors. (2) Detects the sound played by the monitors with the Room Acoustic Sensor, and analyzes its frequency response. - Page 36 Advanced use Using the MAIN MIX LEVEL knob and the volume controls of your amp or speakers, adjust the volume of the sound from the speakers so it’s at a suitable level. Adjust the volume as you would for normal playback when listening to the music. If the speaker volume is too high the test signal will be produced at a loud volume, and if the volume is too low the sensor will be unable to detect the test signal.
- Page 37 Advanced use fig.RAC-04 Press the CURSOR [BWD] [FWD] buttons to move the cursor to the amplitude of the response curve. Use the VALUE [-] [+] buttons to adjust the amplitude of the response curve. * If you’ve selected FLAT as the response curve, you won’t be able to adjust the amplitude. Range 70–100–130% If the [ROOM ACOUSTIC AUTO CONTROL] button is lit, you can hold down the [DISPLAY] button and...
- Page 38 When the adjustment has been completed, the input channels will be unmuted, and the M-16DX will return to normal operation. Listen to the adjusted sound. The frequency response curve and its amplitude is stored together with the adjustment results (graphic equalizer settings) as a set.
-
Page 39: Manual Adjustment
Advanced use Manual adjustment Depth of the adjustment results Use the CURSOR [BWD] [FWD] buttons to move the cursor to the percentage indication, and use the VALUE [-] [+] buttons to change the percentage by which the results of the automatic adjustment will be applied. -
Page 40: Using The 16-Band Graphic Equalizer
Advanced use Using the 16-band graphic equalizer If you’re not using the Room Acoustic Control function, you can use a sixteen-band graphic equalizer to adjust the output signal. This will not affect the Room Acoustic Control settings. fig.GEQ-01 Press the [16 BAND GRAPHIC EQ] button so it’s lit. The graphic equalizer will be turned on, and the equalizer screen will appear. -
Page 41: Creating A Well-Balanced Sound (Finalize)
The M-16DX provides six types of Finalize effects. You can adjust the Finalize settings to create the result that’s suitable for your needs. The Finalize function is not available if you’re using a USB connection and the M-16DX is operating at a sampling frequency of 96 kHz. -
Page 42: List Of Effects
Advanced use List of effects ■ Natural This effect adds a natural finish that does not impair the original character of the sound. Parameter Range Explanation CROSS 10.0–14k (Hz) Specifies the frequency at which the low and high ranges will be divided. Lowers the threshold of the multi-band compressor (the volume at which the compressor begins to apply), and simultaneously raises the volume. -
Page 43: Saving And Calling Up Mixer Settings (Scenes)
Advanced use Saving and calling up mixer settings (Scenes) The M-16DX lets you save eight different sets of mixer settings including the effects. Each set of mixer settings is called a “scene,” and can be called up instantly whenever needed. -
Page 44: Other Functions
* If this is set to NARROW, you’ll be able to make detailed mixing operations more conveniently and efficiently. adjustments. You can also restore the settings of the M-16DX to their original state. When you turn the SENS knob, it may seem as though the change does not occur smoothly, but this is not a malfunction. -
Page 45: Adjusting The Brightness Of The Screen (Lcd Contrast)
MAIN You can specify the M-16DX’s sampling frequency. connector, CONTROL ROOM jacks, and When inputting a digital signal via the M-16DX’s DIGITAL IN PHONES jack. jack, the M-16DX’s sampling frequency must match the Room Acoustic Control and Finalize will ap-... -
Page 46: Initializing The Settings (Initialize)
After the factory reset is completed, the level meter select the settings you want to initialize. screen will appear. Setting Explanation All settings of the M-16DX * Except for UTILITY settings Insert effect (*) Echo/Reverb (*) Graphic equalizer/ GEQ/RAC... -
Page 47: Troubleshooting
If the sound is crackly or distorted even though there is no problem with the level indications in the level meter, the output volume is appropriate but the input volume is too high. Please adjust the M-16DX’s input volume (level). - Page 48 3. Lower the volume ❏ Is an audio device connected to the M-16DX? If the input and output of the audio device are both connected to the M-16DX, the signal may be creating a feedback loop. Please check the connections.
-
Page 49: Phantom Power
❏ Could the M-16DX’s sampling frequency be set to 96 kHz? When using a USB connection, the Finalize function is not available if the M-16DX’s sampling frequency is set to 96 kHz. Either set the sampling frequency to 48 kHz, or disconnect the USB connection. -
Page 50: Problems Related To The Special Driver
USB hub or a computer that has more than one USB connector, you should normally connect the M-16DX to the USB connector for which you installed the driver. If you want to connect the M-16DX to a USB connector other than the one for which you installed the driver, you’ll need to install the USB driver as follows. - Page 51 Adjust the buffer size as described in “Adjusting the audio latency” (separate sheet). * After changing the buffer size, you must restart any software that uses the M-16DX. If your software has an audio device test function, execute the test function.
-
Page 52: Deleting The Usb Driver
M-16DX’s sample rate setting? Set your software and the M-16DX to the same sample rate. If you change the sample rate of the M-16DX, you will need to reconnect the M-16DX in order for the setting to take effect. ❏ Try adding memory. -
Page 53: Main Specifications
Main specifications M-16DX Number of Input Channels 16 channels Sample Rate: 44.1/48.0/96.0 kHz AD/DA Conversion Signal Processing: 24 bits 96.0 kHz: 20 Hz to 40 kHz (+3/-3 dB) Frequency Response 48.0 kHz: 20 Hz to 22 kHz (+3/-3 dB) 44.1 kHz: 20 Hz to 20 kHz (+3/-3 dB) MAIN MIX LEVEL knob = -∞, Channel LEVEL knobs = -∞... - Page 54 I/O module: 1.6 kg/3 lbs 9 oz (only this unit) Weight MIX controller: 1.2 kg/2 lbs 11 oz (only this unit) Owner’s manual Read this first/M-16DX driver installation (driver installation manual) Controller cable (D-SUB 15 pin, 2 m) USB cable Accessories...
-
Page 55: Attaching The Rack-Mount Adaptor
Main specifications Attaching the rack-mount adaptor Remove three screws (on each side) from the right and left panels of the I/O module. Using the screws you removed in step 1, attach the rack-mount brackets to the I/O module. * You must use the screws that you removed. Do not use any other screws. -
Page 56: Index
Index Numerics DIGITAL IN ................. 18 DIGITAL OUT ................19 16 BAND GRAPHIC EQ ............16, 40 DISPLAY ..................17 16-Band Graphic Equalizer ............40 Display ..................16 2 TRACK OUT ................19 Driver ................28, 50, 52 DX BUS ................... 17, 19 AC Adaptor ................. - Page 57 Index REPT ..................... 34 Reverb ..................15, 33 L ..................... 29 ROOM ................... 34 L COMPRESS ................42 ROOM ACOUSTIC AUTO CONTROL ....... 16, 36, 39 LARGE HALL ................34 Room Acoustic Auto Control ............ 35 LCD Contrast ................45 Room Acoustic Control ............
- Page 58 For EU Countries...
- Page 59 Information Information When you need repair service, call your nearest EDIROL/Roland Service Center or authorized EDIROL/Roland distributor in your country as shown below. IRELAND HONG KONG BRAZIL TRINIDAD MIDDLE EAST Roland Ireland Parsons Music Ltd. Roland Brasil Ltda. AMR Ltd...
- Page 60 04561878...