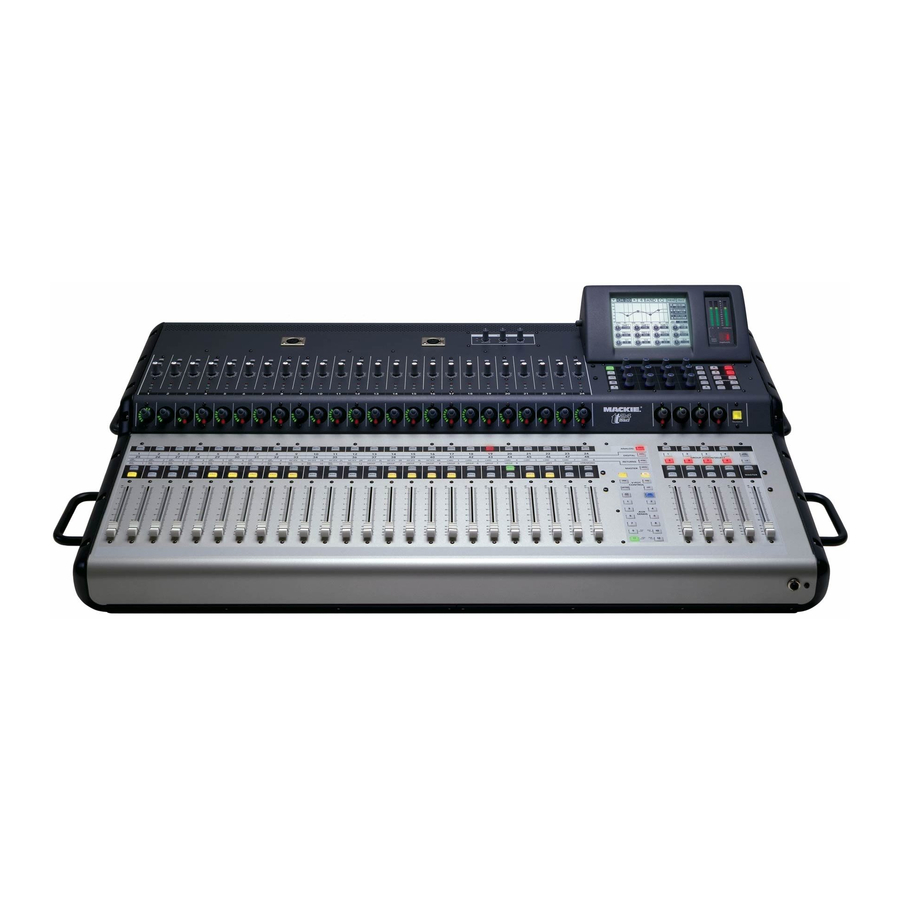
Mackie TT24 Owner's Manual
Digital live console
Hide thumbs
Also See for TT24:
- Quick start manual (130 pages) ,
- Owner's manual (114 pages) ,
- Schematics (18 pages)
Table of Contents
Advertisement
Quick Links
Advertisement
Table of Contents

Related Manuals for Mackie TT24


Summary of Contents for Mackie TT24
- Page 1 �������������� �����������...
-
Page 2: Important Safety Instructions
(servicing) instructions in the literature accompanying the appliance. Le point d'exclamation à l'intérieur d'un triangle équilatéral est employé pour alerter les utilisateurs de la présence d'instructions importantes pour le fonctionnement et l'entretien (service) dans le livret d'instruction accompagnant l'appareil. TT24 DIGITAL LIVE CONSOLE... -
Page 3: Table Of Contents
3.4.8 MATRIX ..............17 3.4.9 Engineer’s Utility .............17 Chapter 1: Introduction ........5 3.4.10 Main Meters and RUDE SOLO LED ....17 1.1 Evolution of the TT24 Console ......... 5 3.5 UTILITY Area ............... 18 1.2 Summary of Features ............5 3.5.1 TALKBACK ..............18 1.2.1 DSP Functionality ............ - Page 4 Appendix A: Specifications ......54 6.3.4 Line ................37 6.3.5 Aux ................37 Appendix B: Snapshot Parameters Saved ..57 6.3.6 Group ................ 37 Appendix C: TT24 Console Surface 6.3.7 Master ...............38 Quick Keys ............58 6.4 Four-Band Equalizer ............38 Appendix D: Configurations and 6.5 Six-Band Equalizer .............39...
-
Page 5: Chapter 1: Introduction
Please write your serial number here for future for live sound. The TT24 design team spent a great deal reference (i.e., insurance claims, tech support, of time implementing and allocating the TT24’s DSP to return authorization, etc.) -
Page 6: Terminology And Conventions
This allows a single instruction to describe this action without knowing the control’s previous state. For example, if the control is not selected, touching the control once selects it. If it is already selected, no action is required. TT24 DIGITAL LIVE CONSOLE... -
Page 7: Chapter 2: Quickstart Tutorial
Ch 2: Quickstart Tutorial This Quickstart Tutorial will help you begin using the TT24 quickly and easily by providing step-by-step 3. Set the LINE switch to the up (mic) position. instructions for its most commonly utilized tasks. Rest Mute button assured that our team of design engineers has verified... - Page 8 SET UP HELP Utilit y GRP / CTR L MATRIX UTI L A UX bu tt o n COPY PA S T E Figure 2-4 QuickMix area Aux 1 Master Level Figure 2-5 AUX MASTER Touchscreen TT24 DIGITAL LIVE CONSOLE...
-
Page 9: Connect A Cd/Tape Device
13. Press AUX SENDS 1 in the V-POT CONTROL area 4. Touch TAPE/CD A or TAPE/CD B in the INPUT (Figure 2-3). SELECTION area (Figure 2-6). 14. Increase the Aux 1 level on channel 1 using the 5. Select L/R in the GRP ASSIGN area to route the stereo V-Pot. -
Page 10: Aux Functions
QuickMix knob to cycle through -6, -12, or -18 dB settings. As the amount of cut increases, the filter Q 7. Press the GRP/AUX QuickMix button to display the increases (i.e., bandwidth narrows). Turn the knob GRPS/AUXES Touchscreen (Figure 2-8). to adjust the frequency. TT24 DIGITAL LIVE CONSOLE... -
Page 11: Effects
2.5 Effects Four effects processors can each use one of the fol- lowing effects: reverb, reverb through gate, mono/stereo/ ping pong delay, chorus, and flange. The default effect sends are Aux sends 9–12 but any Aux or Matrix sends can be used. The effect returns are on the Returns bank. 1. -
Page 12: Chapter 3: Console Surface Controls
XLR mic input. The TT24 can provide phantom LINE level button power to all 24 mic inputs simultaneously. Push the but- The TT24 has 24 channel strips bounded at the bot- 48 V ton up for dynamic mics that do not require phantom 4 8V tom by a fader and at the top by a LINE switch. -
Page 13: Mute
3.1.6 MUTE True stereo compression applies to linked channels so the summed signal is delivered to the stereo compressor. Push the MUTE button to toggle the channel between muted (button lights) and enabled (not lit). 3.1.9 SOLO NOTE: Pre-fader Aux sends can be globally Press the SOLO button to solo the channel. -
Page 14: Returns
They will both illuminate and the faders will snap to their current settings, indicating the The high-pass filter can remove unwanted TT24 is in the user bank. See section low frequencies from an input channel. The 6.13.5 for more information on config- TRIM filter cutoff frequency range is 20–400 Hz;... -
Page 15: Aux Sends 1-12
The QuickMix buttons on the left are: FAT, EQ, DYN, AUX MODE, the only blue button on the console, and GRP/AUX. effectively turns the TT24 into a powerful, dedicated monitor mixer by using the 24 channel faders as chan- The QuickMix buttons on the right are: AUX MSTR, nel Aux sends and the four Group faders as Aux masters. -
Page 16: Dyn
FAT button (see page 37). • 31-BAND EQ: Three 31-band graphic EQ filter for the Main Outputs (L/R and C/Mono). See Aux Master on page 43 for more information. See 31-Band Equalizer on page 39 for more infor- mation. TT24 DIGITAL LIVE CONSOLE... -
Page 17: Snap
HELP • GRPS/AUXES Touchscreen: only Group and Aux The HELP button displays the current firmware ver- assignments sion in the TT24 mixing console. • FAT OVERVIEW Touchscreen: all parameters SETUP Press the SETUP button to open the SETUP Touch- 3.4.10 Main Meters and RUDE SOLO LED... -
Page 18: Utility Area
99 their normal operation. snapshots. See “Appendix B: Snapshot Parameters Saved” for a list of all the TT24 parameters saved in a snapshot. 3.5 UTILITY Area More elaborate snapshot functionality is available on the SNAPSHOTS Touchscreen (i.e., channel and param-... -
Page 19: Group And Master Controls
To activate/deactivate Mute Groups: Press the Group Mute button while holding the Group The TT24 has four Group strips and one Master strip Assign button to activate and deactivate mute groups. (Figure 3-8). Each Group has a V-Pot to control group... -
Page 20: Chapter 4: Rear Panel Connectors
LINE inputs appear on the ANALOG bank. 4.1.1 MIC Inputs 1–24 A balanced line level signal must be wired as follows: The TT24 microphone preamp was based on our • Tip = Positive (+ or hot) extensive knowledge and experience with those used in •... -
Page 21: Aux Sends
The figure below shows three ways to use the INSERT using standard consumer audio RCA cables. The signal jacks: can be routed to the MONITOR outputs with CD/TAPE A selected as the source in the MON. SOURCE Touch- screen (see page 49). This allows cueing intermission music through the MONITOR or PHONES outputs. -
Page 22: Group/Matrix Out
EXPAN S I ON ~100-240VA C In/Out 50 - 60 Hz 300W FUSE: 6A / 250 V C ARD A A C Power Inlet C ARD B Expansion card slots Figure 4-4 Digital I/O and expansion card slots TT24 DIGITAL LIVE CONSOLE... -
Page 23: Aes/Ebu In/Out
CLOCK IN. WORD CLOCK OUT is a BNC connector that produc- es a word clock signal at the TT24’s current sample rate. Use this connector to transmit the word clock to other devices when the TT24 is operating as the system’s master word clock. -
Page 24: Chapter 5: Dsp And Internal Effect Allocation
L/R+Mono: Stereo with an independent mono output. LCR: True LCR panning from the channels and busses. This chapter discusses how the TT24 allocates its DSP and Internal Effects resources. L/R+Mono See Chapter 6: Touchscreen and TT Control for specif- In L/R+Mono mode, the left and right stereo signals ic information about the DSP and Effects Touchscreens. -
Page 25: Six-Band Eq
Master OVERVIEW Touchscreen and adjusted on the Mono Mode COMPRESSOR Touchscreen. If the TT24 is in L/R+Mono mode, all groups are mono by default. Mono groups operate similarly to groups on a 5.2.4 Fader Position in Signal Path typical analog console: pre-pan mono signals are routed... -
Page 26: Group Dsp Allocation
Group mode requires a different number such that channel pan is interpreted as left-right. This of units: Mono = 1, Stereo = 2, LCR = 3. Since the TT24 results in a true LR group, maintaining the stereo im- can have up to 8 LCR groups, there is not enough DSP to age throughout the signal path. -
Page 27: Matrix Output
5.5 Matrix Output Each Matrix output has an adjustable delay. 5.5.1 Delay Each Matrix output has a 600 ms delay to allow time alignment of multiple speaker groups in a large venue (see Delay on page 44). 5.6 Internal Effects Processors The internal EFX have four independent mono input/stereo output effects processors that are adjusted from the EFX Touchscreens, accessed by pressing the... -
Page 28: Tabular Summary Of Dsp And Effects
Release 10 ms to 2500 ms (scaled steps) 100 ms Assignable Bus DSP, Gain 0 dB to 20 dB (0.1 dB steps) 0 dB L/R-C/Mono Compressor On/Off On or Off Knee Mode Hard or Soft Hard TT24 DIGITAL LIVE CONSOLE... - Page 29 FUNCTION CHANNELS PARAMETER VALUE RANGE/INCREMENTS DEFAULT VALUE Gain 1 –15 dB to +15 dB (0.1 dB steps) 0 dB not available when Band 1 is HP Freq 1 20 Hz to 20 kHz (scaled steps) 80 Hz Bandwidth 1 2 octaves to 1/30 octave (scaled steps) not available when Band 1 is Shelf Gain 2 –15 dB to +15 dB (0.1 dB steps)
- Page 30 –15 dB to +15 dB (0.1 dB steps) 0 dB Mid Frequency 20 Hz – 20 kHz (scaled steps) 2 kHz Mid Bandwidth 2 octaves to 1/30 octave (scaled steps) High Shelf Gain –15 dB to +15 dB (0.1 dB steps) 0 dB TT24 DIGITAL LIVE CONSOLE...
- Page 31 FUNCTION PARAMETER VALUE RANGE/INCREMENTS DEFAULT VALUE Size 3–40 m (1 m steps) 10 m Decay 0.1–10 s (0.1 s steps) 1.6 s Pre Delay 0–300 ms (1 ms steps) 0 ms Diffusion 0–10 (1 steps) Damping 0–10 (1 steps) Roll Off Flat to 500 Hz (scaled steps) Flat Reverb Through Gate...
- Page 32 –15 dB to +15 dB (0.1 dB steps) 0 dB Mid Frequency 20 Hz – 20 kHz (scaled steps) 2 kHz Mid Bandwidth 2 octaves to 1/30 octave (scaled steps) High Shelf Gain –15 dB to +15 dB (0.1 dB steps) 0 dB TT24 DIGITAL LIVE CONSOLE...
-
Page 33: Chapter 6: Touchscreen And Tt Control
Ch 6: Touchscreen and TT Control 6.1 TT Control Conventions Most of the TT24’s configuration occurs on the Touch- screen and/or the TT control software. This section The TT control software expands the TT24’s control discusses the general conventions for both interfaces. -
Page 34: Tt Control Knob
The TT24 connects to the PC via a USB cable (6-ft In addition, the Ch. 1 Analog menu has larger cable supplied). The minimum PC requirements are up/down arrows on either side. Click on these arrows, summarized below. or press the console up/down arrow keys, to increment/ decrement through the list without opening the menu. -
Page 35: Touchscreen Buttons
6.2.3 Touchscreen Name and Channel/ Function The name of the current Touchscreen is displayed in the top-center of the screen (MATRIX MIX in Figure 6-3). Some screens are specific to the selected channel or function. For example, the Analog and Effect Return OVERVIEW screens are different. -
Page 36: Digital
(blank =POST). The GROUP ASSIGNMENTS area displays the selected channel’s group assignments. Touch anywhere in the AUXES area to open the GRPS/AUXES Touchscreen (see page 43). Figure 6-7 Effects Edit Touchscreen TT24 DIGITAL LIVE CONSOLE... -
Page 37: Line
EQ and COMP This screen contains the editable effect parameters, IN/OUT meters, EQ IN/OUT button, and a graph show- Touch the EQ or compressor graphs to open their ing the EQ curve associated with this effect. Touch the specific Touchscreens. Touch the arrows to toggle the EDIT EQ button to display the EQ controls (low- and processor order. -
Page 38: Master
The default frequencies for each band are: • Band 1: 80 Hz • Band 2: 500 Hz • Band 3: 2 kHz • Band 4: 10 kHz TT24 DIGITAL LIVE CONSOLE... -
Page 39: Six-Band Equalizer
HPF Freq setting. Pressing and holding CTRL while adjusting the kill filter QuickMix knob resets the kill filter to the off The HPF FREQ field displays the value of the HPF set position. The kill filter setting is displayed beneath its from the V-POT CONTROL area. -
Page 40: Dynamics
The graph summarizes the compressor’s parameter settings. Threshold The THRESH control adjusts the level above which attenuation begins. It is adjustable in the range -60 to 0 dBFS in increments of 0.1 dBFS; the default value is 0 dB. TT24 DIGITAL LIVE CONSOLE... -
Page 41: Gate/Expander
6.7.2 Gate/Expander Hold The HOLD control adjusts the time the Gate/Expand- er stays open after the signal drops below the threshold before gain reduction begins. HOLD is adjustable in the range 0–5 s; the default is 0 s. Attack The ATK control adjusts the time for the gate to open and pass the signal through once the signal exceeds the threshold after reduction has occurred. -
Page 42: Snapshots
• select it and click the PROTECT button; Press the FILTER EDIT button to access the specific filtering screens. The TT24 offers the ability to filter mix • click the lock icon. elements like mute, fader, pan, EQ, compressor, gate, auxes, and others on a per snapshot basis. -
Page 43: Clear
6.9 Aux Master 6.8.2 CLEAR Click the CLEAR button to clear the selected snap- shot. The snapshot is deleted and the name returns to Empty. Attempting to clear a protected snapshot produces a warning message. 6.8.3 STORE Click the STORE button to store the current console state (with filtering if active) in the selected snapshot. -
Page 44: Groups/Auxes
A–H to select a Matrix for editing. The knobs LAY SETUP from the MATRIX MIX Touchscreen. control the input levels to the selected Matrix. The bot- tom-right knob controls the master output level for the selected Matrix, which is reflected on the meter. TT24 DIGITAL LIVE CONSOLE... -
Page 45: Effects
Press the EFX QuickMix button to display the INTER- NAL EFX Touchscreen (left of Figure 6-23). Touch an Effect to change the effect. Touch an Edit button to edit the selected effect. Touch a Source to change the source feeding the Effect; this displays the Touchscreen on the right of Figure 6-23. -
Page 46: Operation
25-48. Additionally, FADERS and SCREEN CALIBRATE when a UFX-II card is inserted in a TT24 and being used to load the digital channels 25-48 with DSP both the Touch either of these CALIBRATE buttons to follow sim- analog and digital buttons are lit indicating that DSP ple instructions to calibrate the faders and Touchscreen. -
Page 47: Midi Control
Configuring the MIDI channel Sample Rate Convert MIDI messages are transmitted and received using one of sixteen MIDI channels. In order for the TT24 to Select this field to activate automatic sample rate communicate with another device, both pieces of equip- conversion for the selected Digital Input. - Page 48 Deck 4: (0x48 to 0x5F) vv = Fader Value (0x00 to 0x7F) Example: Sending “B0 18 61” sets the fader on Chan- nel strip 1 of Deck 2 to 0.0 dB on a TT24 set to MIDI channel 1. Decimal to Hexadecimal Conversion Table...
-
Page 49: Utility
6.14 Utility 6.13.2 TALKBACK Figure 6-34 UTILITY TALKBACK Figure 6-32 UTILITY MENU SELECTION Select the desired Matrix and Aux channels to enable Press the UTIL QuickMix button to open the UTILITY for Talkback. MENU SELECTION Touchscreen. Touch the MONI- TOR SOURCE, STEREO INPUT ASSIGN, TALKBACK, By default, the Talkback button operates in a latching METERING, TEST TONES, and USER BANK buttons manner. -
Page 50: Metering
To access the user bank, simply press the ANLG and DGTL bank select buttons simultaneously. They will both illuminate and the faders will snap to their current settings, indicating the TT24 is in the user bank. TT24 DIGITAL LIVE CONSOLE... -
Page 51: File Management
Use the up and down Touchscreen arrows to scroll if the list is too large to fit. Touch the name of the desired The TT24 has a file backup and restore system. Press venue and touch the OK button. the FILES button in the upper right-hand corner of the Touch SAVE VENUE from Figure 6-33 to save the Touchscreen to open the File Management Select Menu. -
Page 52: Load And Save Preset
This effectively creates an offline file that contains all snap- shots and presets currently on the TT24. Choose the backup console function from the file menu and simply choose a name and directory for your *.tt24bk file. -
Page 53: Backup And Restore Files
1 console backup file is selected and a new translat- ed backup file named and pointed to a directory on the PC. Once a file has been translated it can be restored to the TT24 thru the previously explained restore console function. Owner’s Manual... -
Page 54: Appendix A: Specifications
< 0.03% @ +4 dBu input, 96 kHz, 10 Hz to 20 kHz AES Input with SRC to AES Output < 0.0002% @ –10 dBFS input, 44.1 kHz, 10 Hz to 22.05 kHz < 0.0006% @ –10 dBFS input, 96 kHz, 10 Hz to 48 kHz TT24 DIGITAL LIVE CONSOLE... - Page 55 SIGNAL TO NOISE RATIO –78 dBu (ref. +4 dBu Mic In to Main Out) DYNAMIC RANGE 101 dB (Mic In to Main Out) MAXIMUM VOLTAGE GAIN 96 dB (Mic In to Main Out) CROSSTALK Adjacent Inputs –110 dB @ 1 kHz Adjacent Main Outputs –95 dB @ 1 kHz Adjacent Aux Outputs...
- Page 56 71.0 lb/32.2 kg Disclaimer Since we are always striving to make our products better by incorporating new and improved materials, compo- nents, and manufacturing methods, we reserve the right to change these specifications at any time without notice. TT24 DIGITAL LIVE CONSOLE...
-
Page 57: Appendix B: Snapshot Parameters Saved
Appendix B: Snapshot Parameters Saved The following parameters are saved in a snapshot. AUXILIARY MASTER OUTPUTS 1-12 • ANALOG and DIGITAL INPUT channels 1-48 • Kill filters (when UFXII is providing DSP on DIGITAL bank) • Compressor • Trim • Mute •... -
Page 58: Appendix C: Tt24 Console Surface Quick Keys
SYSTEM Hard Reset = CTRL+HELP on power up Pressing and holding these two buttons on power up will hard reset the TT24 to factory default settings. This will also clear all internal memory deleting all snapshots, presets, and venues. Soft Reset = CTRL+UTIL on power up Pressing and holding these two buttons on power up will soft reset the TT24 to factory default settings. -
Page 59: Appendix D: Configurations And Block Diagrams
Appendix D: Configurations and Block Diagrams Owner’s Manual... - Page 60 TT24 DIGITAL LIVE CONSOLE...
- Page 61 Owner’s Manual...
- Page 62 TT24 DIGITAL LIVE CONSOLE...
- Page 63 Solo Solo Main Figure B-5 TT24 in L/R + Mono mode Owner’s Manual...
- Page 64 Solo Solo Main Figure B-6 TT24 in LCR mode TT24 DIGITAL LIVE CONSOLE...
-
Page 65: Appendix E: Service Information
Try the same source signal in another channel, set in Appendix E: Warranty Information. up exactly like the suspect channel. If you think your TT24 has a problem, please do ev- erything you can to confirm it before calling for service. Bad Output Doing so might save you from the deprivation of your TT24 and the associated suffering. - Page 66 Repair 7. Tech Support will tell you where to ship the TT24 for repair. We suggest insurance for all forms of Service for Mackie products is available at one of our cartage. factory-authorized service centers. Service for Mackie products living outside the United States can be ob- 8.
-
Page 67: Appendix F: Warranty Information
G. LOUD Technologies warrants all repairs performed for 90 days or for the remainder of the warranty period. This C. Service and repairs of Mackie products are to be per- warranty does not extend to damage resulting from im- formed only at a factory-authorized facility (see D below).