Table of Contents
Advertisement
Quick Links
Advertisement
Table of Contents

Related Manuals for MSI MS-8929


Summary of Contents for MSI MS-8929
- Page 1 SER’S UIDE NX Series FX Series II Version 6.0 August 2004 G52-V1NFZX6...
- Page 2 (1) this device may not cause harmful interference, and (2) this device must accept any interference received, including interference that may cause undesired operation. Micro Star International Micro Star International Micro Star International MS-8929 MS-8937 MS-8946 Micro Star International Micro Star International MS-8966...
-
Page 3: Copyright Notice
MSI Patent Notice MSI has been working on graphics products for years and has achieved a superior accomplishment in various graphics series. MSI is not only devoted to delivering the best product quality, but also to bringing up the most novel solutions. - Page 4 Important Safety Precautions Always read and follow these basic safety precautions carefully when handling any piece of electronic component. Keep this User’s Manual for future reference. 2. Keep this equipment away from humidity. 3. Lay this equipment on a stable, flat surface before setting it up. 4.
-
Page 5: Table Of Contents
4.6 Display Adjustment ............... 4-7 Chapter 5 MSI Live Update 3 5.1 Installing the MSI Live Update 3 with MSI Live Monitor ....5-2 5.2 Using the MSI Live Update 3 ............5-3 5.3 Live VGA Driver Update ..............5-4 5.4 Live VGA BIOS Update .............. -
Page 7: Chapter 1 Getting Started
1 1 1 1 1 GETTING STARTED This user’s guide is designed for a series of VGA cards. Read this chapter first, and it will give you a clear instruction on how to use this guide. -
Page 8: How To Use This Guide
Windows XP or 2000, including the driver and useful utilities. Chapter 5, MSI LIVE UPDATE 3, a useful utility for you to upgrade your MSI mainboard and VGA card. Because of this powerful capacity of this utility, you... -
Page 9: Conventions Of This Guide
3.5 TV_Out Connector (S)............ 3-6 4. Software Installation............4-1 5. MSI Live Update 3 5.1 Installing the MSI Live Update 3 with MSI Live Monitor..5-2 5.2 Using the MSI Live Update 3 ........... 5-3 5.3 Live VGA Drive Update...........5-4 Corresponding function for 5.4 Live VGA BIOS Update............5-8... - Page 10 Chapter 1...
-
Page 11: Chapter 2 Introduction
INTRODUCTION This chapter provides the brief specification and function of each VGA card. For detailed descrip- tion of all functions, you may refer to the rest of the chapters. Note that the VGA card you purchased may not cover all functions mentioned herein; therefore, it is recommended to read the “... -
Page 12: System Requirements
Chapter 2 2.1 System Requirements To install the VGA card, your system needs to meet the following requirements: ® Computer Intel Pentium II/III/4 processor, ® Intel Celeron processor, or compatible system Expansion Slot AGP slot Monitor VGA support, minimum 640 x 480 resolution ®... -
Page 13: Nx6800 Series
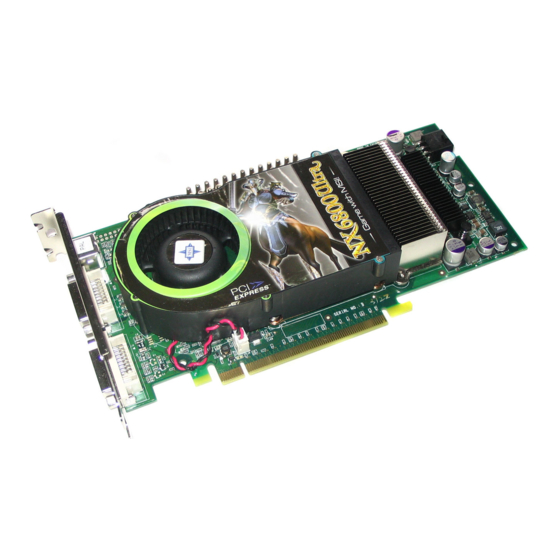
Introduction 2.2 Card List NX6800 Series Features & Specifications § Superscalar GPU architecture § NVIDIA ® CineFX™ 3.0 engine § On-chip Video processor delivers unmatched video performance and features. § High-speed GDDR3/ DDR memory interface § 256-bit memory interface with advanced memory control §... - Page 14 Chapter 2 NX6800Ultra- T2D256 Layout nVIDIA GeForce NX GPU Power Connector 256MB DDR3 RAM Power Connector AGP Interface DVI-I Connector Fan Connector DVI-I Connector DVI Chip TV_Out Connector (S)
-
Page 15: Package Contents
4. SOFTWARE INSTALLATION ............4-1 5. MSI LIVE UPDATE 3 ................ 5-1 5.1 Installing MSI Live Update 3 with MSI Live Monitor ....5-2 5.2 Using the MSI Live Update 3 ........... 5-3 5.3 Live VGA Drive Update ............5-4 5.4 Live VGA BIOS Update ............ - Page 16 D-Sub Port (DB 15-Pin) AGP Interface TV_Out Connector (S) Fan Connector DVI-I Connector DVI Chip MSI reminds you... Note that the VGA card shown above may vary from the actual card. For further information, please visit MSI website at http://www.msi.com.tw...
- Page 17 4. SOFTWARE INSTALLATION ............4-1 5. MSI LIVE UPDATE 3 ................ 5-1 5.1 Installing MSI Live Update 3 with MSI Live Monitor ....5-2 5.2 Using the MSI Live Update 3 ........... 5-3 5.3 Live VGA Drive Update ............5-4 5.4 Live VGA BIOS Update ............
- Page 18 D-Sub Port (DB 15-Pin) AGP Interface DVI-I Connector Fan Connector TV_Out Connector (S) DVI Chip MSI reminds you... Note that the VGA card shown above may vary from the actual card. For further information, please visit MSI website at http://www.msi.com.tw...
- Page 19 4. SOFTWARE INSTALLATION ............4-1 5. MSI LIVE UPDATE 3 ................ 5-1 5.1 Installing MSI Live Update 3 with MSI Live Monitor ....5-2 5.2 Using the MSI Live Update 3 ........... 5-3 5.3 Live VGA Drive Update ............5-4 5.4 Live VGA BIOS Update ............
- Page 20 D-Sub Port (DB 15-Pin) AGP Interface DVI-I Connector Fan Connector TV_Out Connector (S) DVI Chip MSI reminds you... Note that the VGA card shown above may vary from the actual card. For further information, please visit MSI website at http://www.msi.com.tw 2-10...
- Page 21 4. SOFTWARE INSTALLATION ............4-1 5. MSI LIVE UPDATE 3 ................ 5-1 5.1 Installing MSI Live Update 3 with MSI Live Monitor ....5-2 5.2 Using the MSI Live Update 3 ........... 5-3 5.3 Live VGA Drive Update ............5-4 5.4 Live VGA BIOS Update ............
- Page 22 D-Sub Port (DB 15-Pin) AGP Interface DVI-I Connector Fan Connector TV_Out / Video_In DVI Chip Connector (S&C) MSI reminds you... Note that the VGA card shown above may vary from the actual card. For further information, please visit MSI website at http://www.msi.com.tw 2-12...
- Page 23 4 . S O F T WA RE I NS TA L L AT I O N ..............4 - 1 5. MSI LIVE UPDATE 3 .................. 5 - 1 5.1 Installing MSI Live Update 3 with MSI Live Monitor ....5 - 2 5.2 Using the MSI Live Update 3 ............5 - 3 5.3 L ive VGA Drive Up date ..............
-
Page 24: Fx5950Ultra Series
C h a p t e r 2 FX5950Ultra Series Features & Specifications § 256-bit memory interface with advanced memor y control § N VID I A U lt raShadow ™ t echnology § ® NVID IA C ineF X™ 2.0 engine §... - Page 25 I n t r o d u c t io n Features & Specifications § Effective Memory Bandwidth: 6.4G B/s (This value is for reference only, depending ont he type of memory implemented) § Bandwidth compression ratio: 6:1 § Peak Pixel Fill Rate: 6+ GB/s §...
- Page 26 C h a p t e r 2 FX5950Ultra- VTD256 L a y o u t nVIDIA GeForce FX GPU DVI Chip Pow er Connec tor 256MB DDR RAM D-Sub Port (DB 15-Pin) Flash-BIOS AGP Int erface TV_Out / Video_In Connector (S&C) Fan Connec tor Video D ec oder...
- Page 27 4 . S O F T WA RE I NS TA L L AT I O N ..............4 - 1 5. MSI LIVE UPDATE 3 .................. 5 - 1 5.1 Installing MSI Live Update 3 with MSI Live Monitor ....5 - 2 5.2 Using the MSI Live Update 3 ............5 - 3 5.3 L ive VGA Drive Up date ..............
- Page 28 C h a p t e r 2 FX5950Ultra- VTD128 L a y o u t nVIDIA GeForce FX GPU DVI Chip Pow er Connec tor 128MB DDR RAM D-Sub Port (DB 15-Pin) Flash-BIOS AGP Int erface TV_Out / Video_In Connector (S&C) Fan Connec tor Video D ec oder...
- Page 29 4 . S O F T WA RE I NS TA L L AT I O N ..............4 - 1 5. MSI LIVE UPDATE 3 .................. 5 - 1 5.1 Installing MSI Live Update 3 with MSI Live Monitor ....5 - 2 5.2 Using the MSI Live Update 3 ............5 - 3 5.3 L ive VGA Drive Up date ..............
- Page 30 C h a p t e r 2 FX5950Ultra- TD256 L a y o u t nVIDIA GeForce FX GPU DVI Chip 256MB DDR RAM Pow er Connec tor Flash-BIOS D-Sub Port (DB 15-Pin) AGP Int erface TV_Out Connector (S) Fan Connec tor DVI-I Connector 2- 20...
- Page 31 4. SOFTWARE INSTALLATION ............4-1 5. MSI LIVE UPDATE 3 ................ 5-1 5.1 Installing MSI Live Update 3 with MSI Live Monitor ....5-2 5.2 Using the MSI Live Update 3 ........... 5-3 5.3 Live VGA Drive Update ............5-4 5.4 Live VGA BIOS Update ............
- Page 32 Chapter 2 FX5950Ultra- TD128 Layout nVIDIA GeForce FX GPU DVI Chip 128MB DDR RAM Power Connector Flash-BIOS D-Sub Port (DB 15-Pin) AGP Interface TV_Out Connector (S) Fan Connector DVI-I Connector 2-22...
- Page 33 4 . S O F T WA RE I NS TA L L AT I O N ..............4 - 1 5. MSI LIVE UPDATE 3 .................. 5 - 1 5.1 Installing MSI Live Update 3 with MSI Live Monitor ....5 - 2 5.2 Using the MSI Live Update 3 ............5 - 3 5.3 L ive VGA Drive Up date ..............
-
Page 34: Fx5900Ultra Series
C h a p t e r 2 FX5900Ultra Series Features & Specifications 2 5 6 - BI T A D VAN C E D ME M O RY I N T E R FAC E § Wider memory data path with next generation controller technol- ogy for superior performance and throughput. - Page 35 I n t r o d u c t io n Features & Specifications § Integrated NTSC/PAL TV encoder supporting resolutions up to 1024x768 without the need for panning with built-in Macrovision copy protec tion. § Dual, integrated 400MHz RAMDACs for display resolutions up to and including 2048x 1536@85Hz §...
- Page 36 C h a p t e r 2 FX5900Ultra- VTDR256 L a y o u t Video D ecoder nVIDIA GeForce FX GPU 256MB DDR RAM Pow er Connec tor D-Sub Port (DB 15-Pin) Flash-BIOS TV_Out / Video_In Connector AGP Int erface Fan Connec tor (S&C) + Remote Receiver DVI-I Connector...
- Page 37 4 . S O F T WA RE I NS TA L L AT I O N ..............4 - 1 5. MSI LIVE UPDATE 3 .................. 5 - 1 5.1 Installing MSI Live Update 3 with MSI Live Monitor ....5 - 2 5.2 Using the MSI Live Update 3 ............5 - 3 5.3 L ive VGA Drive Up date ..............
- Page 38 C h a p t e r 2 FX5900Ultra- TDR256 L a y o u t Pow er Connec tor nVIDIA GeForce FX GPU D-Sub Port (DB 15-Pin) 256MB DDR RAM Flash-BIOS TV_Out Connector (S&C) + Remote Receiver AGP Int erface Fan Connec tor DVI-I Connector 2- 28...
- Page 39 4 . S O F T WA RE I NS TA L L AT I O N ..............4 - 1 5. MSI LIVE UPDATE 3 .................. 5 - 1 5.1 Installing MSI Live Update 3 with MSI Live Monitor ....5 - 2 5.2 Using the MSI Live Update 3 ............5 - 3 5.3 L ive VGA Drive Up date ..............
- Page 40 Chapter 2 FX5900Ultra- VTD256 Layout Video Decoder nVIDIA GeForce FX GPU 256MB DDR RAM Power Connector D-Sub Port (DB 15-Pin) Flash-BIOS AGP Interface TV_Out / Video_In Connector (S&C) Fan Connector DVI-I Connector 2-30...
- Page 41 4. SOFTWARE INSTALLATION ............4-1 5. MSI LIVE UPDATE 3 ................ 5-1 5.1 Installing MSI Live Update 3 with MSI Live Monitor ....5-2 5.2 Using the MSI Live Update 3 ........... 5-3 5.3 Live VGA Drive Update ............5-4 5.4 Live VGA BIOS Update ............
- Page 42 Chapter 2 FX5900Ultra- TD256 Layout nVIDIA GeForce FX GPU Power Connector 256MB DDR RAM D-Sub Port (DB 15-Pin) Flash-BIOS TV_Out Connector (S) AGP Interface DVI-I Connector Fan Connector 2-32...
- Page 43 4. SOFTWARE INSTALLATION ............4-1 5. MSI LIVE UPDATE 3 ................ 5-1 5.1 Installing MSI Live Update 3 with MSI Live Monitor ....5-2 5.2 Using the MSI Live Update 3 ........... 5-3 5.3 Live VGA Drive Update ............5-4 5.4 Live VGA BIOS Update ............
-
Page 44: Fx5900 Series
Chapter 2 FX5900 Series Features & Specifications 256-BIT ADVANCED MEMORY INTERFACE § Wider memory data path with next generation controller technol- ogy for superior performance and throughput. NVIDIA CINEFX 2.0 ENGINE § Advanced pixel shaders deliver 2x the floating-point shader pixel performance of previous generations. - Page 45 Introduction Features & Specifications § Integrated NTSC/PAL TV encoder supporting resolutions up to 1024x768 without the need for panning with built-in Macrovision copy protection. § Dual, integrated 400MHz RAMDACs for display resolutions up to and including 2048x1536@85Hz § Dual DV0 ports for interfacing to external TMDS transmitters. §...
- Page 46 Chapter 2 FX5900ZT- TD256/TD128 Layout nVIDIA GeForce FX GPU Power Connector 256MB/128MB DDR RAM D-Sub Port (DB 15-Pin) AGP Interface TV_Out Connector (S) Fan Connector DVI-I Connector DVI Chip 2-36...
- Page 47 4. SOFTWARE INSTALLATION ............4-1 5. MSI LIVE UPDATE 3 ................ 5-1 5.1 Installing MSI Live Update 3 with MSI Live Monitor ....5-2 5.2 Using the MSI Live Update 3 ........... 5-3 5.3 Live VGA Drive Update ............5-4 5.4 Live VGA BIOS Update ............
- Page 48 Chapter 2 FX5900- TD256 Layout nVIDIA GeForce FX GPU Power Connector 256MB DDR RAM D-Sub Port (DB 15-Pin) Flash-BIOS TV_Out Connector (S) AGP Interface DVI-I Connector Fan Connector 2-38...
- Page 49 4. SOFTWARE INSTALLATION ............4-1 5. MSI LIVE UPDATE 3 ................ 5-1 5.1 Installing MSI Live Update 3 with MSI Live Monitor ....5-2 5.2 Using the MSI Live Update 3 ........... 5-3 5.3 Live VGA Drive Update ............5-4 5.4 Live VGA BIOS Update ............
- Page 50 Chapter 2 FX5900- TD128 Layout nVIDIA GeForce FX GPU Power Connector 128MB DDR RAM D-Sub Port (DB 15-Pin) Flash-BIOS TV_Out Connector (S) AGP Interface DVI-I Connector Fan Connector 2-40...
- Page 51 4. SOFTWARE INSTALLATION ............4-1 5. MSI LIVE UPDATE 3 ................ 5-1 5.1 Installing MSI Live Update 3 with MSI Live Monitor ....5-2 5.2 Using the MSI Live Update 3 ........... 5-3 5.3 Live VGA Drive Update ............5-4 5.4 Live VGA BIOS Update ............
- Page 52 Chapter 2 FX5900- VTD256 FX5900SP- VTD256 MS-8929 Layout nVIDIA GeForce FX GPU Video Decoder Power Connector 256MB DDR RAM Flash-BIOS D-Sub Port (DB 15-Pin) TV_Out / Video_In AGP Interface Fan Connector Connector (S&C) DVI-I Connector 2-42...
- Page 53 4. SOFTWARE INSTALLATION ............4-1 5. MSI LIVE UPDATE 3 ................ 5-1 5.1 Installing MSI Live Update 3 with MSI Live Monitor ....5-2 5.2 Using the MSI Live Update 3 ........... 5-3 5.3 Live VGA Drive Update ............5-4 5.4 Live VGA BIOS Update ............
- Page 54 Chapter 2 FX5900- VTD128 FX5900SP- VTD128 MS-8929 Layout Video Decoder nVIDIA GeForce FX GPU Power Connector 128MB DDR RAM Flash-BIOS D-Sub Port (DB 15-Pin) TV_Out / Video_In AGP Interface Fan Connector Connector (S&C) DVI-I Connector 2-44...
- Page 55 4. SOFTWARE INSTALLATION ............4-1 5. MSI LIVE UPDATE 3 ................ 5-1 5.1 Installing MSI Live Update 3 with MSI Live Monitor ....5-2 5.2 Using the MSI Live Update 3 ........... 5-3 5.3 Live VGA Drive Update ............5-4 5.4 Live VGA BIOS Update ............
- Page 56 Chapter 2 FX5900XT- VTD128 Layout nVIDIA GeForce FX GPU Video Decoder Power Connector 128MB DDR RAM Flash-BIOS D-Sub Port (DB 15-Pin) TV_Out / Video_In AGP Interface Connector (S&C) Fan Connector DVI-I Connector 2-46...
- Page 57 4. SOFTWARE INSTALLATION ............4-1 5. MSI LIVE UPDATE 3 ................ 5-1 5.1 Installing MSI Live Update 3 with MSI Live Monitor ....5-2 5.2 Using the MSI Live Update 3 ........... 5-3 5.3 Live VGA Drive Update ............5-4 5.4 Live VGA BIOS Update ............
- Page 58 Chapter 2 FX5900- TD128 FX5900XT- TD128 FX5900SP- TD128 MS-8937 Layout nVIDIA GeForce FX GPU Power Connector 128MB DDR RAM D-Sub Port (DB 15-Pin) AGP Interface TV_Out Connector (S) Fan Connector DVI-I Connector 2-48...
- Page 59 4. SOFTWARE INSTALLATION ............4-1 5. MSI LIVE UPDATE 3 ................ 5-1 5.1 Installing MSI Live Update 3 with MSI Live Monitor ....5-2 5.2 Using the MSI Live Update 3 ........... 5-3 5.3 Live VGA Drive Update ............5-4 5.4 Live VGA BIOS Update ............
- Page 60 Chapter 2 2-50...
-
Page 61: Chapter 3 Hardware Installation
3 3 3 3 3 HARDWARE INSTALLATION This chapter tells you how to install your VGA card into your computer correctly and the function of each connector on the VGA card. Note that your VGA card may not cover all functions mentioned in this chapter. -
Page 62: Card Installation
3.1.1 Installation on new system Remove the computer case. Locate the AGP slot on your mainboard. MSI reminds you... Inserting your VGA card into a wrong type of slot (e.g. PCI slot) will damage your card (refer to your mainboard manual for more information). - Page 63 Remove the computer case. Remove the existing VGA card. Locate the AGP slot on your mainboard. MSI reminds you... Inserting your VGA card into a wrong type of slot (e.g. PCI slot) will damage your card (refer to your mainboard manual for more information).
- Page 64 Attach one end of the power cord to the power connecter located on the VGA card. Attach the other ends of the power cord to the power supply connector of the computer. MSI reminds you... The VGA card displays above may appear different from the card you purchase.
- Page 65 Hardware Installation 3.1.4 Remove the Free-boundled Back Fan Sink Some VGA cards come with two fan sinks that are attached on the both side of the card to achieve better cooling result. However, if you find that the free- bundled fan sink which is attached on the back side of the card may be stuck while inserting the VGA card into the AGP slot on your mainboard, you may remove this fan sink without consulting anyone.
- Page 66 Chapter 3 2. Locate the four hooks that fix the back fan sink on the card, and use a pliers to push each hook inward. 3. Detach the back fan sink. 4. Locate the two hooks that fix the back fan on the card, and use a pliers to push each hook inward.
- Page 67 Hardware Installation 3.1.5 Install the Free-boundled Back Fan Sink As you know that some VGA cards come with two fan sinks to achieve better cooling result. However, the back fan that should be attached on the back side of the card may not be attached during the assembling procedure be- cause of the consideration for those users who prefer not to have the back fan installed on the VGA card.
- Page 68 Chapter 3 2. Hold the back fan, and turn over the VGA card. Find the two hooks that fix the back fan, and then press down each hook. 3. C o n n e c t t h e power connec- tor of the back fan.
-
Page 69: D-Sub Port (Db 15-Pin)
Hardware Installation 3.2 D-Sub Port (DB 15-Pin) The VGA card provides a standard D-Sub Port, which allows you to connect a CRT or LCD monitor. Simply plug your monitor cable into the D-Sub Port on your VGA card, and make sure that the other end of the cable is properly connected to your monitor (refer to your monitor manual for more information.) LCD Monitor CRT Monitor... -
Page 70: Digital Panel Connector (Dvi-I)
Chapter 3 3.3 Digital Panel Connector (DVI-I) The VGA card provides a DVI (Digital Visual Interface) connector which al- lows you to connect an LCD monitor. The DVI connector provides a high- speed digital interconnection between the computer and its display device. To connect a LCD monitor, simply plug your monitor cable into the DVI connector on the VGA card, and make sure that the other end of the cable is properly connected to your monitor. -
Page 71: Tv_Out Connector (C)
Hardware Installation 3.4 TV_Out Connector (C) The VGA card provides a TV_Out connector for video-out function which al- lows you to output the image to a TV or video device. Simply plug one end of the RCA cable into the TV_Out connector on the VGA card, and the other end to the video input connector on your TV or video device. -
Page 72: Video_In Connector (C)
Chapter 3 3.6 Video_In Connector (C) The VGA card provides a Video _In connector for video-in function which al- lows you to input the image from video devices. Simply plug one end of the RCA cable into the Video_In connector on the VGA card, and the other end to the video output connector on your video devices. -
Page 73: Tv_Out Connector (S & C)
Hardware Installation 3.8 TV_Out Connector (S & C) The VGA card provides a 9-pin TV_Out connector (S & C) for video-out func- tion which allows you to output the image to a TV or video device. This type of connector can be used for either RCA cable or S_Video cable if the attached TV-Out 1-to-2 connector is plugged in. -
Page 74: Tv_Out / Video_In Connector (S & C)
Chapter 3 3.9 TV_Out / Video_In Connector (S & C) The VGA card provides a 9-pin TV_Out / Video_In connector (S & C) for video- out / video-in function which allows you to output / input the image to / from a TV or video device. - Page 75 Hardware Installation 3-15...
-
Page 76: Chapter 4 Software Installation
4 4 4 4 4 SOFTWARE INSTALLATION This chapter describes how to install MSI VGA card software for Windows XP or 2000, including the driver and useful utilities. -
Page 77: Installing The Vga Card Drivers
2. Insert the CD-ROM provided into the CD-ROM drive. The Autorun pro- gram will start the Setup program and show the setup screen as shown below: MSI reminds you... If, on your computer, the Autorun program does not ex- ecute automatically, please 1) enable the CD-ROM drive’s auto-detect function from Control Panel;... - Page 78 Software Installation 3. Click nVIDIA VGA Drivers. Follow the on-screen instructions to com- plete the installation. MSI reminds you... ® Under Windows 2000, the Digital Signature Not Found dialog box (as shown below) will pop up during the installation. Press Yes to continue the installation.
-
Page 79: Installing Nvidia Capture Driver
1. Turn on the computer. 2. Insert the CD into the CD-ROM drive and enter the Setup program. 3. In the MSI Installation dialog box, click nVIDIA Capture Drivers. Fol- low the on-screen instructions to complete the installation. 4. After finishing the installation, restart the computer as instructed. -
Page 80: Installing Optional Software
After restarting the computer, you can install the optional software from the CD-ROM provided, such as Microsoft DirectX 8.0, Adobe Acrobat Reader, and MSI 3D Turbo Experience. Simply click to select the button and follow the on-screen instructions to complete the installation. -
Page 81: More Information
4.5 More Information To browse through the contents on the CD, simply click Browse CD under each tab. You can use the Manual tab to learn more about your MSI products. 1. Insert the CD into the CD-ROM drive and start the Setup program. -
Page 82: Display Adjustment
Properties in the pop-up menu. The Display Properties window below will show on your screen: MSI reminds you... The figures in this section are for reference only. The actual information on the Display Properties window may... -
Page 83: Display Settings
This screen shows information of the display adapter, colors, range of dis- play area, and refresh rate. MSI Information This screen shows the detailed information of the VGA card, including the model name, display mode, version of the driver and BIOS, memory size, AGP mode and so on. - Page 84 Auto Adjust Auto Adjust Auto Adjust Auto Adjust ,and the proper memory clock will be set for your VGA card automatically. (Example Page) MSI reminds you... WARNING: WARNING: WARNING: WARNING: WARNING: Overclocking may cause the display to be abnormal. It is recommended to use the Default settings...
- Page 85 Chapter 4 GPU Information This screen shows the detailed information of GPU used on your V GA card, including the bus type, BIOS version, memory size and so on. (Example Page) Select the items on the above list to make adjustments of your VGA card. 4-10...
- Page 86 Software Installation nView Display Mode If your VGA card is equipped with a TV-Out connector, you can use a second output device (for example, a TV or a computer monitor) as a part of your operating desktop --- extending your desktop to the second device or copying your desktop onto the second device.
- Page 87 Chapter 4 Setting the nView You can configure the extended desktop for your perference and convenience. You can enter the nView Settings window from two ways. From the blank desktop: 1. Right-click the blank desktop and the pop-up window will show on the screen as following: Click here (Example Page)
- Page 88 Software Installation Profiles This window allows you to load your previous settings or to save the current settings. You can load your previous settings (Example Page) Hot Keys This window provides a personalized setting which allows you to execute an action with just one click on your keyboard.
- Page 89 Chapter 4 Zoom Window In the Zoom tag, you are able to adjust the zoom settings. (Example Page) Magnifying glass When this iption is enabled and you click the Show Zoom Window option, the Zoom window displays a magnification of a fixed area on the screen. 1.
- Page 90 Software Installation Effects In the Effects tag, you are able to adjust the Window Drawing Enhancements and Windows Color Keying. (Example Page) Window Drawing Enhancements 1. Automatically activate windows under cursor: Makes windows under the cursor become active. 2. Make windows minimize and maximize faster: Accelerates the Open Maximize, and Restore window functions.
- Page 91 Chapter 4 Color Correction This tag allows you to adjust the proper values of Digital Vibrance, Brightness, Contrast and Gamma. 1. Click Device Settings in GeForce FX series tag (see the figure in p. 4- 12), and then choose Color Correction in the pop-up window. 2.
- Page 92 Software Installation Screen Adjustment In this tag, you are allowed you to adjust the proper position of the display image. 1. Click Device Settings in GeForce FX series tag (see the figure in p. 4- 12), and then choose Screen Adjustment in the pop-up window. 2.
- Page 93 Chapter 4 Performace and Quality Setting In Performance & Quality Setting, you are allowed to adjust the Performance and Quality Settings by dragging the sliders below: Intellisample(tm) Setting - Quality Drag the slider to select the performance setting for quality enhancements in Direct 3D and OpenGL application.
- Page 94 Software Installation In Performance & Quality Setting / Direct3D Settings, you are allowed to ad- just the performance and compatibility Options for Direct3D. Enable for table emulation Direct3D specifies that an nVIDIA GPU capable of Direct3D hardware acceleration should be able to implement either vertex fog or table fog. Mipmap Dtail Level In this term, you are allowed to adjust the Level of Detail (LOD) bias for mipmaps.
- Page 95 Chapter 4 In Performance & Quality Setting / Direct3D Settings / Refresh Rate Override, you are allowed to select refresh rate overrides to be used in Direct3D applications. Applications control refresh rate Allow the Direct3D application to select its own refresh rate. The list box below is disabled when this option is enabled.
- Page 96 Software Installation In Performance & Quality Setting / OpenGL Settings, you are allowed to the performance and compatibility Options for OpenGL applications. Default Color Depth (for textures) Determines whether textures of a specific color depth should be used by default in OpenGL applications Buffer-Flipping Mode Determines the buffer-flipping mode for full-screen OpenGL application.
- Page 97 Chapter 4 Overlay Controls In Overlay Controls, you are allowed to adjust adjust the proper values of , Brightness, Contrast, Hue, and Satuation. (Example Page) 4-22...
- Page 98 Software Installation Destop Utility Select Display the Media Center icon in the taskbar to add the nVIDIA Media Center icon to the Windows taskbar. This icon allows you to apply any of the custom Direct3D, OpenGL or color setting “on the fly” from a convenient pop- up menu.
- Page 99 Chapter 4 NVRotate In NVRotage, you are allowed you to adjust the proper angle of screen. 1. Click TURN CLOCKWISE , or TURN ANTI-CLOCKWISE button to configure the angle of screen. 2. Selet the options listed below to configure the angle of screen. (Example Page) 4-24...
- Page 100 Software Installation 4-25...
-
Page 101: Chapter 5 Msi Live Update
5 5 5 5 5 MSI LIVE UPDATE 3 MSI LIVE UPDATE 3 is a useful utility for you to enhance the performance of your MSI mainboards and VGA cards. With its auto-search & scheduling function, the Live Update 3 saves you the efforts &... - Page 102 MSI Live Update to avoid problems occurred to your system. To use this feature, you have to install the program first. You can download the program from: 1) the software pack CDs in the package; or 3) the MSI Web site. Installing from CDs 1.
-
Page 103: Using The Msi Live Update 3
MSI Live Update 3 5.2 Using the MSI Live Update 3 After the installation is completed, you can launch the MSI Live Update 3 by 1) double-clicking the MSI Live Update 3 icon on the desktop; or 2) click- ing the Start button , and select Programs / MSI / Live Update 3/MSI Live Update 3. -
Page 104: Live Vga Driver Update
1. To update your VGA driver, click Live VGA Driver on the left pane of the main page. Click here MSI reminds you... The model name and driver/BIOS version appear in the following instructions are for reference only; the actual result should depend on the card you installed. - Page 105 MSI Live Update 3 3. Click the graphic button at the bottom to connect to the MSI Live Up- date Server. It will automatically connect to the Internet and search for drivers of more updated versions in the database. 4. It may take several minutes to detect the required drivers. Please wait until the detection is completed.
- Page 106 Chapter 5 6. Click the Live Update button on the right side of the table to download and update the driver. All actions will proceed automatically. 7. Follow the on-screen instructions to complete the updating procedures. Select a folder to save the driver file Click Next to start installing the VGA Driver...
-
Page 107: Live Vga Bios Update
MSI Live Update 3 5.4 Live VGA BIOS Update 1. To update your VGA BIOS, click Live VGA BIOS on the left pane of the main page. Click here 2. If your VGA card does not support the Live VGA BIOS function, you will receive a warning message on the screen. - Page 108 Chapter 5 Select No to keep Select Yes to continue everything unchanged 5. If you click Yes to continue, it will check the information and BIOS version of your VGA card, and list them in a table:...
- Page 109 MSI Live Update 3 6. Click the graphic button at the bottom to connect to the MSI Live Up- date Server. 7. The MSI Live VGA BIOS will automatically connect to the Internet and search for BIOS of more updated versions in the database of MSI. The followings are examples of the searching results.
- Page 110 Live Update button on the right side of the table to have the new BIOS downloaded and updated automatically. MSI reminds you... Your monitor may go BLANK while the software EEPROM is being erased. Please wait for a while before proceeding to the next step.
- Page 111 MSI Live Update 3 Click Next to continue. It is recommended that you close all programs (by clicking Close all listed programs, and then clicking Next to continue) before updating new VGA BIOS. Click Start to start flashing VGA BIOS.
-
Page 112: Live Utility
5.5 Live Utility Live Utility is a tool that helps users to get the correct system information, and generates a list containing various compatible links of MSI’s software in accordance with the system information being detected. Click here first. Click here to connect to MSI Live Update Server. -
Page 113: How To Use The Msi Live Monitor
MSI Live Update 3 5.6 How to Use the MSI Live Monitor MSI Live Update 3 comes with a useful utility, MSI Live Monitor, to help users detect their system information, and search for the up-to-date drivers or BIOS online. To use MSI Live Monitor, follow the instructions shown below. - Page 114 Chapter 5 3. The utility will at first detect your system information in order to search for corresponding downloads from the MSI on-line database. Searching Click Finish Searching Result Click the Live VGA BIOS / Live VGA Driver Tag or click the listed items on the page to browse the Up-to-date VGA BIOS/ Drivers found by MSI Live Monitor.
- Page 115 MSI Live Update 3 4. Click the item that you would like to download. Click either item to select what you wish to download Click here to download the selected item. 5. Follow the on-screen instructions, and the InstallShield Wizard will guide you through the downloading and installation of the selected new VGA BIOS/Drivers.
- Page 116 Chapter 5 View Last Result MSI Live Monitor provides a shortcut for users to recall the last search result more efficiently. 1. Right-click the MSI Live Monitor icon on the Windows system tray in the lower-right corner of the screen.
- Page 117 MSI Live Update 3 Preference MSI Live Monitor provides a scheduling function of automatically searching for the latest BIOS/Drivers on-line in a set period or condition. 1. Right-click the MSI Live Monitor icon on the Windows system tray in the lower-right corner of the screen.
- Page 118 Click here Start Up Function MSI News Color Selections 5. To contact MSI for further technical support or to get the information about the MSI Live Monitor utility, click About and Support on the left pane of the window. Click here...
- Page 119 2. Select FAQ from the shortcut menu. Select FAQ 3. To find the answers to your questions in MSI FAQ database, try select- ing a particular category relevant to your questions. Select the...
-
Page 120: Contact Us
If you need any technical support, it is strongly recommended that you de- scribe the problem of any kind specifically in your mail to MSI, and attach your system information which will be detected and generated by MSI Live Update 3 if Append System Information is checked. -
Page 121: Twin-Bios™ (Optional)
MSI Live Update 3 5.8 Twin-BIOS™ (Optional) The diagram below describes the procedures in brief: BIOS I Return to BIOS I Run the flash utility BIOS II Boot up with BIOS II Successfully updated! OOPS! Failed... 5-21... - Page 122 Chapter 5 Our products are under continual improvement, and there may be a later version of the BIOS to solve the existing problems on displays or the installation. When you use the flash utility* to update the BIOS on the card, it is inevitable that your devices may encounter some unexpected risks, such as power interruption, during the updating process.
- Page 123 6. Replace the case and restart the computer. MSI reminds you... * To update the BIOS, you must use the special flash utility (MSI Live Update Series) provided by MSI only, which can fully support the Twin-BIOS technology. If the third party’s utility is used in the updating procedure, it will erase the data in BIOS II.
- Page 124 Chapter 5 5-24...
-
Page 125: Chapter 6 Troubleshooting
6 6 6 6 6 TROUBLESHOOTING TROUBLE SHOOTING, provides you with the gen- eral methods to solve problems that might hap- pen to your system or VGA card. -
Page 126: General Help
6.1 General Help Q: Where can I find more information about my VGA card? Please visit our Web site at http://www.msi.com.tw Q: How do I know the driver version of my VGA card? How do I update it? To know the driver version of your VGA card, simply click the Start button , and then point to Settings. - Page 127 Troubleshooting 6.2 Install InterVideo WinDVR Q: My monitor displays nothing after the system boots up. Your VGA card may not be installed correctly. Please check the installation procedure described in Chapter 2 Hardware Installation. Make sure that your monitor are connected to the VGA card properly, and the power is turned on.
- Page 128 Settings. Point to the folder that contains Control Panel. In Control Panel, double-click Display to set the values. For example, when you installed the dedicated driver for your MSI VGA card, which is on the software CDs in your VGA card package, you will see the MSI Information tab in the Display Properties window.
- Page 129 Troubleshooting Q: The DVD playback is of poor quality (skipping frames, color blocks and so on). Why? Change the refresh rate, color and resolution settings to proper values. Enable the DMA mode for your DVD drive. However, not all DVD drives support this function.
- Page 130 Chapter 6...
- Page 131 Troubleshooting...
- Page 132 Chapter 6...