Table of Contents
Advertisement
Quick Links
Vonage V-Portal User Guide
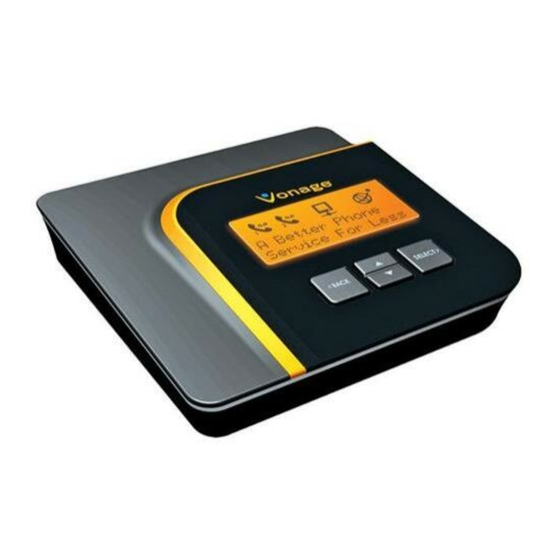
Getting to know your V-Portal
Ever hear the term user friendly? Well, the Vonage V-Portal defines the term. From the LCD
Display messages to the color coded ports on the rear panel, the V-Portal is friendly to the user ...
YOU. Installation and use is easy!
The V-Portal can connect up to 2 Vonage digital phone lines through your high-speed Internet
connection. Just plug the blue Ethernet cable from the V-Portal into your broadband modem and
use the two green RJ-11 telephone ports to plug in your existing phones or fax machine. The
Vonage V-Portal allows you to use your Internet connection for your computer and your phones
at the same time, and because it's Vonage, you get clear digital phone sound quality.
The V-Portal's built-in single-port wired router supports your PC or home network connection.
You can plug one computer directly into the yellow Ethernet (LAN) port of your V-Portal or build
your own home network (often referred to as a LAN, "Local Area Network") by plugging in another
router or switch and connecting network devices, such as computers or printers.
View the Terms of Service by visiting the Vonage website at www.vonage.com/tos. Pay particular attention to
1
Section 11 which explains limitations on Warranty, Remedy and Liability.
Advertisement
Table of Contents

Related Manuals for Vonage VDV21-VD

Summary of Contents for Vonage VDV21-VD
- Page 1 Getting to know your V-Portal Ever hear the term user friendly? Well, the Vonage V-Portal defines the term. From the LCD Display messages to the color coded ports on the rear panel, the V-Portal is friendly to the user ...
- Page 2 LCD and Web UI when the V-Portal is connected to your computer or LAN. View the Terms of Service by visiting the Vonage website at www.vonage.com/tos. Pay particular attention to Section 11 which explains limitations on Warranty, Remedy and Liability.
- Page 3 Vonage V-Portal User Guide represents Phone Port 1 or Phone Line 1. When you sign up for one line of Vonage service, you’ll typically plug your phone into Phone Port 1 on the V-Portal. The Phone Port 1 icon on the green label surrounding a port on the rear panel of the V-Portal identifies it as the port you’ll use to connect your phone to the V-Portal.
- Page 4 And, for all you technology buffs, you can find out network and device information such as View the Terms of Service by visiting the Vonage website at www.vonage.com/tos. Pay particular attention to Section 11 which explains limitations on Warranty, Remedy and Liability.
- Page 5 5. Place the wall-mount slots over the screws and slide the V-Portal down until the screws fit snugly into the wall-mount slots. That’s all there is to it! View the Terms of Service by visiting the Vonage website at www.vonage.com/tos. Pay particular attention to Section 11 which explains limitations on Warranty, Remedy and Liability.
- Page 6 All icons are off. The display backlight is on and set to High (full brightness). View the Terms of Service by visiting the Vonage website at www.vonage.com/tos. Pay particular attention to Section 11 which explains limitations on Warranty, Remedy and Liability.
- Page 7 You will be able to make calls momentarily, as soon as “Ready to make calls” displays. View the Terms of Service by visiting the Vonage website at www.vonage.com/tos. Pay particular attention to Section 11 which explains limitations on Warranty, Remedy and Liability.
- Page 8 If you’ve activated both phone lines on the V-Portal, the total number of missed calls on both lines is displayed. View the Terms of Service by visiting the Vonage website at www.vonage.com/tos. Pay particular attention to Section 11 which explains limitations on Warranty, Remedy and Liability.
- Page 9 30 seconds and plug it back in. The modem will then View the Terms of Service by visiting the Vonage website at www.vonage.com/tos. Pay particular attention to Section 11 which explains limitations on Warranty, Remedy and Liability.
- Page 10 30 seconds and plug it back in. The cable modem View the Terms of Service by visiting the Vonage website at www.vonage.com/tos. Pay particular attention to Section 11 which explains limitations on Warranty, Remedy and Liability.
- Page 11 NOTE: If you are having trouble accessing the Web UI using V-Configure.com, please enter 192.168.15.1 in the address bar of your browser instead. View the Terms of Service by visiting the Vonage website at www.vonage.com/tos. Pay particular attention to Section 11 which explains limitations on Warranty, Remedy and Liability.
- Page 12 Vonage for assistance. You can reach our customer service department at 1-VONAGE-HELP (1-866-243-4357) . View the Terms of Service by visiting the Vonage website at www.vonage.com/tos. Pay particular attention to Section 11 which explains limitations on Warranty, Remedy and Liability.
- Page 13 If the problem still exists after you’ve power cycled your V-Portal, check with your ISP to see if they're blocking VoIP calls. Note that this message only applies for Phone Line 1 – see Vonage Register Error [Code 005] if the same problem occurs with Phone Line 2.
- Page 14 Vonage V-Portal User Guide If you bought your V-Portal in a Retail store and have not activated it on the Vonage website, please visit www.vonage.com/activate to activate it and sign up for Vonage digital phone service. If you received your V-Portal in the mail it is already activated. In rare instances you might see this error message displayed even though the V-Portal is activated.
- Page 15 Tests? to run the phone ports diagnostic test and determine if the error has been corrected. View the Terms of Service by visiting the Vonage website at www.vonage.com/tos. Pay particular attention to Section 11 which explains limitations on Warranty, Remedy and Liability.
- Page 16 Tests? to run the phone ports diagnostic test and determine if the error has been corrected. View the Terms of Service by visiting the Vonage website at www.vonage.com/tos. Pay particular attention to Section 11 which explains limitations on Warranty, Remedy and Liability.
- Page 17 FAX machine to green Phone Port 2 of your V-Portal. To resolve the problem: 1. Replace the four-wire telephone cord with a standard two-wire telephone cord. View the Terms of Service by visiting the Vonage website at www.vonage.com/tos. Pay particular attention to Section 11 which explains limitations on Warranty, Remedy and Liability.
- Page 18 View the Terms of Service by visiting the Vonage website at www.vonage.com/tos. Pay particular attention to Section 11 which explains limitations on Warranty, Remedy and Liability.
- Page 19 Like any phone line, there is a limit to the number of phones you can connect to a single Vonage line. If too many phones are connected, the signal may fade and not all the phones will ring when a call comes in. Therefore, we recommend you connect a maximum of five phones to a single Vonage line.
- Page 20 Like any phone line, there is a limit to the number of phones you can connect to a single Vonage line. If too many phones are connected, the signal may fade and not all the phones will ring when a call comes in. Therefore, we recommend you connect a maximum of five phones to a single Vonage line.
- Page 21 Vonage customer care agents are trained to assist customers with this rare problem. Disconnect the phone cords from both green phone ports 1 and 2 then call Vonage at 1-VONAGE-HELP (1- 866-243-4357) for assistance. Line Wiring Error [Code 213] Phone ports 1 and 2 may be connected to live telco lines.
- Page 22 View the Terms of Service by visiting the Vonage website at www.vonage.com/tos. Pay particular attention to Section 11 which explains limitations on Warranty, Remedy and Liability.
- Page 23 Like any phone line, there is a limit to the number of phones you can connect to a single Vonage line. If too many phones are connected, the signal may fade and not all the phones will ring when a call comes in. Therefore, we recommend you connect a maximum of five phones to a single Vonage line.
- Page 24 MMM DD HH:MM xM as hour, minute and an indication of AM or PM.) View the Terms of Service by visiting the Vonage website at www.vonage.com/tos. Pay particular attention to Section 11 which explains limitations on Warranty, Remedy and Liability.
- Page 25 While the call is being placed the phone number being dialed displays. Once the call goes through, a message displays indicating that the line is in use. View the Terms of Service by visiting the Vonage website at www.vonage.com/tos. Pay particular attention to Section 11 which explains limitations on Warranty, Remedy and Liability.
- Page 26 Voicemail. Choose Easy Dialing > Phone Line 1 (or Phone Line 2) > Voicemail. View the Terms of Service by visiting the Vonage website at www.vonage.com/tos. Pay particular attention to Section 11 which explains limitations on Warranty, Remedy and Liability.
- Page 27 V-Portal Easy Dialing menu to place calls to Vonage’s 511 Traveler Information, powered by the US Department of Transportation. Start at the main menu and choose Easy Dialing > Traffic. A call is placed to the Vonage 511 Traveler Information number. If you didn’t pick up your phone handset before initiating the call, the V-Portal rings your phone when the call is placed.
- Page 28 99 cents and gets you up to two listings. Start at the main menu and choose Easy Dialing > Directory Info. A call is placed to the Vonage 411 Enhanced Dialing service. If you didn’t pick up your phone handset before initiating the call, the V-Portal rings your phone when the call is placed.
- Page 29 Start at the main menu and choose Easy Dialing > Life/Health Info. A call is placed to the Vonage 211 Dialing service. If you didn’t pick up your phone handset before initiating the call, the V-Portal rings your phone when the call is placed. Simply pick up your phone’s handset to get community services information.
- Page 30 If you try to enable or disable the Anonymous Call Block feature when someone else in your home or office is already using the Vonage phone line, a message indicating that the line is in use will be displayed.
- Page 31 Vonage V-Portal User Guide If you try to enable or disable the Do Not Disturb feature when someone else in your home or office is already using the Vonage phone line, a message indicating that the line is in use will be displayed.
- Page 32 V-Portal, discover the V-Portal’s IP Address by listing the network information for the V- Portal’s Ethernet port. View the Terms of Service by visiting the Vonage website at www.vonage.com/tos. Pay particular attention to Section 11 which explains limitations on Warranty, Remedy and Liability.
- Page 33 Vonage V-Portal User Guide Or, if you are able to make phone calls from your Vonage phone line but can not access the Internet from a computer connected to the V-Portal, these settings may help diagnose the problem. If you call a Vonage representative for assistance, the Ethernet port’s network information may help the representative solve the problem.
- Page 34 How can I run the network quality tests a Vonage Customer Service agent asked me to? If you are having voice quality issues and a Vonage Customer Service agent asks you to test the quality of your network, start at the main menu and choose System > Diagnostics > Test Quality.
- Page 35 V-Portal help information as well as the printable V-Portal Quick Start Guide and User Guide. View the Terms of Service by visiting the Vonage website at www.vonage.com/tos. Pay particular attention to Section 11 which explains limitations on Warranty, Remedy and Liability.
- Page 36 The Log In page will be displayed. Enter router in the User Name field. View the Terms of Service by visiting the Vonage website at www.vonage.com/tos. Pay particular attention to Section 11 which explains limitations on Warranty, Remedy and Liability.
- Page 37 The Web UI of the V-Portal is very simple to use. When you first log in to the Web UI you are at the Home page. The Home page has a lot of valuable information. View the Terms of Service by visiting the Vonage website at www.vonage.com/tos. Pay particular attention to Section 11 which explains limitations on Warranty, Remedy and Liability.
- Page 38 You can click on the Refresh button to update the status on demand. To get more detailed status information, click on the Status button. This will take you to the View the Terms of Service by visiting the Vonage website at www.vonage.com/tos. Pay particular attention to Section 11 which explains limitations on Warranty, Remedy and Liability.
- Page 39 Status Page. For more information on these icons and their meanings, see the LCD help. View the Terms of Service by visiting the Vonage website at www.vonage.com/tos. Pay particular attention to Section 11 which explains limitations on Warranty, Remedy and Liability.
- Page 40 This provides information on the hardware and software versions of your device. If you encounter a problem with your device and need to call Vonage customer support, they may need to know this information. If you’d like more detailed information, click on the See full device status >...
- Page 41 For your reference, here’s an overview of the menus and the functions available from each: View the Terms of Service by visiting the Vonage website at www.vonage.com/tos. Pay particular attention to Section 11 which explains limitations on Warranty, Remedy and Liability.
- Page 42 Vonage V-Portal User Guide Basic Setup View the Terms of Service by visiting the Vonage website at www.vonage.com/tos. Pay particular attention to Section 11 which explains limitations on Warranty, Remedy and Liability.
- Page 43 Internet connections) that uses DHCP on the Ethernet (LAN) port. (This includes a DSL modem with a built in router.) An example of this is illustrated below. View the Terms of Service by visiting the Vonage website at www.vonage.com/tos. Pay particular attention to Section 11 which explains limitations on Warranty, Remedy and Liability.
- Page 44 ISP or Vonage Customer Care has asked you to change it. • Click the A pply button View the Terms of Service by visiting the Vonage website at www.vonage.com/tos. Pay particular attention to Section 11 which explains limitations on Warranty, Remedy and Liability.
- Page 45 Connect to the Internet sub-menu. Select Static IP Address from the Connect Using drop down list. The following screen will be displayed: View the Terms of Service by visiting the Vonage website at www.vonage.com/tos. Pay particular attention to Section 11 which explains limitations on Warranty, Remedy and Liability.
- Page 46 V-Portal. We recommend using the default value unle s your ISP or Vonage ustomer Care has asked you to change it. Please check with your ISP for the MTU setting used on their network.
- Page 47 ISP or Vonage Customer Care has asked you to change it. • Click the Apply button. View the Terms of Service by visiting the Vonage website at www.vonage.com/tos. Pay particular attention to Section 11 which explains limitations on Warranty, Remedy and Liability.
- Page 48 V-Portal. We recommend using the default value unless your ISP or Vonage Customer Care has asked you to change it. Please check with your ISP for the MTU setting used on their network.
- Page 49 To configure your V-Portal to work as a DHCP server: • Select the Yes radio button associated with the DHCP Server field. View the Terms of Service by visiting the Vonage website at www.vonage.com/tos. Pay particular attention to Section 11 which explains limitations on Warranty, Remedy and Liability.
- Page 50 The user name is always router and the default password is router. View the Terms of Service by visiting the Vonage website at www.vonage.com/tos. Pay particular attention to Section 11 which explains limitations on Warranty, Remedy and Liability.
- Page 51 Examples of settings that are lost are ISP user name, ISP password, and IP View the Terms of Service by visiting the Vonage website at www.vonage.com/tos. Pay particular attention to Section 11 which explains limitations on Warranty, Remedy and Liability.
- Page 52 Log in to the Web UI. From the home page click on the Basic Setup tab and then choose the Save & Import Configuration sub-menu. The following screen will be displayed: View the Terms of Service by visiting the Vonage website at www.vonage.com/tos. Pay particular attention to Section 11 which explains limitations on Warranty, Remedy and Liability.
- Page 53 Click on the Restore button. • A message will appear indicating the import was successful. View the Terms of Service by visiting the Vonage website at www.vonage.com/tos. Pay particular attention to Section 11 which explains limitations on Warranty, Remedy and Liability.
- Page 54 ‘forwarded’ to a different port and/or machine. Network clients do not know that port forwarding is being done. It is all done transparently. View the Terms of Service by visiting the Vonage website at www.vonage.com/tos. Pay particular attention to Section 11 which explains limitations on Warranty, Remedy and Liability.
- Page 55 Port Setting screen will be displayed. The Port Forwarding section is at the top of that screen: View the Terms of Service by visiting the Vonage website at www.vonage.com/tos. Pay particular attention to Section 11 which explains limitations on Warranty, Remedy and Liability.
- Page 56 Refer to your software application documentation for more information on specific port settings. Setting up Port Triggering View the Terms of Service by visiting the Vonage website at www.vonage.com/tos. Pay particular attention to Section 11 which explains limitations on Warranty, Remedy and Liability.
- Page 57 If you need to specify more than 5 port triggering rules, click on the Show more rows> link. View the Terms of Service by visiting the Vonage website at www.vonage.com/tos. Pay particular attention to Section 11 which explains limitations on Warranty, Remedy and Liability.
- Page 58 ‘MAC Cloning’ or ’MAC Spoofing’. This will essentially copy the MAC address you registered with the ISP onto the Vonage device, so you can avoid a call to your ISP to change the registered MAC address to the Vonage V-Portal's MAC address.
- Page 59 From the home page, click on the Advanced Setup tab. Click on the Ethernet Options sub- menu. The Ethernet Options screen will be displayed. View the Terms of Service by visiting the Vonage website at www.vonage.com/tos. Pay particular attention to Section 11 which explains limitations on Warranty, Remedy and Liability.
- Page 60 Internet. Web Content Filtering blocks specific types of data from passing through the V-Portal to your network. IP Filtering View the Terms of Service by visiting the Vonage website at www.vonage.com/tos. Pay particular attention to Section 11 which explains limitations on Warranty, Remedy and Liability.
- Page 61 IP address of the device you want to restore access for • Click the Apply button. MAC Filtering View the Terms of Service by visiting the Vonage website at www.vonage.com/tos. Pay particular attention to Section 11 which explains limitations on Warranty, Remedy and Liability.
- Page 62 From the home page, click on the Advanced Setup tab. Click on the Filtering sub-menu. Scroll down to the Port Filtering section: View the Terms of Service by visiting the Vonage website at www.vonage.com/tos. Pay particular attention to Section 11 which explains limitations on Warranty, Remedy and Liability.
- Page 63 Internet sites. They are secondary windows that appear (“pop up”) in your web browser and are often used in online advertising. View the Terms of Service by visiting the Vonage website at www.vonage.com/tos. Pay particular attention to Section 11 which explains limitations on Warranty, Remedy and Liability.
- Page 64 From the home page, click on the Advanced Setup tab. Click on the Filtering sub-menu. The Web Content Filter section is at the bottom of that screen: View the Terms of Service by visiting the Vonage website at www.vonage.com/tos. Pay particular attention to Section 11 which explains limitations on Warranty, Remedy and Liability.
- Page 65 MAC Address), parental controls restrict access based on website. You can block access to View the Terms of Service by visiting the Vonage website at www.vonage.com/tos. Pay particular attention to Section 11 which explains limitations on Warranty, Remedy and Liability.
- Page 66 Controls. If it is not already active, click on the User Setup tab. View the Terms of Service by visiting the Vonage website at www.vonage.com/tos. Pay particular attention to Section 11 which explains limitations on Warranty, Remedy and Liability.
- Page 67 To confirm the password you have chosen, re-enter the password in the Re-Enter Password field. View the Terms of Service by visiting the Vonage website at www.vonage.com/tos. Pay particular attention to Section 11 which explains limitations on Warranty, Remedy and Liability.
- Page 68 To define the content olicy for the us • Click on the Parental Controls Tab. View the Terms of Service by visiting the Vonage website at www.vonage.com/tos. Pay particular attention to Section 11 which explains limitations on Warranty, Remedy and Liability.
- Page 69 To setup an Override Password: View the Terms of Service by visiting the Vonage website at www.vonage.com/tos. Pay particular attention to Section 11 which explains limitations on Warranty, Remedy and Liability.
- Page 70 Using the User Settings drop down list, select the user you want to disable parental controls for. • Click on the Remove User button. View the Terms of Service by visiting the Vonage website at www.vonage.com/tos. Pay particular attention to Section 11 which explains limitations on Warranty, Remedy and Liability.
- Page 71 Content Policy with the same name of the user you added. View the Terms of Service by visiting the Vonage website at www.vonage.com/tos. Pay particular attention to Section 11 which explains limitations on Warranty, Remedy and Liability.
- Page 72 Trusted User checkbox indicating this user will have unrestricted access to the Internet. View the Terms of Service by visiting the Vonage website at www.vonage.com/tos. Pay particular attention to Section 11 which explains limitations on Warranty, Remedy and Liability.
- Page 73 When Child 1 logs on to the computer and opens an Internet browser, the following screen will be displayed: View the Terms of Service by visiting the Vonage website at www.vonage.com/tos. Pay particular attention to Section 11 which explains limitations on Warranty, Remedy and Liability.
- Page 74 “Child 1” and the password we created “vonage”. Click on the Login button. The following screen will be displayed: View the Terms of Service by visiting the Vonage website at www.vonage.com/tos. Pay particular attention to Section 11 which explains limitations on Warranty, Remedy and Liability.
- Page 75 This screen is followed by the following screen: View the Terms of Service by visiting the Vonage website at www.vonage.com/tos. Pay particular attention to Section 11 which explains limitations on Warranty, Remedy and Liability.
- Page 76 VPN device (or software) on your LAN may communicate properly with the Internet. View the Terms of Service by visiting the Vonage website at www.vonage.com/tos. Pay particular attention to Section 11 which explains limitations on Warranty, Remedy and Liability.
- Page 77 To enable a Network Option, click the Enable box next to the appropriate option. View the Terms of Service by visiting the Vonage website at www.vonage.com/tos. Pay particular attention to Section 11 which explains limitations on Warranty, Remedy and Liability.
- Page 78 You can specify which items of interest are monitored. You can choose to monitor for: View the Terms of Service by visiting the Vonage website at www.vonage.com/tos. Pay particular attention to Section 11 which explains limitations on Warranty, Remedy and Liability.
- Page 79 To specify which Fi rewall events you’d like to monitor and record in the Local Log: View the Terms of Service by visiting the Vonage website at www.vonage.com/tos. Pay particular attention to Section 11 which explains limitations on Warranty, Remedy and Liability.
- Page 80 From the home page click on the Advanced Setup tab. Click on the Factory Defaults sub- menu. The Factory Reset page is displayed: View the Terms of Service by visiting the Vonage website at www.vonage.com/tos. Pay particular attention to Section 11 which explains limitations on Warranty, Remedy and Liability.
- Page 81 Advanced Setup tab. Click on the QoS sub-menu. The QoS page is displayed. View the Terms of Service by visiting the Vonage website at www.vonage.com/tos. Pay particular attention to Section 11 which explains limitations on Warranty, Remedy and Liability.
- Page 82 VPN to high and click the Apply button. IMPORTANT NOTE: These priorities are always secondary to voice traffic. View the Terms of Service by visiting the Vonage website at www.vonage.com/tos. Pay particular attention to Section 11 which explains limitations on Warranty, Remedy and Liability.
- Page 83 Vonage recommends that the Upstream Bandwidth setting remain in Auto mode. View the Terms of Service by visiting the Vonage website at www.vonage.com/tos. Pay particular attention to Section 11 which explains limitations on Warranty, Remedy and Liability.
- Page 84 Rules List By default, there are no priority rules defined. To define a priority rule: View the Terms of Service by visiting the Vonage website at www.vonage.com/tos. Pay particular attention to Section 11 which explains limitations on Warranty, Remedy and Liability.
- Page 85 Source Port Range. View the Terms of Service by visiting the Vonage website at www.vonage.com/tos. Pay particular attention to Section 11 which explains limitations on Warranty, Remedy and Liability.
- Page 86 1. Highlight the rule you want to edit in the Priority Rules List. 2. Click the Edit button. The Edit Priority Rule screen will be displayed. View the Terms of Service by visiting the Vonage website at www.vonage.com/tos. Pay particular attention to Section 11 which explains limitations on Warranty, Remedy and Liability.
- Page 87 Vonage Acc ount and the Online User Manual for the V -Portal. View the Terms of Service by visiting the Vonage website at www.vonage.com/tos. Pay particular attention to Section 11 which explains limitations on Warranty, Remedy and Liability.
- Page 88 Ethernet (LAN) port of the V-Portal. Possible values are Connected and Not Connected. Current Time: Displays the current time. View the Terms of Service by visiting the Vonage website at www.vonage.com/tos. Pay particular attention to Section 11 which explains limitations on Warranty, Remedy and Liability.
- Page 89 DHCP server or there is no device plugged into the Ethernet (LAN) port then details on the DHCP clients will not be displayed. View the Terms of Service by visiting the Vonage website at www.vonage.com/tos. Pay particular attention to Section 11 which explains limitations on Warranty, Remedy and Liability.
- Page 90 The Diagnostics Page will be displayed: The Diagnostics page provides access to four utilities: • Ping • View the Terms of Service by visiting the Vonage website at www.vonage.com/tos. Pay particular attention to Section 11 which explains limitations on Warranty, Remedy and Liability.
- Page 91 GR-909 Test Most users w ill not need to use these utilities unless asked to do so by a member of the Vonage Customer Support team. The results of these tests should be interpreted by users who have sufficient networking knowledge or a member of the Vonage Customer Support team.
- Page 92 Abort Test button. You can clear the results box by clicking on the Clear Test utton. View the Terms of Service by visiting the Vonage website at www.vonage.com/tos. Pay particular attention to Section 11 which explains limitations on Warranty, Remedy and Liability.
- Page 93 Resolve Host drop-down field. If you do not want to resolve the address select Off. • Click on the Start Test button. View the Terms of Service by visiting the Vonage website at www.vonage.com/tos. Pay particular attention to Section 11 which explains limitations on Warranty, Remedy and Liability.
- Page 94 The results provide the agent with vital information that can help analyze the problem. The final tool in the V-Support suite is the Send Stats option. If you’re having trouble a Vonage Customer Service agent may ask you to send call statistics to Vonage. When this option is selected, pertinent diagnostic test results and statistics on recent calls are automatically sent to Vonage for analysis.
- Page 95 V-Portal. For example, if the phone port of the V-Portal was connected to a live PSTN line, is would be detected with this test. View the Terms of Service by visiting the Vonage website at www.vonage.com/tos. Pay particular attention to Section 11 which explains limitations on Warranty, Remedy and Liability.
- Page 96 Select GR-909 Test from the Utility field drop down list. The follo wing reen will be displayed: View the Terms of Service by visiting the Vonage website at www.vonage.com/tos. Pay particular attention to Section 11 which explains limitations on Warranty, Remedy and Liability.
- Page 97 Log in to the Web UI. From the home page click on the Status button and then choose the Diagnostics sub-menu. Scroll to the bottom of the Diagnostics page. View the Terms of Service by visiting the Vonage website at www.vonage.com/tos. Pay particular attention to Section 11 which explains limitations on Warranty, Remedy and Liability.
- Page 98 Vonage network and gets the current information, it will show the proper date and time. View the Terms of Service by visiting the Vonage website at www.vonage.com/tos. Pay particular attention to Section 11 which explains limitations on Warranty, Remedy and Liability.
- Page 99 Web UI of the V-Portal. If you are uncertain, contact your ISP to determine which type of Internet connection you have. View the Terms of Service by visiting the Vonage website at www.vonage.com/tos. Pay particular attention to Section 11 which explains limitations on Warranty, Remedy and Liability.
- Page 100 Parental Controls, followed by a login page. View the Terms of Service by visiting the Vonage website at www.vonage.com/tos. Pay particular attention to Section 11 which explains limitations on Warranty, Remedy and Liability.
- Page 101 Certainly. Plug your FAX machine into an active green phone port on the back of your V-Portal. Use Phone Port 1 if you signed up for one line of Vonage service and either Phone Port 1 or Phone Port 2 if you signed up for two lines of Vonage service.
- Page 102 LAN. Enter V-Configure.com into the address bar of a web browser and navigate to the View the Terms of Service by visiting the Vonage website at www.vonage.com/tos. Pay particular attention to Section 11 which explains limitations on Warranty, Remedy and Liability.
- Page 103 What can I do if I have questions or problems not covered here? Contact Vonage at 1-VONAGE-HELP (1-866-243-4357). View the Terms of Service by visiting the Vonage website at www.vonage.com/tos. Pay particular attention to Section 11 which explains limitations on Warranty, Remedy and Liability.
- Page 104 Easy Dialing Status System Settings Help The functionality of each category is depicted below. View the Terms of Service by visiting the Vonage website at www.vonage.com/tos. Pay particular attention to Section 11 which explains limitations on Warranty, Remedy and Liability.
- Page 105 It will only be displayed if you’ve activated two phone lines on your V-Portal. View the Terms of Service by visiting the Vonage website at www.vonage.com/tos. Pay particular attention to Section 11 which explains limitations on Warranty, Remedy and Liability.
- Page 106 Vonage V-Portal User Guide View the Terms of Service by visiting the Vonage website at www.vonage.com/tos. Pay particular attention to Section 11 which explains limitations on Warranty, Remedy and Liability.
- Page 107 Test Phone Ports Run Test? Please wait Test passed Diagnostics data Send Stats sent okay View the Terms of Service by visiting the Vonage website at www.vonage.com/tos. Pay particular attention to Section 11 which explains limitations on Warranty, Remedy and Liability.
- Page 108 Use / key Contrast -------- -------- Use / key Volume -------- -------- Restore Defaults Reset? View the Terms of Service by visiting the Vonage website at www.vonage.com/tos. Pay particular attention to Section 11 which explains limitations on Warranty, Remedy and Liability.
- Page 109 Internet. View the Terms of Service by visiting the Vonage website at www.vonage.com/tos. Pay particular attention to Section 11 which explains limitations on Warranty, Remedy and Liability.
- Page 110 When used in this context, Java Applets are used to provide interactive features that cannot be provided by HTML. The Keep Alive is a timer that the Vonage device uses to interact with your ISP to Keep Alive keep the Internet connection alive.
- Page 111 Simple Mail Transfer Protocol. SMTP is a protocol used for sending and receiving SMTP View the Terms of Service by visiting the Vonage website at www.vonage.com/tos. Pay particular attention to Section 11 which explains limitations on Warranty, Remedy and Liability.
- Page 112 Wide Area Network. A WAN is a network that covers a relatively broad geographic area. View the Terms of Service by visiting the Vonage website at www.vonage.com/tos. Pay particular attention to Section 11 which explains limitations on Warranty, Remedy and Liability.