D-Link DES-3226 User Manual
Layer 2 switch release 4.01
Hide thumbs
Also See for DES-3226:
- User manual (179 pages) ,
- Release note (4 pages) ,
- Reference manual (1 page)

Related Manuals for D-Link DES-3226


Summary of Contents for D-Link DES-3226
-
Page 1: Layer 2 Switch
DES-3226S Layer 2 Switch Release 4.01 User’s Guide (October 2004) 651E3226S055 Printed In Taiwan RECYCLABLE... -
Page 2: Table Of Contents
Table of Contents Introduction ....................................1 Features ......................................1 Ports......................................1 Performance ...................................1 Management ...................................2 Switch Stacking..................................2 Unpacking and Setup ..................................3 Installation....................................3 Desktop or Shelf Installation ..............................3 Rack Installation..................................4 Power on....................................5 Power Failure ..................................5 Identifying External Components..............................6 Front Panel ....................................6 Rear Panel ....................................6 Side Panels .....................................7 Optional Plug-in Modules ................................8 LED Indicators ..................................16... - Page 3 Factory Reset..............................43 Restart System..............................44 Basic Setup..............................44 Stacking Information..........................48 Configure Ports ............................51 Port Security.............................53 Traffic Segmentation...........................55 SNTP and Time Settings ..........................57 Network Management ...........................60 SNMP Settings ..............................60 Switch Utilities............................66 TFTP Utilities..............................66 Advanced Setup..............................69 Configuring VLANs..........
-
Page 4: Introduction
DES-3226S Layer 2 Fast Ethernet Switch User’s Guide Introduction This section describes the functionality features of the DES-3226S. Some background information about Ethernet/Fast Ethernet, Gigabit Ethernet, and Switching technology is presented. Features The DES-3226S Switch was designed for easy installation and high performance in an environment where traffic on the network and the number of users increase continuously. -
Page 5: Management
Management for the entire stack is done through the Master Switch. You may add Switches later as needed. The Switch can also be grouped in a stack as a slave with the D-Link DGS-3212SR or DGS-3312SR Switch (acting as the Master). -
Page 6: Unpacking And Setup
4. One AC power cord 5. This User’s Guide with Registration Card If any item is found missing or damaged, please contact your local D-Link reseller for replacement. Installation Use the following guidelines when choosing a place to install the Switch: •... -
Page 7: Rack Installation
DES-3226S Layer 2 Fast Ethernet Switch User’s Guide Rack Installation The DES-3226S can be mounted in an EIA standard-sized, 19-inch rack, which can be placed in a wiring closet with other equipment. To install, attach the mounting brackets on the Switch’s side panels (one on each side) and secure them with the screws provided. -
Page 8: Power On
DES-3226S Layer 2 Fast Ethernet Switch User’s Guide Power on The DES-3226S Switch can be used with AC power supply 100-240 VAC, 50 - 60 Hz. The power Switch is located at the rear of the unit adjacent to the AC power connector and the system fan. The Switch’s power supply will adjust to the local power source automatically and may be turned on without having any or all LAN segment cables connected. -
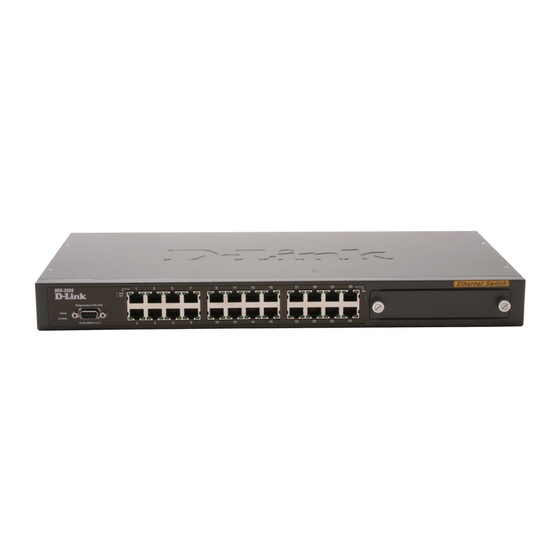
Page 9: Identifying External Components
DES-3226S Layer 2 Fast Ethernet Switch User’s Guide Identifying External Components This chapter describes the front panel, rear panel, optional plug-in modules, and LED indicators of the DES-3226S. Front Panel The front panel of the Switch consists of LED indicators, an RS-232 communication port, a slide-in module slot, and 24 (10/100 Mbps) Ethernet/Fast Ethernet ports. -
Page 10: Side Panels
DES-3226S Layer 2 Fast Ethernet Switch User’s Guide Side Panels The right side panel of the Switch contains two system fans (see the top part of the diagram below). The left side panel contains heat vents. Figure 3 - 3. Side panel views of the Switch The system fans are used to dissipate heat. -
Page 11: Optional Plug-In Modules
DES-3226S Layer 2 Fast Ethernet Switch User’s Guide Optional Plug-in Modules The DES-3226S 24-port Fast Ethernet Switch is able to accommodate a range of optional plug-in modules in order to increase functionality and performance. These modules must be purchased separately. DES-132 2-port 100BASE-TX Module Figure 3 - 4. -
Page 12: Port Functions
DES-3226S Layer 2 Fast Ethernet Switch User’s Guide DES-131F/132F 1/2-port 100BASE-FX Module Figure 3 - 5. 100BASE-FX two-port module Port Functions • Fully compliant with IEEE802.3u 100BASE-FX • Supports auto-negotiation in the following operation: 100M / Full-duplex / Flow control •... - Page 13 DES-3226S Layer 2 Fast Ethernet Switch User’s Guide DES-131FL/132FL 1/2-port 100BASE-FX Module Figure 3 - 6. 100BASE-FX module Port Functions • Fully compliant with IEEE802.3u 100BASE-FX • Supports auto-negotiation in the following operation: 100M / Full-duplex / Flow control • IEEE 802.3x compliant Flow Control support for full-duplex Connector: SC type Distance: 15km...
- Page 14 DES-3226S Layer 2 Fast Ethernet Switch User’s Guide DES-132T 2-port 1000BASE-T Module Figure 3 - 7. 1000BASE-T two-port module Port Functions • 2 1000BASE-T Gigabit Ethernet ports • Fully compliant with IEEE802.3 10BASE-T, IEEE802.3u 100BASE-TX, and IEEE802.3ab 1000BASE-T • Supports auto-negotiation in the following operation: 10/100/1000M / Full-duplex / Flow control •...
- Page 15 DES-3226S Layer 2 Fast Ethernet Switch User’s Guide DES-132G 2-port 1000BASE-SX Gigabit Ethernet Module Figure 3 - 8. 1000BASE-SX two-port module Port Functions • 2 1000BASE-SX Gigabit Ethernet ports • IEEE 802.3z 1000BASE-SX compliance • Supports Full-duplex operations • IEEE 802.3x compliant Flow Control support for full-duplex Connector: SC Type Distance: 550m DEM-320S 2-port 1000BASE-SX Gigabit Ethernet Module...
- Page 16 DES-3226S Layer 2 Fast Ethernet Switch User’s Guide DES-132GL 2-port 1000BASE-LX Gigabit Ethernet Module Figure 3 - 9. 1000BASE-LX two-port module Port Functions • 2 1000BASE-LX Gigabit Ethernet ports • IEEE 802.3z 1000BASE-LX compliance • Supports Full-duplex operations • IEEE 802.3x compliant Flow Control support for full-duplex •...
- Page 17 DES-3226S Layer 2 Fast Ethernet Switch User’s Guide DES-132GB 2-port GBIC-based Gigabit Ethernet Module Figure 3 - 10. GBIC two-port module Port Functions • 2 GBIC-based Gigabit Ethernet ports • Allows multi-mode fiber optic connections of up to 550 m (SX and LX) and single-mode fiber optic connections of up to 5 km (LX only).
- Page 18 DES-3226S Layer 2 Fast Ethernet Switch User’s Guide DES-332GS 1-port GBIC-Based Gigabit Ethernet Switch and stacking Module Figure 3 - 11. Stacking Module with one GBIC port Port Functions • 1 GBIC-Based Gigabit Ethernet port • Allows multi-mode fiber optic connections of up to 550 m (SX and LX) and single-mode fiber optic connections of up to 5 km (LX only).
-
Page 19: Led Indicators
DES-3226S Layer 2 Fast Ethernet Switch User’s Guide LED Indicators The LED indicators of the Switch include Power, Console, and Link/Act. The following shows the LED indicators for the Switch along with an explanation of each indicator. Figure 3 - 12. The LED Indicators •... -
Page 20: Connecting The Switch
DES-3226S Layer 2 Fast Ethernet Switch User’s Guide Connecting the Switch This chapter describes how to connect the DES-3226S to your Fast Ethernet network. Switch to End Node End nodes include PCs outfitted with a 10, 100 or 10/100 Mbps RJ-45 Ethernet/Fast Ethernet Network Interface Card (NIC) and most routers. -
Page 21: Switch Stack Connections
DES-3226S Layer 2 Fast Ethernet Switch User’s Guide Switch Stack Connections Up to eight DES-3226S Switches (with optional stacking modules installed) can be stacked into a Switch stack that can then be configured and managed as a single unit. The management agent of the master Switch can configure and manage all of the Switches in a Switch stack −... -
Page 22: Management Concepts
DES-3226S Layer 2 Fast Ethernet Switch User’s Guide Management Concepts This chapter discusses many of the concepts and features used to manage the Switch, as well as the concepts necessary for the user to understand the functioning of the Switch. Further, this chapter explains many important points regarding these features. Configuring the Switch to implement these concepts and make use of its many features is discussed in detail in the next chapters. -
Page 23: Stacking Vs. Standalone Operation (Release 4.01)
DES-3226S Layer 2 Fast Ethernet Switch User’s Guide Stacking vs. Standalone Operation (Release 4.01) By default, the Switch configuration settings allow it to operate as a standalone device, or in a stacked group. It is not necessary to change any settings for the Switch to function in either capacity. However, it is useful to understand how the stacking mode operates in the Switch and the effects if any this may have on configuration settings in a Switch when its stacking status is changed. -
Page 24: Managing Switch Stacks
DES-3226S Layer 2 Fast Ethernet Switch User’s Guide For DES-3226S Switch stacks, changes made to the composition of a Switch stack group, that is, adding new Switches or taking Switches out of the stack, require all Switches to restart. The new stacking order is negotiated to reflect the changes made to the group. -
Page 25: Convert A Standalone Switch To A Stacked Switch
DES-3226S Layer 2 Fast Ethernet Switch User’s Guide NOTE: For a Switch that has already been configured with many settings already in place, it is a good idea to save the configuration files to a server before changing the stacking mode status. Configuration files can be saved using the CLI, SNMP manager or web manager interface. -
Page 26: Swap A Master From A Stack
DES-3226S Layer 2 Fast Ethernet Switch User’s Guide Switch C is added to the existing stack where Switch A is the designated master. Power off all devices and securely place Switch C in the slot beneath Switch B. Adjust stacking cable connections so the OUT port on Switch B connects the IN port on Switch C and the OUT port of Switch C connects to the IN port of Switch A. -
Page 27: Stacking With Dgs-3212Sr Or Dgs-3312Sr
DES-3226S Layer 2 Fast Ethernet Switch User’s Guide Stacking with DGS-3212SR or DGS-3312SR The DES-3226S Release 4.01 Switch can be arranged in a star topology and managed as slave devices through either the DGS- 3212SR or DGS-3312SR Master Switch. Up to eight Switches can be connected to the DGS-3x12SR series Switch in this arrangement. -
Page 28: Switch Ip Address
DES-3226S Layer 2 Fast Ethernet Switch User’s Guide Switch IP Address Each Switch must be assigned its own IP Address, which is used for communication with an SNMP network manager or other TCP/IP application (for example BOOTP, TFTP). The Switch’s default IP address is 10.90.90.90. You can change the default Switch IP Address to meet the specification of your networking address scheme. -
Page 29: Snmp Network Management
DES-3226S Layer 2 Fast Ethernet Switch User’s Guide SNMP Network Management The Simple Network Management Protocol (SNMP) is an OSI layer 7 (the application layer) protocol for remotely monitoring and configuring network devices. SNMP enables network management stations to read and modify the settings of gateways, routers, Switches, and other network devices. -
Page 30: Forwarding And Filtering
DES-3226S Layer 2 Fast Ethernet Switch User’s Guide • Topology Change A Topology Change trap is sent by the Switch when any of its configured ports transitions from the Learning state to the Forwarding state, or from the Forwarding state to the Blocking state. The trap is not sent if a new root trap is sent for the same transition. -
Page 31: 802.1W Rapid Spanning Tree
DES-3226S Layer 2 Fast Ethernet Switch User’s Guide Additional criteria are applied to the forwarding decision. Depending on what header information is being examined, forwarding is permitted or denied based on the packet’s source or destination, its protocol classification, DiffServ code, 802.1p level or VLAN. -
Page 32: Link Aggregation
DES-3226S Layer 2 Fast Ethernet Switch User’s Guide The edge port is a configurable designation used for a port that is directly connected to a segment where a loop cannot be created. An example would be a port connected directly to a single workstation. Ports that are designated as edge ports, transition to a forwarding state immediately without going through the listening and learning states. -
Page 33: Vlans
VLANs without a network device performing a routing function between the VLANs. 2. The DES-3226 supports only IEEE 802.1Q VLANs. The port untagging function can be used to remove the 802.1Q tag from packet headers to maintain compatibility with devices that are tag unaware. -
Page 34: Q Vlan Tags
DES-3226S Layer 2 Fast Ethernet Switch User’s Guide Figure 5 - 4. IEEE 802.1Q Packet Forwarding 802.1Q VLAN Tags The figure below shows the 802.1Q VLAN tag. There are four additional octets inserted after the source MAC address. Their presence is indicated by a value of 0x8100 in the EtherType field. When a packet’s EtherType field is equal to 0x8100, the packet carries the IEEE 802.1Q/802.1p tag. -
Page 35: Port Vlan Id
DES-3226S Layer 2 Fast Ethernet Switch User’s Guide Figure 5 - 6. Adding an IEEE 802.1Q Tag Port VLAN ID Packets that are tagged (are carrying the 802.1Q VID information) can be transmitted from one 802.1Q compliant network device to another with the VLAN information intact. This allows 802.1Q VLANs to span network devices (and indeed, the entire network –... -
Page 36: Ingress Filtering
DES-3226S Layer 2 Fast Ethernet Switch User’s Guide Ingress Filtering A port on a Switch where packets are flowing into the Switch and VLAN decisions must be made is referred to as an ingress port. If ingress filtering is enabled for a port, the Switch will examine the VLAN information in the packet header (if present) and decide whether or not to forward the packet. -
Page 37: Multicasting
DES-3226S Layer 2 Fast Ethernet Switch User’s Guide Multicasting Multicasting is a group of protocols and tools that enable a single source point to send packets to groups of multiple destination points with persistent connections that last for some amount of time. The main advantage to multicasting is a decrease in the network load compared to broadcasting. -
Page 38: Igmp Versions 1 And 2
DES-3226S Layer 2 Fast Ethernet Switch User’s Guide Some of the reserved IP multicast addresses are as follows: Address Assignment 224.0.0.0 Base Address (reserved) 224.0.0.1 All Systems on this subnet 224.0.0.2 All Routers on this subnet 224.0.0.3 Unassigned 224.0.0.4 DVMRP Routers 224.0.0.5 OSPF IGP Routers 224.0.0.6... - Page 39 DES-3226S Layer 2 Fast Ethernet Switch User’s Guide The IGMP Type codes are shown below: Type Meaning 0x11 Membership Query (if Group Address is 0.0.0.0) 0x11 Specific Group Membership Query (if Group Address is Present) 0x16 Membership Report (version 2) 0x17 Leave a Group (version 2) 0x12...
-
Page 40: Web-Based Switch Management
DES-3226S Layer 2 Fast Ethernet Switch User’s Guide Web-Based Switch Management Introduction The DES-3226S offers an embedded Web-based (HTML) interface allowing users to manage the Switch from anywhere on the network through a standard browser such as Netscape Navigator/Communicator or Microsoft Internet Explorer. The Web browser acts as a universal access tool and can communicate directly with the Switch using the HTTP protocol. -
Page 41: Configuring The Switch
DES-3226S Layer 2 Fast Ethernet Switch User’s Guide Configuring the Switch To begin managing your Switch simply run the browser you have installed on your computer and point it to the IP address you have defined for the device. The URL in the address bar should read something like: http://123.123.123.123, where the numbers 123 represent the IP address of the Switch. -
Page 42: Web-Based Manager's User Interface
DES-3226S Layer 2 Fast Ethernet Switch User’s Guide Web-based Manager’s User Interface The user interface provides access to various Switch configuration and management screens, allows you to view performance statistics, and permits you to graphically monitor the system status. Areas of the User Interface The figure below shows the user interface. - Page 43 DES-3226S Layer 2 Fast Ethernet Switch User’s Guide Area Function Presents a graphical near real-time image of the front panel of the Switch. This area displays the Switch’s ports and expansion modules, showing port activity, duplex mode, or flow control, depending on the specified mode. Various areas of the graphic can be selected for performing management functions, including the ports, expansion modules, management module, or the case.
-
Page 44: User Accounts Management
DES-3226S Layer 2 Fast Ethernet Switch User’s Guide User Accounts Management From the Main Menu, highlight Setup User Accounts and press Enter, then the User Account Management menu appears. Figure 6 - 2. User Accounts Control Table Click New to add a user. Figure 6 - 3. -
Page 45: Saving Changes
DES-3226S Layer 2 Fast Ethernet Switch User’s Guide Admin and User Privileges There are two levels of user privileges: Admin and User. Some menu selections available to users with Admin privileges may not be available to those with User privileges. The following table summarizes the Admin and User privileges: Switch Configuration Privilege... -
Page 46: Factory Reset
DES-3226S Layer 2 Fast Ethernet Switch User’s Guide Click the Save Configuration button to save the current Switch configuration in NV-RAM. The following dialog box will confirm that the configuration has been saved: Figure 6 - 5. Save Configuration Confirmation Click the OK button to continue. -
Page 47: Restart System
DES-3226S Layer 2 Fast Ethernet Switch User’s Guide Restart System Use the menu below to restart the Switch. Click to check the Yes option if you want to save the current configuration to non-volatile RAM before restarting the Switch. Click the No option if you do not want to save the current configuration before restarting the Switch. In this case, all of the configuration information entered from the last time Save Changes was performed will be lost. -
Page 48: Switch Information
DES-3226S Layer 2 Fast Ethernet Switch User’s Guide Switch Information Click the Switch Information link in the Basic Setup folder to display basic information. Switch Information Click the Switch Information link in the Basic Setup folder to display basic information. The Switch Information window shows which (if any) external modules are installed, and the Switch’s MAC Address (assigned by the factory and unchangeable). - Page 49 DES-3226S Layer 2 Fast Ethernet Switch User’s Guide To use the BOOTP or DHCP protocols to assign the Switch an IP address, subnet mask, and default gateway address: Use the Get IP From: <Manual> pull-down menu to choose from Manual, BOOTP, or DHCP. This selects how the Switch will be assigned an IP address on the next reboot.
- Page 50 DES-3226S Layer 2 Fast Ethernet Switch User’s Guide The New Switch IP Settings options include: Parameter Description BOOTP The Switch will send out a BOOTP broadcast request when it is powered up. The BOOTP protocol allows IP addresses, network masks, and default gateways to be assigned by a central BOOTP server.
-
Page 51: Stacking Information
DES-3226S Layer 2 Fast Ethernet Switch User’s Guide Stacking Information When DES-3226S Switches are properly interconnected in a stacked group, information about the stack is displayed in the Stack Information menu. This link is visible only when a Switch stack has been connected and the optional stacking modules are active. - Page 52 DES-3226S Layer 2 Fast Ethernet Switch User’s Guide The stacking order can be automatically configured using the Switch’s MAC address − the lower the numerical value of a given Switch’s MAC address, the lower the number in the stacking order the Switch will be assigned. The Switch with the lowest MAC address, will then become the Master Switch.
- Page 53 DES-3226S Layer 2 Fast Ethernet Switch User’s Guide Now move the management station’s console connection (via the serial port) to the Switch with MAC address 00-11-33-44-55- 60, and enter the following command: config stacking mode master This will configure the Switch with MAC address 00-11-33-44-55-60 to always have a Unit number of 1 (as the master). You can then use the show stacking command to verify the stacking configuration, as shown below: Figure 6 - 13.
-
Page 54: Configure Ports
DES-3226S Layer 2 Fast Ethernet Switch User’s Guide Configure Ports Click the Port Configurations link in the Basic Setup folder: For stacked switch installations, it will be necessary to select the Unit (switch) according to its logical position in the stack. Figure 6 - 14. - Page 55 DES-3226S Layer 2 Fast Ethernet Switch User’s Guide Click on the port you want to configure on the Port Configurations menu and then click the Edit button. This will open the following dialog box: Figure 6 - 16. Port Configurations − Edit The Unit drop-down dialog box allows you to select different Switches in a Switch stack, if you have the optional stacking module installed and the Switches in the stack are properly interconnected.
-
Page 56: Port Security
DES-3226S Layer 2 Fast Ethernet Switch User’s Guide Port Security A given port’s (or a range of port’s) dynamic MAC address learning can be locked such that the current source MAC addresses entered into the MAC address forwarding table can not be changed once the port lock is enabled. The port can be locked by using the Learn <Disabled>... - Page 57 DES-3226S Layer 2 Fast Ethernet Switch User’s Guide Select the port you want to configure and click Edit. The Port Security Edit menu appears, notice that once this menu is available you may move to any port on any Switch in the stack to configure security for that port. Figure 6 - 18.
-
Page 58: Traffic Segmentation
DES-3226S Layer 2 Fast Ethernet Switch User’s Guide Traffic Segmentation The traffic segmentation table is used to limit traffic flow from a single port to other ports on the Switch. It cannot be used to segment traffic between Switch units in a stack. For this it would be appropriate to use VLANs or a filtering method. This provides an additional tool to direct traffic flow without relying on the Master CPU. -
Page 59: Serial Port Settings
DES-3226S Layer 2 Fast Ethernet Switch User’s Guide Figure 6 - 20. Traffic Segmentation – Edit To configure Traffic Segmentation for a port, select the ports from the Port List that are allowed to receive forwarded frames from the port that is being configured. Click the Apply button to add the ports to the forward list. Serial Port Settings The Serial Port Settings window allows the configuration of the Switch’s serial port. -
Page 60: Sntp And Time Settings
DES-3226S Layer 2 Fast Ethernet Switch User’s Guide SNTP and Time Settings Use the Current Time Settings and Time Zone/DST Settings menus to configure the system time settings manual or use SNTP service. Current Time The Current Time Settings menu is used to set system time. SNTP service can be enabled and configured here or use manual settings. - Page 61 DES-3226S Layer 2 Fast Ethernet Switch User’s Guide Configure the following settings in the Current Time Settings menu: Parameter Description SNTP State Enable or Disable SNTP service SNTP Primary Server Enter the IP address of the primary server the SNTP information will be taken from.
- Page 62 DES-3226S Layer 2 Fast Ethernet Switch User’s Guide Daylight Savings Time settings can be enabled and set using either a formula for Repeating DST settings or using a definitive date, Annual DST settings. Parameter Description DST State Enable or Disable the DST seasonal time adjustment for the Switch. DST Offset (in minutes) Time Zone Offset (+/- GMT) Choose to add (+) or subtract (-) time to adjust for time zone relative to GMT.
-
Page 63: Network Management
DES-3226S Layer 2 Fast Ethernet Switch User’s Guide Network Management The DES-3226S incorporates a flexible SNMP management for the Switching environment. SNMP management can be customized o suit the needs of the networks and the preferences of the network administrator. Use the SNMP V3 menus to select the SNMP version used for specific tasks. -
Page 64: Snmp Group Table
DES-3226S Layer 2 Fast Ethernet Switch User’s Guide Parameter Description View Name Type an alphanumeric string of up to 32 characters. This is used to identify the new SNMP view being created. Subtree Type the Object Identifier (OID) Subtree for the view. The OID identifies an object tree (MIB tree) that will be included or excluded from access by an SNMP manager. -
Page 65: Snmp Community Table
DES-3226S Layer 2 Fast Ethernet Switch User’s Guide Parameter Description Group Name Type an alphanumeric string of up to 32 characters. This is used to identify the new SNMP group of SNMP users. Read View Name This name is used to specify the SNMP group created can request SNMP messages. Write View Name Specify a SNMP group name for users that are allowed SNMP write privileges to the Switch’s SNMP agent. -
Page 66: Snmp Engine Id
DES-3226S Layer 2 Fast Ethernet Switch User’s Guide Figure 6 - 29. SNMP Community Table – Add New Configure the following for the new SNMP Community entry: Parameter Description Community Name Type an alphanumeric string of up to 33 characters that is used to identify members of an SNMP community. -
Page 67: Snmp Host Table
DES-3226S Layer 2 Fast Ethernet Switch User’s Guide SNMP Host Table Use the SNMP Host Table to set up trap recipients. Figure 6 - 31. SNMP Host Table To delete an existing entry, click the selection button on the far left that corresponds to the port you want to configure and click the Delete button. -
Page 68: Snmp User Table
DES-3226S Layer 2 Fast Ethernet Switch User’s Guide SNMP User Table Use the SNMP User Table to create a new SNMP user and add the user to an existing SNMP group or to a newly created group. Figure 6 - 33. SNMP User Table To delete an existing entry, click the selection button on the far left that corresponds to the port you want to configure and click the Delete button. -
Page 69: Switch Utilities
TFTP server to the Switch. A configuration file can also be loaded into the Switch from a TFTP server, Switch settings can be saved to the TFTP server, and a history log can be uploaded from the Switch to the TFTP server. NOTE: To get the latest firmware for the Switch go to the D-Link website: www.dlink.com. - Page 70 DES-3226S Layer 2 Fast Ethernet Switch User’s Guide Use Configuration File on Server To download a configuration file for the Switch’s, click on the Basic Setup folder and then the Switch Utilities folder and then the TFTP Services folder and finally click on the Download Configuration from TFTP Server link: Figure 6 - 36.
-
Page 71: Ping Test
DES-3226S Layer 2 Fast Ethernet Switch User’s Guide Save History Log to Server To download a configuration file for the Switch’s, click on the Basic Setup folder and then the Switch Utilities folder and then the TFTP Services folder and finally click on the Upload history Log to TFTP Server link: Figure 6 - 38. -
Page 72: Advanced Setup
DES-3226S Layer 2 Fast Ethernet Switch User’s Guide Advanced Setup Advanced setup menus include menus used to setup VLANs, change QoS scheduling, configure link aggregation, adjust Spanning Tree and Rapid Spanning Tree configuration, setup 802.1x parameters, assign unicast and multicast forwarding and configure port mirroring. - Page 73 DES-3226S Layer 2 Fast Ethernet Switch User’s Guide To edit an existing 802.1Q VLAN, click the corresponding click-box and then click the Edit icon to open the following dialog box: Figure 6 - 42. 802.1Q Static VLANs Entry Settings – Edit The following fields can then be set in either the Add or Edit dialog boxes: Parameter Description...
- Page 74 DES-3226S Layer 2 Fast Ethernet Switch User’s Guide Figure 6 - 43. Port VLAN ID (PVID) The following fields can be set: Parameter Description PVID A Port VLAN Identifier is a classification mechanism that associates a port with a specific VLAN and is used to make forwarding decisions for untagged packets received by the port.
-
Page 75: Asymmetric Vlans
DES-3226S Layer 2 Fast Ethernet Switch User’s Guide To enable or disable GVRP, globally, on the Switch: Go to the VLAN Configurations link and click on the Switch GVRP link: Figure 6 - 44. – Switch GVRP Parameter Description GVRP <Disabled> Group VLAN Registration Protocol (GVRP) –... -
Page 76: Configure Qos (Quality Of Service)
DES-3226S Layer 2 Fast Ethernet Switch User’s Guide Configure QoS (Quality of Service) The DES-3226S Switch supports 802.1p priority queuing. The Switch has 4 priority queues. These priority queues are numbered from 0 (Class 0) — the lowest priority queue — to 3 (Class 3) — the highest priority queue. The eight priority queues specified in IEEE 802.1p (p0 to p7) are mapped to the Switch’s priority queues as follows: •... - Page 77 DES-3226S Layer 2 Fast Ethernet Switch User’s Guide overrides the round-robin queuing and gives the priority queue that it was set for access to the transmit buffer. The default value of 0 combined with the default MAX. Packets value of 0 will enforce a strict scheduling for output queues. The maximum value for MAX.
-
Page 78: Configuring Default Priority
DES-3226S Layer 2 Fast Ethernet Switch User’s Guide Configuring Default Priority The Switch allows the assignment of a default 802.1p priority to each port on the Switch. Click on the Default Priority link: Figure 6 - 48. Priority Based on Port This window allows you to assign a default 802.1p priority to any given port on the Switch. -
Page 79: Bandwidth Control
DES-3226S Layer 2 Fast Ethernet Switch User’s Guide Bandwidth Control The bandwidth control settings are used to place a ceiling on the transmitting and receiving data bit rates for any port. To change the maximum allowed bandwidth for a given port: In the Bandwidth Control Table, click the selection button in the far left column that corresponds to the port you want to configure... -
Page 80: Port Mirroring
DES-3226S Layer 2 Fast Ethernet Switch User’s Guide Port Mirroring To configure a port for port mirroring: Click the Mirroring link and then the Target Port Selection link: Figure 6 - 51. Target Port Selection The target port is the port where information will be duplicated and sent for capture and network analysis. This is the port where a network analyzer would be attached to capture packets duplicated from the source port. -
Page 81: Forwarding And Filtering
DES-3226S Layer 2 Fast Ethernet Switch User’s Guide Forwarding and Filtering MAC Address Aging Time The MAC Address Aging Time specifies the length of time a learned MAC Address will remain in the forwarding table without being accessed (that is, how long a learned MAC Address is allowed to remain idle). The Aging Time can be set to any value between 300 and 1,000,000 seconds. - Page 82 DES-3226S Layer 2 Fast Ethernet Switch User’s Guide To add a new MAC address to the MAC Address Forwarding Table, click the New button: Figure 6 - 54. Unicast MAC Address Settings − Add To edit an existing entry in the MAC address in the MAC Address Forwarding Table, click the Edit button: Figure 6 - 55.
-
Page 83: Multicast Mac Address Forwarding
DES-3226S Layer 2 Fast Ethernet Switch User’s Guide Multicast MAC Address Forwarding Multicast MAC addresses can be statically entered into the Switch’s MAC Address Forwarding Table. These addresses will never age out. To enter a Multicast MAC address into the Switch’s forwarding table, click on the Forwarding folder and then the MAC Forwarding folder and then click on the Multicast MAC Address Settings link: Figure 6 - 56. - Page 84 DES-3226S Layer 2 Fast Ethernet Switch User’s Guide The following fields can be set: Parameter Description MAC Address:[ Allows the entry of the MAC address of an end station that will be entered into the Switch’s static forwarding table. VLAN Name Allows the entry of the VLAN name of the VLAN the MAC address below is a member of −...
-
Page 85: Multicast Port Filtering
DES-3226S Layer 2 Fast Ethernet Switch User’s Guide Multicast Port Filtering This command configures the multicast filtering and forwarding for specified ports. Click the selection button on the far left that corresponds to the port you want to configure and click the Edit button. - Page 86 DES-3226S Layer 2 Fast Ethernet Switch User’s Guide Figure 6 - 60. Edit Multicast Port Filtering To configure Multicast Port Filtering, select the ports from the Port List. Click the Apply button to add the ports to the forward list. Parameter Description Port...
- Page 87 DES-3226S Layer 2 Fast Ethernet Switch User’s Guide Broadcast/Multicast Storm Control Broadcast and Multicast storms consist of broadcast or multicast packets that flood and/or are looped on a network causing noticeable performance degradation and, in extreme cases, network failure. The DES-3226S allows some control over broadcast/multicast storms by setting thresholds on the number of broadcast/multicast packets received (in thousands of packets per second or Kpps), and then following a user-specified course of action when this threshold is exceeded.
-
Page 88: Spanning Tree
DES-3226S Layer 2 Fast Ethernet Switch User’s Guide Spanning Tree The Switch supports 802.1d Spanning Tree Protocol (STP) and 802.1w Rapid Spanning Tree Protocol (RSTP). RSTP is compatible with 802.1d STP however the advantages of rapid network convergence is lost if the Switch is connect to a segment that cannot support RSTP. -
Page 89: Stp Port Settings
DES-3226S Layer 2 Fast Ethernet Switch User’s Guide NOTE: The Hello Time cannot be longer than the Max. Age. Otherwise, a configuration error will occur. Observe the following formulas when setting the above parameters: Max. Age ≤ 2 x (Forward Delay - 1 second) Max. - Page 90 DES-3226S Layer 2 Fast Ethernet Switch User’s Guide The STP on the Switch level blocks redundant links between Switches (and similar network devices). The port level STP will block redundant links within an STP Group. It is advisable to define an STP Group to correspond to a VLAN group of ports. The following fields can be set: Parameter Description...
-
Page 91: Mac Notification
DES-3226S Layer 2 Fast Ethernet Switch User’s Guide MAC Notification MAC address notification is used to monitor MAC addresses learned and entered into the forwarding database. Global Settings Figure 6 - 65. MAC Notification Global Settings Configure the following MAC notification global settings: Parameter Description State... -
Page 92: Link Aggregation
DES-3226S Layer 2 Fast Ethernet Switch User’s Guide To change MAC Notification settings for a port or a group of ports on the same Switch, select the first (lowest numbered) port from the list and click the Edit button, a separate menu will appear. Figure 6 - 67. - Page 93 DES-3226S Layer 2 Fast Ethernet Switch User’s Guide Figure 6 - 68. Link Aggregation Algorithm − Selection Mac_source − Indicates that the Switch should examine the MAC source address. Mac_destination − Indicates that the Switch should examine the MAC destination address. Mac_source_dest −...
- Page 94 DES-3226S Layer 2 Fast Ethernet Switch User’s Guide Figure 6 - 70. Link Aggregation − New To edit an existing entry to the Switch’s forwarding table, click the entry’s corresponding click-box and then click the edit button: Figure 6 - 71. Link Aggregation − Edit The following fields can be set: Parameter Description...
-
Page 95: 802.1X Configuration
DES-3226S Layer 2 Fast Ethernet Switch User’s Guide 802.1X Configuration The DES-3226S implements the server-side of the IEEE 802.1x Port-based Network Access Control. This mechanism is intended to allow only authorized users, or other network devices, access to network resources by establishing criteria for each port on the Switch that a user or network device must meet before allowing that port to forward or receive frames. - Page 96 DES-3226S Layer 2 Fast Ethernet Switch User’s Guide Click the selection button on the far left that corresponds to the port you want to configure and click the Edit button, a separate menu will appear. Parameter Description Port status Lists the current status of port, Authorized or Unauthorized. PAE State Displays the administrative control over the port’s authorization status.
- Page 97 DES-3226S Layer 2 Fast Ethernet Switch User’s Guide Configure the following 802.1x port settings: Parameter Description Port Port being configured for 802.1x settings. AdminCtlDir From the pull-down menu, select whether a controlled Port that is unauthorized will exert control over communication in both receiving and transmitting directions, or just the receiving direction.
-
Page 98: Port Capability
DES-3226S Layer 2 Fast Ethernet Switch User’s Guide Port Capability Click the selection button on the far left that corresponds to the port you want to configure and click the Next button. This will open the Port Capability Settings - Edit menu. -
Page 99: Initialize Ports
DES-3226S Layer 2 Fast Ethernet Switch User’s Guide Initialize Ports Use this to initialize the 802.1x functions on a specified ports or for specified MAC addresses operating from a specified range of ports. Figure 6 - 77. Initialize Ports Parameter Description Port Select the port or lowest number of the group of ports being configured. -
Page 100: Radius Server Settings
DES-3226S Layer 2 Fast Ethernet Switch User’s Guide Radius Server Settings Use this menu to configure the settings the Switch will use to communicate with a Radius server. To add Radius server settings click the New button, a separate configuration menu appears. To edit an existing Radius settings index, select it and click the edit button Figure 6 - 79. -
Page 101: Access Profile Mask
DES-3226S Layer 2 Fast Ethernet Switch User’s Guide Access Profile Mask Access profiles allow you to establish criteria to determine if the Switch will forward packets based on the information contained in each packet’s header. These criteria can be specified on a basis of VLAN, MAC address or IP address. Creating an access profile is divided into two basic parts. - Page 102 DES-3226S Layer 2 Fast Ethernet Switch User’s Guide Configure the following Access Profile Mask settings: Parameter Description Profile ID Type in a unique identifier number for this profile set or allow an ID to be automatically assigned by checking the Auto Assign option. This value can be set from 1 – 255. Access Profile Select profile based on Ethernet (MAC Address) or IP address.
- Page 103 DES-3226S Layer 2 Fast Ethernet Switch User’s Guide To establish the rule for a previously created Access Profile Mask: Select the Access Profile from the Access Profile Mask Setting Table and click the Edit Rule button. Figure 6 - 85. Access Profile Rule Setting To create a new rule set for the access profile click the New button.
-
Page 104: System Log Server
DES-3226S Layer 2 Fast Ethernet Switch User’s Guide System Log Server The Switch can send Syslog messages to up to four designated servers. Figure 6 - 87. System Log Server list The parameters configured for adding and editing System Log Server settings are the same. See the table below for a description. -
Page 105: System Log State
DES-3226S Layer 2 Fast Ethernet Switch User’s Guide Set the following parameters for Syslog service: Parameter Description Index Syslog server settings index (1-4). Server IP Type in the IP address of the Syslog server receiving the message. Select the level of message sent, select: Warning, Information or All. Severity Facility Some of the operating system daemons and processes have been assigned Facility... -
Page 106: Igmp Snooping Settings
DES-3226S Layer 2 Fast Ethernet Switch User’s Guide IGMP Snooping Settings To configure IGMP Snooping: Click IGMP Snooping Configurations to open the following dialog box: Figure 6 - 90. IGMP Snooping Configuration To edit an IGMP Snooping entry on the Switch, select the entry on the IGMP Snooping Configurations screen and then click the edit button: Figure 6 - 91. - Page 107 DES-3226S Layer 2 Fast Ethernet Switch User’s Guide The following fields can be set: Parameter Description VLAN Name Allows the entry of the name of the VLAN for which IGMP Snooping is to be configured. Query Interval Allows the entry of a value between 1 and 65500 seconds, with a default of 125 seconds. This specifies the length of time between sending IGMP queries.
-
Page 108: Network Monitoring
DES-3226S Layer 2 Fast Ethernet Switch User’s Guide Network Monitoring The DES-3226S provides extensive network monitoring capabilities that can be viewed from the under Network Monitoring menu. Port Utilization The Port Utilization window shows the percentage of the total available bandwidth being used on the port. Port utilization statistics may be viewed using a line graph or table format. -
Page 109: Port Error Statistics
DES-3226S Layer 2 Fast Ethernet Switch User’s Guide Port Error Statistics The Port Error Packet Statistics window displays the packet errors that the Switch can detect and displays the results on a per port basis. To view the error statistics for a port, click on the Port Error Packets link: Figure 6 - 94. - Page 110 DES-3226S Layer 2 Fast Ethernet Switch User’s Guide The port error packets fields from above are described below: Parameter Description Unit Allows the selection of a particular Switch in a Switch stack if you have installed the optional stacking module and have properly interconnected the Switches. Port Allows the selection of a particular port on the Switch.
-
Page 111: Port Packet Analysis
DES-3226S Layer 2 Fast Ethernet Switch User’s Guide Port Packet Analysis The Port Packet Analysis window displays the size of packets received or transmitted by a given Switch port. In addition, statistics on the number and rate of unicast, multicast, and broadcast packets received by the Switch are displayed. To view an analysis of packets received or transmitted by a port, click on the Port Packet Analysis link: Figure 6 - 95. -
Page 112: Mac Address Table
DES-3226S Layer 2 Fast Ethernet Switch User’s Guide MAC Address Table This allows the Switch’s dynamic MAC address forwarding table to be viewed. When the Switch learns an association between a MAC address and a port number, it makes an entry into its forwarding table. These entries are then used to forward packets through the Switch. -
Page 113: Router Ports
DES-3226S Layer 2 Fast Ethernet Switch User’s Guide Router Ports This displays which of the Switch’s ports are currently configured as router ports. A router port configured by a user (using the console or Web-based management interfaces) is displayed as a static router port, designated by S. A router port that is dynamically configured by the Switch is designated by D. -
Page 114: Switch History
DES-3226S Layer 2 Fast Ethernet Switch User’s Guide Switch History This allows the Switch History Log to be viewed. The Switch records all traps, in sequence, that identify events on the Switch. The time since the last cold start of the Switch is also recorded. To view the Switch history log: Click the Switch History link on the Applications menu: Figure 6 - 100. -
Page 115: Technical Specifications
DES-3226S Layer 2 Fast Ethernet Switch User’s Guide Technical Specifications Physical and Environmental AC Input & External Redundant Power 100 – 120; 200 - 240 VAC, 50|60 Hz (internal universal power supply) Supply: Power Consumption: 30 watts maximum DC fans: 3 built-in 40 x 40 x10 mm fans Operating Temperature: 0 to 40 degrees Celsius... - Page 116 DES-3226S Layer 2 Fast Ethernet Switch User’s Guide Performance Transmission Method: Store-and-forward RAM Buffer: 8 Megabytes per device Filtering Address Table: 8K MAC address per device Full-wire speed for all connections. 148,800 pps per port (for 100Mbps) Packet Filtering| Forwarding Rate: 1,488,000 pps per port (for 1000Mbps) Automatic update.
- Page 117 Ontario, L6H 5W1 Canada TEL: 1-905-829-5033 FAX: 1-905-829-5223 BBS: 1-965-279-8732 FTP: ftp.dlinknet.com TOLL FREE: 1-800-354-6522 URL: www.dlink.ca E-MAIL: techsup@dlink.ca Chile D-Link South America (Sudamérica) Isidora Goyenechea 2934 Oficina 702, Las Condes, Santiago, Chile TEL: 56-2-232-3185 FAX: 56-2-232-0923 URL: www.dlink.com.cl China...
- Page 118 TEL: 33-1-3023-8688 FAX: 33-1-3023-8689 URL: www.dlink-france.fr E-MAIL: info@dlink-france.fr Germany D-Link Central Europe (D-Link Deutschland GmbH) Schwalbacher Strasse 74, D-65760 Eschborn, Germany TEL: 49-6196-77990 FAX: 49-6196-7799300 BBS: 49-(0) 6192-971199 (analog) & BBS: 49-(0) 6192-971198 (ISDN) INFO: 00800-7250-0000 (toll free) & HELP: 00800-7250-4000 (toll free) REPAIR: 00800-7250-8000 &...
- Page 119 TEL: (Jebel Ali): 971-4-883-4234 FAX: (Jebel Ali): 971-4-883-4394 & (Dubai): 971-4-335-2464 E-MAIL: dlinkme@dlink-me.com & support@dlink-me.com U.K. D-Link Europe (United Kingdom) Ltd Floor, Merit House, Edgware Road, Colindale, London NW9 5AB United Kingdom TEL: 44-020-8731-5555 SALES: 44-020-8731-5550 FAX: 44-020-8731-5511 SALES: 44-020-8731-5551 BBS: 44 (0) 181-235-5511 URL: www.dlink.co.uk E-MAIL: info@dlink.co.uk...
- Page 120 U.S.A. D-Link U.S.A. 17575 Mt. Herrmann, Fountain Valley, CA 92708, USA TEL: 1-714-885-6000 FAX: 1-866-743-4905 INFO: 1-800-326-1688 URL: www.dlink.com E-MAIL: tech@dlink.com & support@dlink.com...
-
Page 121: Technical Support
Contacting Technical Support You can find software updates and user documentation on the D-Link website. D-Link provides free technical support for customers within the United States and within Canada for the duration of the warranty period on this product. U.S. and Canadian customers can contact D-Link technical support through our web site, or by phone. -
Page 122: Warranty
The customer must submit with the product as part of the claim a written description of the Hardware defect or Software nonconformance in sufficient detail to allow D-Link to confirm the same, along with proof of purchase of the product (such as a copy of the dated purchase invoice for the product) if the product is not registered. - Page 123 Warranty provides specific legal rights and you may also have other rights which vary from state to state. Trademarks: D-Link is a registered trademark of D-Link Systems, Inc. Other trademarks or registered trademarks are the property of their respective owners.
-
Page 124: Registration
Registration Product registration is entirely voluntary and failure to complete or return this form will not diminish your warranty rights. 020905 D-Link Systems, Inc.