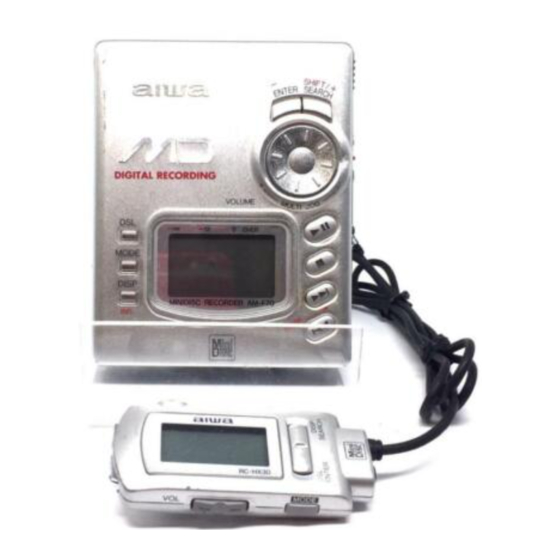
Aiwa AM-F70 Operating Instructions Manual
Aiwa am-f70 minidisc players: operating instruction
Hide thumbs
Also See for AM-F70:
- Servise manual (10 pages) ,
- Servise manual (9 pages) ,
- Service manual (9 pages)
Table of Contents
Advertisement
Mini
Dist'
MINIDISC RECORDER
GRABADOR DE MINIDISCOS
AM=F70
OPERATING INSTRUCTIONS
INSTRUCCIONES DE MANEJO
MODE D'EMPLOI
OWNER'S
RECORD
For your convenience,
record the model
number and serial number (you will find it
in the disc holder) in the space provided
below. Please refer tothem
when you
contact your Aiwa dealer in case of
difficulty.
Model No. AM-F70
Serial No.
WARNING
TO REDUCE THE RISK OF FIRE OR ELECTRIC SHOCK, DO NOT EXPOSE
THIS APPLIANCE
TC) RAIN OR MOISTURE.
—
Advertisement
Table of Contents

Related Manuals for Aiwa AM-F70


Summary of Contents for Aiwa AM-F70
- Page 1 Please refer tothem when you contact your Aiwa dealer in case of difficulty. Model No. AM-F70 Serial No. — WARNING TO REDUCE THE RISK OF FIRE OR ELECTRIC SHOCK, DO NOT EXPOSE THIS APPLIANCE TC) RAIN OR MOISTURE.
- Page 2 @) Carrying case NOTE FOR USE IN THE U.S.A. This equipment has been tested and found to comply with the limits for a Class B digital device, pursuant to Parl 15 of the FCC Rules. These limits are designed to provide reasonable...
- Page 3 Accessoires Accesorios Les accessoires suivants sent fournis avec Los siguientes accesorios se entregan con cet appareil. Verifiezd’abord Ieurpresence. el aparato. Verifique et ccmtenido antes de @) Te16commande usar. coin @ Eccmteurs stereo @) Mando a dstancia pantalla cristal @) Adaptateur...
-
Page 4: Table Of Contents
......... 64 To limit the maximum volume level (Ear guard function) ..To cancel the back light of the display and buttons ........66 MD GUIDE MESSAGES ..68 TROUBLESHOOTING GUIDE ...71... - Page 5 Reproduction programada ....51 Autre:; modes de lecture . . 49 Lecture programmed ......51 EDICION Registro del nombre del disco y titulo de EOITl@lN cancion . . 53 Consignation du nom de disque et du Combmaclon de dos canciones ..57 titre de piste ........
-
Page 6: Precautions
Make sure that pins orotherforeign objects do not get inside the unit. Take care not to drop the unit or subject it to strong shocks. To keep dust from the pickup lens, keep the disc holder closed after use. Never touch the lens. -
Page 7: Precauciones
I’appareil. No deje caer el aparato o exponga a un Prenezgarde de nepas Iaissertomberl’appareil golpe fuerte. et de ne pas Ie soumettre a des chocs wolents. Para mantener el polvo fuera del receptor Pour eviter toute... - Page 8 PRECAUTIONS Note on condensation If the unit is suddenly moved from a cold place to a warm one, it may result in condensation on the pickup Iens causing malfunction or playback difficulties. Should this occur, leave the unit for a few hours, then try playback again.
- Page 9 Ie disque @ a Tambien puede dahar el catiucho. I’inteneur. Si Ie disquea I’interieurestsali, Cierre la tapa si se abre durante el uso o il sera tres dlfficile de Ie nettoyer. al expulsar un disco. De Iocontrario puede cartouche peut aussi 6tre endommagee.
-
Page 10: Using On The Rechargeable Battery
USING ON THE RECHARGEABLE BATTERY When using on the rechargeable battery for the first time, charge it for more than 1 hour. 1 Open the disc holder and open the battery compartment. 2 Insert the rechargeable battery with the step marks @ correctly aligned. -
Page 11: Uso Con La Bateria Recargable
Chargez la batterie rechargeable pendant 1 hors. plus d’1 heure avant de I’utiliser pour la premiere fois. 1 Abra el compartimiento del disco y abra el compartimiento de la bateria. -
Page 12: Using Onac House Current
Do not disassemble the battery, heat it or put it in water. To prolong the performance of the battery, recharge it in an ambient temperature 10 to 30°C and keep it in a cool Icmation when not using. To maintain the performance... -
Page 13: Uso Con La Corrieinte Electrica Del Hogar
Utilice solo el adaptador de CA entregado para recargar la bateria. Utilisez uniquement I’adaptateur secteur No Ileve la bateria en un bolsillo o cartera fourni pour recharger la batterie. junto con objetos de metal tales como Neportez paslabatterie dansunepoche collares o Ilaveros. -
Page 14: Using On Dry Cell Batteries
“LOW BATT” appears and the operation will stop. For prolonged operation Insert the fully charged rechargeable battery in the unit and attach the battery case with three new size AA (LR6) alkaline batteries inside. Playback of approx. 40 hours is possible. -
Page 15: Uso Con Pilas
USO CON PILAS FONCTIONNEMENT SUR PILES SECHES 1 Abra la tapa de la caja de pilas y coloquetrespilas alcalines detamaiio 1 Ouvrez Ie couvercle du carter a piles AA (LR6) con Ias marcas et inserez-y trois piles alcalines correctamente alineadas. -
Page 16: Preparations
HOLD on the main unit. + @ When operating with the remote control, release HOLD on the remote control. + @ When not using the unit, set both to the HOLD position. + @ Accidentally pressed buttons will function. -
Page 17: Preparatives
Raccordez Ies ecouteurs fournis a la mando a distancia y conecte el mando a te16commande et la telecommande a la distancia en la toma OUTPUT del aparato. prise OUTPUT de I’appareil. Para encender la Iuz en la indication... - Page 18 “CLOCK SET” is displayed. 2 Turn MULTI JOGtoaetthe year. 3 Press m. The month starts flashing. 4 Repaat the steps 2 and 3 to set the month, day, hour and minute. 5 Press ENTER. The clock starts from the 00 seconds.
- Page 19 3 Appuyez sur W. Gire MULTI JOG para ajustar el afio. Le mois se met a clignoter. Oprima W. 4 Repr$tez Ies etapes 2 et 3 pour regler Ie El mes empieza a desteilar. mois, Iejour, Ies heureset Ies minutes.
-
Page 20: Recording
+ High quality recording is possible since the digital source signals from a CD, etc. are not converted into analog signals. The playing time and index mark data of the TOC (Table of contents) are recorded automatically at the same time. -
Page 21: Grabacion
La prise lNPUTde cet appareil peut accepter (salidade Iinea) ysehal desonidodel des signaux numeriques, des signaux microfono. analogiques (sortiede Iigne) et dessignaux De acuerdo con la seiial de fuente y toma sonores d’un microphone. de salida del equipo conectado, haga Effectuez correctement Ies raccordements correctamente... - Page 22 @ 1st generation @ Digital recording cannot be done @2nd generation only analog recording) When the source material is BS or CS signal, digital recording can be done for 2nd generation (except recording from some types of tuners). Analog recording (connecting with...
- Page 23 @2a. generation (solo grabacion analogica) analogique seulement) . Quand Ie materiau de source est un signal Cuando el material fuente es una seiial BS o CS, la grabaclon digital puede 13S ou CS, I’enregistrement numerique mt possible pour la seconde generation hacerse para la 2a.
- Page 24 RECORDING Microphone recording -+ Set INPUT SELECT on the bottom of the unit to MIC HIGH or MIC LOW . To increase the microphone sensitivity, set to HIGH. To decrease the microphone sensitivity, set to LOW. Connect an optional microphone and orient to the sound source with correct direction.
- Page 25 GRABACION micrdfom + Enregistrement avec un microphone Grabacih em –+ Ajuste INPUT SELECT en la parte inferior del aparato a MIC HIGH o MIC LOW. Reglez INPUT SELECT sous I’appareil a Paraaumentarlasenshilidad del mlcrofono, VIIC HIGH MIC LOW. ajuste a HIGH.
-
Page 26: Basic Operation
Release HOLD. recording are registered. + @ 2 Insert a recordable disc with the label After the TOC (Table Of Contents) data side @ up and in the direction of the is registered, the display changes and arrow (l). power is automatically turned off. -
Page 27: Funcionamiento Basico
1 Liberez HOLD. Inserte un disco grabable con el Iado 2 Inserez un disque enregistrable, de la etiqueta @ hacia arriba y en el c6te portant l’etiquette@ vers Ie haut, sentido de la flecha @. clans Ie sens de la fleche @. - Page 28 Adjusting the volume does not affect the recorded sound. record on a previously recorded disc If there is an unrecorded section left on the disc, the new recording automatically starts from where the previous recording finished. If there is not enough unrecorded...
- Page 29 Pour enregistrer w un disque pricedemment enregistre Para grabar en un disco ya grabado S’il reste une section non enregistree sur Ie Si hay una seccion sin grabar del disco, la disque, Ie nouvel enregistrement demarre nueva grabacion empieza automaticamente automatiquement a partir de I’endroit ou...
-
Page 30: Adjusting The Recording Level
5 Prass -II to start recording. To adjust the recording level during recording Press + or - during recording in the same way as step 4. resume automatic level control Press MODE while in recording pause mode to display “MANUAL”, then press ENTER to display “A.L.C.”. -
Page 31: Ajuste Del Nivel De Grabacion
Appuyez sur + ou – en consultant ajustar el nivel de grabacion. I’indicateur de niveau de I’afficheur Ajuste el nivel de grabacion @ 10 mas pourajuster Ie niveau d’enregistrement. alto posible sin Ilegar a la indication Reglez Ie niveau d’enregistrement @ Ie OVER. -
Page 32: Usable Functionsfor Recoroing
During digital recording from a CD or MD+~ The index mark information recorded on the CD or MD is copied as it is. @)CD or MD @ Recording (MD) @ Index marks During analog recording microphone recording If there is an unrecorded... -
Page 33: Funcionesutiles Para Grabacion
I’enregistrement analogique grabacion de microfono + E ou I’enregistrement avec un Si hay una parte sin grabar de mas de 3 microphone segundos, se registra automaticamente un En cas de section non-enregistree de plus codigo indite cuando vuelve a entrar una... -
Page 34: Selecting A Marker Function
USABLEFUNCTIONSFOR RECOROING Time marker function You can register an index mark by pressing during recording even if the Marker function is set to OFF. This function is activated when the Auto marker or Time marker function is set. Note The index mark may not be registered correctly even if the Auto marker function is set. -
Page 35: Seleccion De La Funcion De Marcador
I’enregistrement m6me si la fonction esta desactivada a OFF. marqueur est desactivee (OFF). Esta funclon se activa cuando esta en el Cette fonction s’active au reglage de la modo de marcador automatic o en el fonction marqueur automatique modo de marcador de tiempo. -
Page 36: Extended Recording (Monaural Recording)
USABLEFUNCTIONSFOR RECORDING Extended recording (Monaural recording) The available time printed on the disc can be doubled when the sound is recorded in monaural. Operate while in recording pauae mode. ‘bIEEu 1 Press MODE repeatedly until “STEREO” is displayed. 2 Press ENTER. -
Page 37: Grabaci6N Mas Iarga
Undlscograbado enmonoauralnopuede Un disque enregistre en monaural reproducirse en otro reproductor peut pas ~tre Iu sur un autre Iecteur MD ne pouvant pas Iire Iesdisques enregistres minidiscos sin la funcion de reproduction en monaural. de disco grabados en monoaural. -
Page 38: Synchronized Analog Recording
After recording, press 9. Note Synchronized digital recording can be done from a unitwith a DIGITAL OPTICAL OUTPUT jack. Synchronized digital recording may not be done from some type of Aiwa mini component. -
Page 39: Grabacion Anaiogica Sincronizada
FUNCIONESUTILES PARA FUNCTIONSUTILISABLESPOLIR _ GRABACION L’ENREGISTREMENT Grabacion analogica sincronizada Enregistrement analogique synchronise La grabacion entra en pausa cuando no se L’appareil passe en pause d’enregistrement quand il n’y a pas de son, et reprend escucha ningun sonido y continua automatiquement I’enregistrement... -
Page 40: Playback
To pause during hip, hip, hip, 1 Release HOLD. bip n.. playback 2 Insert a disc with the label side up @ To resume >11 while in bip and in the direction of the arrow @. pause mode 3 Press ph. -
Page 41: Reproduction
Funcionamiento basko Operations debase Suelte HOLD. Liberez HOLD. Inserte un disco con el lado de la 2 Inserez un disque, Ie c6te portant etiqueta @ hacia arriba yen el sentido I’etiquette vers Ie haut @, clans Ie de la flecha @. - Page 42 DSL1. DSL 3: Low and high frequencies more emphasized than in DSL2. DSL OFF: Normal sound To play a disc at double speed (Rapid- playback) Keep > I I pressed for 2 seconds during playback. “x2 PLAY is displayed.
- Page 43 DSL OFF: Somdo normal accentuees qu’avec DSL 2. Para reproducer w disco a doble DSL OFF: Son normal velocidad (reproduction rapida) Pour Iire w disque deux fois plus vite Mantenga oprimido durante ,(Lecture rapide) segundos de la reproducci6n. Mfaintenez...
-
Page 44: To Change The Display
@Title of current track displayed when playing a prerecorded (.@Remaining time of current track disc or a disc in which no data is registered. @ Disc name @Total number of tracks on the disc @ Recording date of thecurrenttrack (22nd... -
Page 45: Para Cambiar La Indication
Remarques case) ~L’affichage passe a @ a I’arri% de la lecture. Notas I) “No Title” ou “NO Name” apparalt Iors de La indication cambia a @ cuando se la lecture d’un disque sur Iequel aucune detiene la reproduction. Aparece “NoTitle’)o “No Name’’... -
Page 46: Title Search Function
You can search for a desired track confirming the title during playback. Operate during playback. 1 Press SEARCH. The track number in the display flashes for about 4 seconds. When operating with the remote control, keep DISP/SEARCH pressed for 3 seconds. -
Page 47: Funcion De Busqueda De T
3 segundos. appuyez plusieurs fois sur M Mientras destella el nrlmero jusqu’a ce que Ie titre de la piste cancion, oprima o FM varias souhaitee s’affiche. veces hasta que aparezca el titulo da Vous pouvez utiliser MULTI JOG. -
Page 48: Other Playback Modes
PLAYBACK Other playback modes This unit has 4 play modes other than normal play. Press MODE repeatedly during playback to select the desired play mode. Each time the button is pressed, the play mode changes in the following order. @All-repeat play All tracks are played repeatedly. -
Page 49: Otros Modos De Reproduction
Ie mode de reproduction deseado. lecture souhaite. Cada vez que oprima el boton, el modo de Chaque pression de la touche change de reproduction cambiaen el siguienteorden. mode de lecture clans I’ordre suivant. @ Repetition... -
Page 50: Programmed Play
YCIU disc holder or removing the batteries. If “PRGM FULL” appears 25 tracks are already programmed. Ycu cannot add any track to the program. Note YCIUcannot go back to a previous track by keeping W pressed during programmed... -
Page 51: Reproduction Programada
Si “PRGM FULL” apparait Si aparece “PRGM FULL” 25 pistes sent deja programmers. vous ne pouvez plus ajouter de piste a la Se han programado ya 25 canciones. programmation. No puede agregar canciones programa. -
Page 52: Registering The Disc Name And Track Title
EDITING Rt!gistering the disc name and track tit/e A total of 1700 characters can be registered in {one disc. Operate during playback or in playback pause mode. 1 lPlay a track to be assigned a title. “The name of the disc can be registered while any track is in play. -
Page 53: Edicion
Operez en mode de lecture ou pause durante la reproduction en el modo de lecture. II Lisez une piste a Iaquelle un titre doit de pausa de reproduction. keproduzca”una cancion a la cfue @tre assigne. Le nom de disque peut &re consigne desea agregar un titulo. - Page 54 To insert a space between the characters Press W or w repeatedly until the character to the right of where the space is to Ibe added flashes. Press DISP/lNS, then press FFl. Note When you operate during random, repeat c~r programmed play, the play mode changes to normal play.
- Page 55 I’operation pour desactiver I’afficheur. Si I’adaptateur secteur est deconnecte Sise desconecta el adaptador de CA o ou si la batterie ou Ies piles sent retirees se sacan Ias pilas antes de apagarse la indication, Ios dates no quedaran avant I’extinction...
-
Page 56: Combining Two Tracks
To cancel entering Press -11 the tracks are titled When both tracks are titled, the title of the lower numbered track remains. When only one track is titled on the tracks to be combined, this title remains. Note... -
Page 57: Combmaclon De Dos Canciones
Appuyez sur -11 Oprima -II Si /es pistes ont un titre Si Ias canciones tienen LWo Si Ies deux pistes ont un titre, Ie titre de la piste de plus petit numero est maintenu. Cuando ambas canciones tlenen tftulo, Si une seule des deux pistes a un titre, ce se mantiene el titulo de la cancion con el numero mas bajo. -
Page 58: Dividing A Track
EDITING Dividing a track You can divide a track into 2 parts by registering an index mark. 1 Press -II during playback at the point to be divided. Playback is paused. 2 Slide REC/EDIT while pressing red button. 3 PressMODErepeatedly until’’DIVIDE... -
Page 59: Division De Unacancion
1 Appuyez sur ~11 pendant la lecture en el punto a dividir. au point ou la division doit se faire. La reproducci6n entra en pausa. L’appareil passe en pause de lecture. Deslice REC/EDIT mientres oprime el 2! Faites glisser REC/EDIT en appuyant boton rojo. -
Page 60: Changing The Order Of The Tracks
EDITING tracks Cfiaflgjflg ffie Order Of tfie You can change the order of tracks after completing a recording. Operate during playback or in playback pauae mode. Play the track that you want to move. Example: To move the 3rd track, play the 3rd track. -
Page 61: Cambio Del Orden De Ias Canciones
1 Lisez la piste a deplacer. Reproduzca la cancion desea Exemple: Pour deplacer la piste 3, Iisez mover. la piste 3. Ejemplo: Para mover la 3a. cancion, 2 Faites glisser REC/EDIT en pressant reproduzca la 3a. -
Page 62: Erasing Tracks
MODE repeatedly until “ ALL ERASE is displayed.+@ Press ENTER. “ERASE OK?” is displayed. Make sure to check that it is ail right to erase. To cancel, press 011 Press ENTER again. When selected “ERASE”, selected track is erased... -
Page 63: Borrado De Canciones
EDICION EDITION Borrado de canciones Effacement de pisfes VOLJS pouvez effacer Une OIJ toutes I es Se puede borrar una cancion o todas Ias canciones de un disco. pistes d’un disque. Oprima una cancion quedesea borrar. 1 Lisez la piste a effacer. -
Page 64: To Cancel The Beep Sound (Signal Sound Function)
Display “BEEP ON in step 3. To limit the maximum volume level (Ear guard function)+ You can set the volume level from O to 20. When you set the Ear guard function, the maximum volume will be limited at 12. Operate in stop mode. -
Page 65: Para Cancelar El Sonido De Alarma (Funclon De Sonido De Aefial)
Pour retablir la tonaliti bip Para que vuelvan a escucharse Ios Affichez “BEEP ON a I’etape 3. sonidos de alarma Haga aparecer “BEEP ON” en el paso 3. Pour limiter /e volume sonore nnaximum (tonction protection de Para Iimitar el nivel de volumen... -
Page 66: To Cancel The Back Light Of The Display And Buttons
OTHERSETTINGS To came/Me /Jack /igM d the dispkiy ml buttons -+ When a button is pressed, the backlight of the display and buttons lights up. When using on batteries, you can cancel this backlight. Operate in stop mode. 1 Keep... -
Page 67: Para Cancelar La Iuz De Tespaldo De La
4 Appuyez Aparece “EL OFF. Pour retablir I’eclairage de fond Oprima Affichez “EL ON a I’etape 3. Para que vuelva a encenderse Haga aparecer “EL ON en el paso 3. Remarque L’eclairage de fond est toujours allum6 Nota pendant Ie fonctionnement sur Ie secteur. -
Page 68: Md Guide Messages
The batteries wear out. page 22. OPEN Can’t EDIT The disc holder IS not closed. Tracks are too short to be combined. + See “The limitations of MD on page 76. PB DISC The combine function was used while Recording is attempted on the disc for playing the first track. -
Page 69: Mensajes De Guia De Minidisco
PB DISC primers cancion del disco. Se ha tratado de grabar en un disco que La funcion dedivision se utilizo al principio es solo para reproduction. de una cancion. La funcion de combination se utllizo para... -
Page 70: Messages Guide Du Md
MESSAGES GUIDE DU MD DISC BLANK DISC II n’y a pas de disque clans I’appareil. Rien n’est enregistre sur Ie disque. Signal Can’t COPY La lecture n’a pas encore commence sur L’enreglstrement numerique est interdit I’appareil raccorde. par la norme SCMS. -
Page 71: Troubleshooting Guide
TROUBLESHOOTING GUIDE If the unit fails to perform as described in Wrong or no display appears on the these Operating InstructIons, check the remote contro/c following guide. Connect the remote control firmly. Power does not turn on. Connect the AC adaptor firmly. -
Page 72: Averias
GUIA DE LOCALIZACIOhl DE AVERIAS Nose registrd correctamente la fecha Si el aparato no funciona como se describe en el manual de instrucciones, inspeccione de grabacion. Ios puntos de esta guia. Vuelva a ajustar el reloj. Cargue la bateria recargable o cambie conecta el aparato. -
Page 73: Guide De Depannage
Mode d’emploi, verifiez Ies Reglez I’horloge. grands points suivants. Rechargez la batterie rechargeable remplacez Ies piles seches. L ‘appareil ne se met pas sous tension. Affichage errone ou pas d’affichage sur Raccordez fermement I’adaptateur secteur. la tilecommande. -
Page 74: What Isa Minidisc
But Mini Discs can be used to store and play back a full 74 minutes of information, as much as a CD. Unlike a CD, a Mini Disc comes in a plastic cartridge, so that it can be handled with ease. -
Page 75: Cw'est-Ce Cnj'un Minidisque
4(UJEES Ull MINIDISCO? _ QU’EST-CE QU’UN MINIDISQUE? Un minidisco tiene un diametro de tan solo 64 mm, es decir, la mitad del tamaiio de un Un MiniDisc (MD) est un disque d’un disco compacto conventional. Pero el diametre de 64 mm, soit environ la moitie minidisco puede registrar y reproducer 74 d’un CD conventionnel,... -
Page 76: What Isa Minidisc? Specifications
* Adaptive Transform Acoustic Coding Uuick random access One of the great features of the MiniDisc is that you can search for desired tracks quickly. There are also quick and easy... - Page 77 Acceso aleatorio ripido MiniDisc est qu’il vous permet de trouver rapidement Ies pistes souhaitees. II y a Uno de Ios grandes detalles del disco es la posibilidad de buscar rapldamente la pista egalement desfonctions rapides et simples deseada. En la reproducclon...
- Page 78 (the COMBINE function does not function). Tracks created by editing may not be joined. The total of the recorded time and the remaining time on a disc does not match with the maximum recordable time of the disc (60-minute or 74- minute).
- Page 79 I’enregistrement. rayas se borran automaticamente. C7est pourquol Ie temps disponible devient plus court. II devient aussi plus court s’il y a Los numeros de cancion pueden no des rayures sur Ie dlsque, parce que Ies registrars correctamente.
-
Page 80: Specifications
COPYRIGHT Please check the laws on copyright relating Jack type Stereo mmi-jack to recordings from discs, radio or external 10 mW+10 mW Maximum output tape for the country in which the machine is level being used. 16 ohms Load imoedance... -
Page 81: Especificaciones
3,6 V con la bater[a recargable Sistema de audio digital por mclulda de Ilbo-ion LIB-901 minidsco CC de 4,5 V con tres pilas LR6 (tamafio Receptor laser Laser por semiconductor CA del hogar con el adaptador de CA Sistema de grabacion... -
Page 82: Specifications
Systeme de lecture 3,6 V C.C.avec la batterie rechargeable Systeme audio numerique aux ions de lithium LIB-901 MiniDisc 4,5 V C.C.avec trois piles seches LR6 Bloc de lecture Ieser (format AA) Laser semi-conducteur Courant secteur domestique fourni par Systeme d’enregistrement l’adaptateur secteur AC-D401... - Page 84 8Z-HM1 -903-01 981124AY0-O-UO AIWA CO.,LTD. Printed in Japan...