Table of Contents
Advertisement
Advertisement
Table of Contents

Related Manuals for Acer Veriton 3700GX


Summary of Contents for Acer Veriton 3700GX
- Page 1 Veriton Series 3700GX/5700GX/ 6700GX/7700GX User’s Guide...
- Page 2 Changes may be made periodically to the information in this publication without obligation to notify any person of such revision or changes. Such changes will be incorporated in new editions of this manual or supplementary documents and publications. This company makes...
-
Page 3: Table Of Contents
Lock keys Cursor keys Windows keys Function keys Palm rest Optical drive Taking care of your CDs and DVDs Hard disk 3 Setting up your computer Arranging a comfortable work area Adjusting your chair Positioning your PC Positioning your monitor... - Page 4 5 System utilities Acrobat Reader Acer LANScope (optional) Norton AntiVirus How do I check for viruses? NTI CD&DVD-Maker (for models with CD or DVD Burner) PowerDVD (for models with DVD) How do I open and watch a DVD? BIOS utility...
- Page 5 Acer eLock Acer eSetting Acer eRecovery Using Backup (Windows® XP only) How do I back up files from my hard drive? Disk Defragmenter (Windows® XP only) How do I defragment my hard drive? 6 Frequently asked questions Frequently asked questions...
- Page 6 Contents...
-
Page 7: First Things First
1 First things first... - Page 8 This chapter describes the system specifications and the contents of your computer package.
-
Page 9: System Specifications
Audio Intel® High Definition Audio, HD Audio hardware is capable of delivering the support and sound quality for up to eight channels at 192 kHz/32-bit quality. 10/100/1000 Base-T Gigabit Ethernet connectivity One 40-pin parallel ATA IDE slot Four Serial ATA ports 1.44 MB 3.5 inch floppy drive... - Page 10 1 First things first Component Specification Wake system Wake on LAN Wake on modem USB mouse/keyboard • Parallel ATA (5400, 7200 RPM) • Serial ATA (7200 RPM) Optical Drive CD-ROM, CD-RW, DVD-ROM, DVD/CD-RW combo,DVD-Dual or DVD-Super multi Operating system •...
-
Page 11: Package Contents
Package contents Before you unpack your computer, make sure that you have enough space to set up your computer. Carefully unpack the carton and remove the contents. If any of the following items are missing or damaged, contact your dealer immediately: •... -
Page 12: Accessing The User's Guide
1 First things first Accessing the user’s guide This user’s guide is also available on your computer as an Adobe Acrobat™ PDF file. To access the user’s guide (for Windows ® On the Windows XP taskbar, click on the start button then select Help ®... -
Page 13: System Tour
2 System tour... - Page 14 This chapter discusses the features and components of your computer.
-
Page 15: Features
• One parallel port • One VGA port • Eight Universal Serial Bus (USB) 2.0 ports (four on the front and four on the rear panel) • High-speed V.92, 56K Fax/modem (manufacturing optional) • Gigabit Ethernet LAN support with remote wake-up function... -
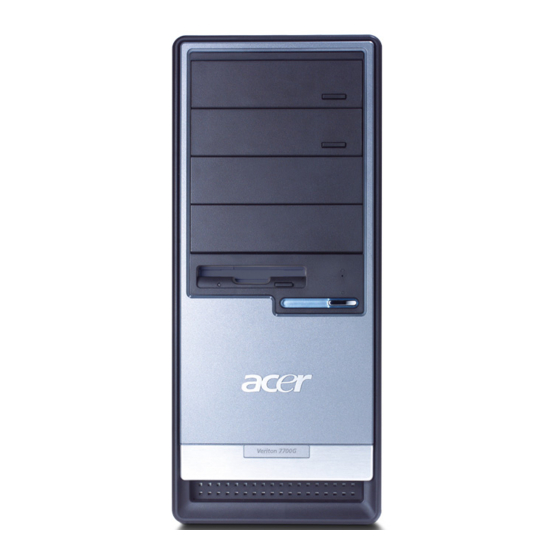
Page 16: Front Panel
2 System tour Front panel Your computer’s front panel consists of the following: 3700GX/6700GX 5700GX... - Page 17 7700GX Icon Component 6700GX 3700GX/5700GX/7700GX 5.25-inch drive bay(s) 3.5-inch floppy drive Microphone-in jack (front) Speaker-out/Line-out port USB ports One button recovery slot Indicators Power button...
-
Page 18: Rear Panel
2 System tour Rear panel Your computer’s rear panel consists of the following: 3700GX/6700GX 5700GX... - Page 19 7700GX Icon Component 3700GX/5700GX/6700GX/7700GX Power supply Power cord socket Voltage selector switch PS/2 mouse port PS/2 keyboard port Serial port...
- Page 20 CRT/LCD monitor port USB ports Network port Audio jacks Expansion slots Chassis lock pad *. For information on audio ports, please reference the function table of the audio ports. The audio jack function table Color\Use Headphone 1.1 CH 3.1 CH 5.1 CH...
-
Page 21: Keyboard
Keyboard The keyboard has full-sized keys that include separate cursor keys, two Windows keys, four multimedia keys, and twelve function keys. For information on how to connect your keyboard, see “Connecting your mouse and keyboard” on page 27. Description Description... -
Page 22: Internet/E-Mail/Search Keys
Email Launches your email application. Search Opens a search window. Multimedia keys Allow you to conveniently play, pause, stop, advance, or rewind a song or movie using your keyboard. Icon Description Backward Press to skip backward to the previous track or video file. -
Page 23: Volume Control/Mute Keys
Volume down Press to decrease audio volume. Mute Toggle sound on/off. Lock keys The keyboard has three lock keys which you can toggle on and off to switch between functions. Lock key Description Scroll Lock When activated, the screen moves one line up or down when you press the up arrow or down arrow respectively. -
Page 24: Cursor Keys
2 System tour Cursor keys The cursor keys, also called the arrow keys, let you move the cursor around the screen. They serve the same function as the arrow keys on the numeric keypad when the Num Lock is toggled off. -
Page 25: Function Keys
Function keys The function keys, F1 - F12, let you perform specific functions, depending on the application that uses them. Palm rest The detachable palm rest provides you with a comfortable place to rest your hands while typing. -
Page 26: Optical Drive
Optical drive Your computer may come with a CD-ROM, DVD-ROM, DVD/CD-RW combo, DVD-Dual or DVD-Super multi drive. This drive is located on the front panel of your computer. The CD drive allows you to play different types of compact discs (CDs). The DVD drive allows you to play not only old CD-ROMs, CD-I discs, and video CDs, but digital video discs (DVDs) as well. - Page 27 6700GX/7700GX When the disc tray slides open, place the CD or DVD gently on the tray. Make sure that the label or title side of the disc is facing upward. When holding a disc, hold it by the edges to avoid leaving smudges or fingerprints.
-
Page 28: Taking Care Of Your Cds And Dvds
Taking care of your CDs and DVDs • Keep your disc in its case when not in use to avoid scratches or other damage. Any kind of dirt or damage can affect the data on the disc, impair the disc lens reader on the CD or DVD drive, or stop the computer from successfully reading the disc. -
Page 29: Setting Up Your Computer
3 Setting up your computer... - Page 30 This chapter contains step-by-step instructions on how to set up your computer and connect additional peripherals.
-
Page 31: Arranging A Comfortable Work Area
• Avoid tilting your chair. If you have a chair that tilts, lock the tilt knobs so that your chair will not tilt forward or backward while you are using your computer. -
Page 32: Positioning Your Monitor
The location of the keyboard is a very important factor to your posture. Placing it too far away will make your body lean forward, forcing you to sit in an unnatural position. Placing it too high will add tension to your shoulder muscles. -
Page 33: Connecting Peripherals
Connecting peripherals Setting up your computer is easy. For the most part, you only have four things to connect: the mouse, the keyboard, the monitor, and the power cable. Note: The peripherals shown in the connections below are for your reference only. Actual device models may vary in select countries. -
Page 34: Connecting A Monitor
3 Setting up your computer Connecting a monitor To connect a monitor, simply plug the monitor cable into the monitor port (blue port) located on the rear panel of your computer . Note: When a VGA card is added to the PCI-E slot, the monitor should be connected to the add-on card and the on-board VGA will be disabled. -
Page 35: Connecting The Power Cable
Set the voltage selector switch to the voltage range applicable to your area (a). Plug the power cable into the power cable socket located on the rear panel of your computer (b). Then plug the other end of the power cable into a power outlet (c). -
Page 36: Turning On Your Computer
On the front panel of your computer, press the Power button. Important: Make sure that the power cable is properly plugged into an electrical outlet. If you are using a power strip or an AVR (Auto-Voltage Regulator), make sure that it is plugged in and turned on. -
Page 37: Connecting Options
Connecting your printer Your computer supports parallel, serial and USB printers. To connect a parallel printer, plug the printer cable into the parallel port (burgundy port) located on the rear panel of your computer. Note: The printer shown below is for your reference only. Actual device model may vary by country. -
Page 38: Connecting The Modem (Optional)
Connecting to the network You can connect your computer to a Local Area Network (LAN) using a network cable. To do so, simply plug the network cable into the network port on the rear panel of your computer. Note: Consult your network system administrator or operating system manual for information on how to configure your network setup. -
Page 39: Connecting Multimedia Devices
Connecting multimedia devices You can connect multimedia devices such as microphones, earphones or headphones, external speakers, and audio line-in devices. These devices will allow you to take advantage of your computer’s multimedia features. Note: The multimedia devices shown below are for your reference only. - Page 40 Note: To adjust the headphones volume, use the volume control buttons on the keyboard. You can also adjust the volume by using the volume icon on the taskbar at the bottom of your screen.
-
Page 41: Connecting Usb Devices
USB devices to your computer without using up its resources. To connect a USB device, simply plug the device cable into any of the USB ports (black) located on the front and rear panels of your computer. - Page 42 3 Setting up your computer Note: The USB devices shown below are for your reference only. Actual device models may vary by geographic region. Note: Some USB devices have a built-in USB port which allows you to connect more USB devices.
-
Page 43: Upgrading Your Computer
Upgrading your computer... - Page 44 This chapter contains instructions on how to upgrade your computer and basic information about your system boards that you will find helpful when performing the upgrade process.
-
Page 45: Installation Precautions
Do not remove a component from its protective packaging until you are ready to install it. Wear a wrist grounding strap and attach it to a metal part of the computer before handling components. If a wrist strap is not available, maintain contact with the computer throughout any procedure requiring ESD protection. -
Page 46: Post-Installation Instructions
4 Upgrading your computer Post-installation instructions Observe the following after installing a computer component: See to it that the components are installed according to the step-by-step instructions in their respective sections. Replace any expansion boards or peripherals that you removed earlier. -
Page 47: Opening Your Computer (3700Gx)
Turn the thumbscrews counterclockwise with your fingers to release the cover. Hold the sides of the cover with both hands. Slide it back about an inch and then gently lift it upward to detach it. -
Page 48: To Replace The Computer Cover
4 Upgrading your computer To replace the computer cover Align the cover’s hinges to the housing frame; then gently push it in to slide it back into place. Secure the cover with thumbscrews. -
Page 49: Opening Your Computer (5700Gx)
Slide it back about an inch and then gently lift it upward to detach To replace the computer cover Align the cover to the housing frame and then push it in to slide it back into place. Secure the cover with the thumbscrews you released earlier. -
Page 50: Opening Your Computer (6700Gx/7700Gx)
Place your computer on a flat, steady surface. Turn the screws counterclockwise with your fingers to release the cover. Hold right panel (from rear view) with both hands. Slide it back about an inch and then gently pull it outward to detach it. -
Page 51: To Replace The Side Panel
To replace the side panel Align the side panel's hinges to the housing frame and then push it in to slide it back into place Secure the side panels with the two screws. -
Page 52: System Boards
4 Upgrading your computer System boards Mainboard layout The mainboard becomes accessible once you open your computer. Refer to the section below for the corresponding mainboard layout of your Veriton series computer model. 17 18 19 20 21... - Page 53 Component Component PCI Express x 16 connector PCI Express x1 connector LAN LED S/PDIF output connector Front panel audio PCI Conventional bus connector connectors (2) Front daughter board 9,10 Front panel USB connector connector System fan connector One Button Recovery connector...
-
Page 54: Audio Board
4 Upgrading your computer Audio board The audio board that came with your computer should look like the figure that follows. 7700GX, 5700GX (upper), 6700GX/3700GX (bottom left, right) Component 7700/5700GX 6700GX 3700GX Audio connector USB Connector USB ports Microphone-in jack... -
Page 55: Upgrading Your Computer
Upgrading your computer Certain components of your computer are upgradeable such as the memory, the hard disk, the CPU and the expansion cards. You need to observe the “Installation precautions” on page 39 when installing or removing a computer component. However, for safety purposes, we do not recommend that you perform these upgrades yourself. -
Page 56: To Install A Ddr2 Dimm
4 Upgrading your computer Press the holding clips on both sides of the DDR2 DIMM socket outward to release the DDR2 DIMM (a). Gently pull the DDR2 DIMM out of the socket (b). To install a DDR2 DIMM Locate the DDR2 DIMM socket on the mainboard. -
Page 57: To Reconfigure Your Computer
To reconfigure your computer Your computer automatically detects the amount of memory installed. Run the BIOS utility to view the new value for total system memory and make a note of it. Replacing the hard disk (3700GX) Follow these steps to replace your computer’s hard disk: Remove the computer cover (see page 41). - Page 58 Pull out the drive rails that hold the hard disk to the housing. Set the drive rails aside. Slide the hard disk frame to the left (d); then gently move it out (e) and pull it up to detach it (f).
-
Page 59: Installing An Expansion Card
Pull out the bracket on the housing opposite the selected empty slot. Remove the expansion card from its protective packaging. Align the card with the empty bracket and then insert it into the slot. Make sure that the card is properly seated. -
Page 60: Installing An Expansion Card
Pull out the bracket on the housing opposite the selected empty slot. Remove the expansion card from its protective packaging. Align the card in the empty bracket and then insert it into the slot. Make sure that the card is properly seated. -
Page 61: Replacing The Hard Disk (6700Gx/7700Gx)
Detach the hard disk from the drive frame (b). Insert the new hard disk into the frame (a). Connect the power and hard disk cables to the new hard disk (b). Note: Make sure that the other ends of the disk cables are securely connected to their corresponding connectors on the mainboard. -
Page 62: Installing An Expansion Card
Pull out the bracket on the housing opposite the selected empty slot. Remove the expansion card from its protective packaging. Align the card with the empty bracket and then insert it into the slot. Make sure that the card is properly seated. -
Page 63: System Utilities
5 System utilities... - Page 64 This chapter describes applications that are preinstalled on your computer.
- Page 65 • Backup • Disk Defragmenter All of the applications that came with your computer are very easy to use. However, if you need more help and information, you may refer to the online help documentation provided in each software application.
-
Page 66: Acrobat Reader
Acrobat Reader. Once the program is running, select Open from the File menu. Select the file you wish to view in the Open file browser and click the Open button. For more information about Acrobat Reader, you may refer to the Acrobat... -
Page 67: Acer Lanscope (Optional)
Improper insertion may damage both the CD and the drive. Refer to page 20 for instructions on how to insert a CD into your computer's optical drive. Follow all onscreen instructions until installation is completed. -
Page 68: Norton Antivirus
How do I check for viruses? A Full System Scan scans all files on your computer. To perform a system scan: Start Norton AntiVirus Double click on the Norton AntiVirus Icon on the desktop or Click on the Start menu in the Windows taskbar, highlight Programs, and select Norton AntiVirus. -
Page 69: Nti Cd&Dvd-Maker (For Models With Cd Or Dvd Burner)
To copy an audio or data disc: Click the Quick Burning icon on the desktop. Insert the CD you would like to copy into the source drive and a blank disc into the target drive. Choose the source and target drives from the pull-down lists. -
Page 70: Powerdvd (For Models With Dvd)
PowerDVD (for models with DVD) PowerDVD is a high-quality, pure software DVD player which brings high- quality movies and karaoke to your multimedia PC. You can play back high resolution DVD titles or MPEG-2 files with MPEG-2 video and Dolby Digital (AC-3) audio. -
Page 71: Bios Utility
Note: Before you run BIOS, make sure that you have saved all open files. The computer reboots immediately after you exit Setup. To run the BIOS utility, press the Del key on your keyboard during computer boot up. -
Page 72: Reinstalling Programs
5 System utilities Reinstalling programs If you uninstall one of the preinstalled programs and want to reinstall it, do the following: Make sure that the system is turned on. Insert the System CD into the CD or DVD drive. Select the application that you want to reinstall. -
Page 73: Acer Emanager
Acer eManager Acer eManager is a simple and easy to use portal for managing your new Acer desktop computer. eManager includes: • Acer eLock - for ensuring your data security. • Acer eSetting - for managing your computer health and optimizing your system. -
Page 74: Acer Elock
• Floppy Disk Drives - 3.5 inch disc only. To activate Acer eLock, a password must be set first. Once set, you may apply locks to any of the three kinds of devices. The lock will immediately be set without any reboot necessary. -
Page 75: Acer Esetting
Acer eSetting Acer eSetting is a system utility that is included within Acer eManager and made specifically for Acer desktop computers. This utility allows users to inspect hardware specifications and to monitor the system health status. Furthermore, Acer eSetting contains several internal functions which are made to optimize your Windows operating system, allowing your computer to run faster, smoother and better. -
Page 76: Acer Erecovery
5 System utilities Acer eRecovery Acer eRecovery is a powerful utility that does away with the need for recovery discs to be provided by the manufacturer. The Acer eRecovery utility occupies space in a hidden partition on your system's HDD and allows you to perform backup/restore operations and to burn backup images to CD or DVD, depending on system configuration. -
Page 77: Using Backup (Windows® Xp Only)
Using Backup (Windows® XP only) The Backup utility creates copies of information on your hard disk. In the event that the original data on your hard disk is erased or overwritten, or becomes inaccessible because of a hard disk malfunction, you can use the copy to restore your lost or damaged data. -
Page 78: Disk Defragmenter (Windows® Xp Only)
Click Disk Defragmenter When Disk Defragmenter opens, select a drive/volume and click Analyze. The system will quickly examine the volume and determine whether it needs to be defragmented or not. For more information about Disk Defragmenter, refer to Windows® XP help. -
Page 79: Frequently Asked Questions
6 Frequently asked questions... - Page 80 This chapter tells you what to do in case your computer is not working properly. However, if a more serious problem arises, contact your dealer or the technical support center (www.acersupport.com) for assistance.
-
Page 81: Frequently Asked Questions
Q: I pressed the power switch but the system did not boot up. A: Check the LED located above the power switch. If the LED is not lit, no power is being applied to the system. Try the following: •... - Page 82 6 Frequently asked questions • Make sure that the printer is connected to a power outlet and that it is turned on. • Make sure that the printer cable is connected securely to the system’s parallel or usb port and the corresponding port on the printer. See “Connecting your printer”...
-
Page 83: Appendix A: Notices
Appendix A: Notices... -
Page 84: Energy Star Guidelines Compliance
FCC notice This device has been tested and found to comply with the limits for a Class B digital device pursuant to Part 15 of the FCC Rules. These limits are designed to provide reasonable protection against harmful interference in a residential installation. This... -
Page 85: Notice: Canadian Users
Use conditions This part complies with Part 15 of the FCC Rules. Operation is subject to the following two conditions: (1) this device may not cause harmful interference, and (2) this device must accept any interference received, including interference that may cause undesired operation. -
Page 86: Notice For Australia
Appendix A: Notices CAUTION: To reduce the risk of fire, use only No. 26 AWG or larger UL Listed or CSA Certified Telecommunication Line Cord. TBR 21 This equipment has been approved [Council Decision 98/482/EC - "TBR 21"] for pan- European single terminal connection to the Public Switched Telephone Network (PSTN). -
Page 87: Macrovision® Copyright Protection Notice
Never push objects of any kind into this product through cabinet slots as they may touch dangerous voltage points or short out parts that could result in a fire or electric shock. Never spill liquid of any kind on the product. -
Page 88: Lithium Battery Statement
Batterien nach Angaben des Herstellers. Laser compliance statement The CD or DVD drive used with this computer is a laser product. The CD or DVD drive’s classification label content (shown below) is located on the drive. CLASS 1 LASER PRODUCT CAUTION: INVISIBLE LASER RADIATION WHEN OPEN. -
Page 89: Federal Communications Comission Declaration Of Conformity
Federal Communications Comission Declaration of Conformity This device complies with Part 15 of the FCC Rules. Operation is subject to the following two conditions: (1) this device may not cause harmful interference, and (2) this device must accept any interference received, including interference that may cause undesired operation. -
Page 90: Declaration Of Conformity For Ce Marking
Rules under the most accurate measurement standards possible, and that all the necessary steps have been taken and are in force to assure that production units of the same equipment will continue to comply with the requirements. -
Page 91: Appendix B: Taking Care Of Your Computer
Appendix B: Taking care of your computer... -
Page 92: Important Tips
Do not expose the computer to dust and dirt. • Never place the system on uneven surfaces. • Do not step on the power cord or place heavy objects on top of it. Carefully route the power cord and any cables away from personal traffic. •... -
Page 93: To Clean Your Pointing Device
To clean a regular mouse (with rubber ball) Open the circular cover underneath the mouse. Take out the rubber ball and wipe it with a soft, damp cloth. Put the ball back and close the cover. To clean an optical mouse For users of an optical mouse, refer to the documentation that came with your mouse for maintenance instructions. - Page 94 Appendix B: Taking care of your computer...
-
Page 95: Index
Index front panel 10 internet/suspend key email 16 suspend 16 accessing the online User’s Guide 6 web browser 16 applications 59 keyboard 15 BIOS utility 65 application key 18 computer cover lock keys remove 43 Caps Lock 17 replace 43... - Page 96 59 install DDR DIMM 50 Norton AntiVirus 62 reconfigure computer 51 system boards 46 computer 49 audio board 48 install an expansion card 54 mainboard 46 installation precautions system utilities post-installation 40 Acrobat Reader 60 open computer 41 Norton AntiVirus 62...