Table of Contents

Related Manuals for Curtis RCD951


Summary of Contents for Curtis RCD951
- Page 1 PORTABLE STEREO CD RADIO CASSETTE RECORDER MODEL RCD951 INSTRUCTION MANUAL Operating Instructions BEFORE OPERATING THIS PRODUCT, READ, UNDERSTAND, AND FOLLOW THESE INSTRUCTIONS. Be sure to save this booklet for future reference.
-
Page 2: Safety Instructions
SAFETY INSTRUCTIONS The Lightning flash with arrowhead symbol, with an equilateral triangle is intended to alert the user of the presence of uninsulated dangerous voltage within the product’s enclosure that may be of sufficient magnitude to constitute a risk of electric shock to persons. - Page 3 Water and Moisture - The appliance should not be used near water, e.g. near a bathtub, washbowl, kitchen sink, laundry tub, in a wet basement, or near a swimming pool or the like. Ventilation - The appliance should be situated so that its location or position does not interfere with its proper ventilation.
- Page 4 Power Supply Operating the player on AC power Insert one end at the supplied power cord to the AC IN Jack located at the rear Of the rear of the unit and the other end into the Wall outlet. NOTE: WHEN THE FIRST TIME USED THE CORD HAS TO BE FIRMLY PUSHED INTO THE SOCKET IF IT DOES NOT WORK ON AC, TO TRY AGAIN TO BE SURE FOR A POSITIVE CONNECTION.
-
Page 5: Radio Operation
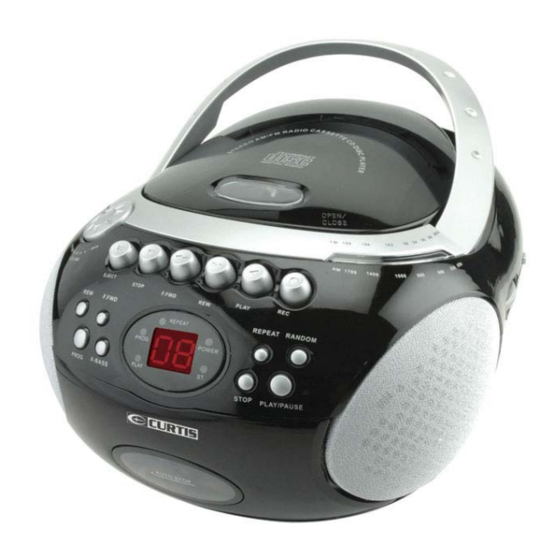
1. CASSETTE EJECT BUTTON 2. CASSETTE STOP BUTTON 3. CASSETTE FAST-FORWARD BUTTON 4. CASSETTE REWIND BUTTON 5. CASSETTE PLAY BUTTON 6. CASSETTE REC BUTTON 7. CD REPEAT BUTTON 8. CD RANDOM BUTTON 9. CD PLAY/PAUSE BUTTON 10. CD STOP BUTTON 11. - Page 6 station, the FM stereo LED indicator will light. For better reception For FM, pull out the telescopic antenna. Incline and turn the antenna. Reduce its length if the signal is too strong (very close to a transmitter). For AM the set is provided with a built-in antenna so the telescopic antenna is not needed. Direct the antenna by turning the whole set.
-
Page 7: Random Play
you select RADIO sound source; the CD has reached to the end. Selecting a different track During playback you can use F.FWD or REW to select a particular track. If you have selected a track number in the stop or pause mode, press PLAY to start playback. Press F.FWD once briefly for the next track, or press repeatedly until the desired track number appears in the display. -
Page 8: Cassette Operation
When your chosen track number appears, press PROG once to store the track. →PROG LED indicator flashes and the display shows PROG. Repeat steps 1 to 2 to select and store all desired tracks in this way. To play your program, press PLAY/PAUSE. Reviewing your set program •... -
Page 9: Recording From Radio
2. Insert a CD into the CD compartment and close the CD Door. 3. Slide the TAPE/AUX/RADIO/CD selector to the “CD” position. 4. Press the CD PLAY/PAUSE Button, then select the CD track number to be recorded. 5. Press the Cassette “PLAY” and “REC” recorder buttons at the same time. 6. -
Page 10: Specifications
CD SECTION Functions Program Feature Compatible With Tuner Frequency Range GENERAL DESCRIPTION Speaker Headphone Jack Impedance Power Source Power Consumption Sound/Noise Radio Level Dimensions (WXHXD) SPECIFICATIONS Play/Pause, Stop, Repeat and Program 20-track programmable memory CD-DA, CD-R Amplitude Modulation(AM) Frequency Modulation(FM) FM Stereo AM:530~1700KHz FM:88~108MHz...