Advertisement
- 1 INTRODUCTION
- 2 GET TO KNOW YOUR COFFEEMAKER
- 3 COFFEEMAKER EXTRAS
- 4 UNDERSTAND YOUR CONTROL PANEL
- 5 GETTING STARTED
- 6 SETTING THE CLOCK
- 7 ADVANCED WATER FILTRATION SYSTEM
- 8 CLEAN BEFORE FIRST USE
- 9 BREWING COFFEE
- 10 STRONG BREW
- 11 BREW LATER
- 12 1-4 CUP
- 13 KEEP WARM
- 14 WATER
- 15 ROUTINE CLEANING
- 16 DECALCIFYING
- 17 TROUBLESHOOTING YOUR COFFEEMAKER
- 18 IMPORTANT SAFEGUARDS
- 19 POWER CORD INSTRUCTIONS
- 20 PRODUCT NOTICES
- 21 Documents / Resources
INTRODUCTION
Your new Mr. Coffee will wake you up in the morning, give you a boost in the afternoon and provide you the flexibility to brew however you choose!
Our number one goal is to give you the best-tasting cup of coffee every time, so if you have any questions about your new coffeemaker, please contact us at 1-800-672-6333 or visit us at www.mrcoffee.com.
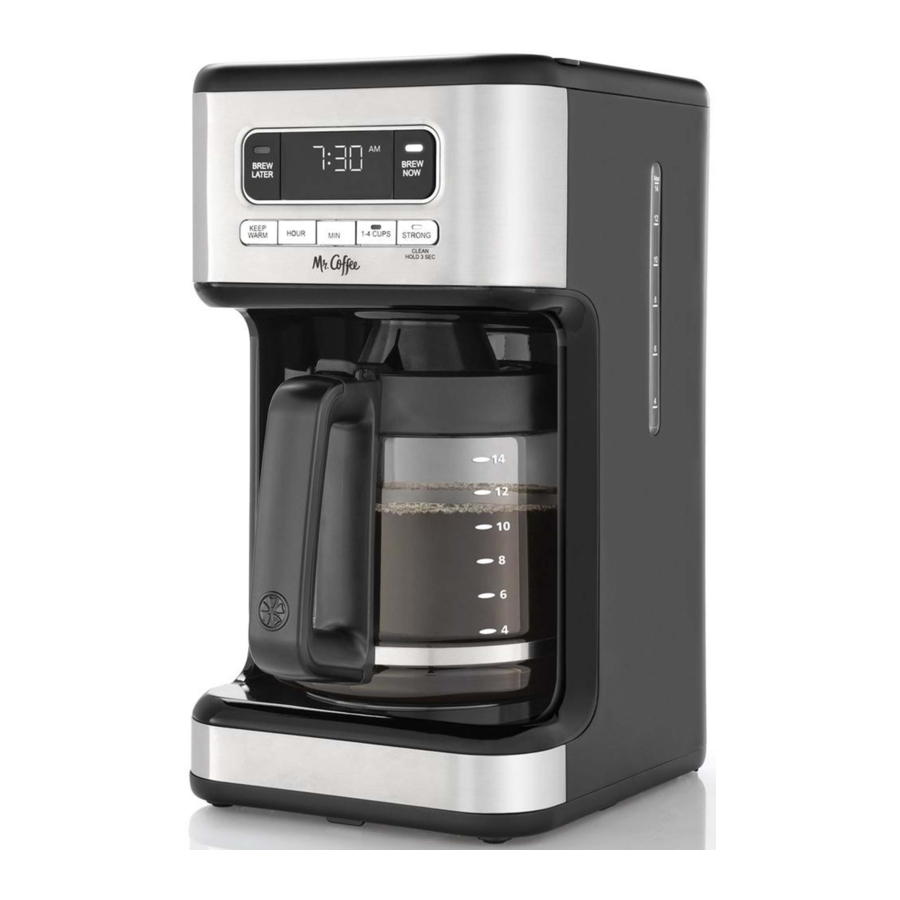
GET TO KNOW YOUR COFFEEMAKER

- Brew Basket
- Carafe
- Control Panel
- Brewer Base
- Grab-a-cup Auto Pause
- Warming Plate
- Water Reservoir
COFFEEMAKER EXTRAS
(Not included with all models)

UNDERSTAND YOUR CONTROL PANEL

- Clock Display
- AM/PM Indicator
- Clean Indicator
- Brew Now Indicator
- Brew Now Button
- 1-4 Cup Indicator
- 1-4 Cup Button
- Strong Indicator
- Strong / Clean Button
- Clean Function
- Minute Button
- Hour Button
- Keep Warm Button
- Brew Later Button
- Brew Later Indicator
GETTING STARTED
Unpack your Coffeemaker
Unpack your coffeemaker and remove plastic bags, cartons and any tape on the unit.

KEEP PLASTIC BAGS AWAY FROM CHILDREN.
SETTING THE CLOCK
Plug in brewer into an outlet. Press the HR and MIN buttons to set the clock. 5 seconds of inactivity will set the clock at the time selected.

ADVANCED WATER FILTRATION SYSTEM
(Not included with all models)
The improved 2-step advanced water filtration system reduces impurities like chlorine and calcium to make coffee taste better.

- Soak the advanced water filtration cartridge in cold water for 5 minutes.
- Rinse the soaked cartridge for about 1 minute.
- Open bottom hatch where the cartridge goes and insert a new Advanced Water Filtration cartridge. (Figure 1)
![]()
- Close the hatch and place system in designated slot in water reservoir. Press firmly in place. (Figure 2)
![]()
- After 30 days or 30 uses (whichever comes first), replace the Advanced Water Filtration cartridge.


NOTE: When cleaning the coffeemaker, be sure to remove the Advanced Water Filtration holder and cartridge.
CLEAN BEFORE FIRST USE
- Wash the Parts - Wash the Carafe and brew basket in a mixture of mild detergent and water. Rinse each thoroughly.
- Fill Water Reservoir - Fill the Water Reservoir with fresh water to the MAX fill line.
- Place Carafe - Set the Carafe on the Warming Plate.
- Run a Cleansing Brew - Leave the Brew Basket empty. Press the BREW NOW button once so that the Brew Now Indicator is illuminated to begin the Cleansing Brew cycle. There will be an audible signal when the brewing cycle is complete. Once the unit stops dripping, pour the hot water in the carafe into the sink.
NOTE: Brew Basket and Carafe are top rack dishwasher safe.
BREWING COFFEE
Suggested Coffee Measurement Chart:
| Water to Brew | Ground Coffee |
| 14 cups = 70 oz. | 11.5 tbsp. |
| 12 cups = 60 oz. | 9 tbsp. |
| 10 cups = 50 oz. | 7.5 tbsp. |
| 8 cups = 40 oz. | 6 tbsp. |
| 6 cups = 30 oz. | 4.5 tbsp. |
| 4 cups = 20 oz. | 3 tbsp. |
Please note that when using extra fine and decaf you may notice some grounds in the carafe due to the filtering process. If you find this bothersome, please increase the coarseness of the grounds.
- Fill Water Reservoir - Fill the Water Reservoir with fresh water to the desired amount. Use the Water Window to check how much water is in the reservoir.
- Line the Brew Basket - Place an 8-12 Cup Paper Filter or a Reusable Coffee Filter (for best results) inside the Brew Basket.
- Add Coffee - Scoop the desired amount of coffee into the Brew Basket. (Figure 3) Refer to the Coffee Measuring Chart for guidance based on the number of cups being brewed.
![]()
- Place Carafe - Place the Carafe on the warming plate.
- Begin Brewing - Press the BREW NOW button of the unit once so that the Brew Now Indicator is illuminated. (Figure 4). There will be an audible signal when the brewing cycle is complete and the Brew Now Indicator will remain illuminated for the duration of the keep warm time.
![]()


NOTE: For a fresh cup, remember to clean the Brew Basket between each use.
STRONG BREW
The strong brew function slows down the brewing process to allow the hot water to fully saturate the grounds and extract bolder flavors. There will be a brief intermittent pause in the brewing process in order to pull the strong taste from your coffee grounds.
- To enjoy a richer and bolder cup of coffee, follow steps 1-4 in the "Brewing Coffee" section or steps 1-3 in the "How to Use the Brew Later Function" section.
- Press the STRONG Button once so that the Strong Brew Indicator is illuminated. (Figure 5)

- If you change your mind mid-brew, press the STRONG Button again so that the Strong Brew Indicator is no longer illuminated.
- After making the brew selection, press the BREW NOW button of the unit once. The Brew Now is illuminated and the brewing will start.

BREW LATER

YOU MUST SET THE CLOCK BEFORE USING THIS FEATURE.
- To set the Brew Later function, follow steps 1-4 in the "Brewing Coffee" section.
- Press BREW LATER. The Brew Later Indicator will flash. To set desired brew time, press the HR and MIN buttons. 5 seconds of inactivity will set Brew Later at the time selected. The Brew Later Indicator will remain illuminated to indicate that the coffeemaker is set to brew at a later time. (Figure 6)

- If you change your mind and wish to turn off the Brew Later feature, simply press BREW LATER again and the Brew Later indicator will turn off. Once the Brew Later time is set, the coffeemaker will automatically remember the time until you change it or unplug the machine.

NOTE: As a reminder, if you want to continue to use the Brew Later feature, you will have to repeat these steps each time. Your coffeemaker will not automatically start again the next day.
1-4 CUP
The 1-4 Cup Function slows down the brewing process to allow the hot water to fully saturate the grounds for smaller batches of coffee. There will be a brief intermittent pause in the brewing process in order to pull the full flavor from your coffee grounds when brewing 1-4 cups of coffee.
- To enjoy a richer and bolder cup of coffee, follow steps 1-4 in the "Brewing Coffee" section or steps 1-3 in the "Brew Later" section.
- Press the 1-4 CUP Button once so that the 1-4 Cup Indicator is illuminated. (Figure 7)
![]()
- If you change your mind mid-brew, press the 1-4 CUP Button again so that the 1-4 Cup Indicator is no longer illuminated.
- After making the brew selection, press the BREW NOW button of the unit once. The Brew Now is illuminated and the brewing will start.

KEEP WARM
The default Keep Warm time is 4 Hours and your coffeemaker will automatically shut off 4 hours after brewing. The Keep Warm function helps you customize how long your warming plate is on after brewing.
- Press the KEEP WARM button and the clock display will show the number of hours the Keep Warm time is currently set at. (Figure 8)

- Press the KEEP WARM button until the desired Keep Warm time is displayed on the clock. The options are 1, 2, 3, or 4 hours. 5 seconds of inactivity will set the Keep Warm time on the hour selected.

NOTE: Once the Keep Warm time is set, the coffeemaker will automatically remember the time until you change it or unplug the machine.
WATER
While it may not seem like an important ingredient, coffee is 98 percent water. The type of water that you brew with greatly affects the final taste. Always use fresh, cold water that is filtered and free of impurities - avoid soft water or well water. Please refer to the "Advanced Water Filtration System" section to learn more about how your coffeemaker reduces impurities in water.
ROUTINE CLEANING
A clean coffeemaker is essential to brewing great tasting coffee each and every time.
Daily Cleaning

Make sure your coffeemaker is unplugged and has cooled completely before cleaning.
Remove the Brew Basket, Reusable Coffee Filter, and Carafe and wash them in a solution of hot water and mild liquid soap, and dry thoroughly. You can also place the Brew Basket, Reusable Coffee Filter, and Carafe in the dishwasher; top-rack only. Do not wash the Advanced Water Filtration cartridge with soap.
DECALCIFYING
Using the Clean Function to Decalcify your Coffeemaker
Minerals (calcium/limestone) found in water will leave deposits in your coffeemaker and affects its performance. The CLEAN word will appear on the display underneath the clock when it is recommended to decalcify your coffeemaker using vinegar. To decalcify your coffeemaker, follow the steps below:
![]()
Remove the advanced water filtration system from the coffeemaker.- Prepare 4 cups or 20 fl. oz. of undiluted, white household vine ar. Pour the vinegar into the water reservoir on the carafe side.
- Place an empty 8-12 cup basket-style paper filter or the Mr. Coffee Reusable Coffee Filter into the brew basket.
- Place the empty carafe on the unit, centered on the warming plate.
- Hold down the STRONG button for 3 seconds so that the Clean Indicator begins blinking and the Brew Now Indicator is illuminated. The prepared cleaning solution will begin being brewing through the coffeemaker (Figure 9). When the cleaning process starts, then CLEAN starts blinking on & off throughout the process.

- The entire cycle will take approximately 45 minutes to complete. At the end of the cycle, the BREW NOW indicator light will turn off, an audible signal will beep and the clock time will turn into CLn to indicate the process is completed.
- Discard the cleaning solution and rinse the carafe thoroughly with clean water.
- Fill the water reservoir with 14 cups of clean, fresh water.
- Place the empty carafe back on the coffeemaker, centered on the warming plate.
- Remove and discard the paper filter used during the cleaning cycle. If a Mr. Coffee Reusable Coffee Filter was used during cleaning, remove it and rinse it thoroughly before replacing it in the brew basket.
- Press BREW NOW so that the Brew Now Indicator is illuminated and allow the full brew cycle to complete, rinsing the coffeemaker with hot water.
- Discard the water from the carafe and rinse the carafe thoroughly with clean water.
- Repeat steps 8 through 12 one more time, to ensure the coffeemaker is fully rinsed.

If you wish to stop the Clean function once it has already begun, press the BREW NOW button or the STRONG button and the Cleaning function will stop and the Brew Now and Clean Indicators will turn off. Press the BREW NOW button again to ensure the cleaning solution is completely brewed through the machine and follow steps 7-12.
If you wish to turn off the Clean indicator without running a decalcification cycle, simply hold down the STRONG button for 3 seconds so that the Clean Indicator and Brew Now Indicator is illuminated. Then quickly press BREW NOW and the Clean and Brew Now Indicators will shut off.
If the Clean Indicator is not illuminated, but you wish to use the Clean function, you can still follow steps 1-13.
Cleaning Frequency
| Type of Water | Cleaning Frequency |
| Soft Water | Every 80 Brew Cycles |
| Hard Water | Every 40 Brew Cycles |
TROUBLESHOOTING YOUR COFFEEMAKER
| Problem | Possible Cause | Solution |
| The BREW NOW light does not light up. | It is not plugged into a working outlet. | Reset the outlet and/or circuit breaker. |
| There's a power outage. | Wait for power to be restored. | |
| The coffee is not brewing. | The appliance is unplugged. | Plug unit in. |
| There's a power outage. | Wait for power to be restored. | |
| No water in the water reservoir. | Fill water reservoir above minimum level marking. | |
| The brew basket is not properly inserted. | Insert brew basket correctly. | |
| The coffeemaker only brews water. | There are no coffee grounds in the brew basket. | Add the paper filter or reusable coffee filter with the desired amount of coffee to the brew basket. |
| The coffeemaker brews slowly. | The coffeemaker needs cleaning. | Clean coffeemaker as described in the "Routine Cleaning" section. |
| The Strong Brew function might be engaged. | The Strong Brew function causes the brewing process to slow down for more flavor extraction. If this function is on, the unit will intermittently pause briefly during brewing. | |
| The 1-4 Cup function might be engaged. | The 1-4 Cup function causes the brewing process to slow down for the best flavor extraction when brewing a smaller batch. If this function is on, the unit will intermittently pause briefly during brewing. | |
| The water tank might be clogged with grounds. | Clean the water reservoir to ensure that the coffeemaker will be able to brew properly. | |
| The Clean function might be engaged. | The Clean function causes the brewing process to slow down to allow for the cleaning solution to clean your coffeemaker thoroughly. If this function is on, the unit will resume brewing after pausing. The process can take up to 45 minutes. | |
| The filter basket overflows. | The filter basket is not properly inserted. | Insert the filter basket correctly. |
| The carafe is not placed all the way on the warming plate. | Place the carafe correctly on the warming plate. | |
| Too many coffee grounds were placed in the filter. | Remove filter and discard grounds. If paper filter, replace. If permanent filter, rinse. Begin brewing process again. | |
| The carafe was removed from the warming plate for more than 30 seconds. | Turn off and unplug the unit. Allow to cool. Wipe up the spill. | |
| The coffee is not hot. | There's a power outage. | Wait for power to be restored. |
| The Warming Plate was not configured for the desired length of time. | Check to ensure the Warming Plate is properly configured and that Brew Now is illuminated. | |
| The coffee tastes bad. | Coffee grounds other than for an automatic drip coffeemaker were used. | Use fresh coffee grounds recommended for automatic drip coffeemakers. |
| The ground coffee-to-water ration was unbalanced. | Use the correct coffee-to-water ratio. | |
| The coffeemaker needs cleaning. | Clean coffeemaker as described in "Routine Cleaning" section. | |
| The water is not filtered. | Use cold, filtered or bottled water. | |
| The unit suddenly stopped brewing. | There is no water in the water reservoir. | Fill the water reservoir with fresh, cold water to the desired water level, up to the MAX line. |
IMPORTANT SAFEGUARDS
When using electrical appliances, basic safety precautions should always be followed to reduce the risk of fire, electric shock, and/or injury to persons including the following:
- Read all instructions.
- Do not touch hot surfaces. Use handles or knobs.
- To protect against electric shock, do not place or immerse cord, plugs, or appliance in water or other liquid.
- This appliance is not intended for use by children or by persons with reduced physical, sensory, or mental capabilities, or lack of experience and knowledge. Close supervision is necessary when any appliance is used near children. Children should be supervised to ensure that they do not play with the appliance. Keep the appliance and its cord out of reach of children.
- Unplug from outlet when either the appliance or display clock (if provided) is not in use, and before cleaning. Allow to cool before putting on or taking off parts, and before cleaning the appliance.
- Do not operate any appliance with a damaged cord or plug or after the appliance malfunctions, or has been damaged in any manner. Return appliance to an Authorized Service Center for examination, repair or adjustment. Do not attempt to replace or splice a damaged cord.
- The use of an accessory not recommended by the appliance manufacturer for use with this appliance may result in fire, electric shock or injury to persons.
- Do not use outdoors.
- Do not let cord hang over edge of table or counter, or touch hot surfaces.
- Do not place on or near a hot gas or electric burner, or in a heated oven.
- Always attach plug to appliance first, then plug cord into the wall outlet (for appliances with detachable cords). To disconnect, turn any control to the off position, then remove plug from wall outlet.
- Do not use appliance for other than intended use.
- All lids should be closed during use.
- Scalding may occur if the lid is removed or brew basket door is opened during or immediately after the brewing cycles. Contents may be hot. Allow to cool before opening the lid.
For appliances with sealed capsules:
![]()
To avoid the risk of injury, never open or disengage the brew chamber during the brew cycle.- Only use capsules intended for this appliance. If the capsule does not fit, do not force the capsule into the appliance.
For appliances with glass containers:
- The container is designed for use with this appliance. It must never be used on a range top.
- Do not set a hot container on a wet or cold surface.
- Avoid sudden temperature changes, such as rinsing, washing, filling, or immersing a hot container with cold liquids.
- Do not use a cracked or chipped container or a container having a loose or weakened handle.
- Do not clean container with cleansers, steel wool pads, or other abrasive material.
For appliances with service panels:
![]()
TO REDUCE THE RISK OF FIRE OR ELECTRICAL SHOCK, DO NOT REMOVE THIS COVER. NO USER-SERVICEABLE PARTS INSIDE. REPAIR SHOULD BE DONE BY AUTHORIZED SERVICE PERSONNEL ONLY.
SAVE THESE INSTRUCTIONS
HOUSEHOLD USE ONLY
Polarized plug
This appliance has a polarized plug, (one blade is wider than the other). As a safety feature to reduce the risk of electrical shock, this plug is intended to fit in a polarized outlet only one way. If the plug does not fit fully in the outlet, reverse the plug. If it still does not fit, contact a qualified electrician. Do not attempt to defeat this safety feature or modify the plug in any way. If the plug fits loosely into the AC outlet or if the AC outlet feels warm do not use that outlet.

POWER CORD INSTRUCTIONS
A short power-supply cord (or detachable power-supply cord) may be provided to reduce risks resulting from becoming entangled in or tripping over a longer cord. Longer detachable power-supply cords or extension cords are available and may be used if care is exercised in their use. If a long detachable power-supply cord or extension cord is used:
- The marked electrical rating of the detachable power-supply cord or extension cord should be at least as great as the electrical rating of the appliance;
- If the appliance is of the grounded type, the extension cord should be a grounding type 3-wire cord; and
- The longer cord should be arranged so that it will not drape over the counter top or table where it can be pulled on by children or tripped over unintentionally.
Do not pull, twist or otherwise abuse the power cord.
PRODUCT NOTICES
- Place the appliance on a hard, flat, level surface to avoid interruption of airflow underneath the coffeemaker.
- Glass decanters only: Discard the decanter immediately if it is ever boiled dry.
- Glass decanters only: Protect the decanter from sharp blows, scratches or rough handling.
- Do not operate the appliance with an empty water tank.
- Keep the area above the appliance clear during use, as hot steam will escape the appliance.
Documents / ResourcesDownload manual
Here you can download full pdf version of manual, it may contain additional safety instructions, warranty information, FCC rules, etc.
Advertisement
Thank you! Your question has been received!


Need Assistance?
Do you have a question about the BVMC-PC14 Series that isn't answered in the manual? Leave your question here.