
Related Manuals for ECM NOxCAN


Summary of Contents for ECM NOxCAN
- Page 1 ENGINE CONTROL AND MONITORING NOxCAN NOx CAN Module Instruction Manual REV 1.11 12/04/08...
- Page 2 All Rights Reserved. No part of this manual may be photocopied or reproduced in any form without prior written consent from ECM: ENGINE CONTROL AND MONITORING. Information and specifications subject to change without notice. Printed in the United States of...
-
Page 3: Table Of Contents
Connecting the NOxCAN module Application Notes Getting Information from the NOxCAN Module CANopen Message Types Writing to the NOxCAN Module (SDO Write) Reading from the NOxCAN Module (SDO Read) Identifying the NOxCAN Module Commands to the NOxCAN Module ZEROing and SPANing... -
Page 5: Introduction And General Notes
Introduction and General Notes Introduction The NOxCAN kit is a ceramic sensor-based NOx, O , and pressure (optional) measurement system that communicates and is configured via the CANopen protocol. Its primary application is for the analysis of combustion systems and their after-treatment. -
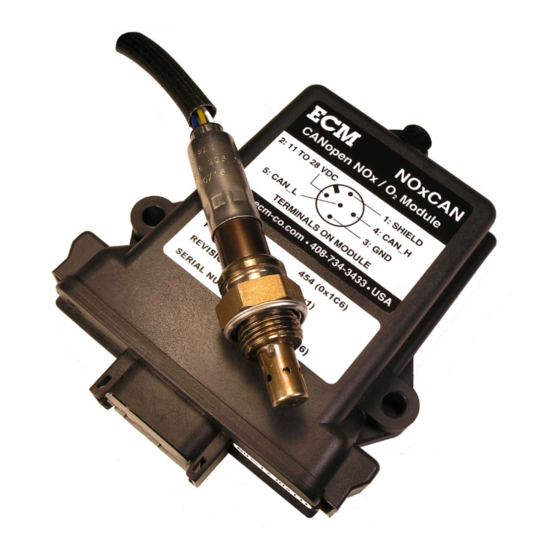
Page 6: Parts
Parts The NOxCAN Kit consists of: PART 1. NOxCAN Control Module 02-02 2. NOx Sensor 06-01 (NTK) 3. Inconel shield (installed on NOx sensor) 12-09 4. NOx Extension Cable 10-02 (1m) 5. Eurofast “T” 09-05 6. Eurofast Terminating Resistor 09-06 7. -
Page 8: Connecting The Noxcan Module
CAN bus at this baud rate is 100m. Each end of the CAN bus must have a terminating resistor of 121 Ohms. Application Notes 1. Configuration software (ECM Configuration Tool) for the module is located on the CD. This software allows the setup, configuration, monitoring, and recording of data using supported CAN adapters. - Page 9 7. The NOxCAN broadcasts several messages on the CAN bus using the CANopen protocol. Each message has an identifying number known as the CAN identifier (CANid). Since multiple modules can be placed on the same CAN bus, each module on the bus also has an identifying number known as the node identifier (NID).
-
Page 10: Getting Information From The Noxcan Module
Getting Information from the NOxCAN Module As soon as power is attached to the NOxCAN module, it will perform a POWER ON/RESET sequence during which the bi-color LED will display a 2 second GREEN/BOTH/RED pattern. After the POWER ON/RESET sequence is finished, the LED will flash green at 10Hz until the NOx sensor has reached its operating temperature. - Page 11 iii) TRANSMIT PROCESS DATA OBJECT [TPDO] (Broadcast rate = 0.005sec, DLC=8) TPDO1 CAN id byte 0 byte 1 byte 2 byte 3 byte 4 byte 5 byte 6 byte 7 0x180+NID NOx (ppm) TPDO2 CAN id byte 0 byte 1 byte 2 byte 3 byte 4...
-
Page 12: Writing To The Noxcan Module (Sdo Write)
Writing to the NOxCAN Module (SDO Write) Configuration of the NOxCAN module is performed by writing to the Object Dictionary (OD) and by issuing ECM CANopen OS Commands (OS Command). Both of these actions are implemented using a Service Data Object Expedited Write (SDO Write). The format is as... -
Page 13: Reading From The Noxcan Module (Sdo Read)
Reading from the NOxCAN Module (SDO Read) During configuration it may be necessary to read certain locations in the Object Dictionary (OD). The format for a Service Data Object Read (SDO Read) is as follows: byte 0 byte 1 byte 2... -
Page 14: Identifying The Noxcan Module
Identifying the NOxCAN Module Each NOxCAN module can be uniquely identified by reading the following four parameters in the OD: Vendor ID (0x000001C6) located at OD address 0x1018, subindex 0x01 (4 byte integer/unsigned 32) Product Code (NOxCAN = 0x00000003) located at OD address 0x1018... -
Page 15: Commands To The Noxcan Module
Commands to the NOxCAN Module There are several commands that can be used with the NOxCAN module. The commands are executed by performing an SDO Write to OD address 0x1023, subindex 0x01. A list of the commands can be found in Appendix B. -
Page 16: Canceling (Erasing) The Zero And Span
0x01 0x0E If the ECM Error Code is from 0x10 to 0x3F inclusive, there is a problem with the module and/or the sensor memory. Therefore the SPAN will be ignored. A successful SPAN can be determined by reading locations 0x5000 and 0x5001 in the OD by performing an SDO Read. If the SPAN was successful those locations will read as 99999.0. -
Page 17: Modifying The Pre-Broadcast Averaging Of Data
Modifying the Pre-Broadcast Averaging of Data The Lambda sensor output (Ip1) and pressure (P) data is averaged prior to being broadcast. Each is averaged by the module every 5ms independent of the TPDO broadcast rate (see section 8.6). The averaging filter (α) can range from 0.001 (heavy averaging) to 1.000 (no averaging). The averaging filters (also called recursive averaging filters or digital low-pass filters) are used as follows: α... -
Page 18: Returning The Pre-Broadcast Averaging To Factory Default
The Node ID (NID) can be programmed from 0x01 to 0x7F (1 to 127). To change the NID, several messages must be sent to the NOxCAN module. This must be followed by a reset of the module (that can be performed three different ways; see the following). - Page 19 The last message sent takes the module out of configuration mode. CAN id byte 0 byte 1 0x7E5 0x04 0x00 After the NID has been successfully changed, the module enters pre-operational mode and does not broadcast data. The module can be returned to broadcast mode 1 of 3 ways: i) Power-cycle the module by disconnecting and reconnecting the power.
-
Page 20: Changing The Tpdo Broadcast Rate
CAN bus and how many TPDOs have been enabled for each module. If the broadcast rate is too fast the ECM Configuration Tool will not be able to identify or configure any of the modules. The formula for calculating the minimum broadcast rate is as follows: Minimum Broadcast Rate (ms) >... -
Page 21: Enable Transmit Process Data Object (Tpdo)
Minimum Broadcast Rate (ms) = (3 + 1 + 4 + 2 + 4 + 4 + 4 + 4) x 0.3125 = 8.125ms. Since the broadcast rate is valid only in increments of 1ms, round 8.125ms up to the next integer value; 9ms. -
Page 22: Transmit Process Data Object Mapping (Tpdo Mapping)
CANid byte 0 byte 1 byte 2 byte 3 byte 4 byte 5 byte 6 byte 7 0x600+NID 0x23 EnableOD EnableOD 0x01 Transmit Transmit 0x00 0xC0 Address lo Address hi CANid lo CANid hi Example: Enable TPDO1 for the module with NID = 0x10, (EnableOD Address = 0x1800, Transmit CANid = 0x180 + 0x10 = 0x190). -
Page 23: Entering Fuel Constants
The module and sensor are compatible with hydrogen fuels. To configure the module for hydrogen fuel requires sending the ECM CANopen OS Command 0x19 (EnableH2Calc) via an SDO Write. The H:C, O:C, N:C constants are ignored until the hydrogen fuel mode is disabled. -
Page 24: Factory Reset
0x10 0x01 0x1A 8.11 Factory Reset Parameters that are stored in non-volatile memory (EEprom) can be reset to a standard configuration by issuing the ECM OS Command 0xDF (see Appendix B). CANid byte 0 byte 1 byte 2 byte 3... -
Page 25: Appendix A: Error Codes And Error Register
Appendix A: Error Codes and Error Register CAN id byte 0 byte 1 byte 2 byte 3 byte 4 byte 5 byte 6 byte 7 0x80+NID Error Error Error Code lo Code hi Register Error lo Error hi ERROR CODE DESCRIPTION OF ERRORS 0x0000 - 00FF No error or error reset... - Page 26 Serial overrun 0x00B7 Can overrun Lss 0x00B8 Can overrun Sdo 0x00B9 Can overrun Rx 0x00BA Can overrun ECT5 0x00FF Both ON Module powering down within 500ms Sensor Warm-up count down in seconds (active during ECM ECM AUX Error Code 0x0001)
-
Page 27: Appendix B: Ecm Canopen Os Commands
Appendix B: ECM CANopen OS Commands A user-specific CANopen OS Command to the NOxCAN module is sent using an SDO expedited write message in the following form. These commands apply only to the NOxCAN module and are listed on the following page:... - Page 28 Command Value Description Reply SensorOn 0x07 Turn on sensor power None SensorOff 0x08 Turn off sensor power None OWDisable 0x0A Ignore 1wire memory (OWDisabled) and use None EE memory values, unit subsequently performs defForceOW/EERead OWEnable 0x0B Use 1wire memory values (OWEnabled), unit None subsequently performs defForceOW/EERead ForceOW/EERead...
- Page 29 Command Value Description Reply defSenModNotReady 0xFD defZeroSpanDataInvalid 0xFE defOWZeroSpanWrFail 0xFF ResetO2 0x11 Resets the zero and span for %O2 back to factory values (M=1, b=0, x=0) defZeroSpanSuccessful 0x00 defSenModNotReady 0xFD defZeroSpanDataInvalid 0xFE defOWZeroSpanWrFail 0xFF ResetNOX 0x12 Resets the zero and span for NOX back to factory values (M=1, b=0, x=0) defZeroSpanSuccessful 0x00...
-
Page 30: Appendix C: Heartbeat
Appendix C: Heartbeat A Heartbeat message is transmitted every 0.5 seconds by the NOxCAN module. During normal operation the module is in operational mode (NMT state = 0x05). CAN id byte 0 byte 1 byte 2 byte 3 byte 4... -
Page 31: Appendix D: Process Data Objects
PDO Data Ip2raw (bits) PR16 0x200E single float PDO Data Error bit flags ERFL 0x200F single float PDO Data ECM CANOpen Error Code ERCD 0x2010 single float PDO Data Praw (bits) PR10 0x2011 single float PDO Data PCF (Pressure Correction Factor) * 10000... -
Page 32: Appendix E: Sensor Constants
The module can be configured to use generic sensor constants which can be modified by the user by issuing the proper ECM CANopen OS Command (see Appendix B). The memory locations are organized as shown below:... - Page 33 The procedure for using the generic sensor constants is as follows: i) Disable the 1WIRE memory in the sensor connector by issuing ECM CANopen OS Command 0x0A. ii) Load the appropriate sensor constants from ROM into EEPROM by writing the sensor type to OD location 0x5017.
- Page 34 = 0x0001 (1) NTK NOx Example: Disable 1WIRE sensor memory (ECM CANopen Command 0x0A), load sensor constants for a NTK NOx sensor (SDO Write 0x0001 to OD address 0x5017) and modify the RVS TARGET to 150 ohms (SDO Write to 150*10 = 0x05DC to OD...
-
Page 35: Appendix F: Calculating The %O In Air
Appendix F: Calculating the %O in Air The oxygen concentration in dry air (zero humidity) is 20.945 and decreases with increasing humidity. The %O2 in air can be calculated from the barometric pressure (Pb), the relative humidity (Rh), and the saturated water vapor pressure (Pws) by using the following formula: %O2 = 20.945% x (Pb - Pws x (Rh/100)) / Pb The saturated water vapor pressure (Pws) is a function of the ambient temperature (Ta) and is given in the table below. -
Page 36: Appendix G: Module Eib Mode And Stand-Alone Mode
Module EIB mode and Stand-alone Mode The NOxCAN module can be used in conjunction with a display head (EIB mode) or on its own (Stand-alone mode). When delivered to be used with a display head, the module is setup in EIB mode. - Page 37 2. Install and start the Configuration Tool (software). Click on the “Module” tab. Select the CAN adapter being used. Then start the communication. 3. Click on the “Set to EIB Mode”. Wait for “Done” Message. Stop communication and exit program.
- Page 38 4. Take the nut off the end of the module. Use an 18mm socket without the wrench. 5. Release the two tangs at each side of the module. 6. Slide the PCB out. Remove the jumper from JP4. You can hang it on one pin of JP4 when “off”.
- Page 39 7. Make sure both O-rings are on the threaded connector. 8. Slide the PCB into the enclosure until the two tangs “click”. 9. Put the nut on and tighten ONLY ½ turn from where it is seated. If this nut is tightened too much, the connector will crack and the enclosure will not be sealed.
-
Page 40: Appendix H: 5200 Series Instruments Parts List
Display Heads 01-01 NOx 5210 01-02 Lambda 5220 01-03 EGR 5230 CAN Modules 02-01 LambdaCAN 02-02 NOxCAN Modules 03-01 Lambda Sensor Simulator, SIM300 03-02 NOx Sensor Simulator, SIM400 03-03 Ceramic Sensor Heater, BTU200 Power Supplies 04-01 AC/DC Power Supply, Universal, 24VDC @ 4.2A 04-02 Vboost Supply, 10~14VDC to 24VDC @ 14.5A... - Page 41 Actuators 08-01 Ceramic Sensor Heater Mount Eurofast Cables, Ts, Termination Resistors, and Connectors 09-01 4 m Eurofast 12 mm Cable 09-02 2 m Eurofast 12 mm Cable 09-03/n “n” m Eurofast 12 mm Cable 09-04 Flexi-Eurofast Cable, 0.3 m 09-05 Eurofast “T” 09-06 Eurofast Termination Resistor 09-07 Eurofast Male Connector 09-08 8 Channel Eurofast Hub Block...
- Page 42 11-07 Not assigned 11-08 2 m Key-on Cable 11-09 2 m Heater Cable 11-10 2 m Heater Power Cable 11-11 Heater Power Hookup 11-12 Simulator Lambda Adapter Cable 11-13 Simulator NOx Adapter Cable 11-14 BNC to Banana Cable 11-15 DC Power Cable, Spades 11-16 DC Power Cable, Banana Plugs 11-17 Deutsch DTM3M to DB9F 11-18 3 m, DB9 Cable, M-F...
- Page 43 Software and Media 13-01 5200 Series Analyzer and Module Manuals and Configuration Software, CD Tools 14-01 18 mm x 1.5 mm Tap 14-02 18 mm x 1.5 mm Die 14-03 ¼” NPT Tap 14-04 ¼” ISO Tapered Tap 14-05 Antiseize 14-06 Metal Brush...
-
Page 44: Appendix I: Warranty And Disclaimers
Appendix I: Warranty and Disclaimers WARRANTY The products described in this manual, with the exception of the lambda and pressure sensors, are warranted to be free from defects in material and workmanship for a period of 365 days from the date of shipment to the buyer. Within the 365 day warranty period, we shall at our option repair such items or reimburse the customer the original price of such items which are returned to us with shipping charges prepaid and which are determined by us to be defective. - Page 45 ENGINE CONTROL AND MONITORING Los Altos, CA 94023-0040 • USA • (408) 734-3433 • Fax: (408) 734-3432 www.ecm-co.com...
- Page 46 DIS1000 Display head Lambda 5220 Lambda meter NOx 5210 NOx meter EGR 5230 EGR meter LambdaCAN Lambda module NOxCAN NOx module NOx1000 NOx module BTU200 Ceramic Sensor Heater EGR 4830 Analyzer SIM300 SIM400 To which this declaration relates are in conformity with the essential requirements of the following standards: EN61326: 1997/A2: 2001 (Class A &...