Advertisement
- 1 Features
- 2 Accessories
- 3 Parts Name
- 4 Unpacking and preparation
- 5 Putting the player together
- 6 Connections and installation
- 7 Playing records
- 8 Pitch control
- 9 Operation and display of the control unit
- 10 Maintenance
- 11 Troubleshooting guide
- 12 Specifications
- 13 Dimensional drawings
- 14 Safety precautions
- 15 IMPORTANT SAFETY INSTRUCTIONS
- 16 Documents / Resources
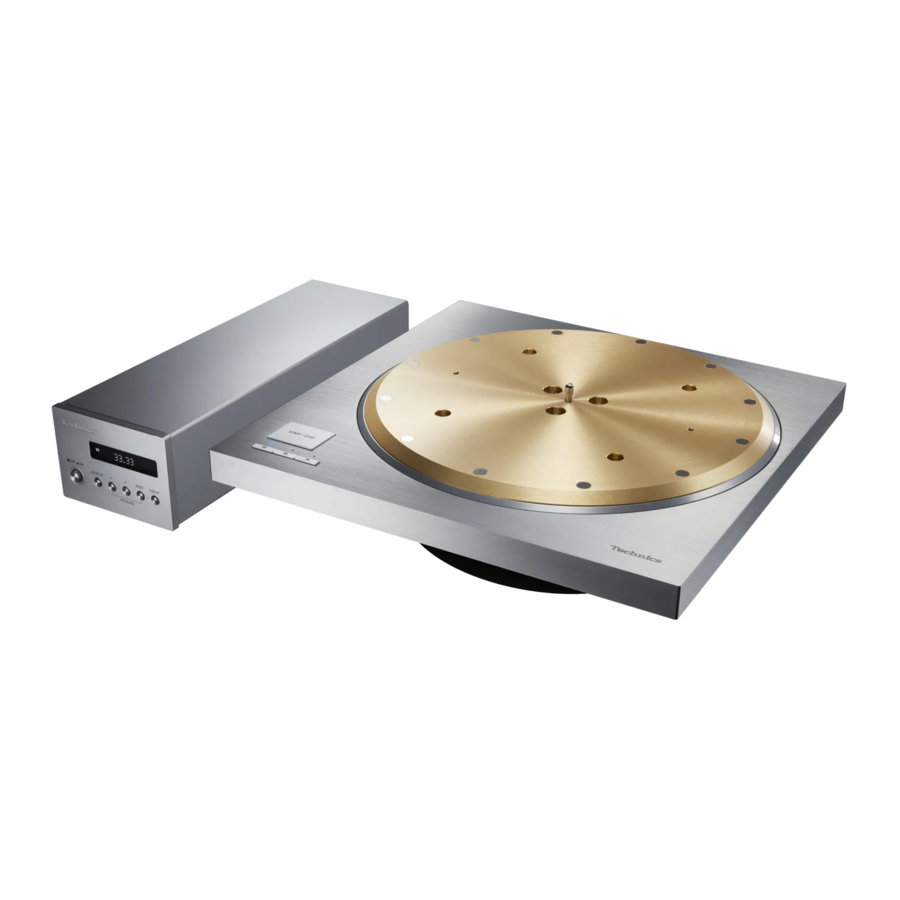
Features
Coreless direct drive motor for smooth and accurate rotation
- The new coreless direct drive motor can reduce minute vibration during rotation by ensuring strong torque to drive the grand class turntable.
- The high-precision motor control technology changes the drive mode according to the motor operation status to achieve high rotation accuracy.
Three-layer turntable for stable rotation
- The three-layer turntable structure is consisting of brass, aluminum die-cast and deadening rubber that is against unwanted resonance and attached to the bottom surface.
- Dense tungsten weights are located on the outer periphery of the brass part to deliver large inertial mass.
Special control unit that can eliminate unwanted noise interference with the main unit
- The power circuit and control circuit are separated to minimize unwanted external noise interference with the main unit and stored in a single control unit.
- The new switching power supply with a noise reduction circuit has been developed to reduce noise in voltage supply.
Compatibility with SP-10MK2 and SP-10MK3
- The player preserves the bottom shape and screw locations of SP-10MK2 and SP-10MK3 so that you can continue to use your cabinet and tone arm.
Accessories
In order to prevent damage during shipping some of the equipment has been disassembled.
Please check and identify the supplied accessories.
 AC mains lead (1 pc.) (K2CG3YY00191) |  AC mains lead (1 pc.) (K2CM3YY00041) |  AC mains lead (1 pc.) (K2CS3YY00033) |
 AC mains lead (1 pc.) (K2CT3YY00081) |  Turntable mat (1 pc.) (RGS0008) |  EP record adaptor (1 pc.) (TEKX077) |
 Screw set for turntable (1 set) (TYL0194)
|  Turntable (1 pc.) (TYL0195) |  Detachable handle (2 pc.) (TXQ0020) |
- The model numbers of the accessories are as of February 2018.
They are subject to change without notice. - Keep the packaging materials after taking out the goods.
You will need them when carrying the product for a long distance. - Follow the local regulations when disposing of the product.
- Do not use any other AC mains lead except the supplied one.
- Keep the auxiliary weight, screws and washers out of reach of children to prevent swallowing.
Parts Name
Main unit
Front

Back

Control unit
Front

Back

Unpacking and preparation

Notes for taking out the goods from the package box and transporting
Attention
- Always use two or more people to take out and transport the main unit.
- Be careful not to lose balance if lifting the unit with your hands at non-optimal position.
- You may damage your back.
- You may lose balance on the stairs and the like, which may lead to injury.
- Be careful not to catch your fingers when taking out the main unit.
- Be careful not to catch your fingers in the gap between the bottom of the main unit and floor.
- Keep the packaging materials after taking out the goods.
- Take out the goods after deciding the installation location.
- For notes regarding installation, see "Installation".
- Take out the turntable sheet and operating instructions.

- Keep accessories out children's reach.
- The main unit and control unit are wrapped in protective sheets.
- Put your hands between the packing cushions (
![]() dotted line area of the package box top view) and slowly lift the main unit to take it out. Always perform this task using two or more people.
dotted line area of the package box top view) and slowly lift the main unit to take it out. Always perform this task using two or more people.
![]()
- Be very careful when lifting the main unit.
- Hold the main unit from the bottom to prevent it from slipping from your hands.
- Perform the task using both hands to not lose balance.
- Take out the control unit, AC mains lead cord, turntable, and other accessories.


 dotted line area of the package box top view) and slowly lift the main unit to take it out. Always perform this task using two or more people.

Putting the player together
Before putting the player together
Regarding the cabinet
- This player preserves the bottom shape and screw locations of SP-10MK2 and SP-10MK3 so that you can continue using your cabinet and tone arm for a system using SP-10MK2 or SP-10MK3.
- This player is a model with a large starting torque. To make full use of its characteristics and performance, use a heavy cabinet made of a thick material.
- When choosing a cabinet, decide its external dimensions based on the effective length of your tone arm.
- Use solid and strong insulators to support the cabinet.
- Player mounting dimensions (See Dimensional drawings)
Regarding the tone arm mounting
- Use the tone arm base sold separately. For details such as the mounting method, follow the tone arm base operating instructions and the tone arm leaflet.
Mounting to the cabinet
- Tighten the detachable handle screws into the detachable handle mounting holes (two locations) on the main unit.
![]()
- Slowly lift the main unit and place it on the cabinet.
![]()
- Fix the main unit to the cabinet using screws.
- Mount by following the cabinet operating instructions.


In order to prevent damage during shipping, some of the equipment has been disassembled.
Put the player together in the following order.

Attention
- Do not connect the AC mains lead until set up is complete.
- When fitting the turntable, prevent foreign material from getting in between the main unit and turntable.
- Do not use an electric screwdriver or impact wrench to tighten screws.
- Note that using a screwdriver not fitting to the screws for mounting the turntable may damage the main unit.
Fitting the unit
- Tighten the detachable handle screws into the detachable handle mounting holes (two locations) on the turntable. Slowly lift the turntable and then lower it in such a way as to insert the center spindle into the hole in the center of the turntable.
![]()

Attention
- Tighten the detachable handle by turning it 5 or more times. If you have tightened it until the end, loose a little bit. Do not tighten it firmly.
- Be careful when handling the turntable, as it is heavy.
- Wipe off fingerprints or dirt with a soft cloth.
- Slowly lower the turntable while aligning the rotor shaft fix holes (three locations) with the rotor shafts.
- Mount by using the rotor shaft with the arrow mark as a guide. (See Putting the player together)
Attention
- If the rotor shafts are misaligned, a gap remains between the turntable and main unit and you cannot mount the turntable correctly.
Do not force the turntable downward.


- Attach the washers, belleville springs, and screws for turntable to the rotor shaft fix holes, and tighten the mounting screws securely.
![]()

Attention
- When tightening screws, do not allow screw heads to protrude from the top surface of the turntable.
- Tighten the three screws uniformly. Failing to do so may make the turntable rattle or rotate unstably. Make sure none of the screws are loose.
To remove the turntable
- Loosen the mounting screws for turntable and remove them.
- Keep the screws, belleville springs, and washers carefully.
- Tighten the detachable handle screws into the detachable handle mounting holes (two locations) on the turntable and slowly lift the turntable straight up.
Fitting the unit mat
- Lay the turntable mat on the turntable.
Connections and installation
- Turn off all units and disconnect the AC power supply cord from the outlet before making any connections.
- Connect the AC power supply cord only after all other connections are completed.
- Refer also to the instruction manual of the connected device.
Connecting the control unit / Connecting the power plug and earth ground

* When necessary, connect the earth terminal of the main unit to that on the amplifier by using a commercially available earth lead.
- Connect the control unit connection cable by inserting it until it clicks into place.
- Connect the AC mains lead.
- Connect the power plug and earth ground.
- Confirm the wattage of the AC outlet on the connected equipment before using it for this unit.
(This unit consumes 10 W.)
- Confirm the wattage of the AC outlet on the connected equipment before using it for this unit.
Note
- Although the AC power switch is in the "OFF" position, the unit is not completely disconnected from the mains. Remove the plug from the main electrical outlet if you will not be using the unit for an extended period of time. Place the unit so the plug can be easily removed.
Installation
Notes for installation
- Always use two people or more to install or move the unit.
- Before you move the unit, remove all devices connected and turn off the power supply. Moving the unit with the control unit connected may make it fall off and cause injury.
- Ensure the unit is not exposed to direct sunlight, dust, humidity, and heat from a heating appliance.
- This unit may pick up interference from a radio if there is one nearby. Keep the unit as far as possible from a radio.
- Do not install the unit on a heat source.
- Avoid a place with large temperature variations.
- Avoid a place with frequent condensation.
- If anti-tip measures are required, consult a contractor. The floor and wall strength need to be checked.
- Avoid an unstable place.
- Do not put an object on the unit.
- Do not install the unit in a confined space such as a book shelf.
- Install the unit at a position well away from walls or other devices to ensure effective heat radiation from the inside of the unit.
- Make sure the installation location is sufficiently strong to withstand the total weight of the unit and system.
- Note that the unit may be damaged by cigarette smoke or moisture from an ultrasonic humidifier.
Condensation
Think of taking out a cold bottle from a refrigerator. If you leave it in a room for a while, dewdrops will form on the bottle surface.
This phenomenon is called "condensation".
- Conditions causing condensation
- Rapid temperature change (caused by moving from a warm place to a cold place or vice versa, rapid cooling or heating, or direct exposure to cooled air)
- High humidity in a room with much steam, etc.
- Rainy season
- Condensation may damage the unit. If it has occurred, turn the unit off and leave it until it adapts to the ambient temperature (approximately 2 to 3 hours).
Playing records
Preparation
*1 Put a record (not included) on the turntable.

Attention
Do not press [START-STOP] when the turntable is removed.
- Press the power button of the control unit to turn it on.
The speed is automatically set to 33 turns, the [33] indicator lights on the main unit and the turntable speed of [33.33] appears on the display of the control unit.

- Press [START-STOP].
The turntable starts revolving.


- When play finishes
- Lift the cue lever, return the tone arm to the arm rest and lower the cue lever.
- Press [START-STOP].
The electronic brake gently stops the turntable. - Press the power button of the control unit to turn it off.
- Clamp the tone arm with the arm clamp.
- Put the stylus cover back on (to protect the stylus tip).
- When playing EP records
- Press the speed select button [45] ([45] lights).
![]()
- Fit the EP record adaptor over the centre spindle.
- Press the speed select button [45] ([45] lights).
- When playing SP records
- Press the speed select button [78] ([78] lights).
![]()
- Press the speed select button [78] ([78] lights).
- When using a record stabilizer (not included)
- See the instruction manual of the record stabilizer.
- Maximum weight: 1 kg


Note
- Pressing [33/45/78] on the control unit can also change the turntable speed. (See Unit speed setting)
![]()

Pitch control
(fine adjustment to pitch)
- Press [-] or [+] on the control unit to make adjustment.
- The pitch can be set within approximately ±16% of the currently set turntable speed [33/45/78].
- The current set value appears on the display of the control unit. The display differs depending on the display mode.
(See Switching the display mode ) - The turntable speed changes each time the pitch is set while the turntable is rotating.
* Pressing the button increases or decreases the value.
* Holding the button down accelerates the increase or decrease.
- When the display mode is "Turntable speed setting"

- The value to two decimal places is displayed.
- The turntable speed can be adjusted in increments of ±0.01 turn.
- When the display mode is "Pitch setting"

- The value to one decimal place is displayed.
- The pitch can be adjusted in increments of ±0.1%.
- To return to the prescribed turntable speed
Press [RESET] on the control unit.
The value immediately returns to the prescribed turntable speed. (33 1/3 , 45 or 78.26 rpm)
*The display of the control unit shows the prescribed setting.
The turntable speed becomes the prescribed turntable speed in the turntable speed setting mode and 0.0% in the pitch setting mode.

- Speed selector button indicators of the main unit during pitch control

- Blue LED on: Without pitch control (0.0%)
- Orange LED on: During pitch control


Note
- The pitch can be set for each turntable speed.
- Turning off the power button cancels the pitch control setting. Turning on the power button again returns the value to the initial setting.
Operation and display of the control unit
Unit speed setting
- Press [33/45/78] on the control unit.
Each time [33/45/78] is pressed, the turntable speed changes in order of "33" → "45" → "78" → "33" →...

- The turntable speed changes each time the pitch is set while the turntable is rotating.

Switching the display mode
- Press [DISPLAY] on the control unit.
Each time [DISPLAY] is pressed, the display mode changes in order of "turntable speed setting" → "Pitch setting" → "Turntable speed measurement" → "Turntable speed setting" →...


Turntable speed measurement
The actual turntable speed can be measured in this display mode. Switch the display mode (see above) to enter this mode.
- "rpm" appears after the numerical value.
- "--.-- rpm" appears when the turntable has stopped.


- Operation during "Turntable speed measurement"
Operating the buttons as below changes the display mode to "Turntable speed setting" allowing you to make the setting.
*The display mode returns to "Turntable speed measurement" if no operation is performed within three seconds.
| The pitch can be adjusted. (See Pitch control) |
| The value immediately returns to the prescribed turntable speed. |
| The turntable speed changes each time the button is pressed. |
Note
- An averaged value is displayed.
Display dimmer setting
The display dimmer will be activated if the control unit is not operated for 20 seconds. There are four dimming patterns.

- On the control unit, hold [RESET] down and press [DISPLAY].
- The dimmer setting is displayed.
- Press [DISPLAY] on the control unit.
The setting changes each time [DISPLAY] is pressed. (See above.)- The display returns to the original display if no operation is performed within three seconds.
| Display | Display dimmer when no operation is performed for 20 seconds |
| Display OFF | Brightness is reduced by one level. ⇒ (No operation for further five seconds) ⇒ Brightness is reduced by two levels. ⇒ (No operation for further five seconds) ⇒ Off |
| Dimmer OFF | No dimming (Always on) |
| Dimmer 1 | Brightness is reduced by one level. |
| Dimmer 2 | Brightness is reduced by two levels. |
- After setting, brightness is immediately adjusted to the set value. The display is immediately turned off if "Display OFF" is selected.
- Operating a button (any button other than the power button) on the control unit while the dimmer is active returns the display to full brightness.
Note
- The setting is saved. When the power is turned on the next time, the setting when the power was turned off last will be recovered.
Adjusting the torque to rotate the unit at a constant speed
Press [START·STOP] and then adjust the torque (rotational force) at five levels to rotate the turntable at a constant speed.

- On the control unit, hold [RESET] down and press [-] and [+] simultaneously.
- The torque setting is displayed.
- Press [-] or [+] on the control unit to make adjustment.
- Select one of the five levels from "TORQUE1" to "TORQUE5".
Pressing the button increases or decreases the value. - Use the table below as a guide.
- The display returns to the original display if no operation is performed within three seconds.
- Select one of the five levels from "TORQUE1" to "TORQUE5".
| Display | Torque to rotate at a constant speed |
| TORQUE5 | Maximum (Initial setting) |
| TORQUE4 |  |
| TORQUE3 | |
| TORQUE2 | |
| TORQUE1 | Minimum |
Note
- The setting is saved. When the power is turned on the next time, the setting when the power was turned off last will be recovered.
Maintenance
Cleaning the main unit
Wipe the main unit and other components with a dry soft cloth.
When dirt is heavy, wring a wet cloth tightly to wipe the dirt, and then wipe it with a soft cloth.
- Do not use solvents including benzene, thinner, alcohol, kitchen detergent, a chemical wiper, etc. This might cause the exterior case to be deformed or the coating to come off.
Moving the unit
Repackage the unit in the packaging it came in. (See Unpacking and preparation)
Keep the packaging materials after taking out the goods.
If you no longer have the packaging, do the following:
- Take off the turntable and turntable mat and carefully wrap them.
- Carefully wrap the main unit in a blanket or paper.


Troubleshooting guide
Before requesting service, make the below checks. If you are in doubt about some of the check points, or if the remedies indicated in the chart do not solve the problem, contact your dealer.
No power
- Is the AC mains lead plugged in?
→ Plug the mains lead in firmly. (See Connections and installation) - Is the control unit connected with the main unit?
→ Insert the control unit connection cable until it clicks. (See Connections and installation)
No indication on the display of the control unit
- Is the power plug connected?
→ Insert it firmly. (See Connections and installation) - Is the power on?
→ Press the power button to turn on the power. (See Playing records) - Is the display dimmer activated?
→ Operate a button (any button other than the power button) on the control unit. (See Display dimmer setting)
Error code
Occurrence of an error will be notified as necessary on the display of the control unit and with the speed selector button indicators of the main unit.
| Display of the control unit | Measure |
| Unconnected | Check that the control unit is connected with the main unit. (See Connections and installation) |
| F58 F76 F17 | Consult your dealer.
|

(Example of the display of the control unit in case of an error)

(Example of the speed selector button indicators of the main unit in case of an error)
Flashes in orange.
Specifications
| General | |
| Power supply | AC 110-240 V, 50/60 Hz |
| Power consumption | 10 W (Power ON) 0.05 W (Power OFF) |
| Dimensions (W×H×D) | <Control unit> 110×84×350 mm (4- 11/32 ×3- 5/16 ×13- 25/32 inch ) |
| <Main unit> 365×109×365 mm (14- 3/8 ×4- 5/6 ×14- 3/8 inch ) | |
| Mass | <Control unit> Approx. 2.1 k g (4.7 lbs) |
| <Main unit> Approx. 18.2 k g (40.2 lbs) | |
| Operating temperature range | 0°C to 40°C (32°F to 104°F) |
| Operating humidity range | 35% to 80% RH (no condensation) |
| Turntable section | |
| Drive method | Direct drive |
| Motor | Brushless DC motor |
| Turntable | Brass and Aluminum die-cast combined Diameter: 323 mm (12- 23/32 inch ) Mass: Approx. 7.9 k g (17.5 lbs) (including the turntable sheet) |
| Turntable speeds | 33-1/3, 45 and 78* rpm |
| Variable range pitch | ±16% |
| Starting torque | 0.39 N·m (4.0 k g ·cm) / 3.47 lb-in |
| Braking system | Electronic brake |
| Wow and flutter | 0.015% W.R.M.S. (JIS C5521) |
| Terminal section | |
| Output terminal | Earth terminal |
Specifications are subject to change without notice.
* The turntable speed will be 78.26 rpm when set to 78 rpm (pitch control 0.0%).
Dimensional drawings
External dimensions

Select a cabinet that fits with the external dimensions of the player.
<Unit: mm>
Locations of the screws for fixing the cabinet

Fix the player to the cabinet at the nine positions (marked with dotted line) shown in the figure above (the bottom surface of the main unit). <Unit: mm>
- Fixing screw: M5
See the sectional view below when selecting the length of the fixing screws.


Safety precautions
Warning

Unit
![burn hazard]()
![shock hazard]()
To reduce the risk of fire, electric shock or product damage,- Do not expose this unit to rain, moisture, dripping or splashing.
- Do not place objects filled with liquids, such as vases, on this unit.
- Use only the recommended accessories.
- Do not remove covers.
- Do not repair this unit by yourself.
Refer servicing to qualified service personnel. - Do not let metal objects fall inside this unit.
- Do not place heavy items on this unit.

AC mains lead
![shock hazard]()
![shock hazard]()
To reduce the risk of fire, electric shock or product damage,- Ensure that the power supply voltage corresponds to the voltage printed on this unit.
- Insert the mains plug fully into the socket outlet.
- Do not pull, bend, or place heavy items on the lead.
- Do not handle the plug with wet hands.
- Hold onto the mains plug body when disconnecting the plug.
- Do not use a damaged mains plug or socket outlet.
- The mains plug is the disconnecting device. Install this unit so that the mains plug can be unplugged from the socket outlet immediately.
![shock hazard]() Ensure the earth pin on the mains plug is securely connected to prevent electrical shock.
Ensure the earth pin on the mains plug is securely connected to prevent electrical shock. - An apparatus with CLASS I construction shall be connected to a mains socket outlet with a protective earth connection.
Caution

Unit
- Do not place sources of naked flames, such as lighted candles, on this unit.
- This unit may receive radio interference caused by mobile telephones during use.
If such interference occurs, please increase separation between this unit and the mobile telephone. - This unit is intended for use in moderate and tropical climates.
- Do not put any objects on this unit. This unit becomes hot while it is on.
- Be careful not to catch your hands and/or fingers in the turntable unit when assemble the player.
- Always use two people or more to install or move the unit.
Placement
- Place this unit on an even surface.
![burn hazard]()
![shock hazard]()
To reduce the risk of fire, electric shock or product damage,- Do not install or place this unit in a bookcase, built-in cabinet or in another confined space.
Ensure this unit is well ventilated. - Do not obstruct this unit's ventilation openings with newspapers, tablecloths, curtains, and similar items.
- Do not expose this unit to direct sunlight, high temperatures, high humidity, and excessive vibration.
- Do not install or place this unit in a bookcase, built-in cabinet or in another confined space.
- Ensure that the placement location is sturdy enough to accommodate the weight of this unit (See Specifications).
- Do not lift or carry this unit by holding the knobs.
Doing so may cause this unit to fall, resulting in personal injury or malfunction of this unit.
Caution for AC Mains Lead
(For the AC mains plug of three pins)
For your safety, please read the following text carefully.
This appliance is supplied with a moulded three pin mains plug for your safety and convenience.
A 10-ampere fuse is fitted in this plug.
Should the fuse need to be replaced please ensure that the replacement fuse has a rating of 10-ampere and that it is approved by ASTA or BSI to BS1362.
Check for the ASTA mark ![]() or the BSI mark
or the BSI mark ![]() on the body of the fuse. If the plug contains a removable fuse cover you must ensure that it is refitted when the fuse is replaced. If you lose the fuse cover the plug must not be used until a replacement cover is obtained.
on the body of the fuse. If the plug contains a removable fuse cover you must ensure that it is refitted when the fuse is replaced. If you lose the fuse cover the plug must not be used until a replacement cover is obtained.
A replacement fuse cover can be purchased from your local dealer.
Before use
Remove the connector cover.
How to replace the fuse
The location of the fuse differ according to the type of AC mains plug (figures A and B).
Confirm the AC mains plug fitted and follow the instructions below.
Illustrations may differ from actual AC mains plug.
- Open the fuse cover with a screwdriver. (figures A and B)
![]()
- Replace the fuse and close or attach the fuse cover. (figures A and B)
![]()


IMPORTANT SAFETY INSTRUCTIONS
For the U.S.A. and Canada
Read these operating instructions carefully before using the unit. Follow the safety instructions on the unit and the applicable safety instructions listed below.
Keep these operating instructions handy for future reference.
- Read these instructions.
- Keep these instructions.
- Heed all warnings.
- Follow all instructions.
- Do not use this apparatus near water.
- Clean only with dry cloth.
- Do not block any ventilation openings. Install in accordance with the manufacturer's instructions.
- Do not install near any heat sources such as radiators, heat registers, stoves, or other apparatus (including amplifiers) that produce heat.
- Do not defeat the safety purpose of the polarized or grounding-type plug. A polarized plug has two blades with one wider than the other. A grounding type plug has two blades and a third grounding prong. The wide blade or the third prong are provided for your safety. If the provided plug does not fit into your outlet, consult an electrician for replacement of the obsolete outlet.
- Protect the power cord from being walked on or pinched particularly at plugs, convenience receptacles, and the point where they exit from the apparatus.
- Only use attachments/accessories specified by the manufacturer.
- Use only with the cart, stand, tripod, bracket, or table specified by the manufacturer, or sold with the apparatus. When a cart is used, use caution when moving the cart/ apparatus combination to avoid injury from tip-over.
![]()
- Unplug this apparatus during lightning storms or when unused for long periods of time.
- Refer all servicing to qualified service personnel. Servicing is required when the apparatus has been damaged in any way, such as power-supply cord or plug is damaged, liquid has been spilled or objects have fallen into the apparatus, the apparatus has been exposed to rain or moisture, does not operate normally, or has been dropped.

Warning
Unit
![burn hazard]()
![shock hazard]()
To reduce the risk of fire, electric shock or product damage,- Do not expose this unit to rain, moisture, dripping or splashing.
- Do not place objects filled with liquids, such as vases, on this unit.
- Use only the recommended accessories.
- Do not remove covers.
- Do not repair this unit by yourself.
Refer servicing to qualified service personnel.
AC power supply cord
- The power plug is the disconnecting device. Install this unit so that the power plug can be unplugged from the socket outlet immediately.
![shock hazard]() Ensure the earth pin on the power plug is securely connected to prevent electrical shock.
Ensure the earth pin on the power plug is securely connected to prevent electrical shock. - An apparatus with CLASS I construction shall be connected to a power socket outlet with a protective earthing connection.
Caution
Unit
- Do not place sources of naked flames, such as lighted candles, on this unit.
- Be careful not to catch your hands and/or fingers in the turntable unit when assemble the player.
- Always use two people or more to install or move the unit.
Placement
![burn hazard]()
![shock hazard]()
To reduce the risk of fire, electric shock or product damage,- Do not install or place this unit in a bookcase, built-in cabinet or in another confined space.
Ensure this unit is well ventilated. - Do not obstruct this unit's ventilation openings with newspapers, tablecloths, curtains, and similar items.
- Do not install or place this unit in a bookcase, built-in cabinet or in another confined space.
For the U.S.A. and Canada
The following mark and symbols are located on bottom of the unit.

RISK OF ELECTRIC SHOCK
DO NOT OPEN
TO REDUCE THE RISK OF ELECTRIC SHOCK, DO NOT REMOVE SCREWS.
NO USER-SERVICEABLE PARTS INSIDE.
REFER SERVICING TO QUALIFIED SERVICE PERSONNEL.
 | The lightning flash with arrowhead symbol, within an equilateral triangle, is intended to alert the user to the presence of uninsulated "dangerous voltage" within the product's enclosure that may be of sufficient magnitude to constitute a risk of electric shock to persons. |
 | The exclamation point within an equilateral triangle is intended to alert the user to the presence of important operating and maintenance (servicing) instructions in the literature accompanying the appliance. |
- The illustrations shown may differ from your unit.
For the U.S.A. and Canada
If you have any questions, visit:
U.S.A.: http://shop.panasonic.com/support
Canada: www.panasonic.ca/english/support
Register online at http://shop.panasonic.com/support (U.S. customers only)
For the United Kingdom and Ireland customers
Sales and Support Information
Customer Communications Centre
- For customers within the UK: 0333 222 8777
- For customers within Ireland: 01 447 5229
- Monday–Friday 9:00 am – 5:00 pm, (Excluding public holidays).
- For further support on your product, please visit our website: www.technics.com/uk/
Documents / Resources
References
![shop.panasonic.com]() Panasonic - Official Consumer Product Support
Panasonic - Official Consumer Product Support![www.panasonic.ca]() Panasonic - Official Consumer Product Support
Panasonic - Official Consumer Product SupportHi-Fi Audio | Technics UK
Download manual
Here you can download full pdf version of manual, it may contain additional safety instructions, warranty information, FCC rules, etc.
Advertisement
Thank you! Your question has been received!


Need Assistance?
Do you have a question about the SP-10R that isn't answered in the manual? Leave your question here.