Kärcher RCF 3 - Robot Mop Manual
- Quick start manual (2 pages) ,
- Manual (280 pages)
Advertisement
- 1 General instructions
- 2 Symbols on the device
- 3 Intended use
- 4 Accessories and spare parts
- 5 Scope of delivery
- 6 Device description
- 7 Function of the cleaning robot
- 8 Initial start-up
- 9 Startup
-
10
Operation
- 10.1 Preparing the environment
- 10.2 Settings
- 10.3 Switching on the cleaning robot
- 10.4 Operation without app
- 10.5 Operation with the app
- 10.6 Interrupting cleaning
- 10.7 Battery level indicator
- 10.8 Manually sending the cleaning robot for recharging
- 10.9 Emptying the waste water tank
- 10.10 Refilling the cleaning fluid
- 10.11 Switching off the device
- 10.12 Reset WLAN connection
- 10.13 Restoring the factory settings
- 11 Transport
- 12 Storage
- 13 Care and service
- 14 Troubleshooting guide
- 15 Safety instructions
- 16 Documents / Resources
General instructions
Read these original operating instructions and the enclosed safety instructions before using the device for the first time. Act in accordance with them.
You will find a QR ® code to call up the online operating instructions in:


Symbols on the device

Read the operating instructions and all safety instructions before operating the device for the first time.

Protect the device from moisture. Store the device in a dry place. Do not subject the device to rain. The device is only suitable for indoor use.
Intended use
- This cleaning robot is designed for fully automatic wet cleaning of hard floors.
- Do not clean water-sensitive floor coverings such as e.g. untreated cork floors, since the moisture can penetrate and damage the floor.
- The device is suitable for cleaning PVC, linoleum, tiled, stone, oiled and waxed parquet, laminate and all water-resistant floor coverings.
- This device has been developed for use in private households and is not intended for the load imposed by commercial use.
Accessories and spare parts
Only use original accessories and original spare parts. They ensure that the appliance will run fault-free and safely.
Information on accessories and spare parts can be found at www.kaercher.com.
Scope of delivery
Check the contents for completeness when unpacking. If any accessories are missing or in the event of any shipping damage, please notify your dealer.
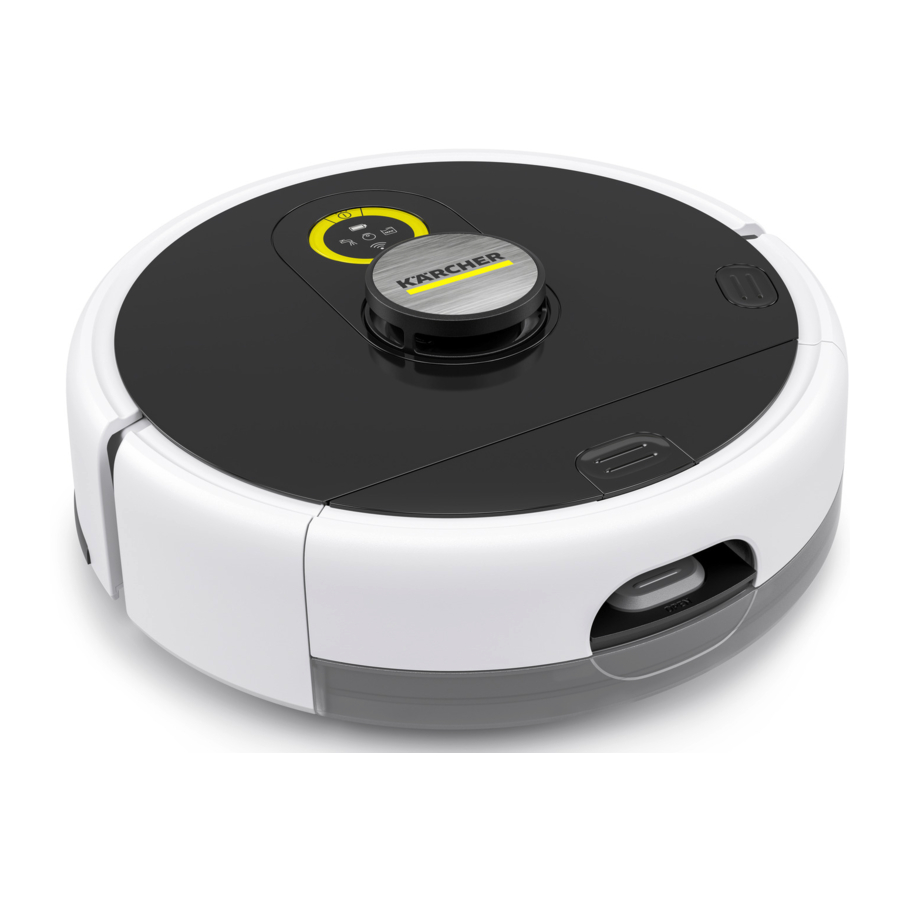
Device description

- Charging station
- Waste water tank unlocking button
- Fresh water tank unlocking button
- Roller cassette unlocking button
- Laser sensor (LiDAR)
- LED display
- Bumper
- Battery terminals
- Ultrasound sensor for carpet detection
- Steering roller
- Wheel
- Fall sensor
- Cleaning roller
- Wall tracking sensor
- Infrared receiver for locating the charging station
- On/Off/Pause button
- LED display indicator "Battery"
- LED display indicator "Max" Emptying the waste water tank
- LED display indicator "WLAN"
- Home button
- LED display indicator "Fresh water" Filling the fresh water tank
- LED display indicator "Robot status"
- Scraper unit with hair comb
- Cleaning tool
- Fresh water tank
- Waste water tank
- Opening lever of waste water tank
- Mains cable
- Detergent (30 ml)
- Cable fasteners
Function of the cleaning robot
- The mobile cleaning robot draws its energy from a built-in rechargeable battery, which it regularly recharges at the charging station provided. With one battery charge, the cleaning robot can clean up to 125 minutes in sensitive mode. It automatically returns to the charging station to recharge when the battery charge is too low.
- As soon as the charging process is finished, the cleaning robot automatically leaves the charging station and continues the cleaning work. The cleaning robot also returns to the charging station when it has finished cleaning.
- The cleaning robot moves systematically. It scans the room with a laser sensor (LiDAR) and then cleans the room step-by-step. It avoids obstacles that are at least as high as the LiDAR tower.
- The cleaning robot has fall sensors that can detect staircases and steps, designed to prevent it from falling.
- The ultrasound sensor detects carpets and avoids them during wet cleaning.
- The cleaning robot has a fresh and a waste water tank as well as a microfibre roller that is regularly moistened with fresh water and continuously cleans itself through its rotation, thereby thoroughly wet mopping the floor. At the same time, light loose dirt such as crumbs, dust fluff etc. can be picked up along with the mopping process. Dirty water is conveyed into the waste water tank via the roller. Particles are collected in the scraper unit with hair comb and partially transported into the waste water tank.
LED symbols on the display
| Symbol | LED | Meaning |
| WLAN | pulses blue | The device is connected to WLAN. The WLAN is reset. |
| flashes red | The robot is offline. | |
| lights up blue | The robot is connected to WLAN. | |
| off | The device is switched off. The device is in sleep mode. The device is in "Do not disturb" mode. The device is no longer connected to WLAN. | |
| Battery | lights up green | LED lights up when the battery is fully charged and up to a remaining battery run time of 30%. |
| lights yellow | LED lights up starting at a remaining battery run time of 29% to 10% | |
| flashes red | LED flashes starting at a remaining battery run time of 9% | |
| flashes green | The device is charging. | |
| off | The device is switched off. The device is in sleep mode. The device is in "Do not disturb" mode. | |
| Robot | off | The device is switched off. The device is in sleep mode. The device is in "Do not disturb" mode. |
| lights yellow | The device is switched on. The device is in standby mode. | |
| pulses yellow | A software update is being carried out. | |
| lights up blue | The robot returns to the charging station. The robot starts the cleaning. | |
| pulses blue | The cleaning was paused. The robot is charged intermittently during a cleaning process and continues cleaning afterwards. The robot returns to the charging station because the waste water tank is full or the fresh water tank is empty and continues cleaning afterwards. | |
| flashes red | A malfunction has occurred. See chapter Troubleshooting guide. | |
| Fresh water tank | flashes blue | The fresh water tank is empty. |
| Waste water tank | flashes red | The waste water tank is full. |
Special modes
Sleep mode
The cleaning robot automatically switches to sleep mode after 5 minutes of inactivity. Press any button to wake it up.
- The cleaning robot does not switch to sleep mode when it is on the charging station.
- The cleaning robot switches off automatically if it is in sleep mode for more than 6 hours
"Do not disturb" mode
It is possible to activate the "Do not disturb" mode. In "Do not disturb" mode, the cleaning robot does not resume an interrupted cleaning, does not perform scheduled cleaning and does not give audible warnings. The LED display indicators are switched off.
"Do not disturb" mode can be activated in the App. Downloading the app is described in the chapter Connecting cleaning robots with WLAN and App.
Note
In "Do not disturb" mode, the cleaning robot is not switched off. To continue cleaning, briefly press On/Off/ Pause button.
Remote control
In the app, there is the option to navigate the robot if it gets stuck in an inaccessible place, for example. This remote control can be selected in the app under "Settings" > "Robot settings".
Initial start-up
Setting up the charging station

TheRCF 3 cleaning robot may only be charged on the charger of a charging station with the part number 4.269-072.0.
- Select the location so that the cleaning robot can easily reach the charging station.
Note
Position the charging station on a floor that is not sensitive to water, as the damp roller could affect the floor during charging. - Ensure a distance of at least 0.5 m to the left and right of the charging station and a distance of at least 1.5 m in front of the charging station.
- The location must not be exposed to direct sunlight.
- Set up the charging station.

- Peel off the film on the adhesive strip of the cable attachment and attach the cable attachment to the back of the charging station. Place the cable neatly as required.

- Plug the mains cable device plug into the cable holder on the side of the charging station.

- Connect the mains plug.


Connecting the cleaning robot with the charging station
- Place the cleaning robot manually on the charging station and make sure that the battery terminals have a good contact.
The cleaning robot switches on automatically and emits an acoustic signal. The LED display indicators light up.
Note
During the initial start-up, manual switch-on without contact to the charging station is not possible.
After the initial start-up, the cleaning robot automatically moves to the charging station.
Connecting cleaning robots with WLAN and App
The cleaning robot can be controlled directly via buttons on the device or via an App using a WLAN-enabled mobile device. To be able to use all available functions we recommended controlling the cleaning robot via the Kärcher Home Robots App.
Before you download the App, make sure you have the following:
- The mobile device is connected to the Internet.
- The 2.4 GHz WLAN of the router is activated.
- Sufficient WLAN coverage is guaranteed. Download the Kärcher Home Robots App from the Apple App Store® or from Google Play™ store.


- Google Play™ and Android™ are trademarks or registered trademarks of Google Inc.
- Apple® and the App Store® are trademarks or registered trademarks of Apple Inc.
Connecting the cleaning robot with the Kärcher Home Robots App and WLAN:
- Download the KÄRCHER Home&Garden App from the Apple App Store or from the Google Play Store.
- Open the Kärcher Home Robots App.
- Create an account (if you are not already registered).
- Add the desired cleaning robot.
- Follow the step-by-step instructions in the App.
Startup
Inserting the waste and fresh water tank
The waste water tank must first be inserted into the fresh water tank before the entire tank module can be installed in the cleaning robot.
- Push the waste water tank horizontally into the fresh water tank until it audibly latches into place.

- Push the fresh water tank horizontally into the cleaning robot until it audibly latches into place.


Note
It is also possible to insert the fresh water tank into the device first and then the waste water tank into the fresh water tank.
Removing the waste and fresh water tank
- Press the fresh water tank unlocking button and remove the fresh water tank from the device.

- Press the waste water tank unlocking button and remove the waste water tank from the fresh water tank.


Inserting the cleaning roller
- Press the roller cassette unlocking button.
The roller cassette detaches from the cleaning robot. - Remove the roller cassette from the cleaning robot.

- Fold up the Scraper unit.
- Place the cleaning roller on the roller holder as shown in the illustration and then press it down.
Note the colour encoding (grey to grey, white to white).

- Fold down the Scraper unit.
- Pay attention to the cassette guide and push the roller cassette into the cleaning robot until it audibly engages.


Filling the fresh water tank
 ATTENTION
Danger from escaping water
Risk of damage
Empty the waste water tank every time the fresh water tank is empty and before filling the fresh water tank to prevent the waste water tank from overflowing.
- Remove the fresh water tank, see chapter Removing the waste and fresh water tank.
- Open the tank cap and turn it to the side.

- Fill the fresh water tank with cold or lukewarm fresh water.
- For an even better cleaning result, add KÄRCHER detergent or care agent to the fresh water tank.
![caution]() ATTENTION
ATTENTION
Overdosing or underdosing of the detergent or care agent
Can result in poor cleaning results.
Follow the dosage recommendations for the detergent or care agent.
Note
Do not use detergents from other manufacturers, as this may cause heavy foaming on the floor or in the waste water tank of the device.
In addition, foam may form during the first cleaning runs if there is still residue on the floor from previously used detergents from other manufacturers. - Close the tank cap.
- Insert the fresh water tank into the device, see chapter Inserting the waste and fresh water tank.

Operation
ATTENTION
Danger due to obstacles
Risk of damage
Before operating the cleaning robot, make sure that there are no obstacles on the floor, stairs or landings.
Preparing the environment
- Keep the floor free of objects lying around to ensure efficient cleaning. Obstacles require time-consuming cleaning because the cleaning robot has to drive around objects.
- Open the doors of the rooms that are to be cleaned.
- When operating the cleaning robot with the app: Carry out the configuration in the app so that the cleaning robot can clean according to individual cleaning requirements (no-go zones, different cleaning parameters, etc.), see chapter Settings in the app.
Settings
Settings on the robot
Cleaning can also be started from the cleaning robot without an app. The following commands can be executed using the buttons:
- Start cleaning via the On/Off/Pause button.
- Interrupt cleaning via the On/Off/Pause button.
- Return the cleaning robot manually to the charging station via the Home button.
The cleaning robot automatically returns to the charging station for recharging when it has completed a cleaning task or when it is low on energy during a cleaning process.
Settings in the app
The Kärcher Home Robots App offers the following main functions, among others:
- Step-by-step guide for configuration options
- Map creation for rooms and several floors
- Setting of time schedules
- Definition of no-go zones and virtual walls
- Notes on faults or malfunctions and the cleaning progress
- Setting of cleaning parameters such as amount of water, cleaning intensity, number of passes or carpet avoidance mode
- Establishment of cleaning zones
- Activation/deactivation of the "Do not disturb" mode
- FAQ with detailed troubleshooting
Switching on the cleaning robot
Note
Place the cleaning robot directly on the charging station if it cannot be switched on due to a too low charging state, see chapter Initial start-up.
- Place the cleaning robot manually on the charging station and make sure that the battery terminals have a good contact.
The cleaning robot switches on automatically and emits an acoustic signal.
The LED display indicator "Robot status" pulses yellow.
Note
Alternatively, the cleaning robot can also be switched on when it is not on the charging station: - Keep On/Off/Pause button pressed for 3 seconds.
The cleaning robot switches on.


Operation without app
Starting cleaning
Note
Open the doors to all rooms that the cleaning robot is to clean and keep the floor free of objects lying around.
- Press the On/Off/Pause button.
The cleaning robot gives a verbal signal and first creates a map of the surroundings without cleaning. The LED display indicator "Robot status" lights up blue.
When the map creation is finished, it returns to the charging station.
As soon as the cleaning robot is connected to the charging station, the LED display indicator "Robot status" lights up yellow and the LED display indicator "Battery" pulses green.
Note
Wait a few seconds until you press the On/Off/Pause button again so that the robot can save the map. - Press the On/Off/Pause button.
The cleaning robot gives a verbal signal and starts cleaning.
The LED display indicator "Robot status" lights up blue.
Operation with the app
Creating a map
Note
Open the doors to all rooms that the cleaning robot is to clean and keep the floor free of objects lying around.
- In the app, press the control panel "Start" and follow the steps indicated as needed.
The cleaning robot gives a verbal signal and starts the map creation.
The LED display indicator "Robot status" lights up blue.
When the map creation is finished, it returns to the charging station.
As soon as the cleaning robot is connected to the charging station, the LED display indicator "Robot status" lights up yellow and the LED display indicator "Battery" pulses green.
Note
When the cleaning robot is connected to the charging station, it takes a few seconds to create the map in the app. The LED display indicator "Robot status" pulses yellow.
After the map has been successfully saved, an acoustic signal sounds.
Configuring the robot in the app
Individual configurations of the map can be made in the app.
- Virtual walls and restricted areas prevent the cleaning robot from entering areas that should not be cleaned.
- With spot cleaning or cleaning zones, the robot can specifically clean the areas selected by the user once.
- With different cleaning modes, the cleaning intensity can be selected individually for each room depending on the type of floor or soiling (amount of water, number of passes per area, different roller speeds and robot travel speed, etc.)
Downloading the app is described in the chapter Connecting cleaning robots with WLAN and App.
- Follow the step-by-step instructions in the App.
Starting cleaning
- Select the desired map in the app and start cleaning according to the individual configuration.
Interrupting cleaning
Interrupt cleaning on the device:
- Press any button during cleaning.
The cleaning robot stops.
The LED display indicator "Robot status" pulses blue. - Press the On/Off/Pause button.
Cleaning continues.
Interrupt cleaning in the app:
- In the app, press the control panel "Start".
The cleaning robot stops.
The LED display indicator "Robot status" pulses blue. - In the app, press the control panel "Start".
Cleaning continues.
Battery level indicator
The LED display indicator "Battery" shows the battery status, see chapter LED symbols on the display.
Optical signals warn of a flat battery.
- The LED display indicator "Robot status" flashes red when the battery is empty and needs to be recharged.
- When charging in the charging station, the LED display indicator "Robot status" flashes red if the battery level is still too low to continue cleaning.
Note
If the cleaning robot has not finished cleaning, it will independently return to the place where cleaning was interrupted after charging the battery.
Manually sending the cleaning robot for recharging
Procedure on the device:
- If the robot is currently performing a cleaning run, press any button.
The cleaning robot stops.
The LED display indicator "Robot status" pulses blue. - Press the Home button.
The cleaning is cancelled.
The cleaning robot moves to the charging station for recharging. The cleaning robot emits a verbal signal.
As soon as the cleaning robot is connected to the charging station, the LED display indicator "Robot status" lights up yellow and the LED display indicator "Battery" pulses green.
Procedure in the app:
- If the robot is currently performing a cleaning run, press the control panel "Start" in the app.
The cleaning robot stops.
The LED display indicator "Robot status" pulses blue. - In the app, press the control panel "Charge".
The cleaning is cancelled.
The cleaning robot moves to the charging station for recharging. The cleaning robot emits a verbal signal.
As soon as the cleaning robot is connected to the charging station, the LED display indicator "Robot status" lights up yellow and the LED display indicator "Battery" pulses green.
The cleaning robot automatically returns to the charging station for recharging when it has completed a cleaning task or when it is low on energy during a cleaning process.
Emptying the waste water tank
When the waste water tank is full, the LED display indicator "Max" flashes red and the cleaning robot returns to the charging station.
- Remove the waste water tank, see chapter Removing the waste and fresh water tank.
- Pull the opening lever on the waste water tank upwards and lift the cover of the waste water tank.

- Empty the waste water tank. In case of stubborn dirt, rinse the waste water tank with fresh water or clean it with the cleaning brush.

- Close the cover of the waste water tank.
- Insert the waste water tank (see chapter Inserting the waste and fresh water tank).
- To continue cleaning, press the On/Off/Pause button button.


Refilling the cleaning fluid
When the fresh water tank is empty, the LED display indicator "Fresh water" flashes blue and the cleaning robot returns to the charging station.
- Fill the fresh water tank (see chapter Filling the fresh water tank).
ATTENTION
Danger from escaping water
Risk of damage
Empty the waste water tank every time the fresh water tank is empty and before filling the fresh water tank to prevent the waste water tank from overflowing.
Switching off the device
- Press any button during cleaning.
The cleaning robot stops.
Note
The cleaning robot cannot be switched off when it is on the charging station. - Press and hold the On/Off/Pause button 3 seconds.
The cleaning robot emits an audible signal.
All LED display indicators go out.
The cleaning robot switches off. - Empty and clean the waste water tank, see chapter Cleaning the waste water tank.
- Clean the cleaning roller and allow to dry, see chapter Cleaning the cleaning roller.
- Clean the Scraper unit with a hair comb, see chapter Cleaning the scraper unit with hair comb.
Reset WLAN connection
If you switch to a new router or change your WLAN password, you must reset the cleaning robot's WLAN connection.
Note
Only 2.4 GHz WLAN networks are supported.
- Switch on the cleaning robot, see chapter Switching on the cleaning robot.
- Press the on/off button and Home button simultaneously for 3 seconds until a verbal signal sounds.
Restoring the factory settings
- Press the Home button for 5 seconds until a signal sounds.
- Press the Home button again for 5 seconds until a signal sounds.
Factory settings are restored.
Transport
Where possible, always transport or return the device in the original packaging. Please contact our Service Department if the original packaging is not available.
Safety instructions for transporting
The lithium-ion battery is subject to the requirements of dangerous goods regulations.
An undamaged and functional battery pack can be transported by the user in public traffic areas without any further restrictions.
When shipping by third parties (transport companies), special requirements for packaging and labelling must be observed.
Observe the national regulations.
Storage
ATTENTION
Liquids/moist dirt
Unpleasant odours can develop if the device contains liquids/moist dirt when stored.
Completely empty the fresh water tank and waste water tank before storing the device.
Clean the roller cassette.
Use the cleaning tool to remove hair and dirt particles from the scraper unit with hair comb.
Allow the cleaned roller to air dry. Do not place the wet roller in an closed cupboard to dry.
ATTENTION
Damage to the cleaning robot due to incorrect storage
Do not store the cleaning robot upside down. The housing of the laser sensor (LiDAR) should never come into contact with the ground or objects.
Do not place any objects on the cleaning robot.
Store the cleaning robot fully charged and switched off in a cool and dry place.
Note
To avoid a deep discharge of the battery, fully recharge the cleaning robot after 5 months at the latest.
Care and service
Maintenance work
Cleaning the sensors
Clean the sensors at least monthly. Always clean the sensors immediately if they become dirty.

- Wipe the sensors with a soft cloth.
Cleaning the waste water tank
ATTENTION
Adhering dirt deposits
Adhering dirt deposits can damage the device in the long term.
Clean the waste water tank regularly.
For information on the waste water tank cleaning and emptying procedure, see chapter Emptying the waste water tank.
Cleaning the cleaning roller
ATTENTION
Detergent residue in the roller
Foaming
Wash the roller under running water or clean the roller in a washing machine each time after using the device.
ATTENTION
Damage caused by washing the cleaning roller with fabric softener or using a tumble dryer
Damage to the microfibres
Do not use fabric softener when cleaning in a washing machine.
Do not dry the roller in a tumble dryer.
ATTENTION
Material damage due to loose roller
This may damage the washing machine.
Place the roller in a laundry net and load the washing machine with extra laundry.
- Press the roller cassette unlocking button.
The roller cassette detaches from the cleaning robot. - Remove the roller cassette from the cleaning robot.

- Fold up the Scraper unit.
- Remove the cleaning roller from the roller cassette.

- Clean the cleaning roller under running water or wash it in the washing machine at max. 60°C.

- Clean the roller drive with a moist cloth.
- Allow the cleaning roller to air dry.


Cleaning the scraper unit with hair comb
ATTENTION
Adhering dirt deposits
Adhering dirt deposits can damage the device in the long term.
It is recommended to clean the device completely after each application.
ATTENTION
Adhering dirt deposits
Adhering dirt deposits can damage the device in the long term.
Clean the scraper unit regularly with the cleaning tool.
ATTENTION
Damage due to cleaning the scraper unit in a dishwasher
The washing process can distort the scraper unit and it will no longer press on the roller correctly. This worsens the cleaning result.
Do not clean the scraper unit in a dishwasher but rather under running water.
- Press the roller cassette unlocking button.
The roller cassette detaches from the cleaning robot. - Remove the roller cassette from the cleaning robot.
Illustration R - Fold up the Scraper unit.
- Remove the cleaning roller from the roller cassette.
Illustration S - Clean the Scraper unit under running water.
- Remove stubborn dirt with the cleaning tool.

- Fold down the Scraper unit.
- Pay attention to the cassette guide and push the roller cassette into the cleaning robot until it audibly engages.
Illustration J

Cleaning the wheels
Dirt particles (such as sand, etc.) can get stuck on the running surface and then damage sensitive, smooth floor surfaces.
- Clean the running surface of the wheels with a damp cloth.
Cleaning and care agents
ATTENTION
Use of unsuitable detergents and care agents
The use of unsuitable detergents and care agents can damage the device and loss of eligibility for warranty claims.
Use only KÄRCHER detergents.
Take care to ensure the correct dosage.
Note
Use KÄRCHER detergent or care agents for floor cleaning as necessary.
- Observe the manufacturer's dosing quantity recommendations when dosing with detergent or care agents.
- To prevent foaming, fill the fresh water tank with water first and the add the detergent or care agent.
- To prevent the tank from overflowing, be sure to leave enough space for the detergent or care agent when filling with water.
Replacing the cleaning roller
A worn cleaning roller can worsen the cleaning result.
- Check the cleaning roller regularly for wear and replace if necessary.
Troubleshooting guide
Malfunctions often have simple causes that you can remedy yourself using the following overview. When in doubt, or in the case of malfunctions not mentioned here, please contact your authorised Customer Service.
| Fault | Cause | Rectification |
| The LED display indicator "Robot status" flashes red | The battery is discharged. |
|
| The cleaning robot is to be switched off and is standing on the charging station. |
| |
| The fresh water tank is not sitting properly in the device. |
| |
| The cleaning roller is not fitted properly in the device. |
| |
| The cleaning roller is caught or blocked. |
|
Safety instructions
- In addition to the information in the operating instructions, you also need to take into consideration the general safety regulations and accident prevention guidelines applicable by law.
- Warnings and information notices attached to the device provide important information for hazard-free operation.
Hazard levels

- Indication of an imminent threat of danger that will lead to severe injuries or even death.
- Indication of a potentially dangerous situation that may lead to severe injuries or even death.

- Indication of a potentially dangerous situation that may lead to minor injuries.
ATTENTION
- Indication of a potentially dangerous situation that may lead to damage to property.
General safety instructions
The laser radar of the device complies with IEC 608251:2014 for Class 1 laser product safety and does not produce laser radiation that is hazardous to the human body.
- Risk of asphyxiation. Keep packaging film out of the reach of children.
- Only use the device for its proper use. Take into account the local conditions and beware of third parties, in particular children, when working with the device.
- The device is not intended for use by persons with restricted physical, sensory or mental abilities or those lacking in experience and / or lacking in knowledge.
- Only people who have been instructed on how to use the device, or have proven their ability to operate it, and have been explicitly instructed to use it, must use the device.
- Children must not operate the device.
- Children must be supervised to prevent them from playing with the appliance.
- Children may only perform cleaning work and user maintenance under supervision.
- Children from the minimum age of 8 may only use the device if they are properly supervised, have been instructed in its use by a person responsible for their safety, and if they have understood the resultant dangers involved.
- Risk of accidents and injuries. Take into account the weight of the device for transportation and storage. See chapter Technical data in the operating instructions.
- Safety devices are provided for your own protection. Never modify or bypass safety devices.
ATTENTION
- Damage to the device. Do not stand on the device or place children, objects or pets on it.
- The device contains batteries that can only be replaced by qualified staff.
Risk of electric shock

- The appliance contains electrical components - do not clean the appliance under running water.
- Switch off the device before all care and maintenance work.
- Have repair work and work on electrical components carried out by the authorised customer service only.
Safety instructions for operation
- Do not operate the device in rooms with a burning fire or embers in an open fireplace without supervision.
- Do not operate the device in rooms with burning candles without supervision.
- Short circuit hazard. Keep conductive objects (e.g. screwdrivers or similar tools) away from the charging contacts.
- Be aware of the risk of tripping due to the cleaning robot moving around.
- Risk of injury. Never touch the cleaning roller of the device with fingers or tools during operation.
- Do not stand or sit on the station or the cleaning robot.
- Be aware that objects can fall over if the cleaning robot bumps into them (also objects on tables or small pieces of furniture).
- Note that the cleaning robot can get caught in hanging telephone cables, electric cables, tablecloths, cords, belts, etc. This can cause objects to fall.
ATTENTION
- Do not operate the device in rooms that are secured with an alarm system or motion sensor.
- Operate the device only at temperatures from 0°C to +35°C.
- Only use the device indoors.
- Do not pick up sharp or larger objects with the device, such as e.g. glass shards, gravel or toy parts.
- Pick up all cables from the floor before using the device to prevent it from dragging them when cleaning.
- Cordon off all areas where there is a risk of the device falling down. E.g. stairways or galleries without barriers.
Safety instructions for charging station

- Only connect the device to an AC power source. The voltage indicated on the type plate must match the mains voltage of the power source.
- For safety reasons we recommend operating the device only via a fault current protection switch (maximum 30 mA).
- Never touch the mains plug and socket with wet hands.
- Danger of explosion. Do not charge any non-rechargeable battery.
- Only connect the device to an electrical connection which has been set up by a qualified electrician as per IEC 60364-1.
- Check that the mains voltage corresponds with the voltage stated on the type plate of the charger.
- The appliance contains electrical components - do not clean the appliance under running water.
- Short circuit hazard. Keep conductive objects (e.g. screwdrivers or similar tools) away from the charging contacts.
- Short circuit hazard. Only clean the charging contacts of the charging station dry.
- Always pull out the mains plug before all care and maintenance work.
- Only charge the device with the original charger supplied (4.269-072.0).
- Only charge the supplied cleaning machine in the charging station.
- Check the mains cable for damage each time before every operation. Do not use a damaged mains cable. If damaged, replace the mains cable with an approved replacement. You can get a suitable replacement from KÄRCHER or one of our service partners.
ATTENTION
- Use the charging station indoors only.
- Do not place the charging station near heat sources, e.g. heaters.
- Store the charging station indoors only, in a cool, dry place.
- Charge the cleaning robot at least once a month to avoid deep discharge of the battery.
- Switch off the charging station before all care and maintenance work.
Register your product www.kaercher.com/welcome

Documents / Resources
References
![www.kaercher.com]() Cleaning equipment and pressure washers | Kärcher International
Cleaning equipment and pressure washers | Kärcher International![play.google.com]() Google Play
Google Play![www.apple.com]() App Store - Apple
App Store - Apple![www.kaercher.com]() Home and Garden Warranty Registration USA | Kärcher
Home and Garden Warranty Registration USA | Kärcher
Download manual
Here you can download full pdf version of manual, it may contain additional safety instructions, warranty information, FCC rules, etc.
Advertisement
Thank you! Your question has been received!


Need Assistance?
Do you have a question about the RCF 3 that isn't answered in the manual? Leave your question here.