Roland DP-90 - ELCajon Mic Processor Manual
- Manual (4 pages) ,
- Specifications (4 pages)
Advertisement
What is "ELCajon Mic Processor"
The Roland EC-10M ELCajon Mic Processor is a new concept in percussion sound modules; it uses Roland's proprietarily developed mic sensor and sound-generating technology to pick up and amplify the acoustic sound of your cajon, and allows you to layer electronic sounds onto it.
Main features
- While taking advantage of the resonance of the cajon's original sound, you can additionally layer a wide variety of electronic sounds.
- You can switch between two different electronic sounds according to the pitch of the sound that enters the mic.
- You can use a simple loop play function to perform along with a rhythm pattern played by electronic sounds.
- A high-performance clip-type condenser mic that can be installed directly on the cajon is included.
- The volume balance between the mic sound and the electronic sound can be adjusted by the performer.
- Compressor and enhancer effects specifically for the mic are provided, improving the loudness and definition of the sound.
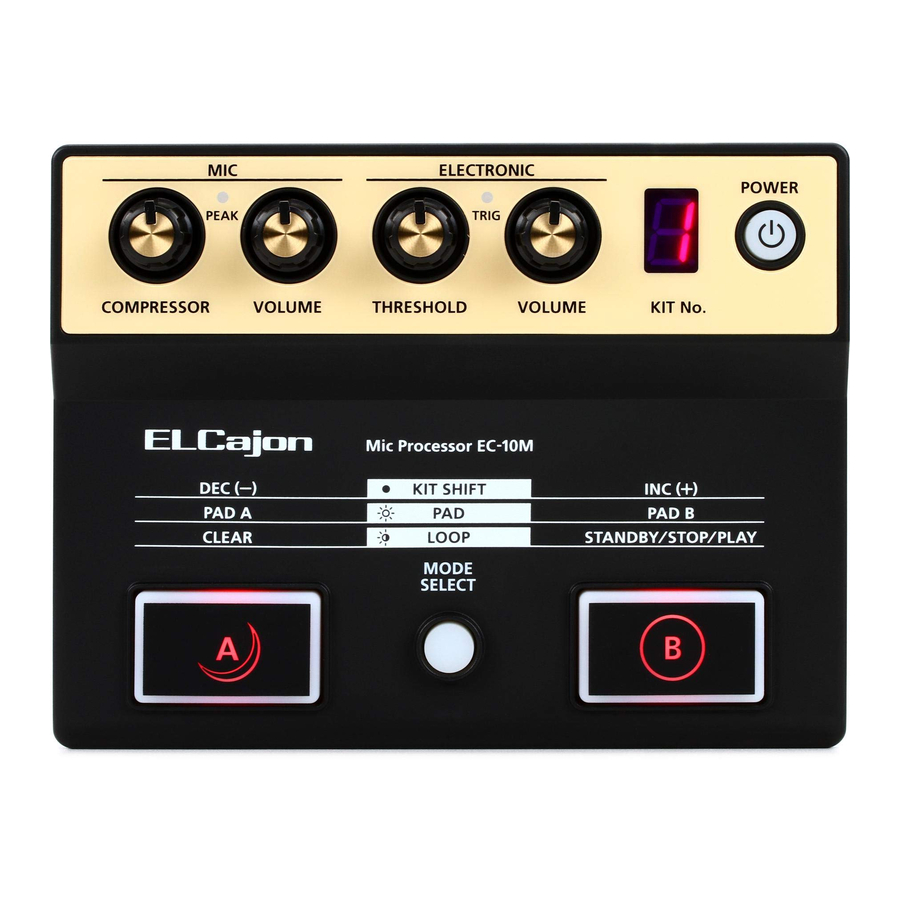
Panel Descriptions
Top panel

MIC
- [COMPRESSOR] knob
Adjusts the loudness of the mic.
Moving the knob toward the right increases the loudness and strengthens the attack. - [VOLUME] knob
Adjusts the volume of the mic. - PEAK indicator
This indicator is lit when the mic input level reaches the peak. Adjust the mic gain so that the PEAK indicator does not light.
ELECTRONIC
- [THRESHOLD] knob
Specifies the input level that triggers the electronic layer sound. Turning the knob toward the right increases the strike strength that is needed to trigger the electronic layer sound. - [VOLUME] knob
Adjusts the volume of the electronic layer sound. - [TRIGGER] indicator
This is it lit when the electronic layer sound is produced. - [KIT No.] indicator
Indicates the selected kit number (1–9, 0, A–F). - [POWER] switch
Turns the power on/off. Long-press this switch to turn the power off. - [MODE SELECT] button
Switches the mode of the foot buttons [A] J / [B] K
| Mode | Button status | Explanation |
| Kit shift mode (the setting when you turn on the power) | Unlit | Use the foot buttons [A] / [B] to switch kits. |
| Pad mode | Lit | Play pad [A] / pad [B]. |
| Loop mode | Blinking | The loop function is used. For details, refer to "About the Loop function". |
Side panel (Right)

- MIC/MIX OUTPUT jack
If a cable is connected to the ELECTRONIC jack, the sound of the mic is output by itself from this jack If a cable is not connected to the ELECTRONIC jack, the sound of the mic and the sound of the electronic layer are output from this jack. - ELECTRONIC OUTPUT jack
The electronic layer sounds are output from this jack. - DC IN jack
Connect the included AC adaptor here.
* We recommend that you keep batteries installed in the unit even though you'll be powering it with the AC adaptor. That way, you'll be able to continue a performance even if the cord of the AC adaptor gets accidentally disconnected from the unit.
* To prevent malfunction and equipment failure, always turn down the volume, and turn off all the units before making any connections.
Side panel (Left)

- TRIGGER IN jack (PAD A/B)
Connect an external kick trigger pad (sold separately: KD-7, KT-9, KT-10) to this jack. You can play the two different electronic layer sounds assigned to pad [A] and pad [B]. * You can use a stereo split cable (sold separately: PCS-31L) to connect up to two kick trigger pads to this unit. - MIC IN jack
Connect the included clip mic to this jack. - [MIC GAIN] knob
Adjusts the gain of the mic. - [ENHANCE ON/OFF] switch
Switches the enhance effect that is applied to the sound of the mic. If this is on, the mic sound is given greater definition. This is effective when you want a crisper sound.
Bottom panel

- Battery case
The EC-10M operates using batteries or the included AC adaptor. If using the unit on batteries, install four AAA batteries, taking care to orient the batteries correctly.
* When turning the unit over, be careful so as to protect the buttons and knobs from damage. Also, handle the unit carefully; do not drop it.
* The battery life is approximately 5 hours for typical performance use. When the batteries run low, "L" blinks in the KIT No. indicator. Replace the battery as soon as possible.
* If you handle batteries improperly, you risk explosion and fluid leakage. Make sure that you carefully observe all of the items related to batteries that are listed in "USING THE UNIT SAFELY" and "IMPORTANT NOTES" (leaflet "USING THE UNIT SAFELY"). - Block diagram
This diagram shows the signal flow of the EC-10M.
Clip mic

- Clip open/close knob
Opens/closes the clip. - Cable hook
Secures the cable of the clip mic.
Use
- Connect the EC-10M to your amp or PA mixer.
![]()
- Connect the included clip mic to the MIC IN jack.
![]()
- Attach the clip mic to your cajon.
As shown in the illustration, clip the mic onto the bottom (6 o'clock position) of the sound hole located on the back of the cajon, so that the mic is inside (with the Roland logo facing outward). Use the cable hook to manage the cable so that it does not strike the cajon.
![]()
* Depending on the shape of the sound hole, it might not be possible to attach the mic at the 6 o'clock position; if so, it is ok to attach the mic at some other position (such as 9 o'clock).
- Place the EC-10M by your foot.
![]()
Place the EC-10M where you can control it with one foot.
- Turn on the power.
![]()
* Before turning the unit on/off, always be sure to turn the volume down. Even with the volume turned down, you might hear some sound when switching the unit on/off. However, this is normal and does not indicate a malfunction.
- Use the [MIC GAIN] knob to adjust the mic gain.
Start with the gain at the maximum setting, and gradually lower it until the PEAK indicator does not light when you strike the cajon strongly.
![]()
* If the sound of the mic seems to be distorted, lower the [MIC GAIN] knob.
- Use the [VOLUME] knobs (MIC, ELECTRONIC) to adjust the volume..
![]()
If you want to emphasize the sound of the cajon itself, it is effective to lower the ELECTRONIC volume and raise the MIC volume.
- Use the [THRESHOLD] knob to adjust the sensitivity at which the electronic layer sound is triggered.
![]()
If this setting is low, the electronic layer sound is triggered even by a soft strike. As this setting is raised, the electronic layer sound is triggered only by a strong strike.
* If the electronic sound is inadvertently triggered by other sounds picked up by the mic when you're not playing the cajon, raise the threshold setting so that only the sound is triggered only when you want it to be triggered.
- Use foot buttons [A] / [B] to switch kits.
![]()
For details on each kit, refer to "Kit List".


About the Loop function
The EC-10M lets you record a phrase of electronic layer sounds and play it back immediately as a loop. This lets you perform on the cajon accompanied by the playback of the electronic layer sound loop (shaker, tambourine, bass drum, or other sound effect). Here's how to record and play back.
- Select the kit containing the electronic sound that you want to record.
- While playing the cajon or the kick trigger, adjust the volume balance of the electronic layer sound.
- Use the [MODE SELECT] button to select loop mode.
- Press the foot button [A] to delete any previously recorded content.
- Press the foot button [B] to enter the record-standby state.
The foot button [B] is lit red. - When you start performing, recording starts automatically.
During recording, the foot button [B] blinks red. - At the moment that you want recording to end, press the foot button [B].
The performance data from when you start recording until you press the foot button [B] is automatically played back as a loop. If recorded performance data exists, the foot button [B] is lit green. - To stop playback, press the foot button [B] once again.
* You can't perform electronic layer sounds during loop playback. You can perform only using the cajon itself and the sound of the mic.
Kit List
| No. | Kit name | Layer (Low) | Layer (High) | Pad A | Pad B |
| 1 | Ambient Cajon | Cajon Bass Reverb | Cajon Reverb | Splash Cymbal | Cowbell |
| 2 | Cajon & Tambourine | Cajon Bass | Tambourine | Splash Cymbal | Cowbell |
| 3 | Cajon & CrossStick | Cajon Thumb Low | Cross Stick | Splash Cymbal | Shaker |
| 4 | Cajon & Shaker | Cajon Foot | Shaker | Splash Cymbal | Cowbell |
| 5 | Cajon & Sagat | Cajon Bass | Sagat | Splash Cymbal | Vintage Kick |
| 6 | Burst Cajon | Cajon Thumb Low | Flamenco Clap | Splash Cymbal | Shaker |
| 7 | Buzzy Snare | Comp Kick | Buzzy Snare | Splash Cymbal | Comp Kick |
| 8 | Hybrid 808 | Hybrid Kick | TR-808 Snare | Splash Cymbal | Hybrid Kick |
| 9 | Steel Snare | Plugged Kick | Steel Snare | Splash Cymbal | Shaker |
| 0 | Darbuka | Darabuka Don | Darabuka Tec | Splash Cymbal | Sagat |
| A | Dhol | Dhol | Dhol Stick | Splash Cymbal | Shaker |
| b | Surdo | Surudo Mid | Surdo Hi | Tambourine | Shaker |
| C | Bougrabou & Djembe | Bougarabou | Djembe Slap | Tambourine | Shaker |
| d | Pot Drum | Pot Drum Hole | Pot Drum Heel | Splash Cymbal | Sagat |
| E | Afro Stomp | Afro Stomp | Ambient Snare | Splash Cymbal | Afro Stomp |
| F | Wobble Kick | Jumper Kick | Old School Snare | Splash Cymbal | Jumper Kick |
Performance Advice
- If you want to emphasize the attack of the mic sound, adjust the compressor setting upward.
- Placing muting material inside the cajon will reduce unwanted resonance, allowing you to produce a sharper and tighter sound.
- The way in which the EC-10M's electronic layer sounds (high/low) are differentiated will vary depending on the character of the sound that enters the mic. If you want to accurately reproduce these distinctions, you'll need to be aware of which area of your cajon must be struck to produce different sounds.
- You can't perform the electronic layer sounds while using loop playback. You can only perform using the sound of the cajon itself and the sound of the mic.
Main Specifications
Roland EC-10M ELCajon Mic Processor
| Power Supply | AC adaptor (DC 5.7 V) Rechargeable Ni-MH batteriesbattery (AAA, HR03) x 4 |
| Current Draw | 150 mA |
| Expected battery life under continuous use | Approx. 5 hours * These can vary depending on the specifications of the batteries, capacity of the batteries, and the conditions of use. |
| Dimensions | 175 (W) x 135 (D) x 55 (H) mm 6-15/16 (W) x 5-3/8 (D) x 2-3/16 (H) inches |
| Weight (including batteries) | 500 g 1 lb 2 oz |
| Accessories | Clip mic, Owner's manual, Leaflet "USING THE UNIT SAFELY, " AC adaptor |
* This document explains the specifications of the product at the time that the document was issued. For the latest information, refer to the Roland website.

Documents / ResourcesDownload manual
Here you can download full pdf version of manual, it may contain additional safety instructions, warranty information, FCC rules, etc.
Advertisement
Thank you! Your question has been received!


Need Assistance?
Do you have a question about the DP-90 that isn't answered in the manual? Leave your question here.