Viking Professional VGSO166SS Installation Instructions Manual
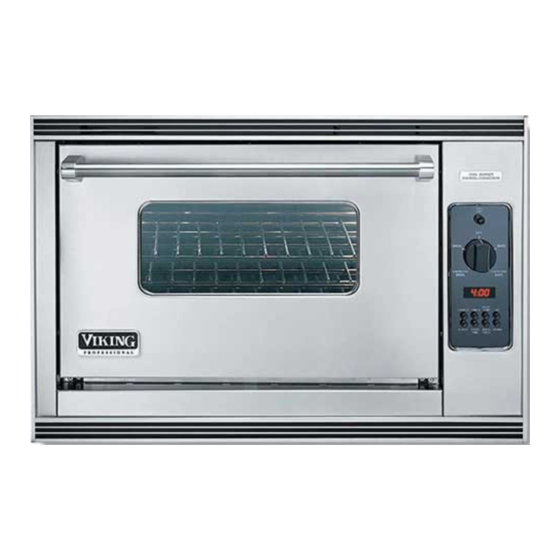
Built-in gas oven
Hide thumbs
Also See for Professional VGSO166SS:
- Installation use and care manual (128 pages) ,
- User manual (52 pages) ,
- Install manual (45 pages)
Table of Contents
Advertisement
Quick Links
INSTALLATION
INSTRUCTIONS
VGSO166 BUILT-IN GAS OVEN
Retain for Future Use
IMPORTANT - PLEASE READ AND FOLLOW
•Before beginning, please read these instructions completely and carefully.
•Do not remove permanently affixed labels, warnings, or plates from the product. This may void the warranty.
•Please observe all local and national codes and ordinances.
•Please ensure that this product is properly grounded.
•The installer should leave these instructions with the consumer who should retain for local inspector's use and for
future reference.
Installation must conform with local codes or in the absence of codes, the National Fuel Gas Code ANSI Z223.1-latest
edition. IN CANADA: Installation must be in accordance with the current CAN/CGA B149.1 & 2 Gas Installation codes
and/or local codes. Electrical installation must be in accordance with the current CSA C22.1 Canadian Electrical Codes
Part 1 and/or local codes.
WARNING:
IF THE INFORMATION IN
THIS MANUAL IS NOT FOLLOWED
EXACTLY, A FIRE OR EXPLOSION MAY
RESULT CAUSING PROPERTY DAMAGE,
PERSONAL INJURY, OR DEATH.
1. Do not store or use gasoline or other flammable vapors
and liquids in the vicinity of this or any other appliance.
2. W W H H A A T T T T O O D D O O I I F F Y Y O O U U S S M M E E L L L L G G A A S S : :
•Do not try to light any appliance.
•Do not touch any electrical switch; do not use any
phone in your building.
•Immediately call your gas supplier from a neighbor's
phone.
•Follow the gas supplier's instructions.
•If you cannot reach your gas supplier, call the fire
department.
3. Installation and service must be performed by a
qualified installer, service agency, or the gas supplier.
VIKING RANGE CORPORATION
111 Front Street
Greenwood, Mississippi (MS) 38930 USA
WARNING
If not installed, operated and maintained in
accordance with the manufacturer's instructions, this
product could expose you to substances in fuel or
from fuel combustion which can cause death or
serious illness and which are known to cause cancer,
birth defects, or other reproductive harm.
For example, benzene is a chemical which is
part of the gas supplied to the cooking
product. It is consumed in the flame during
combustion. However exposure to a small
amount of benzene is possible if a gas leak
occurs. Formaldehyde and soot are by-
products of incomplete combustion.
Properly adjusted burners with a bluish rather
than yellow flame will minimize incomplete
(662)453-1200
Advertisement
Table of Contents

Related Manuals for Viking Professional VGSO166SS


Summary of Contents for Viking Professional VGSO166SS
-
Page 1: Installation Instructions
•If you cannot reach your gas supplier, call the fire department. 3. Installation and service must be performed by a qualified installer, service agency, or the gas supplier. VIKING RANGE CORPORATION 111 Front Street Greenwood, Mississippi (MS) 38930 USA (662)453-1200... -
Page 2: General Information
11. The misuse of oven doors (e.g. stepping, sitting, or leaning on them) can result in potential hazards and/or injuries. 12. If electrical power is not supplied or interrupted, the oven will not work. No attempt should be made to operate the oven. - Page 3 Dimensions •For double side-by-side installation, repeat single cutout with 1½” (3.8 cm) minimum between openings.
-
Page 4: Specifications
(5.3 kW Nat./4.4 kW LP) Bake burner rating Two 15,000 BTU ea. Nat./LP (Two 4.4 kW ea. Nat./LP) Oven interior Dimensions Width - 24 1/8” (61.3 cm) Height - 13 3/4” (34.9 cm) Depth- 17 1/8” (43.5 cm) Overall- 3.3 cu. ft. (94 liter) Approximate shipping wt. - Page 5 •Remove control box (10) disconnecting the 3 harness connectors (11). •Attach 8” (20.3 cm) pipe nipple (12) thru the lower oven cabinet into the upper oven pipe tee (13). •Attach female connector (14) on flex tubing (9) to 8” (20.3 cm) pipe nipple (12).
-
Page 6: Gas Connection
CAUTION: Before placing the oven into operation, always check for gas leaks with a soapy water solution or other acceptable method. D D O O N N O O T T U U S S E E A A N N O O P P E E N N F F L L A A M M E E T T O O C C H H E E C C K K F F O O R R L L E E A A K K S S ! ! - Page 7 B B A A K K E E B B U U R R N N E E R R C C O O N N V V E E R R S S I I O O N N 1. Remove the lower access panel below the oven door. 2. Convert the oven burners by turning the burner orifice hoods clockwise until they become snug against the internal LP pin.
- Page 8 The flame should have sharp, well defined blue inner cone with no yellow tipping. The flame should also be stable and uniform with no flames lifting off the burner ports. To gain access to the oven burner adjustment: 1. Remove the lower access panel.
- Page 9 Infrared Broil Burner 1. An electric ignitor is used to light the burner. D D O O N N O O T T attempt to insert any object into the openings of the protective shield surrounding the ignitor coil. D D O O N N O O T T attempt to clean this area. 2.
-
Page 10: Electrical Connection
NOTE: If electrical power is not supplied or interrupted, the oven burners and the broiler will not work. D D O O N N O O T T A A T T T T E E M M P P T T to operate the appliance during a power failure. -
Page 11: Door Removal
Final Preparation 1. Some stainless steel parts may have a plastic protective wrap which must be removed. The interior of the oven should be washed thoroughly with hot, soapy water to remove film residues and any installation dust or debris before being used for food preparation, then rinsed and wiped dry. -
Page 12: Service Codes
The Time/Temperature digital display is designed to alert you if there is an error or problem in the control. If one of the following codes occur, disconnect the electrical supply to the oven and contact and authorized servicer. Shorted probe...