Breville Wake Cup VCF042 - Bedside Hot Drinks Maker Manual
- Instructions for use manual (21 pages)
Advertisement
- 1 Identifying the Parts
- 2 Before First Use
- 3 Setting the clock time or alarm time
- 4 Alarm with dispense mode
- 5 Other operating modes
- 6 Hints and tips
- 7 Descaling and Cleaning
- 8 Memory back-up battery
- 9 Connection to the mains supply
- 10 After sales service
- 11 Important Safety Instructions
- 12 Documents / Resources
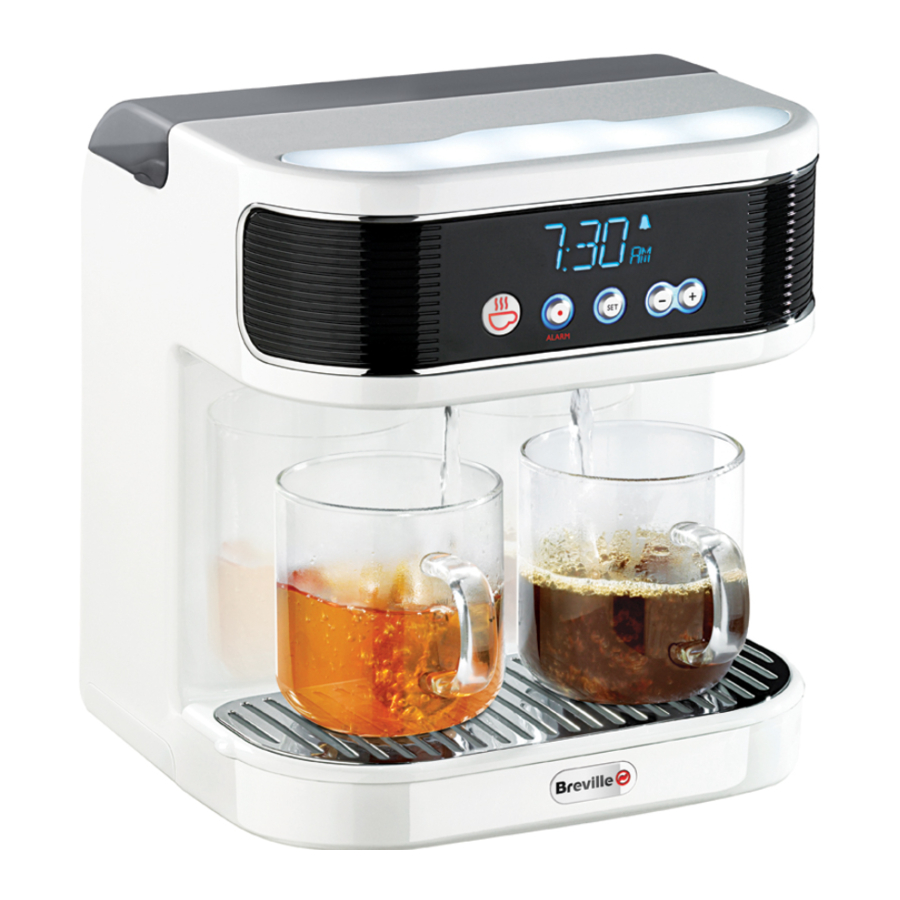
Identifying the Parts

- Rear cover
- Water jug
- Dispensing nozzles and dispensing lights
The dispensing lights come one when your Wake Cup is dispensing hot water. - Pull out tray
You can place dirty spoons and used tea bags, etc. in the pull out tray. - Water tank cap
The water tank cap must be refitted before use. - Light sensor
Controls the display brightness by sensing the ambient light level. - Snooze/Lights button
Press for an extra 5 minutes before the alarm repeats. Also used to switch the lights on or off at any time. - Gradual dawn wake up lights
The lights gradually increase their intensity to help you wake more naturally. - Control panel
- Removable stainless steel drip tray cover
- Removable drip tray
Catches drips and minor overflows. No mess, just lift out and rinse it under the tap. - Clock back-up battery (underneath base)
The AA-size battery (not supplied) will back-up the clock in the event of power cuts or if you need to unplug your Wake Cup for any reason. - Vacuum flask
Allows you to keep your milk fresh and cool for use with your Wake Cup. - Display
- Alarm icon
Lights up when setting the alarm time or when your Wake Cup is in alarm mode. - Dispense button
Puts your Wake Cup into alarm with dispense mode, immediate dispense mode or cancels dispensing. - Alarm button
Used to enter alarm set mode and to cancel the alarm when it has started sounding. - Set button
Used during time and alarm programming. - Increase button
Used during alarm or time setting to increase values. - Decrease button
Used during alarm or time setting to decrease values.
Before First Use
Before using your Wake Cup for the first time
 Always position your Wake Cup in such a way that any splashing during the dispensing cycle will not cause damage to the surrounding areas. Your Wake Cup will become hot during use. Always use care when handling your Wake Cup.
Remove your Wake Cup carefully from the box. Remove any packaging and promotional material and position your Wake Cup on a dry, level, secure surface away from the edge. Remove the water jug and wash it in warm soapy water. Rinse and dry thoroughly.
- Remove the water jug and fill it with cold water to the 2 CUPS MAX mark.
![]()
- Remove the water tank cap by giving it a quarter turn anticlockwise.

- Carefully pour the water from the water jug into the water tank. Refit the water tank cap by giving it a quarter turn clockwise. Make sure that the water tank cap is correctly and securely fitted. Connect your Wake Cup to a mains supply socket. Your Wake Cup will sound two beeps. At this stage, it isn't necessary to set the clock to the current time.

- Place two suitable cups (not supplied) below the dispensing nozzles making sure that each cup is positioned directly below a dispensing nozzle. Make sure that the two cups are capable of holding all of the water used at step 1.
![]()
- Press and hold the dispensing button until it turns red. Your Wake Cup will start to boil the water.
![]()
- When the water reaches boiling point, it will be dispensed into the cups below the dispensing nozzles. Carefully discard this water.


Allow your Wake Cup to cool for a few minutes then repeat the above procedure once more. This will remove any residues left over from the manufacturing process.
Wash your vacuum flask with warm soapy water and rinse thoroughly before use.
Setting the clock time or alarm time
Setting the clock
- Press and hold the SET button for approximately 3 seconds until the hours digits start to flash.

- Use the + or - buttons to select the hour. Your Wake Cup uses a 12 hour clock with an AM or PM indicator showing whether it is day time or night time. When setting the hour, make sure that the AM or PM indication is correct.

- Press the SET button. The minutes digits will flash.

- Use the + or - buttons to select the minutes
- Press the SET button. The clock is now set.


Setting the Alarm Time
- Press the ALARM button. The alarm icon (
![]() ) will flash.
) will flash. - Press and hold the SET button for approximately 3 seconds until the hours digits start to flash.

- Use the + or - buttons to select the hour. Your Wake Cup uses a 12 hour clock with an AM or PM indicator showing whether it is day time or night time. When setting the hour, make sure that the AM or PM indication is correct.

- Press the SET button. The minutes digits will flash.

- Use the + or - buttons to select the minutes
- Press the SET button. The alarm time is now set. Note that the alarm icon (
![]() ) will appear in the display to show that the alarm has been set and is active. If you do not wish the alarm to go off at the selected time, press the SET button and the alarm icon (
) will appear in the display to show that the alarm has been set and is active. If you do not wish the alarm to go off at the selected time, press the SET button and the alarm icon (![]() ) will disappear.
) will disappear.


You can check what time the alarm is set to go off by pressing the ALARM button. The alarm time will be shown for a few seconds then your Wake Cup will revert back to displaying the current time.
Alarm with dispense mode
Always position your Wake Cup in such a way that any splashing during the dispensing cycle will not cause damage to the surrounding areas. Your Wake Cup will become hot during use. Always use care when handling it.
This mode will sound the alarm at a predetermined time and make up to two hot drinks. You can make tea or coffee or one of each. Before starting, make sure that your Wake Cup has been set to the correct time and the alarm time has been set.
- Remove the water jug and fill it with cold water according to the number of drinks you intend to make and the size of cup or cups you are using — see How much water?. Don't fill the jug above the 2 CUPS MAX mark.

- Remove the water tank cap and carefully pour the water from the water jug into the water tank. Refit the water tank cap making sure that it's correctly and securely fitted.

- Add a tea bag or coffee to each cup and add sugar as desired. Place the cups (not supplied) below the dispensing nozzles. If you are using two cups, make sure that each cup is positioned directly below a dispensing nozzle. If you are only using one cup, place it centrally so that it is beneath both dispensing nozzles. Make sure that the cup or cups are capable of holding all of the water used at step 1.

- Press the SET button once. The alarm icon (
![]() ) will appear in the display to show that the alarm has been set and is active.
) will appear in the display to show that the alarm has been set and is active.

- Press the dispense button once. It will light up blue.


1½ minutes before the alarm sounds, the lights on your Wake Cup will slowly come on and increase in brightness. Before the alarm sounds, the dispense button will turn red and your Wake Cup will start to boil the water. When the water reaches boiling point, it will be dispensed into the cups below the dispensing nozzles.
Alarm and snooze function
The alarm will sound for 1 minute and repeat every 5 minutes. To stop the alarm:
- Press any of the function buttons. The alarm will not go off again until 24 hours later.
- Press the snooze/lights button. This will silence the alarm for 5 minutes. Repeat as often as desired.
- Press the dispense button. This will stop the alarm and the dispense function. The alarm icon (
![]() ) will disappear from the display. The alarm will not go off again unless you turn it back on by pressing the SET button.
) will disappear from the display. The alarm will not go off again unless you turn it back on by pressing the SET button.
To turn off the alarm (before the alarm time) so that it does not go off at all, press the SET button. The alarm icon (![]() ) will disappear from the display.
) will disappear from the display.
Cancelling the dispense function
The dispense function can be stopped by pressing the dispense button. The button illumination will go out. Some hot water may still be dispensed into the drip tray or cup(s). Beware of hot water splashing from the drip tray. If boiling has already started, allow it to continue.
Other operating modes
Alarm only mode
The alarm only mode will sound the alarm at the designated time without entering dispense mode.
Before starting, make sure that your Wake Cup has been set to the correct time and the alarm time has been set.
Simply press the SET button once. The alarm icon (![]() ) will appear in the display to show that the alarm has been set and is active.
) will appear in the display to show that the alarm has been set and is active.
1½ minutes before the alarm sounds, the lights on your Wake Cup will slowly come on and increase in brightness.
The alarm will sound for 1 minute and repeat every 5 minutes. To stop the alarm:
- Press any of the function buttons. The alarm will not go off again until 24 hours later.
- Press the snooze/lights button. This will silence the alarm for 5 minutes. Repeat as often as desired.
- Press the dispense button. This will stop the alarm and the alarm icon (
![]() ) will disappear from the display. The alarm will not go off again unless you turn it back on by pressing the SET button.
) will disappear from the display. The alarm will not go off again unless you turn it back on by pressing the SET button.
To turn off the alarm (before the alarm time) so that it does not go off at all, press the SET button. The alarm icon (![]() ) will disappear from the display.
) will disappear from the display.
Manual dispense mode
Always position your Wake Cup in such a way that any splashing during the dispensing cycle will not cause damage to the surrounding areas. Your Wake Cup will become hot during use. Always use care when handling it.
You can make tea or coffee independently of the alarm system.
- Prepare your Wake Cup as previously described.
- Add a tea bag or coffee to each cup and add sugar as desired. Place the cups below the dispensing nozzles. If you are using two cups, make sure that each cup is positioned directly below a dispensing nozzle. If you are only using one cup, place it centrally so that it is beneath both dispensing nozzles.
- Press and hold the dispense button until it turns red.
- Your Wake Cup will start to boil the water. When the water reaches boiling point, it will be dispensed into the cups below the dispensing nozzles.
Lighting
The gradual dawn wake up lights of your Wake Cup are activated 1½ minutes before the alarm sounds when your Wake Cup is in alarm mode. The lights will stay on for 30 minutes unless they are turned off by pressing the snooze/lights button. When turned off, the lights will fade out over 3 seconds.
You can turn the lights on or off at any time by pressing the snooze/lights button.
Hints and tips
How much water?

If you are unsure how much water your cups hold, use them to calibrate your water jug:
- Fill up the cup you intend to use with water (don't forget to make an allowance to the water if you are going to add milk). Pour this water into the water jug and make a note of the level.
- If you're going to use two cups, pour the second cup of water into the water jug and make a note of the water level. If the 2 CUPS MAX marking is exceeded, the cups you have chosen are probably too big for your Wake Cup. Never add more water than the 2 CUPS MAX marking.
- Now you know how much water to put in the water jug whenever you use these cups.
Fresh cool milk
Don't forget to use the supplied vacuum flask to keep your milk fresh and cool ready for your early morning Wake Cup.
No messing about
Don't forget you can use the pull out tray to hold any used tea bags, dirty spoons etc.
Descaling and Cleaning
Descaling your Wake Cup
To maintain it's performance, your Wake Cup will require descaling once every three months or so. You may need to descale your Wake Cup more frequently if you live in a hard water area.
- Remove the water jug and fill it with cold water to the 2 CUPS MAX mark. Add a citric acid based proprietary descaling product to the water and stir.
![]()
- Remove the water tank cap by giving it a quarter turn anticlockwise. Carefully pour the water from the water jug into the water tank. Refit the water tank cap by giving it a quarter turn clockwise. Make sure that the water tank cap is correctly and securely fitted.

- Place two suitable cups (not supplied) below the dispensing nozzles making sure that each cup is positioned directly below a dispensing nozzle. Make sure that the two cups are capable of holding all of the water used at step 1.
![]()
- Press and hold the dispensing button until it turns red. Your Wake Cup will start to boil the water.
![]()
- When the water reaches boiling point, it will be dispensed into the cups below the dispensing nozzles. Carefully discard this water.

- Repeat steps 1 to 5 twice more this time without adding a descaling solution. This will flush out your Wake Cup removing any descaling solution.
![]()


Always switch off and unplug your Wake Cup and allow it to completely cool before cleaning. Never immerse the unit, power cord or plug in water or any other liquid. Do not use harsh abrasives, chemicals or oven cleaners.
Cleaning
- Clean the exterior surface of your Wake Cup with a damp cloth and then polish it with a soft, dry cloth. Do not use steel wool pads or harsh/abrasive cleaners.
- Wash the water jug with warm soapy water. Rinse and dry thoroughly.
- Use warm water and washing-up liquid to clean your vacuum flask after use. Rinse thoroughly with hot water. Do not immerse in water. Dry thoroughly after leaving it to drain. Store with the stopper off. Do not put your vacuum flask in a dishwasher
- To remove difficult stains or odour fill your flask with hot water, add one teaspoon of bicarbonate of soda and secure the cap. Soaking overnight produces excellent results. Always rinse your flask before reusing it.
Memory back-up battery

In the event of a power cut, or if you need to unplug your Wake-Up for any reason, the display will switch off and the clock time will be lost. By using the memory back-up battery the clock time will be saved and will re-appear on the display once power is restored or the unit is plugged back in.
Insert an AA-size battery (not supplied) into the battery compartment located underneath your Wake Cup. Observe the correct polarity when inserting the battery.
Your Wake Cup will still operate with or without the memory back-up battery fitted.
Connection to the mains supply
Plug should be BS1363 approved Fit a 5 Amp Fuse

Ensure that the outer sheath of the cable is firmly held by the clamp
This appliance is fitted with either a moulded or rewirable BS1363, 13 amp plug. The fuse should be rated at 5 amps and be ASTA approved to BS1362.
If the fuse in a moulded plug needs to be changed, the fuse cover must be refitted. The appliance must not be used without the fuse cover fitted.
If the plug is unsuitable, it should be dismantled and removed from the supply cord and an appropriate plug fitted as detailed below. If you remove the plug it must not be connected to a 13 amp socket and the plug must be disposed of immediately. The wires of the mains lead are coloured in accordance with the following code:
GREEN/YELLOW = EARTH
BLUE = NEUTRAL
BROWN = LIVE
The wire which is coloured GREEN/YELLOW must be connected to the terminal in your plug which is marked with an E or by the earth symbol (![]() ) or coloured GREEN or GREEN /YELLOW.
) or coloured GREEN or GREEN /YELLOW.
The wire which is coloured BLUE must be connected to the terminal in your plug which is marked with the letter N or coloured BLACK.
The wire which is coloured BROWN must be connected to the terminal in your plug which is marked with the letter L or coloured RED.
If any other plug is used, a 5 amp fuse must be fitted either in the plug or adaptor or at the distributor board.
After sales service
These appliances are built to the very highest of standards. There are no user serviceable parts. Follow these steps if the unit fails to operate:
Check the instructions have been followed correctly.
Check that the fuse has not blown.
Check that the mains supply is functional.
If the appliance will still not operate, return the appliance to the place it was purchased for a replacement. To return the appliance to the Customer Service Department, follow the steps below:
Pack it carefully (preferably in the original carton). Ensure the unit is clean.
Enclose your name and address and quote the model number on all correspondence.
Give the reason why you are returning it.
If within the guarantee period, state when and where it was purchased and include proof of purchase (e.g. till receipt).
Send it to our Customer Service Department at the address below:
Customer Service Department
Jarden Consumer Solutions (Europe) Limited
Middleton Road
Royton
Oldham
OL2 5LN, UK.
Telephone: 0161 621 6900
Fax: 0161 626 0391
e-mail: info@pulse-uk.co.uk
Important Safety Instructions
READ CAREFULLY AND KEEP FOR FUTURE REFERENCE
This product can be used by children aged 8 years and above, and persons who require supervision, provided:
- they are familiar with the hazards associated with the product, and,
- they receive instruction by a competent person on how to safely use the product.
Children must not play with the product. Cleaning and user maintenance must not be done by children unless they are aged 8 or older and are supervised.
If the supply cord is damaged, it must be replaced by the manufacturer, its service agent or similarly qualified persons in order to avoid a hazard.
This appliance is for household use only.

The water tank cap must not be opened when the appliance is being used. Always allow the appliance to completely cool down before removing the water tank cap.
- This appliance generates heat during use. Adequate precaution must be taken to prevent the risk of burns, scalds, fires or other damage to persons or property caused by touching the exterior whilst in use or during cooling.
- Never use this appliance for anything other than its intended use. This appliance is for household use only. Do not use this appliance outdoors.
- Always ensure that hands are dry before handling the plug or switching on the appliance.
- Always use the appliance on a stable, secure, dry and level surface.
- Always exercise caution when dispensing hot beverages.
- Always clean the appliance thoroughly by flushing the system with clean water.
- This appliance must not be placed on or near any potentially hot surfaces (such as a gas or electric hob).
- Do not use the appliance if it has been dropped, if there are any visible signs of damage or if it is leaking.
- Ensure the appliance is switched off and unplugged from the supply socket after use and before cleaning.
- Always allow the appliance to cool before cleaning or storing.
- Never immerse any part of the appliance or power cord and plug in water or any other liquid.
- Never let the power cord hang over the edge of a worktop, touch hot surfaces or become knotted, trapped or pinched.
- Never leave the appliance unattended when in use.
- Never over fill the appliance.
- Never use the appliance without the drip tray or cover in place.
- Never fill the water tank with any liquid other than water. To prevent damage, never use the appliance without water.

Documents / ResourcesDownload manual
Here you can download full pdf version of manual, it may contain additional safety instructions, warranty information, FCC rules, etc.
Download Breville Wake Cup VCF042 - Bedside Hot Drinks Maker Manual
Advertisement
Thank you! Your question has been received!


Need Assistance?
Do you have a question about the Wake Cup VCF042 that isn't answered in the manual? Leave your question here.