Focusrite VRM Box - USB Interface with Headphone Output Featuring Virtual Reference Monitoring Technology Manual
- User manual (8 pages)
Advertisement
- 1 Introduction
- 2 What's in the box
- 3 VRM Box hardware overview
- 4 Operating system compatibility
- 5 Installing the software
- 6 VRM Box hardware setup
- 7 VRM Box in conjunction with another audio interface
- 8 VRM Box control panel software
- 9 What is Virtual Reference Monitoring?
- 10 The problem
- 11 The solution
- 12 The method
- 13 VRM technical data
- 14 Performance specifications
- 15 Important Safety Instructions
- 16 Documents / Resources
Introduction
VRM Box contains a unique technology that allows you to monitor audio on a pair of headphones, as if you were in a real environment listening to real speakers. There are three environments and 15 pairs of speakers to choose from, creating a total of 24 listening scenarios.
VRM Box has a tactile volume control with a class leading headphone amplifier and external S/PDIF input, complete with built-in sample-rate conversion, in a pocket-sized package that fits neatly on your desk.
What's in the box
1 VRM Box
1 Installer CD (includes installation files for Macintosh and Windows PC, and this User Guide)
1 USB cable
1 Register Me Online card
1 Getting Started Guide
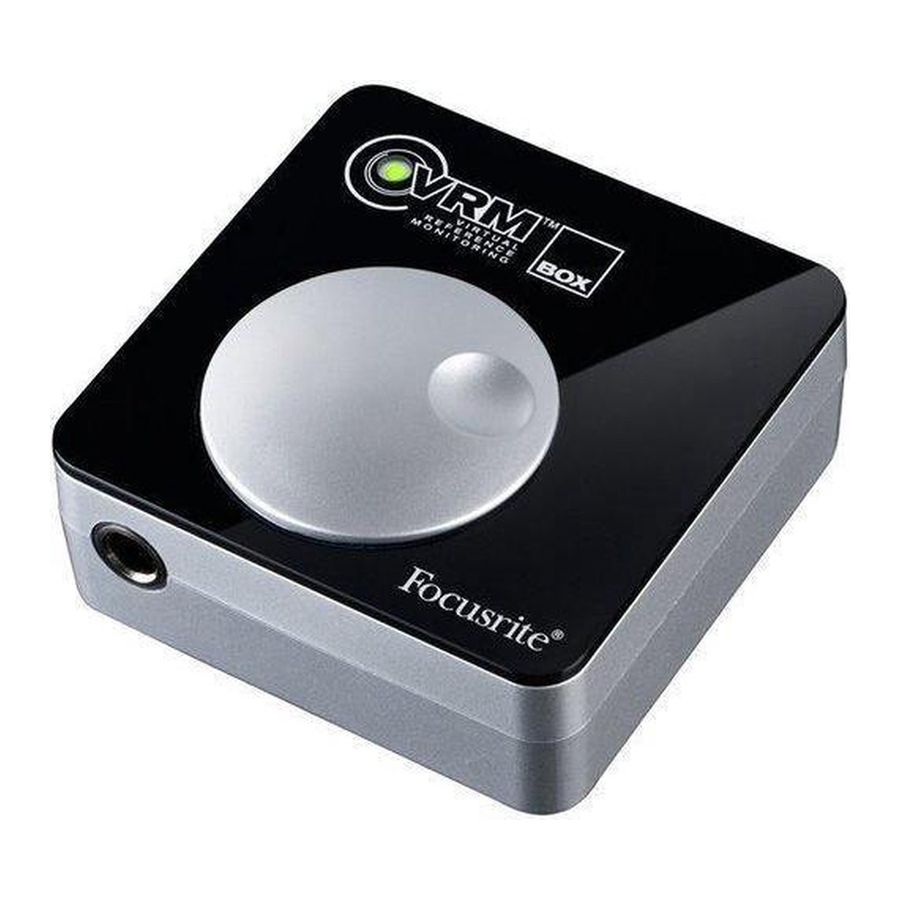
VRM Box hardware overview

- Volume knob
- VRM "Active" LED
- Headphone socket
- Kensington Lock port
- USB socket
- S/PDIF input socket
Operating system compatibility
Windows
Windows XP (SP3), Vista, 7
Macintosh
OSX 10.5 Leopard (Intel only, PPC not supported), OSX 10.6 Snow Leopard.
For more information on compatibility visit www.focusrite.com/vrm_box
Installing the software
The VRM Box is a class compliant device, meaning that there is no need to install drivers for the device to work as an audio output. However, you must run the installer to be able to use the VRM software.
Insert the CD into the computer and click on the installer icon. Follow the instructions on screen to install the VRM Control Panel software and drivers.
Note for Windows users: If this message or similar appears during the installation process, press 'Continue Anyway' to successfully install the drivers.

VRM Box hardware setup
The VRM Box can be used as the main audio interface, or in conjunction with your existing audio interface, providing this interface has a RCA S/PDIF output.
VRM Box as the main audio interface

- Using the USB cable provided, connect the VRM Box to the USB port of your computer
- Set up the VRM Box as your audio playback device

- With the volume control turned down, connect your headphones to VRM Box
- Load the VRM software. This can be found in your Applications folder (Mac) or from the Start menu > All Programs > Focusrite (Windows)
- Start playing audio from your DAW software or any media player
- Turn up the volume control on the VRM Box until you have a healthy level in your headphones

VRM Box in conjunction with another audio interface

- Using the USB cable provided, connect the VRM Box to the USB port of your computer
- Connect the S/PDIF output on your audio interface into the VRM Box S/PDIF input
- In your audio interface's control panel, ensure that audio is sent to the S/PDIF output of your audio interface
- With the volume control turned down, connect your headphones to VRM Box
- Open the VRM software, check the icon in the bottom right corner of the VRM software that the VRM Box has locked to the S/PDIF signal
![]()
S/PDIF is unlocked
![]()
S/PDIF is locked (VRM Box is synchronised to the incoming S/PDIF signal) - Start playing audio from your DAW software or any media player
- Turn up the volume control on the VRM Box until you have the required level in your headphones


VRM Box control panel software

- Currently selected monitor speaker
- Monitor speaker selection drop down list: Click to select the monitor speakers
- S/PDIF input status: (see above for more details)
- VRM on / off: Click the logo to turn VRM on / off. When on, the dot in VRM logo and the LED on the hardware will light green
- Environment selection: Click to change the listening environment
- Information button: When pressed, text information about the listening environment, monitor speakers, and listening position is displayed
- Input level buttons: When playing louder audio material (e.g. a mastered mp3), the additional processing from VRM Box may cause the output to clip. Press the -6dB button to prevent this happening. Conversely, when playing quieter audio material (e.g. a non-mastered recording session), press the 0dB button to achieve more level in your headphones
- Environment display: This gives a graphical representation of the listening environment, monitor speaker placement and listening position
What is Virtual Reference Monitoring?
Developed by Focusrite, VRM (Virtual Reference Monitoring) is a loudspeaker & room simulator designed for headphone listening.
The problem
Accurate mixing has until now required expensive monitors and a carefully designed and treated control room. Currently, both professional music producers facing budgetary limitations, plus project music makers without access to such facilities, frequently encounter mixing and "auditioning" difficulties.
The solution
VRM allows you to choose from ten pairs of industry standard nearfield and main monitors in an acoustically treated space. Engineers routinely assess their mixes by burning CDs and taking them into untreated rooms to reference on consumer stereos. VRM eliminates this process by simulating two extra rooms; a large living room and a smaller bedroom. You can choose between a range of speakers including quality hi-fi, computer, cheap stereo and television speakers. As with the control room simulation, you can observe the effects of typical room modes on your mixes.
The method
VRM uses standard headphones to reproduce the direct sound, together with a digital signal processing system that is used to simulate specific monitoring scenarios. The room models of VRM are mathematical simulations of real rooms, which provide greater flexibility in the possible combinations of loudspeakers and listening positions. The loudspeaker simulations are created using convolutions of impulse responses measured using the original loudspeakers. The accuracy of these simulations in different environments is taken care of by the impulse responses themselves and the way they are calculated and manipulated.
VRM technical data
| Room Model | Available Speaker Emulations |
| Professional Studio | Japanese White Classic |
| KRK RP6 G2 | |
| Auratone 5C | |
| US Passive Nearfield | |
| British Studio | |
| Genelec 1031A | |
| KRK VXT8 | |
| ADAM S2.5A | |
| Rogers LS3/5a | |
| Stirling LS3/5a | |
| Living Room | British 90s Hi-Fi |
| British 80s Hi-Fi | |
| Flat-screen Television | |
| Genelec 1031A | |
| Stirling LS3/5a | |
| Bedroom Studio | KRK RP6 G2 |
| British 90s Hi-Fi | |
| British 80s Hi-Fi | |
| Computer Desktop | |
| Budget Micro System | |
| Flat-screen Television | |
| Genelec 1031A | |
| KRK VXT8 | |
| Stirling LS3/5a |
Listening environment data
| Listening Environment | Dimensions | Volume | Reverb Time |
| Professional Studio | 6.10 x 6.48 x 3.53 m | 139.40 m³ | 0.38 s |
| Living room | 5.48 x 4.66 x 2.79 m | 71.27 m³ | 0.36 s |
| Bedroom Studio | 3.28 x 3.69 x 2.47 m | 29.90 m³ | 0.47 s |
Loudspeaker emulation data
| Description | Based On | Size (cm) | Tweeter | Woofer | System |
| ADAM S2.5A | ADAM S2.5A | 45H, 28W, 30D | Ribbon | 8" | Active 2-way bass reflex |
| US Passive Nearfield | Alesis Monitor One | 38H, 22W, 24D | 1" silk dome tweeter w/ ferrofluid cooling | 6.5" mineral-filled polypropylene cone | Passive 2-way rear firing port |
| Auratone 5C | Auratone 5C | 17H, 17W, 14D | (none) | 4" | Passive single driver closed box |
| British 80's Hi-Fi | B&W DM12 | 34H, 22W, 26D | 1" polyester weave dome | 6" bass/midrange driver | Passive 2-way closed box |
| Computer Desktop Genelec 1031A | Creative S8S35 Genelec 1031A | 15H, 8W, 10D 49H, 25W, 29D | (none) 1" metal dome | 2.5" 8" poly composite | Active single driver rear firing port Active 2-way vented box |
| Budget Micro System | Goodmans MS188 | 28H, 18W, 19D | 1" dome | driver 3.5" | Passive 2-way ported box |
| British 90's Hi-Fi | KEF Q55.2 | 85H, 21W, 25D | 1" | 5" | Passive 2-way rear ported box with passive radiator |
| KRK RP6 G2 | KRK RP6 G2 | 33H, 22W, 27D | 1" neodymium soft dome with ferrofluid | 6" glass aramid composite | Active 2 way front firing ported box |
| KRK VXT8 | KRK VXT8 | 44H, 32W, 30D | 1" silk dome ferrite | 8" woven kevlar | Active 2 way front firing ported box |
| Flat-Screen Television Phocus LCD 26 TV | 45H 87W 10D (Stereo TV) | (none) | 2" x 4" oval-shaped driver | Active single driver | |
| British Studio | Quested S8R | 42H, 30W, 35D | 1" soft dome | 8" cone | Active 2-way bass reflex |
| Rogers LS3/5a | Rogers LS3/5a | 30H, 19W, 16D | 0.75" | 5" KEF B110 | Passive 2 way closed box |
| Stirling LS3/5a | Stirling LS3/5a | 30H, 19W, 16D | 0.75" | 5" KEF B110 | Passive 2 way closed box |
| Japanese White Classic | Yamaha NS-10M Pro | 38H, 22W, 18D | 1.5" | 7" cone | Passive 2 way closed bookshelf |
Performance specifications
Headphone Outputs (Outputs 1-2)
- Output impedance: < 10 Ohms
- Power output into 150R: 15mV
- Power output into 50R: 30mW
- THD+N: -100dB (0.001%) (-1dBFS input, 20Hz/22kHz bandpass filter, 150R load)
- Signal to Noise Ratio: > 105dB
S/PDIF Digital Input
- Automatic Sample Rate conversion
- Supported sample rates: continuous from 32kHz to 192kHz
- THD+N: < -110dB any sample rate
Crosstalk (Channel Isolation)
- Any output to output: > 100dB
Digital Performace
- D/A Dynamic Range: 120dB (A-weighted)
- Measured D/A Dynamic Range: 108dB (A-weighted)
- Clock Source: Internal Clock only
- Clock jitter < 250 picoseconds
- Supported Sample Rates: 44.1kHz & 48kHz.
- 2 input channels to computer: S/PDIF (2).
- 2 output channels from computer: Headphones (2).
Connectors and Controls
- Stereo S/PDIF input on RCA
- Stereo Headphone Output on ¼" TRS
- Headphone Output Level control (analogue)
- 4-pin USB2.0 compatible socket
Indicators
- 1 Green LED Indicator:
Flashing: Unit not installed correctly on host
Off: VRM effects turned off
On: VRM effects turned on
Power
- Bus power from USB bus.
Weight and Dimensions
- Dimensions: 68mm x 25mm x 68mm (W x H x D)
- Weight: 123g
Important Safety Instructions
- Read these instructions
- Keep these instructions
- Heed all warnings
- Follow all instructions
- Clean VRM Box only with dry cloth
- Do not install VRM Box near any heat sources such as radiators, heat registers, stoves, or other apparatus (including amplifiers) that produce heat
- Only use attachments/accessories specified by Focusrite
- Use only with the cart, stand, tripod, bracket, or table specified by the Focusrite, or sold with the VRM Box. When a cart is used, use caution when moving the cart/VRM Box combination to avoid injury from tip-over
![]()
- Unplug the VRM Box during lightning storms or when unused for long periods of time
- Refer all servicing to qualified service personnel. Servicing is required when the VRM Box has been damaged in any way, such as the headphone, USB or S/PDIF sockets are damaged, liquid has been spilled or objects have fallen into the VRM Box, the VRM Box has been exposed to rain or moisture, does not operate normally, or has been dropped No naked flames, such as lighted candles, should be placed on the apparatus


Excessive sound pressure levels from earphones and headphones can cause hearing loss
This equipment must only be connected to USB 1.0, 1.1 or 2.0 type ports to protect against hazard in the event of a product fault
www.focusrute.com

Documents / ResourcesDownload manual
Here you can download full pdf version of manual, it may contain additional safety instructions, warranty information, FCC rules, etc.
Advertisement
Thank you! Your question has been received!

Need Assistance?
Do you have a question about the VRM Box that isn't answered in the manual? Leave your question here.