Table of Contents
Advertisement
Advertisement
Table of Contents

Related Manuals for Craftsman 536.885211


Summary of Contents for Craftsman 536.885211
- Page 1 5.0 Horsepower 21 Inch Single Stage Auger Propelled SNOW THROWER Electric Start MODEL NO. 536.885211 Caution: Read and follow all Safety Rules and Operating Instructions before first use of this product, SEARS, ROEBUCK AND CO., Hoffman Estates, IL 60179 U.S.A. F001019M 04/27/99...
- Page 2 TWO-YEAR WARRANTY For two years from the date of purchase, when this Craftsman Snow Thrower is main- tained, lubricated, and tuned up according to the operating and maintenance instructions in the owner's manual, Sears will repair, free of charge, any defect in material or workman- ship.
-
Page 3: Fuel Safety
• Useonly attachments and accessories approved by the manufacturer of the snow thrower (such as electric starter kits, etc.). • Never operate the snow thrower without good visibility or light. Always be sure of your footing, and keep a firm hold on the handles. - Page 4 Federal laws apply on federal lands. A spark arrester/muffier is available through your nearest Sears Autho- rized Service Center (See ENGINE REPAIR PARTS section in this manual). key to 1 - Electric Starter Cord Craftsman 2-cycle oil lOft.
-
Page 5: Tools Required
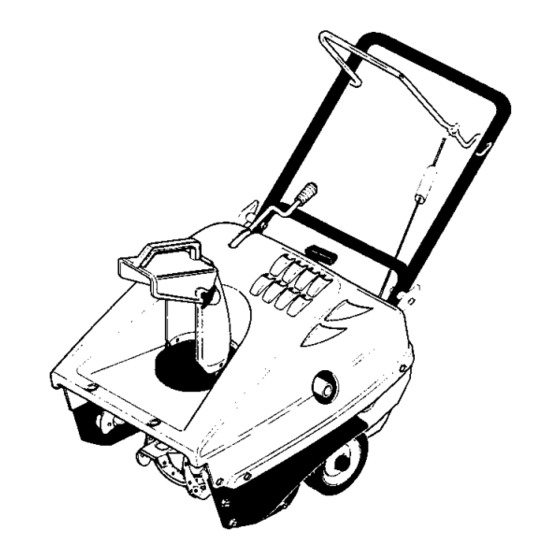
CAUTION: Always wear safety glasses or eye shields while assembling snow thrower. TOOLS REQUIRED FOR ASSEMBLY 1 - Knife to cut carton The figure to the right shows the snow thrower completely assembled. References to the right or left hand side of the snow thrower are from the viewpoint of the operator's position behind the unit. - Page 6 KNOW YOUR SNOW THROWER READ THIS OWNER'S MANUAL AND SAFETY RULES BEFORE OPERATING YOUR SNOW THROWER, Compare the illustrations with your SNOW THROWER yourself with the location of various controls and adjustments. Save this manual for future reference. ElectricStart Ignition Off ignitionOn Chute ControlRod Lower Handle...
-
Page 7: Stop Snow Thrower
HOWTO USEYOUR SNOWTHROWER TOSTOPYOURSNOW THROWER • To stop the auger, release the auger control bar. NOTE: If the auger continues to creep, refer (To Adjust Auger Control Cable paragraph on page 12). • To stop the engine, turn key to the OFF position. -
Page 8: Gasoline/Oil Mixture
Pour 1 U.S. quart of fresh, clean, unleaded automotive gasoline to a gallon gasoline container. • Add 3.2 oz of clean, high quality, Craftsman two-cycle oil into the gasoline container (One 3.2 ounces of oil pro- vided). IMPORTANT: Do not use outboard motor... -
Page 9: To Stop Engine
"1/2choke" position. When engine runs smoothly, move choke lever to "No Choke" Position. NOTE: Allow the engine to warm up for several minutes before blowing snow in temperatures below 0°F. WARM START • Be sure the choke is in the OFF posi- tion and putt the starter handle unlil the engine starts. - Page 10 SNOW THROWING TIPS • This snow thrower will propel itself forward when the handle is raised enough to cause the auger blades to contact the ground. The auger should stop when auger control bar is released. If it does not, refer to Adjust Auger Control Cable paragraph on page 12.
- Page 11 CUSTOMER RESPONSIBILITIES SERVICE RECORDS Fill in dates as Before Each you complete regular service Tighten All Screws & Nuts Check Spark Plug Check Drive Belts Lubricate Chute Control Flange Check Fuel Drain Fuel GENERAL RECOMMENDATIONS The warranty on this snow thrower does not cover items that have been subjected to op- erator abuse or negligence.
-
Page 12: Carburetor Adjustment
CARBURETOR A DJUSTMENT The carburetor onthissnow thrower isnot adjustable. IMPORTANT: Ifyouthink thecarburetor is notoperating properly, contact your nearest Sears s ervice c enter. CAUTION: Never tamper with the engine governor which is factory set for proper engine speed. Over speeding the engine may increase the danger of personal injury and will void the engine warranty. -
Page 13: Belt Cover
• Remove the gas cap. • Remove the two bolts and nuts from the front lip of the top cover. Use a flat head screwdriver and a 3/8" wrench. • Remove the bolt from the front right side. Use a 5/16" and 3/8" wrench. •... -
Page 14: To Replace Drive Belt/Auger
The drive belt on this unit is of special construction and must be replaced with the same type belt available at your nearest Craftsman Service Center. • Remove the belt cover. See to Remove the Belt Cover paragraph on page 13. - Page 15 Unless the operator is fully qualified to make engine repairs or adjustments, recommend that such work should be done by technicians trained to work on snow thrower type engines. Take your snow thrower to your nearest Craftsman Service Center for repair and adjustment. ADJUST ENGINE SPEED Your engine speed has been factory set.
-
Page 16: Engine Storage
Do not use plastic or vinyl. NOTE: A yearly checkup or tune-up at a Craftsman Service Center is a good way of ensuring that your snow thrower wit1provide maximum performance for the next season. - Page 17 Stop engine immediately and remove key. Tighten all bolts and make all necessary repairs. If vibration continues, have the unit serviced by a Craftsman service repairman Repair or replace auger assem- Replace drive belt Adjust auger control cable Adjust auger drive belt;...