Table of Contents
Advertisement
Quick Links
AJY090LELDHS
AJY108LELDHS
INSTALLATION MANUAL
VRF SYSTEM OUTDOOR UNIT
For authorized service personnel only.
INSTALLATIONSANLEITUNG
VRF-SYSTEM AUSSENGERÄT
Nur für autorisiertes Fachpersonal.
MANUEL D'INSTALLATION
UNITÉ EXTÉRIEURE À SYSTÈME VRF
Pour le personnel de service agrée uniquement.
MANUAL DE INSTALACIÓN
UNIDAD EXTERIOR DEL SISTEMA VRF
Únicamente para personal de servicio autorizado.
MANUALE D'INSTALLAZIONE
UNITÀ ESTERNA DEL SISTEMA VRF
A uso esclusivo del personale tecnico autorizzato.
ΕΓΧΕΙΡΙΔΙΟ ΕΓΚΑΤΑΣΤΑΣΗΣ
ΕΞΩΤΕΡΙΚΉ ΜΟΝΆΔΑ ΣΥΣΤΉΜΑΤΟΣ VRF
Μόνο για εξουσιοδοτημένο τεχνικό προσωπικό.
MANUAL DE INSTALAÇÃO
UNIDADE EXTERIOR DE SISTEMA VRF
Somente para o pessoal do serviço técnico autorizado.
РУКОВОДСТВО ПО УСТАНОВКЕ
СИСТЕМА VRF ВНЕШНЕГО МОДУЛЯ
Только для авторизованного обслуживающего персонала.
KURULUM KILAVUZU
VRF SİSTEMİ DIŞ ÜNİTESİ
Yalnızca yetkili servis personeli için.
PART No. 9380545545-01
Advertisement
Table of Contents

Related Manuals for Fujitsu AJY090LELDHS


Summary of Contents for Fujitsu AJY090LELDHS
- Page 1 UNITÉ EXTÉRIEURE À SYSTÈME VRF Pour le personnel de service agrée uniquement. MANUAL DE INSTALACIÓN UNIDAD EXTERIOR DEL SISTEMA VRF Únicamente para personal de servicio autorizado. AJY090LELDHS AJY108LELDHS MANUALE D'INSTALLAZIONE UNITÀ ESTERNA DEL SISTEMA VRF A uso esclusivo del personale tecnico autorizzato.
-
Page 2: Table Of Contents
INSTALLATION MANUAL [Original instructions] 1. SAFETY PRECAUTIONS VRF system outdoor unit • Be sure to read this installation manual thoroughly before installation. PART No. 9380545545-01 • The warnings and precautions indicated in this installation manual contain important information pertaining to your safety. Be sure to observe them. Contents •... -
Page 3: About This Product
2. ABOUT THIS PRODUCT This mark indicates procedures which, if improperly per- CAUTION formed, might possibly result in personal harm to the user, or damage to property. 2.1. Precautions for using R410A refrigerant This unit must be installed by qualified personnel with a capacity certificate for handling refrigerant fluids. -
Page 4: Warning
2.4. Combinations 3.2. Drain processing The number of indoor units that can be connected are as follows: CAUTION Connectable total Perform drain work in accordance with this manual, and ensure that the drain water is Outdoor unit cooling Maximum connect- Model indoor unit capacity capacity [kW]... -
Page 5: Transporting The Unit
3.3.1 Single outdoor unit installation 3.3.3 Outdoor units installation in multi row When the upward area is open Unit: mm * The following settings are not recommended in case of cooling by a low outdoor tem- perature. Unit: mm (1) Obstacles at rear only (2) Obstacles at rear and sides only (1) Single parallel unit arrangement (2) Multiple parallel unit arrangement... -
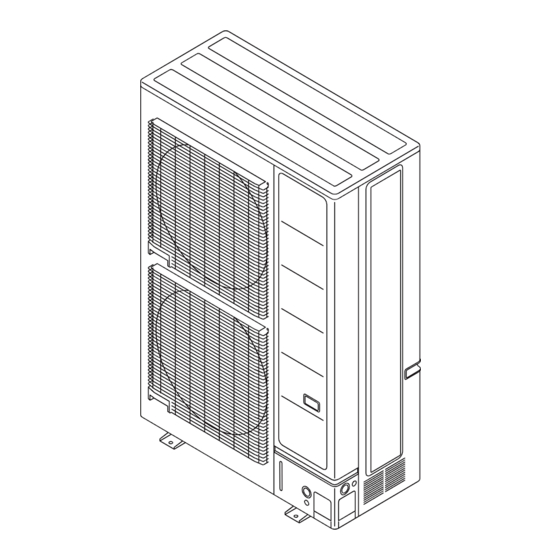
Page 6: Installing The Unit
3.5. Installing the unit 4. SYSTEM CONFIGURATION • Install the outdoor unit without slant. (within 0.3 degrees) For detailed information, refer to the Design and Technical Manual. • Install 4 anchor bolts at the locations indicated with arrows in the figure. 4.1. -
Page 7: Protection Of Pipes
Table. B (Diameter of pipes used between outdoor unit and first separation 5. PIPE INSTALLATION tube or header) For the following installation conditions, it is necessary to increase the pipe size. 5.1. Brazing • Condition 1: Total indoor unit capacity ratio ˃ 110% •... -
Page 8: Opening The Knockout
5.4.2 Removing the pinch pipe 5.3. Opening the knockout WARNING CAUTION Remove the pinch pipe only when the internal gas is completely drained as shown on the below instructions. Be careful not to deform or scratch the panel while opening the knockouts. If gas still remains inside, the pipe may crack when you melt the brazing filler metal of To protect the pipe insulation after opening a knockout, remove any burrs from the edge the joint with a burner. -
Page 9: Electrical Wiring
6. ELECTRICAL WIRING 6.2. Knockout CAUTION 6.1. The precautions of electrical wiring Be careful not to deform or scratch the panel while opening the knockouts. WARNING After opening the knockouts, remove burr on the edges, and attach the one-touch bush (accessory), grommet or conduit etc. -
Page 10: Transmission Line
6.4.3 Enabling/Disabling automatic address setting 6.4. Transmission line You can enable/disable automatic address setting for the indoor unit and the signal ampli- fier. CAUTION To enable automatic address setting for the indoor unit, connect the indoor unit to outdoor Caution when wiring: units under the same refrigerant system. - Page 11 6.5.2 Wiring procedure How to connect cables to the terminal block • Remove the service panel. And connect the cable to the terminal in accordance with the Caution when connecting cable (1) Use ring terminals with insulating sleeves as shown in the figure to connect to the terminal name plate.
-
Page 12: External Input And External Output
Operation behavior 6.6. External input and external output Each input terminal works as follows. 6.6.1 Terminal position Connector Input signal Status Base pan heater Normal operation Output 1 (CN136: Black) Input 1 (CN115: Black) Outdoor unit PC board CN131 (Yellow) Low noise mode operation EXT. -
Page 13: Field Setting
7. FIELD SETTING 7.3. Rotary switch setting The rotary switch (REF AD) sets the refrigerant system address of the outdoor unit. If CAUTION multiple refrigerant systems are connected, set the rotary switch (REF AD) as shown in the table below. Discharge the static electricity from your body before setting up the DIP switches. - Page 14 (1) Turn on the power of the outdoor unit and enter standby mode. Level 1 (stop) • When system is abnormal • When system is normal Level 2 Check the settings as there is an error in the POWER/MODE lamp is on. (ERROR (operated at 40% capacity) settings for outdoor unit address lamp is off.)
-
Page 15: Address Setting For Signal Amplifiers
7.6.2 Procedures to enable automatic address setting on indoor 7.5. Address setting for signal amplifiers units 7.5.1 Address setting for signal amplifiers Check that the rotary switch IU AD on the indoor unit PC board is set to “00”.If it is not set to “00”, it means the address of that device is not set. -
Page 16: Pipe Installation Ii
Evacuation procedure 8. PIPE INSTALLATION II (1) Remove the blank caps of the gas pipe and liquid pipe and check that the valves are closed. Fig. A: Connection diagram Fig. B (2) Remove the charging port cap. (3) Connect a vacuum pump and a pressure gauge to a charging hose and connect it to Service hose Pressure regu- Pressure... -
Page 17: Installing Thermal Insulation
(1) Calculation of additional amount for pipe length 9. TEST RUN Total length of ø 12.70 Total length of ø 9.52 mm liquid pipe mm liquid pipe a × 0.114 a × 0.058 9.1. Indoor unit connection check (kg/m) (kg/m) Normal operation will not be possible without performing the Indoor unit connection check. -
Page 18: Checklist
9.1.3 Error displays Test operation setting method Use the “MODE/EXIT”, “SELECT”, and “ENTER” buttons on the indoor unit PC board to • When error occurs, “Err” and “Number of errors occurred” are alternately displayed on configure settings according to the procedures below. the 7-segment display every 1 second. -
Page 19: Status Display
Outdoor unit rush current limiting resister temp. rise (18) Origin Origin country error (protective operation) Manufacturer Outdoor unit transmission PCB parallel communica- FUJITSU GENERAL LIMITED tion error (19) Manufacturer Address: 3-3-17, Suenaga, Takatsu-ku, Kawasaki 1 Outdoor unit discharge temp. thermistor 1 error 213-8502, Japan 1 Outdoor unit compressor temp.