Advertisement
- 1 IMPORTANT SAFETY INSTRUCTIONS
- 2 PERSONAL SAFETY PRECAUTIONS
- 3 FEATURES
- 4 CHARGING THE INTERNAL BATTERY OF THE JUMP STARTER
- 5 OPERATING INSTRUCTIONS
- 6 MAINTENANCE INSTRUCTIONS
- 7 MOVING AND STORAGE INSTRUCTIONS
- 8 TROUBLESHOOTING
- 9 REPLACEMENT PARTS
- 10 ACCESSORIES
- 11 BEFORE RETURNING FOR REPAIRS
- 12 Documents / Resources
IMPORTANT SAFETY INSTRUCTIONS

CONTAINS SEALED, NON-SPILLABLE LEAD-ACID BATTERY. MUST BE DISPOSED OF PROPERLY.
Possible explosion hazard. Contact with battery acid may cause severe burns and blindness. Keep out of reach of children.
SAVE THESE INSTRUCTIONS.
RISK OF EXPLOSIVE GASES.
WORKING IN THE VICINITY OF A LEAD-ACID BATTERY IS DANGEROUS. BATTERIES GENERATE EXPLOSIVE GASES DURING NORMAL OPERATION. IT IS IMPORTANT THAT YOU FOLLOW THESE INSTRUCTIONS EACH TIME YOU USE THE UNIT.
To reduce the risk of battery explosion, follow these instructions and those published by the battery manufacturer and the manufacturer of any equipment you intend to use in the vicinity of a battery. Review cautionary markings on these products and on the engine.

RISK OF ELECTRIC SHOCK OR FIRE.
- Keep out of reach of children.
- Do not disassemble the jump starter. Take it to a qualified service professional if service or repair is required. Incorrect assembly may result in fire or electrical shock.
- Do not use the jump starter to jump a vehicle while charging the internal battery.
- Do not recharge the jump starter with a damaged extension cord.
- The jump starter gets hot during charging and must have proper ventilation.
- Do not set the jump starter on flammable materials, such as carpeting, upholstery, paper, cardboard, etc.
- Place the jump starter as far away from the battery being jumped as the cables will permit.
- Do not expose the jump starter to rain or snow.
- Never attempt to jump start a frozen battery.
- Never place the jump starter directly above battery being jumped.
- To prevent arcing, never allow the clamps to touch together or to contact the same piece of metal.
- Use of an attachment not recommended or sold by the jump starter manufacturer may result in damage to the unit or personal injury.
- Never operate the jump starter if it is damaged.
- If someone else uses the jump starter, ensure they are well informed on how to use it safely, and have read and understood the operating instructions.
- The jump starter is NOT designed to be installed as a replacement for a vehicle battery.
- Use ONLY on vehicles, boats and garden tractors powered with a 12V DC battery system.
- If the engine fails to start after the recommended number of attempts, disconnect the unit and look for other problems that may need to be corrected.
- Use the jump starter for jump starting lead-acid batteries only. Do not use for dry cell batteries that are commonly used with home appliances.
PERSONAL SAFETY PRECAUTIONS
- Wear complete eye protection and protective clothing when working near lead-acid batteries. Always have someone nearby for help.
- Have plenty of fresh water, soap and baking soda nearby for use, in case battery acid contacts your eyes, skin, or clothing. Wash immediately with soap and water and seek medical attention.
- If battery acid comes in contact with eyes, flush eyes immediately for a minimum 10 minutes and get medical attention.
- Neutralize any acid spills thoroughly with baking soda before attempting to clean up.
- Remove all personal metal items from your body, such as rings, bracelets, necklaces and watches. A battery can produce a short circuit current high enough to weld a ring to metal, causing a severe burn.
- Never smoke or allow a spark or flame in the vicinity of the battery or engine.
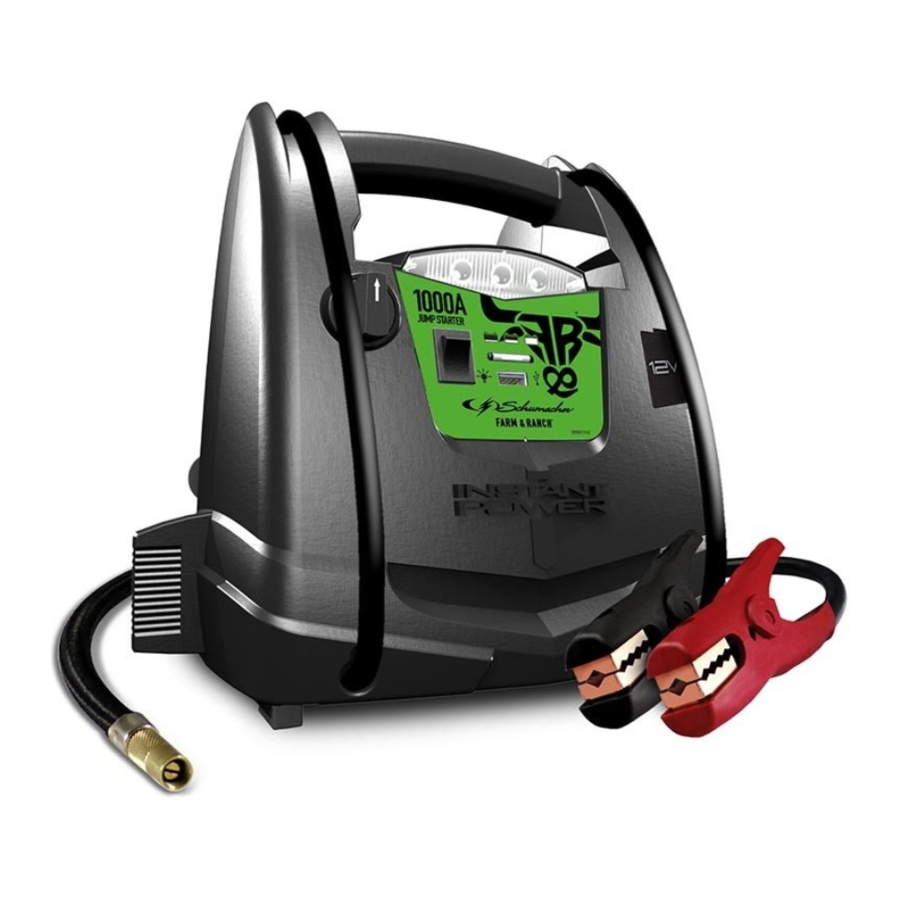
FEATURES

- Worklight ON/OFF switch
- Rotary switch for USB and jump starter
- Built-in work light
- Battery status indicators
- Battery status button
- USB port
- 12V DC power outlet
- Battery clamps
- Air compressor gauge
- Air compressor ON/OFF switch
- Internal battery charger port
- Air compressor hose wrap cleats
- Air compressor hose
- Air compressor adapters and storage bag
CHARGING THE INTERNAL BATTERY OF THE JUMP STARTER

CHARGE IMMEDIATELY AFTER PURCHASE, AFTER EACH USE AND EVERY 30 DAYS, TO KEEP THE UNIT'S INTERNAL BATTERY FULLY CHARGED AND PROLONG BATTERY LIFE.
CHECKING THE LEVEL OF THE INTERNAL BATTERY
Press the Battery Status button on the front of the unit. The LED lights will indicate the current charge level as follows:
- RED – less than 20% of full charge; immediately charge the unit.
- YELLOW/ORANGE – 20-80% of full charge.
- GREEN – more than 80% of full charge.
CHARGING THE INTERNAL BATTERY
Charge the unit's internal battery using an extension cord (not included).
 NOTE: Use of an improper extension cord could result in a risk of fire and electric shock.
- To charge, flip the AC connector on the back of the unit DOWN and plug in an 18 AWG or larger extension cord.
- Plug the extension cord into a 120VAC electrical wall outlet.
- While the jump starter is charging, the RED LED will be on. Complete charging may take up to 72 hours. When the RED LED turns off, the jump starter is ready to use.
- When the internal battery is fully charged, the charger will automatically go into maintain mode and maintain the battery at full charge without damaging it. When in maintain mode, the GREEN LED will light, as long as there is an AC cord connected to the charging port.
- Charge the jump starter as soon as possible after use.
CHARGING THE INTERNAL BATTERY WHILE DRIVING
You may also charge the internal battery while driving, using a male-to-male charger cable (part number 94500109 – not included).
DO NOT CHARGE INTERNAL BATTERY FOR MORE THAN 30 MINUTES OR LEAVE THE BATTERY UNATTENDED. IT COULD EXPLODE, CAUSING PROPERTY DAMAGE OR PERSONAL INJURY.
- Make sure the car is running.
- Insert one end of the accessory cable into the 12V DC power outlet.
- Insert the other end of the accessory cable into the vehicle's accessory outlet (lighter socket).
![warning]() NOTE: The RED LED does not operate during this method of charging. Using this method to charge the battery overrides the maintain mode and the battery can be overcharged.
NOTE: The RED LED does not operate during this method of charging. Using this method to charge the battery overrides the maintain mode and the battery can be overcharged. - Monitor the progress of the charge by pressing the Battery Status button on the front of the unit. When the battery is fully charged, disconnect the accessory cable from the unit, and then from the lighter socket of the vehicle.
NOTE: Completely disconnect the charger cable when the engine is not running.
OPERATING INSTRUCTIONS
JUMP STARTING A VEHICLE
Using the Engine Start feature without a battery installed in the vehicle will damage the vehicle's electrical system.
- Turn the ignition OFF.
- Lay the DC cables away from any fan blades, belts, pulleys and other moving parts.
- For a negative-ground vehicle (as in most vehicles), connect the Instant Power's POSITIVE (RED) clamp to the POSITIVE (POS, P, +) battery post. Next, connect the NEGATIVE (BLACK) clamp to the vehicle chassis or engine block, away from the battery.
- For a positive-ground vehicle, connect the Instant Power's NEGATIVE (BLACK) clamp to the NEGATIVE (NEG, N, -) battery post. Next, connect the POSITIVE (RED) clamp to the vehicle chassis or engine block away from the battery.
- Turn the switch to the ON position
- Crank the engine for no more than 8 seconds. If the engine does not start, wait 2 minutes before cranking again.
- After the engine starts, turn the switch to the OFF position and remove the unit from the battery.
- Charge the unit.
USING THE USB PORT
The USB port provides up to 2A at 5V DC.
- Ensure the battery clamps are securely clipped on the storage holders.
- Turn the unit ON.
- Plug your device into the USB port.
- When finished using the USB port, turn the switch to the OFF position.
- Charge the unit.
USING THE WORK LIGHT
The work light is controlled by a sliding ON/OFF switch located on the front of the unit.
- Make sure the lamp is turned OFF when the unit is being recharged or stored.
- Position the unit on a flat, stable surface near the intended work area.
- Ensure the battery clamps are securely clipped on the storage holders.
POWERING A 12V DC DEVICE
The unit is a power source for all 12V DC accessories that are equipped with a 12V accessory plug. Use it for power outages and on fishing or camping trips.
NOTE: Do not power a 12V device with the unit while charging the internal battery.
- Make sure the device to be powered is OFF before inserting the 12V DC accessory plug into the 12V DC accessory outlet.
- Open the protective cover of the DC power outlet on the unit.
- Plug the 12V DC device into the DC power outlet and turn on the 12V DC device (if required).
- When finished, turn off the DC device (if required) and unplug from the DC power outlet.

Do not use the unit to run appliances that draw more than 20A DC.
NOTE: Extended operation of a 12V DC device may result in excessive battery drain. Recharge the unit immediately after unplugging the 12V DC device.
Estimated run-times
| APPLIANCE TYPE | EST WATTAGE | APPROX. USAGE |
| Cell phone, fluorescent light | 4 watts | 34 hrs |
| Radio, fan, depth finder | 9 watts | 14 hrs |
| Camcorder | 15 watts | 7 hrs |
| Electrical tool | 24 watts | 5 hrs |
| Electric cooler | 48 watts | 2 hours |
| Car vacuum, air compressor | 80 watts | 1.8 hrs |
NOTE: Actual time may vary. Times are based on the internal battery being fully charged.
USING THE AIR COMPRESSOR
Read the instructions of the product being inflated before using the compressor. Avoid overinflation; do not exceed the manufacturer's recommended pressures. Do not leave the air compressor unattended during use.
NOTE: Wrap cleats are provided for convenient storage of the air compressor hose. Wrap the hose around these cleats when the hose is not in use.
- Ensure the battery clips are securely on the storage holders.
- Remove the air compressor hose from the storage cleats.
- Connect the adapter to the valve stem by threading it onto the end. If necessary, use one of the additional adaptors.
- Press the air compressor power switch to turn ON and inflate to the desired pressure or fullness (refer to the gauge next to the switch).
- When the desired pressure is reached, press the air compressor power switch to turn OFF and remove the connector from the valve stem.
- Allow unit to cool.
- Recharge the unit before storing.
NOTE: The air compressor is rated for 150 PSI.
Estimated time for inflating
| Vehicle tires 13-16" | 6-24 minutes |
| Bike tires | 1-3 minutes |
| Sports balls | 30 seconds |
These times are approximate. Use the air compressor gauge to ensure the proper pressure has been reached. Do not overinflate.
MAINTENANCE INSTRUCTIONS
- After use and before performing maintenance, unplug and disconnect the jump starter.
- Use a dry cloth to wipe all battery corrosion and other dirt or oil from the battery clips, cords and the jump starter case.
- Ensure that all of the jump starter components are in place and in good working condition.
- All servicing should be performed by qualified service personnel.
MOVING AND STORAGE INSTRUCTIONS
- Store inside, in a cool, dry place.
- Do not store the clips on the handle, clipped together, on or around metal, or clipped to cables. The clips on the jump starter are live when the switch is in the ON position and will produce arcing or sparking if they come in contact with each other. To prevent accidental arcing, always place the switch in the OFF position and keep the clips on the storage holders when not using it to jump start a vehicle.
- If the jump starter is moved around the shop or transported to another location, take care to avoid/ prevent damage to the cords, clips and jump starter. Failure to do so could result in personal injury or property damage.
![]()
Do not use and/or store the jump starter in or on any area or surface where damage could occur if the internal battery should unexpectedly leak acid. - IMPORTANT:
- CHARGE IMMEDIATELY AFTER PURCHASE
- KEEP FULLY CHARGED
Charge the jump starter's internal battery immediately after purchase, after every use and every 30 days.
All batteries are affected by temperature. The ideal storage temperature is at 70°F. The internal battery will gradually self-discharge (lose power) over time, especially in warm environments. Leaving the battery in a discharged state may result in permanent battery damage. To ensure satisfactory performance and avoid permanent damage, charge the internal battery every month.
TROUBLESHOOTING
| PROBLEM | POSSIBLE CAUSE | SOLUTION | ||
| The unit won't jump start my car. | Clamps are not making a good connection to the battery. Connections are reversed. The internal battery is not charged. The vehicle's battery is defective. The unit is not turned on. | Check for poor connection to battery and frame. Make sure connection points are clean. Disconnect the unit and reverse the clamps. Press the Battery Status button on the front of the unit. The LEDs will indicate the status of charge. Have the battery checked. Turn the unit's ON/OFF switch to the ON position. | ||
| The unit won't power my 12V device. | The 12V device is not turned on. The internal battery is not charged. The 12V device draws more than 20A, has a short circuit, or the internal fuse has blown. | Turn on the 12V device. Check the battery charge status by pressing the Battery Status button. Disconnect the 12V device. The internal 20A fuse needs replacement by a qualified service person. | ||
| The internal battery won't hold a charge. | The battery is bad (will not accept a charge). | Have the battery checked. | ||
| The compressor shuts off. | The compressor is overheated. | Allow to cool for a few minutes, then try again. | ||
REPLACEMENT PARTS
Air compressor accessory kit (3 hose adapters): 2299001425Z
ACCESSORIES
Male-to-male accessory cable: 94500109
BEFORE RETURNING FOR REPAIRS
For REPAIRS OR RETURNS, visit 365rma.com
Visit batterychargers.com for Replacement Parts.

Documents / Resources
References

Download manual
Here you can download full pdf version of manual, it may contain additional safety instructions, warranty information, FCC rules, etc.
Download Schumacher R01578 - 1000 Peak Amp Jump Starter/Power Pack with Compressor Manual
Advertisement
Thank you! Your question has been received!


Need Assistance?
Do you have a question about the R01578 that isn't answered in the manual? Leave your question here.