Advertisement
- 1 What's in the box
- 2 Overview
- 3 Connect to power supply
- 4 Install backup battery (optional)
- 5 Before use
- 6 Test the signal strength
- 7 Mount the Device
- 8 General product care
- 9 Storage
- 10 Frequently asked questions
- 11 Important safety instructions
- 12 Technical specifications
- 13 Documents / Resources
What's in the box
Your product package contains the following items. Save your sales receipt and original packaging in the event warranty service is necessary.

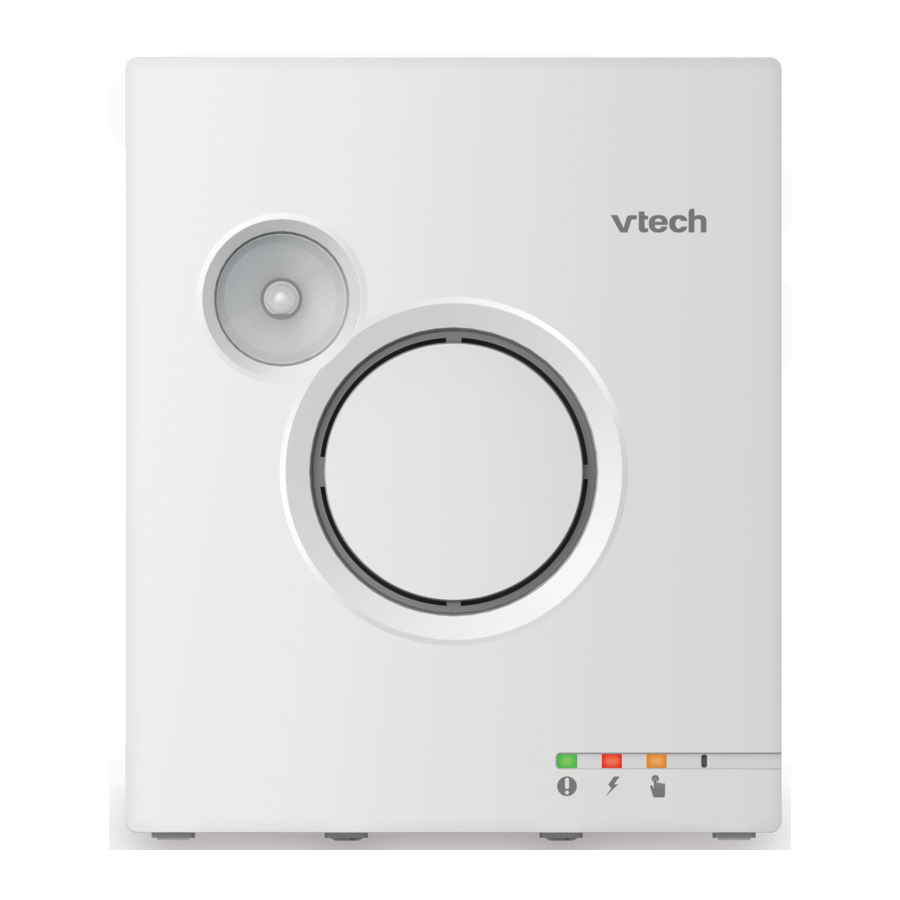
Overview


![]() Pair button
Pair button

- Press and hold to register the Extension ringer to the telephone base.
- Power jack
- LED lights
![]() Red light on when there is no backup batteries installed or the backup batteries are low.
Red light on when there is no backup batteries installed or the backup batteries are low.![]() Green light on when powered on, or green light flashes while registering to the telephone base.
Green light on when powered on, or green light flashes while registering to the telephone base.![]() Blue light on while checking signal strength.
Blue light on while checking signal strength.
- Loud speaker
- Visual ringer indicator (white LED)
- Flashes when receiving an incoming call or when a reminder alarm set with your telephone system goes off.
- If you have purchased and registered a Cordless audio doorbell (SN7021) to the telephone system, the visual ringer indictor light flashes when the doorbell rings.
![]() Ringer volume
Ringer volume - Slide the switch to adjust the ringer volume between:
- Low;
- Medium; and
- High.
![]()
![]()
For hearing protection, do not put the Extension ringer near your ear as loud ringer sound may damage your hearing. Adjust the volume to lower the ringer sound if you find it too loud.
![]()
- Slide the switch to adjust the ringer volume between:
- Alert modes
- The Extension ringer's LED flashes and/or the ringer plays a melody when:
- There is an incoming call; or
- A reminder alarm set with your telephone system goes off; or
- The audio doorbell (purchased separately) rings.
- Slide the switch to change the alert mode between:
![]() Flash only
Flash only
Only the LED light flashes. The ringer does not play a melody.![]() Play melody only
Play melody only
The ringer only plays a melody. The LED light does not flash.![]() Flash and play melody
Flash and play melody
The ringer plays a melody and the LED light flashes.![]() Turn off both flash and melody
Turn off both flash and melody
Disable the alert. The ringer does not play melody and the LED light does not flash.
- The Extension ringer's LED flashes and/or the ringer plays a melody when:
![]() Melodies
Melodies - Slide the switch to change between the three melodies.
- Battery compartment cover
- Insert 3 AA alkaline batteries as power backup (optional).
- Wall mounting holes
 Red light on when there is no backup batteries installed or the backup batteries are low.
 Green light on when powered on, or green light flashes while registering to the telephone base.
 Ringer volume


 Flash only
 Play melody only
 Flash and play melody
 Turn off both flash and melody
 Melodies
 Connect to power supply

Connect Extension ringer to power supply
 Notes
Notes
- Use only the power adapter provided.
- Make sure the Extension ringer is not connected to the switch controlled electric outlet.
- The adapter's prongs are not designed to hold the weight of the Extension ringer. Make sure you connect the adapter to a wall outlet that is in vertical or floor mount position. Do not connect it to undermount and ceiling outlet. Otherwise, your Extension ringer would fall out of the outlet.
- Make sure the Extension ringer and the power adapter cord are out of reach of children.
Install backup battery (optional)
You can insert 3 AA alkaline batteries (not included) to your Extension ringer as a power backup. Install the batteries as shown below.
Match the polarity markings (+ and -) inside the battery compartment.


Notes
- You need to purchase 3 AA alkaline batteries separately as backup batteries.
- If the Extension ringer will not be used for a long time, disconnect and remove the backup batteries to prevent possible leakage.
Replace backup batteries
When the backup battery is low, replace it with 3 new AA alkaline batteries.
To check the battery level of your Extension ringer, refer to the Device monitoring section in the Quick start guide or the online Complete user's manual of your telephone system.
Before use
Add and register the device
Register each new SN7014 Extension ringer to your SN5127/SN5147 telephone base before use. Your telephone system supports a maximum of 30 compatible ULE devices.

Notes
- Connect the Extension ringer to a power supply before registering it to the telephone base.
- Visit www.vtechphones.com for a list of ULE devices that are compatible with your SN5127/SN5147 telephone base.
To register an Extension ringer to the SN5127 telephone base:
- When the telephone is not in use, press and hold PAGE at the telephone base for about five seconds until the visual ringer indicator light turns on. Release PAGE.

- Press and hold the pair button
![]() on the right side of the Extension ringer until the
on the right side of the Extension ringer until the ![]() green LED light on the front flashes, then release
green LED light on the front flashes, then release ![]() .
.


It takes up to 60 seconds to complete the registration. When the registration is successful, the  green LED light on the Extension ringer turns to steady on, and the telephone base beeps and its visual ringer indicator light turns off.
If registration fails, start again from Step 1 above.
Note
- You cannot register an Extension ringer if any other system device is in use.
To register an Extension ringer to the SN5147 telephone base:
- When the telephone is not in use, press and hold
![]() at the telephone base for about five seconds until the visual ringer indicator light turns on. Release
at the telephone base for about five seconds until the visual ringer indicator light turns on. Release ![]() .
.

- Press and hold the pair button
![]() on the right side of the Extension ringer until the
on the right side of the Extension ringer until the ![]() green LED light on the front flashes, then release
green LED light on the front flashes, then release ![]() .
.

 at the telephone base for about five seconds until the visual ringer indicator light turns on. Release

It takes up to 60 seconds to complete the registration. When the registration is successful, the green LED light on the Extension ringer turns to steady on, and the telephone base beeps and its visual ringer indicator light turns off.
If registration fails, start again from Step 1 above.
Note
- You cannot register an Extension ringer if any other system device is in use.
Operating range
The operating range of the Extension ringer is up to 1,000 feet outdoors or 150 feet indoors. The actual operating range may vary depending on the environmental conditions and other interferences such as walls, doors and other obstructions.
Test the signal strength
You can mount the Extension ringer on a wall.
Before you mount the Extension ringer, follow the instructions below to check the signal strength between the ringer and the telephone base. Make sure you mount the device in a location where the signal strength is good.
Test device signal strength with your SN5127/SN5147 telephone
- Press MENU on the cordless handset when the telephone is not in use.
- Press
![]() or
or ![]() to scroll to Set device, and then press SELECT.
to scroll to Set device, and then press SELECT. - Press SELECT again to select Check signal.
- Scroll to select RINGER X (X represents the device number assigned to the ringer) and then press SELECT.
- The handset screen displays Awaiting signal. Then, the telephone begins to test the signal strength.
- When the handset screen displays Good signal, press SELECT. The testing is complete.
- If the handset screen displays No signal, press SELECT. Make sure the Extension ringer is powered on, and then repeat from step 1 to test again.
- If the handset screen displays Weak signal, press SELECT. Then, move the Extension ringer closer to the base, and then adjust the Extension ringer's location to improve the signal. Repeat from step 1 to test again.
 or
or  to scroll to Set device, and then press SELECT.
Mount the Device
Notes
- You will need to purchase the following items separately to mount your Extension ringer.
![]()
- The types of screws and anchors you need depend on the composition of the wall.

- Use a pencil to mark two holes in parallel. Make sure they are the same distance apart as the wall mount holes on the Extension ringer.
- Check for signal strength before drilling the holes.

- Check for signal strength before drilling the holes.
- Drill two holes in the wall (7/32" drill bit).
- If you drill the holes into an object other than a stud, insert the wall anchors into the holes and tap gently on the ends with a hammer until the wall anchors are flush with the wall.
- Insert the screws into the holes and tighten the screws until only 1/4 inch of the screws are exposed.

- Align the wall mount holes of the Extension ringer with the screws on the wall. Slide the Extension ringer down until it locks into place.

- Connect the power adapter to the Extension ringer and a power supply not controlled by a wall switch.


General product care
To keep this product working well and looking good, follow these guidelines:
- Avoid putting it near heating appliances and devices that generate electrical noise (for example, motors or fluorescent lamps).
- DO NOT expose it to direct sunlight or moisture.
- Avoid dropping the product or treating it roughly.
- Clean with a soft cloth.
- DO NOT immerse the Extension ringer in water and do not clean them under the tap.
- DO NOT use cleaning spray or liquid cleaners.
- Make sure the Extension ringer is dry before you connect it to the mains again.
Storage
When you are not going to use the Extension ringer for some time, remove the backup batteries from the Extension ringer. Store the Extension ringer and the power adapter in a cool and dry place.
Frequently asked questions
Below is the question most frequently asked about the Extension ringer. If you cannot find the answer to your question in the below table, visit our website at www.vtechphones.com or call 1 (800) 595-9511 for customer service. In Canada, go to www.vtechcanada.com or call 1 (800) 267-7377.
| The Extension ringer doesn't work with the telephone system equipment. | Make sure the Extension ringer is connected to a power supply, or 3 AA alkaline backup batteries (optional) are installed. |
| The Extension ringer may be deregistered from your telephone system. Refer to the Add and register an Extension ringer to register the ringer back. | |
| The Extension ringer may be out of range. Place or install the ringer closer to your telephone system. | |
| If the above suggestions do not work, deregister the ringer and register it to the telephone base again. | |
I want to deregister the Extension ringer for:
| Using a cordless handset when it is not in use:
- OR -
|
 .
.Important safety instructions


When using your Extension ringer, basic safety precautions should always be followed to reduce the risk of fire, electric shock and injury, including the following:
- Read and understand all instructions.
- Follow all warnings and instructions marked on the product.
- Unplug this product from the wall outlet before cleaning. Do not use liquid or aerosol cleaners. Use a dry non-abrasive cloth for cleaning.
- Do not use this product near water such as near a bath tub, wash bowl, kitchen sink, laundry tub or a swimming pool, nor in a wet basement or shower.
- Do not place this product on an unstable table, shelf, stand or other unstable surfaces.
- Do not cut off the power adapters to replace them with other plugs, as this causes a hazardous situation.
- Avoid placing the device in places with extreme temperature, direct sunlight, or other electrical devices. Protect your Extension ringer from moisture, dust, corrosive liquids and fumes.
- This product should not be placed in any area where proper ventilation is not provided. Slots and openings in the back or bottom of this product are provided for ventilation. To protect them from overheating, these openings must not be blocked by placing the product on a soft surface such as a bed, sofa or rug. This product should never be placed near or over a radiator or heat register.
- This product should be operated only from the type of power source indicated on the marking label. If you are not sure of the type of power supply in your home, consult your dealer or local power company.
- Do not allow anything to rest on the power cord. Do not install this product where the cord may be walked on.
- Never push objects of any kind into this product through the slots because they may touch dangerous voltage points or create a short circuit. Never spill liquid of any kind on the product.
![shock hazard]() To reduce the risk of electric shock, do not disassemble this product, but take it to an authorized service facility. Opening or removing parts of the Extension ringer other than specified access doors may expose you to dangerous voltages or other risks. Incorrect reassembling can cause electric shock when the product is subsequently used.
To reduce the risk of electric shock, do not disassemble this product, but take it to an authorized service facility. Opening or removing parts of the Extension ringer other than specified access doors may expose you to dangerous voltages or other risks. Incorrect reassembling can cause electric shock when the product is subsequently used.- Do not overload wall outlets and extension cords.
- Unplug this product from the wall outlet and refer servicing to an authorized service facility under the following conditions:
- When the power supply cord or plug is damaged or frayed.
- If liquid has been spilled onto the product.
- If the product has been exposed to rain or water.
- If the product does not operate normally by following the operating instructions. Adjust only those controls that are covered by the operation instructions. Improper adjustment of other controls may result in damage and often requires extensive work by an authorized technician to restore the product to normal operation.
- If the product has been dropped or damaged.
- If the product exhibits a distinct change in performance.
![shock hazard]() Avoid using the product during an electrical storm. There is a remote risk of electric shock from lightning.
Avoid using the product during an electrical storm. There is a remote risk of electric shock from lightning.- The power adapter is intended to be correctly oriented in a vertical or floor mount position. The prongs are not designed to hold the plug in place if it is plugged into a ceiling, under-the-table or cabinet outlet.
- For pluggable equipment, the socket-outlet shall be installed near the equipment and shall be easily accessible.
- Periodically examine all components for damage.
![]()
Use only the batteries indicated in this manual. There may be a risk of explosion if a wrong type of battery is used for the Extension ringer. Do not dispose of batteries in a fire. They may explode.- Use only the adapter included with this product. Incorrect adapter polarity or voltage can seriously damage the product.
Charger power adapter: Output: 6V DC @ 450mA.
SAVE THESE INSTRUCTIONS
Battery
![]()
To prevent risk of fire or battery explosion, replace with the correct battery type.- Dispose of used batteries according to the instructions.
- Batteries should not be exposed to excessive heat such as bright sunshine or fire.
- Do not dispose of the batteries in a fire. Check with local waste management codes for special disposal instructions.
![]()
Do not open or mutilate the batteries. Released electrolyte is corrosive and may cause burns or injury to the eyes or skin. The electrolyte may be toxic if swallowed.- Exercise care in handling batteries in order not to create a short circuit with conductive materials.

Precautions for users of implanted cardiac pacemakers
Cardiac pacemakers (applies only to digital cordless devices):
Wireless Technology Research, LLC (WTR), an independent research entity, led a multidisciplinary evaluation of the interference between portable wireless devices and implanted cardiac pacemakers. Supported by the U.S. Food and Drug Administration, WTR recommends to physicians that:
Pacemaker patients
- Should keep wireless devices at least six inches from the pacemaker.
- Should NOT place wireless devices directly over the pacemaker, such as in a breast pocket, when it is turned ON.
WTR's evaluation did not identify any risk to bystanders with pacemakers from other persons using wireless devices.
Electromagnetic fields (EMF)
This VTech product complies with all standards regarding electromagnetic fields (EMF). If handled properly and according to the instructions in this user's manual, the product is safe to be used based on scientific evidence available today.
To obtain warranty service in the USA, please visit our website at www.vtechphones.com or call 1 (800) 595-9511. In Canada, go to www.vtechcanada.com or call 1 (800) 267-7377.
NOTE: Before calling for service, please review the user's manual - a check of the Product's controls and features may save you a service call.
Technical specifications
| Frequency control | Crystal controlled PLL synthesizer |
| Transmit frequency | 1921.536-1928.448 MHz |
| Channels | 5 |
| Nominal effective range | Maximum power allowed by FCC and IC. Actual operating range may vary according to environmental conditions at the time of use. |
| Power requirements | Backup batteries: 3 x AA Alkaline battery Power adapter: 6V DC @ 450mA |
Go to www.vtechphones.com to register your product for enhanced warranty support and latest VTech product news.
Designed to fit your home. And your life.
VTech Communications, Inc.
A member of THE VTECH GROUP OF COMPANIES.
VTech is a registered trademark of VTech Holdings Limite
Specifications are subject to change without notice.
© 2018 VTech Communications, Inc.
All rights reserved.

Documents / Resources
References
![www.vtechphones.com]() VTech Cordless Phones Official Site | Best Home Office & Business Phones
VTech Cordless Phones Official Site | Best Home Office & Business Phones![www.vtechcanada.com]() VTech Canada Official Site | Best Home Office & Business Phones
VTech Canada Official Site | Best Home Office & Business Phones
Download manual
Here you can download full pdf version of manual, it may contain additional safety instructions, warranty information, FCC rules, etc.
Download VTech SN7014 - Amplified Cordless Extension Ringer Manual
Advertisement
Thank you! Your question has been received!

Need Assistance?
Do you have a question about the SN7014 that isn't answered in the manual? Leave your question here.