Advertisement
IMPORTANT SAFEGUARDS
When using your electrical appliance, basic precautions should always be followed, including the following:
READ ALL INSTRUCTIONS AND SAFEGUARDS BEFORE USING THIS TRIMMER.

To reduce the risk of death or injury by electric shock:
- Do not reach for an appliance that has fallen into water. Unplug immediately from the outlet.
- Do not use while bathing or in a shower.
- Do not place or store appliance where it can fall or be pulled into a tub or sink. Do not place in or drop into water or other liquid.
- Except when charging, always unplug this appliance from the electrical outlet immediately after using.
- Always unplug this appliance before cleaning.
- (Rechargeable unit only.) Unplug the charger before using trimmer.

To reduce the risk of burns, electrical shock or injury to persons:
- Close supervision is necessary when this appliance is used by, on, or near children or invalids.
- Use this appliance only for its intended use as described in this manual. Do not use attachments not recommended by the manufacturer.
- Never operate this appliance if it has a damaged cord or plug, if it is not working properly, if it has been dropped or damaged, or if it has been dropped into water. Return the appliance to Wahl Clipper Corporation for examination and repair.
- Keep the cord away from heated surfaces.
- Insert only recharging transformer plug into charger receptacle.
- Do not use outdoors or operate where aerosol (spray) products are being used or where oxygen is being administered.
- Do not use this appliance with a damaged or broken blade or trimming attachment, as facial injury may occur.
- Always attach plug to appliance first, then to outlet. To disconnect, turn unit "OFF - 0," then remove plug from outlet.
SAVE THESE INSTRUCTIONS
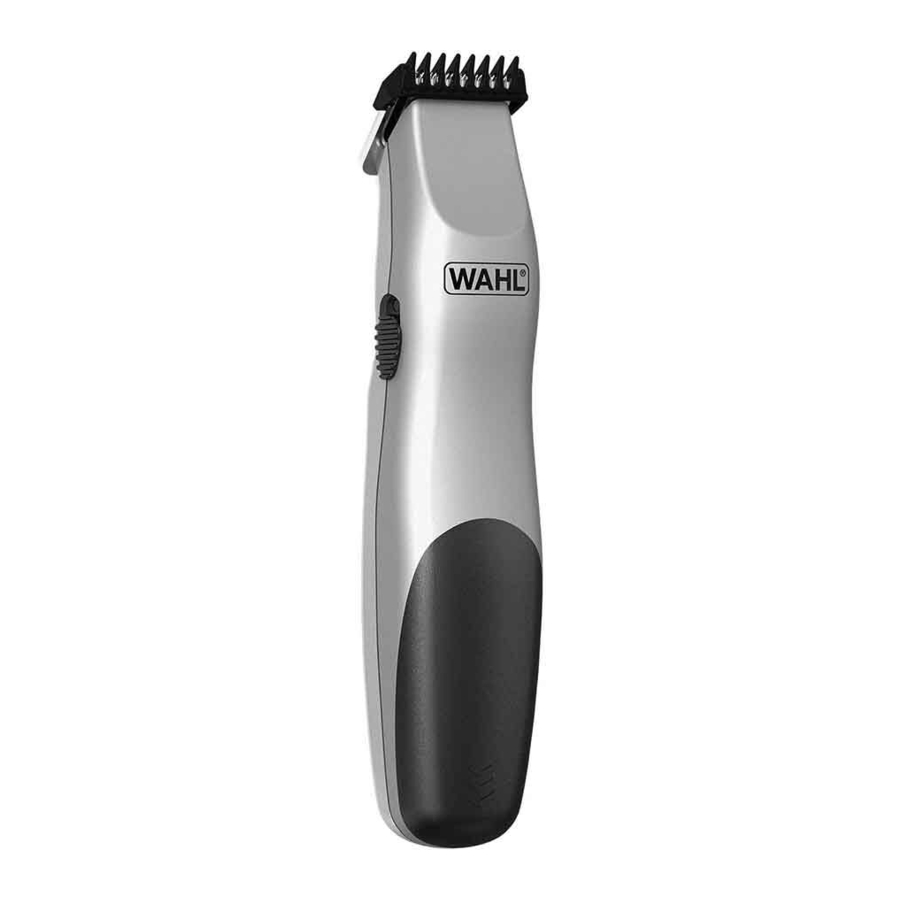
FOR USE WITH THE CORDLESS/AA BATTERY-OPERATED TRIMMER MODEL # 9906 LOADING / REPLACING BATTERIES
- Remove battery cover from front of trimmer by pushing in and back on the plastic door in the direction of the arrows.
- Insert two AA batteries as indicated by molded outline in trimmer.
- Replace battery cover to its original position.
- Move switch to "ON" position to use.
- To maximize battery life, trimmer should be shut "OFF" immediately after using.
FOR USE WITH THE RECHARGEABLE TRIMMER MODEL # 9916 OR RECHARGEABLE CORD/ CORDLESS TRIMMER MODEL # 9918
RECHARGING
- This trimmer is conveniently designed for household use. It should be allowed to charge overnight before first use.
- Remove the trimmer, recharging transformer and accessories from the packing material.
- Connect the transformer to the trimmer. BE SURE TRIMMER IS IN THE "OFF - 0" POSITION WHEN CHARGING.
- Plug the recharging transformer into any convenient electrical outlet at the correct voltage.
- When trimmer is not in use, it may be connected to the transformer and plugged into an outlet to assure maximum power is available when it is next used. This transformer is designed to continuously charge the battery without overcharging.
- Ni-Cad battery life may be extended with the following procedure: Once every month, let the trimmer run until the motor stops. Move the switch to the "OFF - 0" position and recharge fully overnight.
- Your rechargeable cord/cordless trimmer can be used with the cord, so you can trim even if the charge is low. The charging indicator light will glow when your trimmer is in the "OFF" position and connected to its charger. The trimmer cannot be overcharged, so you may charge it as often as desired. We recommend that the battery be "worked" or discharged by trimming without the cord and by not recharging after every use.
In certain areas that experience low line voltages, the red charging indicator light on your trimmer may become dim as the battery nears full charge. This dimming does not affect the performance of your trimmer but is simply a result of variances in power line voltages.
TROUBLESHOOTING
If your trimmer fails to operate when switched "ON," check your batteries to see if they are properly installed. Positive end (center post) should be located as shown in battery housing. Make sure the switch is in the "ON" position and check to be sure blades are free to move. If blades become clogged with debris, manually pushing the blades back and forth a few times while unit is turned "OFF" may help free the blades and allow the trimmer to operate. If it still does not operate, your batteries have probably exceeded their useful life. To maximize battery life, replace both AA batteries at the same time.
If your trimmer does not seem to take a charge, check the following before returning it for repair:
- Check outlet current by plugging in another appliance.
- Make sure the outlet simply is not connected to a light switch which turns the power at the outlet off when lights are turned off.
- Be sure the trimmer is properly connected to the recharging transformer, all connections are secure and the switch on the trimmer is turned "OFF - 0."
- If your electricity is connected to a master power switch, we suggest the trimmer be disconnected from the charger anytime the master switch is off. Leaving the unit plugged into a dead outlet or an unplugged charger will drain the battery.
- If trimmer does not run and it is completely charged, turn the unit "ON - I" and pinch or push the blades manually. (Oil may have dried out between the blades, so they may be temporarily stuck together.)

CONTAINS SEALED, RECHARGEABLE NICKEL-CADMIUM BATTERY. MUST BE RECYCLED OR DISPOSED OF PROPERLY.
The RBRC Battery Recycling Seal on the nickel-cadmium (Ni-Cd) battery contained in this product indicates Wahl is voluntarily participating in an industry program to collect and recycle these batteries at the end of their useful life, when taken out of service in the United States or Canada. The RBRC program provides a convenient alternative to placing used Ni-Cd batteries into the trash or the municipal waste stream, which is illegal in some areas. Please call 1-800-8-BATTERY for information on Ni-Cd battery recycling in your area. Wahl's involvement in this program is part of our commitment to preserving our environment and conserving our natural resources.
RECYCLE / REPLACEMENT OF NI-CAD BATTERY
Under normal use, the rechargeable nickel-cadmium batteries in your trimmer will last from three to five years. At the end of their life, when they will no longer take a full charge, the nickel-cadmium batteries must be removed and recycled or disposed of properly. Do not attempt to replace the batteries. All servicing or battery replacement should be performed by an Authorized WAHL Service Location. To remove the batteries for recycling or disposal, follow these steps:
- Unplug transformer from outlet, disconnect cord from trimmer and allow the batteries to completely run down before disassembly.
- Using a screwdriver, pry the back grip pad away from the housing.
- Turn trimmer over and repeat on the opposite side until the grip pad is loose.
- Remove the back grip pad.
- Remove the two screws.
- Pull the trimmer apart.
- Cut the wires and remove the two batteries.
- Apply tape to both ends of the batteries before recycling or properly disposing.
If you reside within the EU and your unit is marked with the following symbol  do not discard in trash. This product is to be returned to the appropriate municipal waste collection facility for recycling and recovery.
CARING FOR YOUR TRIMMER
OILING BLADES

For best results, put one or two drops of Wahl Clipper Oil on the blades in the areas shown in the illustration. Oil the blades only when necessary or approximately once a month.
When oiling your trimmer, turn the trimmer "ON - I," hold the unit with the blades facing DOWN and squeeze one or two drops of oil onto the blades. Wipe off excess oil with soft cloth.
 NOTICE—DO NOT OVER OIL!
Excessive oiling or application of liquids will cause damage if allowed to seep back into motor.
BLADE CARE
Trimmer blades have precision-hardened, ground and lapped cutting teeth. Blades should be handled carefully and never bumped or used to cut dirty or abrasive material.
Should blades become damaged or dull, you may purchase a new blade assembly from Wahl. Be sure to ask for the Groomsman blade assembly.
CLEANING/STORAGE
Before storing your trimmer, use the cleaning brush to whisk any loose hairs from the unit and the blades. Store unit in such a manner so that blades are protected from damage.
When the trimmer is not in use, the trimmer guide/blade guard attachment should be in place to protect the blades.
6-POSITION ACCULOCK™ BEARD REGULATOR

A 6-Position AccuLock™ Beard Regulator makes achieving a consistent trim easy, every time.
The guide can be removed (providing a seventh cutting position) and reattached without changing the preset cutting length, so once you have found the perfect length, there's no guesswork in achieving it every trim. The trimming guide is a two-piece assembly, consisting of a base and a comb. It should not be disassembled. To attach the guide, simply slide it on at a slight angle and press the release tab down to secure in position. To remove the guide, gently push up on the release tab and slide the assembly away from the trimmer. Adjust the trimming length by pressing on the thumb lever and moving the comb forward or backward to the desired setting.
TRIMMING AND EDGING YOUR BEARD
The following are suggested trimming steps and trimmer positions. You may find different procedures work better for you.
- Comb your beard in the direction that it grows to help reveal stray hairs that may be longer than the others.
- Attach the 6-position trimming guide to trim and taper your beard. With the blades pointing toward you, begin with the trimming guide attachment set at a long trimming length. (C)
![]()

| #1 Stubble Length | (2 mm) | #4 Medium | (8 mm) |
| #2 Short | (4 mm) | #5 Medium Long | (10 mm) |
| #3 Medium Short | (6 mm) | #6 Long | (12 mm) |
For best results, start at each sideburn and stroke downward toward your neck. Trim toward your chin in smooth, overlapping strokes, following the lay of your beard. If you trim against the way your beard naturally lays, the trimmer will cut the hair much shorter and the result may be patchy.
Adjust the trimming guide to progressively shorter settings until you reach the desired length of beard. You may wish to set the trimming guide attachment to cut closer near the ear and down under the chin, changing to a longer setting toward the front of the face and point of your chin. When the trimming guide is removed, it will remain at its last length setting until you change it.
Always be sure the trimming guide is snapped solidly into the desired position before you start to trim.
- Remove the trimming guide and cut the outline of your beard. Rotate the trimmer so that the blades are pointing toward you. Starting under your chin and working back toward your jawbone and ears, cut the outer perimeter of your beard underneath the jawbone. Continue the line all the way up to the ears and hairline. (D)
![]()
- Accentuate your beard line by using the trimmer in a downward motion. Start at the line you've created and, working from the chin back toward the ears, trim the area right under your beard line. (E)
![]()
- Define the upper part of your beard using the same technique.
- For a neater finished look, use the close-trim/jawline blending attachment which is also included with your trimmer. To use the attachment, simply insert one side of the attachment over the front of the blades, and then push the other side back until both sides are locked into position. Then, using the trimmer in an upward motion, start trimming under the chin with short, outward, rolling strokes. Continue trimming until entire jawline is blended. (F)
![]()


To remove the attachment, pull tab away from one side to release attachment from trimmer. Use somewhat of a rolling pressure action, with your thumb on top and index finger underneath.
TRIMMING YOUR MUSTACHE
(with Beard Regulator)
- Comb your mustache.
- Hold the trimmer in a vertical position with the blades pointing toward you in order to define the line of your mustache. (H)
![]()
- With the attachment set at a fairly long trimming length, begin trimming your mustache, starting at the top and working down to your upper lip. Use progressively closer settings to get the look and length you desire. You may also use the close-trim/jawline blending attachment for finish blending and tapering your mustache. (I)
![]()
- For tapering the mustache, set the 6-position trimming guide at a medium length. Starting in the middle of your mustache, follow the lip line and taper with short upward strokes of the trimmer, working out toward the corners until a gentle shape is created on the bottom of your mustache. (J)
![]()
- As a finishing step, remove the trimming guide and, using only the bare blades, make a definitive line at the bottom of your mustache.


(with 3 Mustache Trimmer Attachments) (G)

Your Groomsman Trimmer includes two mustache trimming attachments (medium and short) and the jawline blender. The medium-cut attachment has two bars and the short-cut attachment has one bar. The jawline blender has longer teeth than the medium and short trimming attachments, and may also be used as a long mustache trimming attachment. These attachments are ideal for blending, tapering and defining mustaches. To use the attachments, follow the instructions given for the jawline blender attachment.
- Comb your mustache.
- Cut the outline of your mustache. Holding the trimmer in a vertical position, with the nameplate side facing you, define the line of your mustache. (K)
![]()
- Blending. Holding the trimmer with the nameplate facing you, first take the jawline blender and, starting with the middle of your mustache, lightly trim at direct angles away from the middle. For a shorter length, use the medium- or short-cut attachment.
- Tapering. Hold the trimmer with the nameplate facing away from you. Take the medium- or short-cut attachment and, again starting with the middle of your mustache, follow the lip line and taper out the mustache until a gentle shape is created on the bottom portion of your mustache. (L)
![]()
- Defining. As a finishing step, hold the trimmer with nameplate facing you. Using only the bare blades, make a definitive line at the bottom of your mustache.


Wahl Clipper Corporation
World Headquarters
2900 North Locust Street P.O. Box 578 Sterling, Illinois 61081-0578
Ph: 815-625-6525
Fax: 815-625-6780
www.wahl.com
Wahl GmbH
Roggenbachweg 9 D-78089 Unterkirnach, Deutschland
Telefon: +49 / (0) 7721-806-212
Telefax: +49 / (0) 7721-806-205
Serviceline: +49 / 180 / 323 54 12
info@wahlgmbh.com
Wahl Hungaria Kft
H-9200 Mosonmagyarovar Baratsag u. 2.
Telefon: +36 / 96 578 240 Telefax: +36 / 95 578 249
service@wahl.hu
Wahl Deutschland GmbH
Gutenburg 3 D-35463 Fernwald, Deutschland
Telefon: +49 / (0) 64 04 / 91 89 0
Telefax: +49 / (0) 64 04 / 91 89 89
Repartur-Telefon: +49 / 7721 / 806-212
infor@wahl-deutschland.de -nur für Profi-/Friseurgeräte -only for professional hairdresser products
Wahl Argentina
Av. Alvarez Jonte 5655 Ciudad Autónoma de Buenos Aires (C1407GPK) Argentina
Telefono: 54-11-4648-1850
info@wahlargentina.com
Wahl Nederland B.V.
Engelenburgstraat 36 7391 AM Twello, Nederland
Telefon: +31 / 571 / 26 83 60
Telefax: +31 / 571 26 83 61
info@wahl.ni
Documents / Resources
References
Download manual
Here you can download full pdf version of manual, it may contain additional safety instructions, warranty information, FCC rules, etc.
Advertisement
Thank you! Your question has been received!


Need Assistance?
Do you have a question about the GROOMSMAN that isn't answered in the manual? Leave your question here.