Table of Contents
Advertisement
Quick Links
Use and Care Guide
Liquid Propane Gas Grill
Li
id P
Sears Model No. 122.16648901
Kmart Item No. 640-82960819-9
Safety
S f t
•
• Parts
• Use and Care
• Assembly
This Grill is for Outdoor Use Only
•Read and follow all Safety, Assembly,
and Use and Care Instructions in this Guide
before assembling and cooking with this grill.
•Failure to follow all instructions in this Use and Care
Guide may lead to fire or explosion, which could result
Guide may lead to fire or explosion, which could result
in property damage, personal injury or death.
See our extensive assortment of outdoor living products on-line at
See our extensive assortment of outdoor living products on-line at
Sears Brands Management Corporation, Hoffman Estates, IL 60179 U.S.A.
© 2010 Sears Brands, LLC
®
G
G ill
SAVE THESE INSTRUCTIONS !
www.sears.com and www. kmart.com
Printed in China
Grill Information Center
Missing Parts? Assembly Questions?
g
y Q
Operation Problems? Before returning
grill to store, call 1-800-913-8999.
Tools needed for assembly:
Adjustable wrench (not provided)
Screwdriver (not provided)
7/16" Combination wrench (not provided)
Advertisement
Table of Contents

Related Manuals for Sears Kenmore 122.16648901


Summary of Contents for Sears Kenmore 122.16648901
- Page 1 See our extensive assortment of outdoor living products on-line at See our extensive assortment of outdoor living products on-line at www.sears.com and www. kmart.com Sears Brands Management Corporation, Hoffman Estates, IL 60179 U.S.A. © 2010 Sears Brands, LLC Printed in China...
-
Page 2: Table Of Contents
ANSI Z 223.1/NFPA S4, Natural gas and propane installation code, CSA Sears Brands Management Corporation, B149.1, or propane storage and handling code, Hoffman Estates, IL 60179 U.S.A. B149.2, or the standard for Recreational vehicles, ANSI A 119.2, and CSA Z240 RV series... - Page 3 Precautions • Have your LP gas tank filled by a reputable propane gas dealer and visually inspected and re-qualified at A tank of approximately 12 inches in diameter by 18- each filling. 1/2 inches high is the maximum size LP gas tank to •...
-
Page 4: Warranty
Product replacement up to $1500 if your covered product can’t be fixed Fast help by phone - we call it Rapid Resolution - phone support from a Sears representative. Think of CAUTION: Beware of Flash-Back us as a “talking owner’s manual”... -
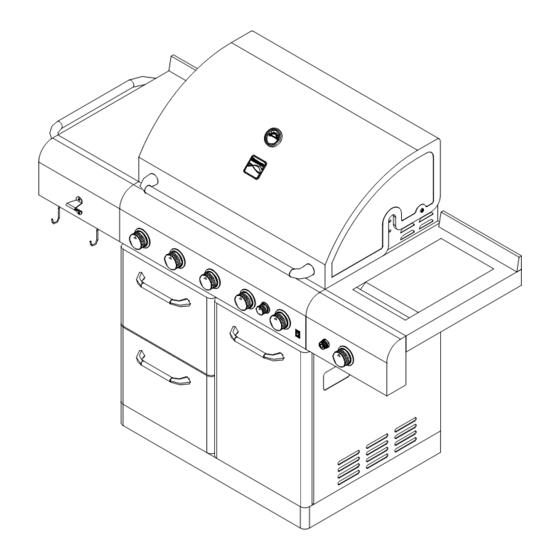
Page 5: Parts Diagram
Model 122.16648901 Parts Diagram... -
Page 6: Parts List Parts List
Model122.16648901 Parts List KEY# PARTS DESCRIPTION QUANTITY KEY# PARTS DESCRIPTION QUANTITY 650A 001A Main Lid 650A-001A Main Lid 650A 048 Tank Tray 650A-048 Tank Tray 650A-002 Main Lid Screw 650A-049 Tank Bolt 650A-003 Temperature Gauge 650A-050 Sw ivel Caster 650A-004B Logo 650A-051N Bottom Panel 650A-005 Hood Buffer 650A-052O Cart Clapboard... -
Page 7: Assembly Instructions
Unpacking Instructions Figure 1 CAUTION: While it is possible for one person to assemble this grill, obtain assistance from another person when handling some of the larger, heavier pieces 1. Open lid of shipping carton and remove top sheet of cardboard. - Page 8 Assembling Side Burner Shelf, Continued Figure 5 Hang side burner shelf on side panel by placing side burner slotted screw holes over the 2 screws and washers loosened in Step 3 (Fig. 4). Fix shelf to panel with the (2) Phillips head screws and lock washers removed in step 2 (Fig.
- Page 9 Figure 9 Installing Igniter Module 1. Remove silver battery cap and black hexagon plastic nut from battery compartment of igniter module. 5/64’’ hex wrench 2. Position igniter module vertically so that battery compartment is at the top of module. 3. Insert threaded stem of battery compartment through hole in side burner control panel as shown (Fig.
- Page 10 Figure 13 Installing Cooking Components Important: Before cooking on your grill the first time, wash cooking grids and cooking rack with warm , soapy water. Rinse and dry thoroughly. Season with cooking oil regularly. After cooking is completed, turn grill to HIGH setting for 3 to 5 minutes to burn off excess grease or food residue.
-
Page 11: Lighting Instructions
Checking for LP gas leaks 6. To light additional burners, push and turn burner Never test for leaks with a flame. Prior to first use, at knob(s) to HI or ON and hold in for 3 to 5 the beginning of each season, or every time your LP seconds until burner(s) ignites, then adjust gas tank is changed, you must check for gas leaks. - Page 12 If Grill Still Fails To Light WARNING 1. Check gas supply and connections for leaks. Check Never lean over the grill cooking area while that all wires connections are secure. lighting your gas grill. Keep your face and body a safe distance (at least 18 inches) from the 2 Repeat basic lighting procedure If your grill still fails 2.
-
Page 13: Light Operation Instruction
Light Operation Instructions 1.Make sure the light power switch on the control panel is in the “OFF” position. 2.Turn the light power switch to “OFF.” 2.Turn the light power switch to OFF. WARNING Picture A Keep any electrical supply cord away from any heated surface. - Page 14 7. Pull out the light bulb and replace with a new Picture F bulb as Picture F, then tighten the four screws which were loosen in picture E. Note: Do not touch the halogen bulb with bare hands. 8. Replace glass cover, reinsert light bulb housing into the grill, and insert and tighten all the screws.
-
Page 15: Cleaning And Maintenance
Cleaning and Maintenance Cleaning Exterior Stainless Steel Surfaces To ensure a proper working unit the following proper care and maintenance is suggested. •Weathering and extreme heat can cause exterior stainless steel surfaces to turn tan in color. Machine Cleaning Cooking Grids oils used in manufacturing process of stainless steel oils used in manufacturing process of stainless steel We suggest you wash your cooking grids in a mild soap... -
Page 16: Troubleshooting
3. Inspect each burner for damage (cracks or holes) Regardless of which burner cleaning procedure you and if such damage is found, order and install a new use, we recommend you also complete the following burner. After installation check to ensure that gas steps to help prolong burner life. -
Page 17: Cooking Instruction
Cooking Instructions Indirect Cooking To cook indirectly, the food should be placed on the left or right side of your grill with the burner lit WARNING WARNING on the opposite side Indirect cooking must be on the opposite side. Indirect cooking must be Do not leave the grill unattended. -
Page 18: Cooking Chart
Grill Cooking Chart FOOD Weight or thickness Temperature Time Special instructions and tips Slice or chop vegetables and dot with butter or Vegetables Vegetables Medium Medium 8 to 20 minutes 8 to 20 minutes margarine. Wrap tightly in heavy duty foil. Grill margarine Wrap tightly in heavy duty foil Grill turning occassionally.