Table of Contents
Advertisement
Advertisement
Table of Contents

Related Manuals for Suunto Vyper


Summary of Contents for Suunto Vyper
- Page 1 SUUNTO VYPER USER’S GUIDE...
-
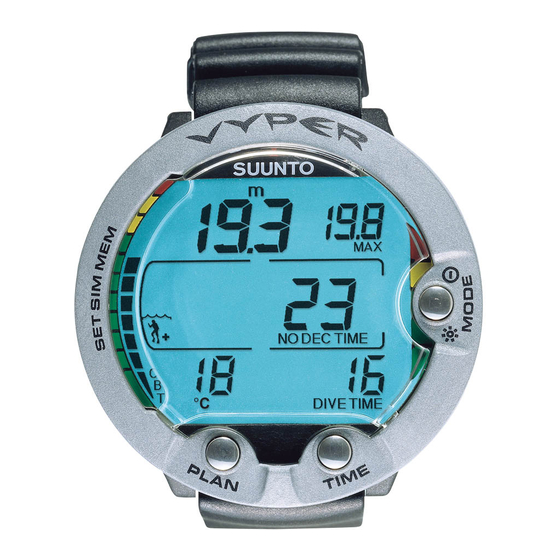
Page 2: Control Panel
QUICK REFERENCE GUIDE... - Page 3 PREN 13319 PrEN 13319 “Diving accessories - Depth gauges and combined depth and time measuring devices - Functional and safety requirements, test methods” is an European diving depth gauge standard draft. The VYPER is designed to comply with this standard draft.
- Page 4 ISO 9001 SUUNTO Oyj’s Quality Assurance System is certifi ed by Det Norske Veritas to be according to the ISO 9001 in all SUUNTO Oyj’s operations (Quality Certifi cate No. 96-HEL-AQ-220). SUUNTO Oyj does not assume any responsibility for losses or claims by third parties, which may arise through the use of this device.
- Page 5 READ THIS MANUAL! Carefully read this instruction manual in its entirety, including section 1.1. “Safety Precautions”. Make sure that you fully understand the use, displays and limitations of the dive computer. Any confusion resulting from improper use of this device may cause diver to commit errors that may lead to serious injury or death.
-
Page 6: Table Of Contents
TABLE OF CONTENTS WARNINGS ... 1. INTRODUCTION ... 1.1. SAFETY PRECAUTIONS ...6 1.1.1. Emergency Ascents ... 1.1.2. Dive Computer Limitations ... 1.1.3. Enriched Air and Safety ... 2. GETTING ACQUAINTED ... 2.1. FUNCTIONS ...10 2.2. PUSH BUTTONS ...10 2.3. WATER CONTACTS ...12 3. - Page 7 5.3. MAINTENANCE ...58 5.4. WATER RESISTANCE INSPECTION ...58 5.5. BATTERY REPLACEMENT ...59 6. TECHNICAL DESCRIPTION ... 6.1. OPERATING PRINCIPLES ...63 6.2. REDUCED GRADIENT BUBBLE MODEL, SUUNTO RGBM 65 6.3. OXYGEN EXPOSURE ...66 6.4. TECHNICAL SPECIFICATION ...67 7. WARRANTY ... 8. GLOSSARY ...
-
Page 8: Warnings
1. INTRODUCTION Congratulations on your choice of the SUUNTO VYPER advanced dive computer. This dive computer is a compact and sophisticated multipurpose dive instrument that will give you years of trouble-free and joyful diving. 1.1. SAFETY PRECAUTIONS Do not attempt to use the dive computer without reading this instruction manual in its entirety, including all the warnings below. - Page 9 NO PROCEDURE, DIVE COMPUTER OR DIVE TABLE WILL PRE- VENT THE POSSIBILITY OF DECOMPRESSION SICKNESS (DCS) OR OXYGEN TOXICITY! You must understand and accept that there is no pro- cedure, dive computer or dive table that will totally prevent the possibility of a decompression accident or that oxygen toxicity will not occur, even within accepted limits.
-
Page 10: Emergency Ascents
ENSURE THE WATER RESISTANCE OF THE DEVICE! Always check the water resistance of the battery compartment when replacing the battery. Moisture inside the device or battery compartment will seriously damage the unit. Only an authorized SUUNTO dealer or distributor should do service activities. 1.1.1. Emergency Ascents In the unlikely event that the dive computer malfunctions during a dive, follow the emergency procedures provided by your certifi... -
Page 11: Dive Computer Limitations
1.1.2. Dive Computer Limitations While the dive computer is based on current decompression research and technol- ogy, you must realize that the computer cannot monitor the actual physiological functions of an individual diver. All decompression schedules currently known to the authors, including the U.S. Navy Tables, are based on a theoretical math- ematical models, which are intended to serve as a guide to reduce the probability of decompression sickness. -
Page 12: Getting Acquainted
2. GETTING ACQUAINTED 2.1. FUNCTIONS The VYPER multipurpose dive computer features three dive computer models (AIR, NITROX, GAUGE), three main operating modes (TIME/STAND-BY, SURFACE, DIVING), three menu based main modes (MEMORY, SIMULATION, SET) and 15 - 17 menu based submodes (see fi gure in the back cover). You can scroll through the modes using the push buttons. - Page 13 Press the arrow up scroll (PLAN) button • To activate the timekeeping display, if the display is blank. • To activate the Dive Planning in the Surface Mode. • To make a special mark in the profi le memory during a dive. •...
-
Page 14: Water Contacts
Fig 2.3 The depth sensor (A), the water/data transfer contacts (B). Fig. 2.4 Active water contacts are indicated by the text AC. 2.3. WATER CONTACTS The water contacts control the automatic activation of the Dive Mode. The water and data transfer contacts are located on bottom of the case (Fig 2.3). -
Page 15: Diving With The Dive Computer
3. DIVING WITH THE DIVE COMPUTER This section contains instructions on how to operate the dive computer and interpret its displays. You will fi nd that this dive computer is easy to use and read. Each display shows only the data relevant to that specifi... - Page 16 Fig. 3.3 Startup III. The Gauge Mode. ° DIVE TIME Fig 3.4 Startup IV. The Surface Mode: The depth and dive time are zeros (as no dives have yet been made), and the tempera- ture is 20°C [68°F]. ° DIVE TIME Fig.
-
Page 17: Battery Power Indicator And Low Battery Warning
3.1.2. Battery Power Indicator and Low Battery Warning This dive computer has a unique graphic Battery Power Indicator designed to give you an advance notice of impending need to change the battery. The Battery Power Indicator can always be seen, when the Dive Mode is acti- vated. -
Page 18: Dive Planning [Plan]
3.1.3. Dive Planning [PLAN] It is possible at any time in the Surface Mode to enter the Planning Mode, simply by pressing the PLAN button. After showing the text PLAN (Fig. 3.6), the display will show the no-decompression limit for the depth of 9 m [30 ft]. By pressing the arrow down TIME (t) button, the dive computer will calculate and show the next deeper no-decompression limits in 3 m [10 ft] increments ending at 45 m [150 ft]. -
Page 19: User Defi Nable Functions And Alarms
3.1.4. User Defi nable Functions and Alarms This dive computer has several User Defi nable Func- tions and depth and time related alarms to be preset according to your personal preference. The dive computer model, units and backlight on time preferences can be set in the MODE- SET- SET PREF submode. -
Page 20: Diving With Air
The bookmarks will also be shown as annotations in the PC-software, Suunto Dive Manager. To make a bookmark on the profi le memory during a dive press the PLAN button (Fig. 3.9). -
Page 21: Consumed Bottom Time (Cbt)
200 minutes, the fi rst (lowest) bar graph segment appears. As your body absorbs more nitrogen, more segments start to appear. Green Zone - As a safety precaution SUUNTO recommends that when using this dive computer you should maintain the no-decompression bar graph within the green zone. -
Page 22: Safety Stop Displays
3 m - 6 m [10 ft - 20 ft]. RECOMMENDED SAFETY STOP SUUNTO highly recommends a safety stop at the end of every dive in the range of 3 m - 6 m [10 ft - 20 ft] for at least 3 minutes. This is shown with... -
Page 23: Ascent Rate Indicator
The Mandatory Safety Stop time always includes the three-minute Recom- mended Safety Stop time. The total length of the Mandatory Safety Stop time depends on the seriousness of the ascent rate violation. You must not ascend shallower than 3 m [10 ft] with the Mandatory Safety Stop warning on. - Page 24 STOP NO DEC TIME ° DIVE TIME Fig. 3.13 Ascent Rate Indicator. Blinking depth reading, SLOW and four segments shown: ascent rate is more than 10 m/min [33 ft/min]. This is a caution to slow down! The STOP sign means that you are advised to make a Manda- tory Safety Stop when you reach the depth of 6 m [20 ft].
-
Page 25: Decompression Dives
3.2.5. Decompression dives When your NO DEC TIME becomes zero, your dive becomes a decompression dive, i.e. you must perform one or several decompression stops on your way to the surface. The NO DEC TIME on your display will be replaced by an ASC TIME notation and the maximum depth will be replaced by a CEILING notation and an upward pointing arrow (Fig. - Page 26 YOU SHOULD ASCEND AND BEGIN DECOMPRESSION IMMEDIATELY WHEN THE DIVE COMPUTER SHOWS YOU THAT DECOMPRESSION IS REQUIRED! Note the blinking ASC TIME symbol and the upward pointing arrow. YOUR ACTUAL ASCENT TIME MAY BE LONGER THAN DISPLAYED BY THE INSTRUMENT. The ascent time will increase if you: - remain at depth - ascend slower than 10 m/min [33 ft/min] or - make your decompression stop deeper than at the ceiling.
- Page 27 SUUNTO recommends that decompression takes place deeper than 4 m [13 ft], even if the indicated ceiling is shallower.
-
Page 28: Display At The Ceiling Zone
CEILING STOP ASC TIME ° DIVE TIME Fig. 3.18 Decompression dive, at the ceiling zone. The two ar- rows point at each other (“hour glass”). You are at the optimum ceiling zone at 3.5 m [11 ft] and your minimum ascent time is 5 minutes. -
Page 29: Diving With Enriched Air Nitrox
3.3. DIVING WITH ENRICHED AIR NITROX 3.3.1. Before Diving This dive computer can be used for diving with standard air only (AIR Mode) or it can be set for diving with Enriched Air Nitrox (EANx) (NITROX Mode). If you are educated for nitrox diving and you plan to make nitrox dives, it is recom- mended that you set the dive computer permanently to its NITROX Mode (see chapter 4.3. - Page 30 Fig. 3.20 Nitrox display. The maximum depth based on set % (21%) and PO (1.4 bar) is 54.1 m [177 ft]. ° DIVE TIME Fig. 3.21 Surface display in the NITROX Mode. WARNING! IF YOUR DIVE COMPUTER IS INSTALLED IN A CONSOLE, DO NOT EXPOSE THE PRES- SURE GAUGE TO ANY GAS MIX CONTAIN- ING MORE THAN 40% OXYGEN! Enriched air with greater oxygen content may present a risk of...
-
Page 31: Oxygen Displays
3.3.2. Oxygen Displays If set to NITROX Mode the NITROX display, with all labeled oxygen information and the label NITROX, is shown after activation and before the Dive Planning mode. The NITROX display shows (Fig. 3.20): • the oxygen percentage labeled with O shown in the left side of the center window •... -
Page 32: Oxygen Limit Fraction, Olf
NO DEC TIME ° TIME TIME TIME Fig. 3.24 Alternative display. Pressing the TIME button dis- plays the current time, maximum depth and CBT. NO DEC TIME ° DIVE TIME Fig. 3.25 The lowest bar graph blinks to indicate that the OLF value shown relates to OTU. -
Page 33: Gauge Mode
3.4. GAUGE MODE If set to GAUGE Mode, the dive computer can be used for diving with TRIMIX or other technical div- ing gas mixes. If you are educated for technical diving and you plan to make these kind of dives, it is recom- mended that you set the instrument permanently to its GAUGE Mode (see chapter 4.3. -
Page 34: At The Surface
° DIVE TIME Fig. 3.27 Surface display. You have surfaced from a 18 minute dive, which maximum depth was 20.0 m [66 ft]. The present depth is 0.0 m [0 ft]. The airplane symbol indicates that you should not fl y and the dive attention symbol indicates that you should prolong your surface interval time. -
Page 35: Dive Numbering
If set to NITROX Mode, the following information will also be shown: • the oxygen percentage labeled with O is shown on the left side of the center win- • the current oxygen toxicity exposure shown with an Oxygen Limit Fraction (OLF) bar graph along the left side of the display (instead of the CBT). -
Page 36: Flying After Diving
- Following any dive that required a decompression stop, fl ying should be delayed for at least 24 hours, and if possible, for 48 hours. SUUNTO recommends that fl ying is avoided until all the DAN and UHMS guidelines and the dive computer wait to fl y conditions are satisfi ed. -
Page 37: Audible And Visual Alarms
3.6. AUDIBLE AND VISUAL ALARMS The dive computer features audible and visual alarms to advise when important limits are ap- proached or to acknowledge preset alarms. A short single beep occurs, when: • the dive computer is activated • when the dive computer automatically returns to the TIME Mode. - Page 38 You are able to set alarms before the actual dive. The preset user programmable alarms can be set for time, dive time and maximum depth. The alarms activate when: • The preset alarm time is reached (Fig. 3.31) - the current time is shown - continuous beep series for 24 seconds or until any button is pressed - the current time blinks for one minute, if no button is pressed.
-
Page 39: High Altitude Dives And Personal Adjustment
SUUNTO STRONGLY RECOMMENDS THAT SPORT DIVERS LIMIT THEIR MAXIMUM DEPTH TO 40 M [130 FT] OR TO THE DEPTH CAL- CULATED BY THE COMPUTER BASED ON THE ENTERED O OF 1.4 BAR SETTINGS. -
Page 40: Personal Adjustment
The entered Altitude Adjustment Mode is indicated by mountain symbols (A0, A1 = one mountain, or A2 = two mountains). Section 4.3.1.1. “Altitude Adjustment and Personal Adjustment Setting” describes how the Altitude Mode is adjusted. SET THE CORRECT ALTITUDE ADJUSTMENT MODE! When diving at altitudes greater than 300 m [1000 ft] the Altitude Adjustment feature must be correctly selected in order for the computer to calculate no-decompression status. - Page 41 The Personal Adjustment Mode is indicated by a diver symbol and plus signs (P0 = a diver, P1 = diver +, or P2 = diver ++). Section 4.3.1.1. “Altitude Adjustment and Personal Adjustment Setting” describes how the Personal Mode is adjusted. This feature should be used to adjust the computer to be more conservative, according to personal preference, by entering the suitable Personal Adjustment Mode with the help of Table 3.4.
-
Page 42: Error Conditions
3.8. ERROR CONDITIONS The dive computer has warning indicators that alert the user to react to certain situations that would otherwise give rise to a signifi cantly increased risk of DCS if left unattended. If you do not respond to its warnings, the dive computer will enter an Error Mode, indicating that the risk of DCS has greatly increased. -
Page 43: Menu Based Modes
4. MENU BASED MODES The main menu based functions include the 1) memory, 2) dive simulator and 3) setting modes. THE USE OF THE MENU BASED FUNC- TIONS 1. Activate the menu based modes by pressing once the SMART (MODE) button in the Dive Mode (Fig. - Page 44 SELECT Fig. 4.4 Set option. [3 SET]. QUIT OPTIONS Fig. 4.5 Memory options. [3 MEMORY]. SELECT Fig. 4.6 Logbook option. [1 LOGBOOK]. THE LIST OF THE MENU BASED MODES 1. MEMORIES AND DATA TRANSFER [1 MEMORY] 1. Logbook and Dive Profi le Memory [1 LOGBOOK] 2.
-
Page 45: Memories And Data Transfer [1 Memory]
4.1. MEMORIES AND DATA TRANSFER [1 MEMORY] The memory options (Fig. 4.5) for this dive computer include the combined Logbook and Dive Profi le Memory (Fig. 4.6 - 4.12), Dive History Memory (Fig. 4.13 - 4.14) and the Data Transfer and PC-Interface functions (Fig. - Page 46 Page II (Fig. 4.8) • dive number in the dive series • maximum depth (NOTE! Due to lower resolution, the reading may differ from the maxi- mum depth reading of the Dive History up to 0.3 m [1 ft].) • total dive time •...
- Page 47 Press the SMART (Select) button once to change the scroll buttons to scroll the different dives forward and backward (Fig. 4.11). Press the SMART (>Select) button again to change function of the scroll buttons back to scroll the different pages of the selected dive. When searching the dives, only the page I is shown.
-
Page 48: Dive History Memory [2 History]
0. NOTE! The maximum depth can be reset to 0.0 m [0 ft] using the optional PC-Interface and its software, Suunto Dive Manager. 4.1.3. Data Transfer and PC-In- terface [3 TR-PC] The instrument can be connected to an IBM com- patible personal computer (PC), using the optional PC-Interface and its software. - Page 49 The data transfer is carried out using the connector on the bottom of the unit. The following data is transferred to the PC: • depth profi le of the dive • dive time • surface interval time • dive number •...
-
Page 50: Simulation Mode [2 Simul]
QUIT OPTIONS Fig. 4.16 Dive Simulation Op- tions. [2 SIMUL]. SELECT Fig. 4.17 Dive Simulator Mode. [1 SIMDIVE]. QUIT ° DIVE TIME Fig. 4.18 Selected Dive Simulator Mode. Descent by pressing the arrow down (TIME) button and ascent by pressing the arrow up (PLAN) button. 4.2. -
Page 51: Dive Planning Simulator [2 Sim Plan]
4.2.2. Dive Planning Simulator [2 SIM PLAN] The Dive Planning Simulator Mode shows you the present no-decompression limits. In this mode, you are able to add the desired surface interval increment to present surface interval time, which allows you to plan your dives in advance. This mode is also used to add the desired surface intervals for dive simulations. -
Page 52: Set Modes [3 Set]
QUIT OPTIONS Fig. 4.22 Setting Options. [3 SET]. SELECT Fig. 4.23 Dive Parameter Set- ting Mode. [1 SET DIVE]. SELECT SELECT Fig. 4.24 Altitude Adjustment and Personal Adjust- ment Setting Mode. [1 AdJ MODE]. 4.3. SET MODES [3 SET] The Set Modes (Fig. 4.22) are divided into three sub- modes for setting the dive-related parameters, time related parameters and your personal preferences. -
Page 53: Dive Time Alarm Setting [2 D Alarm]
To enter the Altitude Adjustment and Personal Adjustment Setting Mode select MODE- 3 SET- 1 SET DIVE- 1 AdJ MODE (Fig. 4.24). Now you are able to select from the three altitude modes (Fig. 4.25) and the three personal modes (Fig. 4.26). WARNING! ALWAYS RECHECK THE ALTITUDE AND PERSONAL ADJUSTMENT TO ENSURE... -
Page 54: Maximum Depth Alarm Setting [3 Max Dpth]
SELECT SELECT Fig. 4.29 Maximum Depth Alarm Setting Mode. [3 MAX DEPTH]. Fig. 4.30 Setting The Maxi- mum Depth Alarm. Press the scroll buttons to change the alarm on/off and to set the maximum depth value. SELECT SELECT Fig. 4.31 Nitrox/Oxygen Set- ting Mode. -
Page 55: Setting Time [2 Set Time]
4.3.2. Setting Time [2 SET TIME] To enter the Time Setting Mode select MODE- 3 SET- 2 SET TIME (Fig. 4.33). The Time Setting mode has three options: 1 Time, 2 Date and 3 Daily Time Alarm. 4.3.2.1. Adjusting Time [1 AdJ TIME] To enter the Time Setting Mode to adjust the time select MODE- 3 SET- 2 SET TIME- 1 AdJ TIME (Fig. -
Page 56: Adjusting Daily Alarm Setting [3 T Alarm]
Fig. 4.37 Adjusting The Date. SELECT SELECT SELECT Fig. 4.38 Adjust Daily Alarm Setting Mode. [3 T ALARM]. Fig. 4.39 Adjusting the Daily Alarm. 4.3.2.3. Adjusting Daily Alarm Setting [3 T ALARM] You can set one daily alarm in the dive computer. When the daily alarm activates, the time symbol blinks for 1 minute and the alarm sounds for 24 seconds. -
Page 57: Dive Computer Units Setting [2 Model]
4.3.3.2. Dive Computer Units Setting [2 UNITS] To enter the Dive Computer Units Setting mode, select MODE- 3 SET- 3 SET PREF- 2 UNITS. This will enable you to choose between metric and imperial units (Fig. 4.43 and Fig. 4.44). 4.3.3.3. -
Page 58: Care And Maintenance
5. CARE AND MAINTENANCE This SUUNTO dive computer is a sophisticated precision instrument. Though designed to withstand the rigors of scuba diving you must treat it with proper care and caution as any other precision instrument. 5.1. IMPORTANT INFORMATION WATER RESISTANCE This device will be watertight up to a static pressure of 10 ATM (100 m [328 ft]). -
Page 59: Care Of Your Dive Computer
The service requires special tools and train- ing. Therefore, it is advisable to contact an authorized SUUNTO dealer or distributor for biennial service. Do not attempt to do any service that you are not sure about how to do. -
Page 60: Maintenance
SUUNTO does not take any responsibility for damage caused by moisture in the dive computer, if the instructions of this manual are not carefully followed. In case of a leak, immediately take the dive computer to an authorized SUUNTO dealer or distributor. CAUTION! -
Page 61: Battery Replacement
5.5. BATTERY REPLACEMENT NOTE! It is advisable to contact an authorized Suunto dealer for battery replacement. It is imperative that the change is made in a proper manner to avoid any leakage of water into the battery compartment or computer. - Page 62 Check for any traces of fl ooding, particularly between the beeper and the lid, or for any other damage. In case of a leak or any other damage, bring the dive computer to an authorized SUUNTO dealer or distributor for check and repair. Check the condition of the O-ring; a defective O-ring may indicate sealing or other problems.
- Page 63 Check that the battery compartment, battery holder and lid are clean. Clean with soft cloth if necessary. 10. Gently insert the new battery in the battery compartment. Check the polarity of the battery: the “-” mark should point toward the bottom of the compartment and the “+”...
- Page 64 K5592 Complete Strap V5841 Fig. 5.1 Instrument parts. The code after the name stands for spare part order number. Fig. 5.2 Opening of the securing ring. CAUTION! Vyper Case Battery K5597 Battery Retainer V5842 Boot K5593 Spring Bar K5588 Short Strap with...
-
Page 65: Technical Description
6. TECHNICAL DESCRIPTION 6.1. OPERATING PRINCIPLES NO-DECOMPRESSION LIMITS The no-decompression limits displayed by the dive computer in a fresh start are (see Table 6.1 and Table 6.2), for most dives to a single depth, slightly more con- servative than those permitted by the U.S. Navy tables. TABLE 6.1 NO-DECOMPRESSION TIME LIMITS (min) FOR VARIOUS DEPTHS (m) FOR THE FIRST DIVE OF A SERIES Personal Mode / Altitude Mode... -
Page 66: Altitude Diving
ALTITUDE DIVING The atmospheric pressure is lower at high altitudes than at sea level. After traveling to a higher altitude, the diver will have additional nitrogen in his body, compared to the equilibrium situation at the original altitude. This “additional” nitrogen is released gradually in time and equilibrium is reached within a couple of days. -
Page 67: Reduced Gradient Bubble Model, Suunto Rgbm
• taking a modern approach to a diffi cult problem. The SUUNTO RGBM algorithm is developed in co-operation with SUUNTO and Bruce R. Wienke. It is based both on laboratory experiments and diving data (for example DAN’s dive data). -
Page 68: Oxygen Exposure
6.3. OXYGEN EXPOSURE The oxygen exposure calculations are based on currently accepted exposure time limit tables and principles. In addition to this the dive computer uses several methods to conservatively estimate the oxygen exposure. These include for example: • the displayed oxygen exposure calculations are rounded to the next higher whole percentage value •... -
Page 69: Technical Specification
6.4. TECHNICAL SPECIFICATION Dimensions and weight without the boot and strap: • Diameter: 61 mm [2.4 in] • Thickness: 28 mm [1.1 in] • Weight: 68 g [2.4 oz] Depth Gauge: • Temperature compensated pressure sensor • Salt water calibrated, in fresh water the readings are about 3% smaller (calibrated complying with prEN 13319) •... - Page 70 It is recommended that the instrument be stored in a dry place at room temperature. NOTE! Do not leave the dive computer in direct sunlight! Tissue Calculation Model • SUUNTO RGBM algorithm (developed by SUUNTO and Bruce R. Wienke, BS, MS and PhD) • 9 tissue compartments •...
- Page 71 Battery • One 3 V lithium battery; CR 2450 (K5597) and O-ring 1,78 mm x 31,47 mm 70 ShA (K5664) • Battery storage time (shelf life): Up to three years • Replacement: Every two years or more often depending on dive activity •...
-
Page 72: Warranty
fi tness for a particular purpose, are limited from date of purchase and in scope to the warranties expressed herein. SUUNTO shall not be liable for loss of use of the product or other incidental or consequential costs, expenses or damage incurred by the purchase. -
Page 73: Glossary
8. GLOSSARY Altitude dive A dive made at an elevation greater than 300 m [1000 Ascent rate The speed at which the diver ascends toward the surface. ASC RATE Abbreviation for ascent rate. Ascent time The minimum amount of time needed to reach the surface on a decompression dive. - Page 74 Decompression sickness Dive series Dive time Enriched Air Nitrox Equivalent Air Depth Floor Half-time Multi-level dive NITROX NOAA No-decompression time The maximum amount of time a diver may remain at Any of a variety of maladies resulting either primarily or secondary from the formation of nitrogen bubbles in tissues or body fl...
- Page 75 Abbreviation for Oxygen Limit Fraction. Abbreviation for Oxygen Tolerance Unit. Oxygen Tolerance Unit Is used to measure the Whole-Body-Toxicity. Oxygen Limit Fraction A term used by SUUNTO for oxygen accumulation/ exposure. A combination of CNS% and OTU%. Oxygen percentage or oxygen fraction in the breathing gas.
- Page 76 Tissue group Whole-Body Toxicity Theoretical concept used to model bodily tissues for the construction of decompression tables or calculations. Another form of oxygen toxicity, which is caused by prolonged exposure to high oxygen partial pressures. The most common symptoms are irritation in the lungs, a burning sensation in the chest, coughing and reduction of the vital capacity.
-
Page 82: Disposal Of The Device
DISPOSAL OF THE DEVICE Please dispose of the device in an appropriate way, treating it as electronic waste. Do not throw it in the garbage. If you wish, you may return the device to your nearest Suunto dealer. - Page 83 MENU BASED MENU BASED MENU BASED MAIN MODE SUBMODE 1 SUBMODE 2...
- Page 84 COPYRIGHT This publication and its contents are proprietary to Suunto Oy. Suunto, Wristop Computer, Suunto Vyper, Replacing Luck and their logos are registered or unregistered trademarks of Suunto Oy. All rights reserved. While we have taken great care to ensure that information contained in this documentation is both comprehensive and accurate, no warranty of accuracy is expressed or implied.
- Page 86 Made in Finland © Suunto Oy 01 / 2003, 02 / 2006...