Table of Contents
Advertisement
Operator's IVlanuai
®
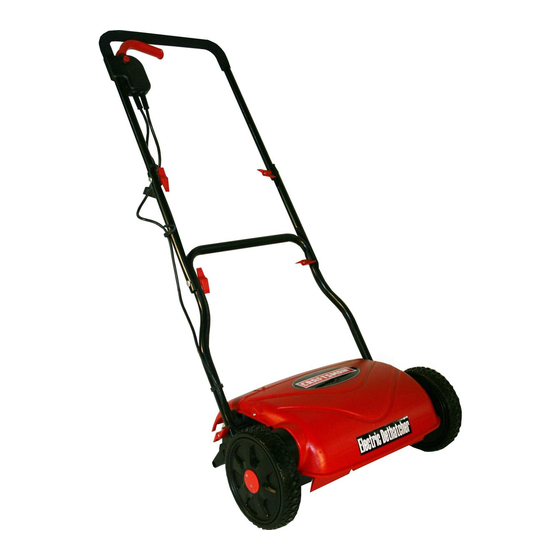
18" ELECTRIC DETHATCHER
Model No. 486.29281
DO NOT RETURN TO STORE
For Missing Parts or Assembly
Questions
Call 1-866-576-8388
CAUTION:
Before using this product, read
this manual and follow all Safety
Rules and Operating
Instructions.
,, Safety
,, Assembly
,, Operation
,, Maintenance
,, Parts
Sears, Roebuck and Co., Hoffman Estates, IL 60179 U.S.A.
www.sears.com/craftsman
FORM NO. 42157 (10/29/08)
Advertisement
Table of Contents
Troubleshooting

Related Manuals for Craftsman 29281


Summary of Contents for Craftsman 29281
- Page 1 Operator's IVlanuai 18" ELECTRIC DETHATCHER Model No. 486.29281 CAUTION: Before using this product, read this manual and follow all Safety Rules and Operating Instructions. Sears, Roebuck and Co., Hoffman Estates, IL 60179 U.S.A. www.sears.com/craftsman ® DO NOT RETURN TO STORE...
- Page 2 When assembled, operated and maintained according to the supplied instructions, if this products fails due to defect in material or workmanship within one year from the date of purchase, return it to any Sears store or other Craftsman outlet in the United States for a free replacement.
- Page 3 SHOWN FULL SIZE DESCRiPTiON Hex Bolt Carriage Bolt Carriage Bolt Wing Knob Power Cord Clip DESCRIPTION Lower Handle Tube Middle Handle Tube NOT SHOWN FULL SIZE Power Cord Clip Left Handle Clamp (marked "L") Right Handle Bracket Left Handle Bracket Right Handle Clamp (marked "R") Upper Handle Tube Power Rake Housing...
- Page 4 CAUTION: DO NOT ASSEMBLE POWER RAKE PLUGGED POWER SOURCE STEP 1 : (SEE FIGURE 1) Turn the Power Rake housing upside down. Fasten the end of the lower handle tube with air intake holes to the side of the Power Rake housing with the large hole.
- Page 5 STEP 5: (SEE FIGURE 5) Attach the upper handle tube to the middle handle tubes using two carriage bolts (C) and wing knobs (D). Keep the cord holder above the carriage bolt and wing knob while assembling. FIGURE 5 STEP 6: (SEE FIGURE 6) Secure the power cord to the upper and lower handle tubes using the power cord clips (E).
- Page 6 OPERATION Become familiar with all of the controls and adjustments on the Power Rake before operating. Controls for operating Power Rake are as follows: SAFETY SWITCH - Must be pressed in before handle switch can be used to start motor. HANDLE SWITCH - Pull and hold to start and keep motor running.
- Page 7 ADJUST TINE HEIGHT The tine height is pre-adjusted for average lawn and may not need to be changed. Changes can be made to tine height if working conditions require it. Only make adjustments to tine height when Power Rake is turned off and unplugged from a power source.
- Page 8 MODEL 486.29281 Call 1-866-576-8388 for missing parts or assembly help DO NOT RETURN TO STORE...
- Page 9 Motor Housing MDL8.263.006 Bearing Cover GB/T276-94 Ball Bearing GB/T818-2000 Screw, M6xl 5 GB864-85 Screw, (ST4.8X16-F-H) MDL8.315.004 Hub Cap MDL8.043.032 Tine Housing 2 (Bottom) MODEL 486.29281 DESCRiPTiON PART NO MDL8.043.033 MDL8.288.004 MDL8.205.023 GB 896 MDL8.123.004 GB119-86 MDL8.224.024 MDL8.299.004 MDL8.306.031 MDL8.075.003 MDL8.224.003 MDL8.205.019...
- Page 10 MODEL 486.29281 Call 1-866-576-8388 for missing parts or assembly help DO NOT RETURN TO STORE...
- Page 11 Wing Knob MDL8.462.001 Tubing Plug MDL8.211.052 Right Handle Bracket MDL8.919.005 Hex Bolt GB14-80 Carriage Bolt M8x65 MDL8.100.013 Left Handle Bracket MDL8.101.011 Left Handle Clamp MODEL 486.29281 DESCRiPTiON L REF L PART NO MDL8.353.029 MDL8.253.052 MDL8.281.028 MDL8.281.029 FA1-6/2B-A1 MDL8.353.030 MDL8.100.016 MDL8.369.006 GB845-85 MDL5.501.026...
- Page 12 For expert troubleshooting For repair - in your home - of all major brand appliances, lawn and garden equipment, no matter who made it, no matter who sold it! For the replacement owner's manuals that you need to do-it-yourself. For Sears professional and items like garage door openers and water heaters.