Advertisement
Quick Links
INSTALLATION INSTRUCTION
READ ALL INSTRUCTIONS THOROUGHLY FROM START TO FINISH BEFORE BEGINNING INSTALLATION
P/N
DESCRIPTION
RS176986B
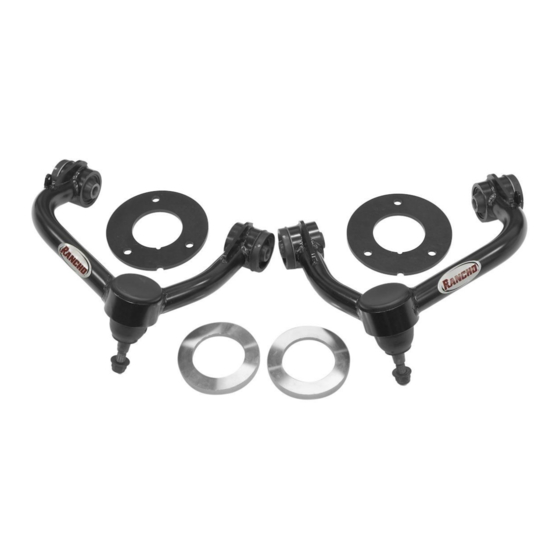
UCA Left
RS520113
Bushing, K200353 (pre-installed)
RS602649
Upper Ball Joint, (pre-installed)
RS176987B
UCA Right
RS520113
Bushing, K200353 (pre-installed)
RS602649
Upper Ball Joint, (pre-installed)
RS176950
Shock Spacer, 1/4"
RS176959
Coil Spring Spacer, 1/2"
P01141
Parts Package
113900067
Nut - M10 X 1.5
RS64511 – Upper Control Arm Upgrade Kit
Fits 2022-2021 Ford F150 4WD & 2WD*
RS66512R9K – 3" Suspension System
Use this instruction for front components RS66512R9-1 and RS66512R9-2.
For rear components RS66512R9-3 use instruction RS84511-1
Fits 2022-2021 Ford F150 4WD ONLY*
*Excludes SVT Raptor, Tremor, Continuously Controlled Damping (CCD) Adaptive Suspension
QTY.
1
2
1
1
2
1
2
2
2
3
Parts List
P/N
DESCRIPTION
RS860895
Sub Assy, Ball Joint Spacer
RS603518
Ball Joint Spacer (not used on 2021+ Models)
RS84511
Instructions
RS94180
Information Pack
RS94177
Rollover Warning Label
RS94119
Consumer/Warranty Information
RS780281
6" Rancho Decal - Color
RS780294
Red Rancho Die Cut Decal
RS780294B
Black Rancho Die Cut Decal
RS84511
Rev B
QTY.
1
2
1
1
1
1
1
1
1
Advertisement

Related Manuals for RANCHO RS84511

Summary of Contents for RANCHO RS84511
- Page 1 Fits 2022-2021 Ford F150 4WD & 2WD* RS66512R9K – 3” Suspension System Use this instruction for front components RS66512R9-1 and RS66512R9-2. For rear components RS66512R9-3 use instruction RS84511-1 Fits 2022-2021 Ford F150 4WD ONLY* *Excludes SVT Raptor, Tremor, Continuously Controlled Damping (CCD) Adaptive Suspension...
-
Page 2: Important Notes
Advanced driver-assistance systems (ADAS) are electronic systems in a vehicle that use advanced technologies to assist the driver. Installation of a Rancho lift kit in any vehicle that features this technology may impact or change the ADAS system, and requires immediate re-calibration by the dealer. -
Page 3: Operation
9. During installation, carefully inspect all parts of the vehicle and WARNING: READ ALL INSTRUCTIONS THOROUGHLY FROM replace anything that is worn or damaged. START TO FINISH BEFORE BEGINNING INSTALLATION. Failure to follow 10. Nip points present the risk of the catching, lacerating, crushing the warnings and instructions provided herein can result in an accident, and/or amputating fingers, hands, limbs and other body parts during severe personal injury or death. - Page 4 Hydraulic Floor Jack Red LocTite NOTE: Rancho components come lubed with lithium or lithium complex grease. Use of a different type (base) of grease can cause grease separ ation and breakdown of the grease and cause the component to fail.
- Page 5 1) Park the vehicle on a level surface. Set the parking brake IWE Lines and chock rear wheels. 2) Measure and record the distance from the center of each wheel to the top of the fender opening. See Illustration Note: This measurement is required later in the installation. ABS Wire Illustration 1 Brake Line Bracket...
- Page 6 21) Remove strut from vehicle if not done previously. TRUT ASSEMBLY AND PACER NSTALLATION LIFT FOR RANCHO LEVEL IT AND QUICK ONLY WARNING: If installing new strut, follow instructions and warnings supplied with strut. 22) Reference mark top mount, coil spring and strut. See Illustration 9.
- Page 7 See Illustration 10. Reference Marks Upper Control Arm Mounting Bolts Illustration 10 30) Loosely install new Rancho upper control arm to frame Reference Marks brackets using OE hardware. Knob RS176986B is the driver side arm, and RS176987B is the passenger side.
- Page 8 51) Ensure that the vehicle brake system operates 42) If equipped with height sensor, remove ball stud from correctly. bracket and attach to Rancho upper control arm. See Illustration 12. 52) Readjust headlamps and have vehicle aligned at a certified alignment facility.
- Page 9 Vehicle Torque Specifications Lower Control Arm 258 lb-ft. Upper Control Arm 122 lb-ft Strut Rod Nut 41 lb-ft. Upper Strut Mounting Nuts 52 lb-ft. Lower Strut Mounting Bolts 66 lb-ft. Tie Rod End Ball Stud Nut 66 lb-ft. Upper Ball Joint Nut 46 lb-ft.
- Page 10 Rancho Technical Department 1-800-325-8886 www.gorancho.com...