Table of Contents
Advertisement
Quick Links
Advertisement
Table of Contents

Related Manuals for JVC TK-C9200EX


Summary of Contents for JVC TK-C9200EX
- Page 1 COLOR VIDEO CAMERA INSTRUCTIONS TK-C9200U TK-C9200E(EX) TK-C9201EG(EX) TK-C9300U TK-C9300E(EX) TK-C9301EG(EX) For Customer Use: Enter below the Serial No. which is located on the body. Retain this information for future reference. Model No. TK-C9200U TK-C9300U Serial No. LST0984-001B...
-
Page 2: Table Of Contents
Introduction Contents Introduction Contents ......................2 Features ......................3 Operating Precautions ..................4 Connection/Installation Mounting the Lens ..................... 6 Connection ......................7 Mounting the Camera ..................9 Setting/Adjustment Switch Settings ....................11 Adjusting the Back Focus ................12 Fine-tuning the Focus ..................13 Adjusting the Auto White Balance .............. -
Page 3: Introduction
: Indicates a reference page or item. Contents of this manual JVC KENWOOD Corporation holds the copyright to this manual. Any part or all of this manual may not be reproduced without prior consent from the company. -
Page 4: Operating Precautions
Introduction Operating Precautions Storage and Location of Use Do not install the camera in the following places. - In a place exposed to rain or moisture. - In a place with vapor or oil, for example in a kitchen. - When the ambient temperature rises above or falls below the acceptable range (from -10 f to 50 f) - In a place at which corrosive gases are emitted. - Page 5 Introduction We will not be responsible for any inconveniences or disturbances caused in the event of privacy invasion as a result of camera footages of this product. Others When using this camera with [AGC] set to "MID" or "HIGH", the sensitivity increases automatically for dark images and the screen may appear grainy, but this is not a malfunction.
-
Page 6: Connection/Installation
Video IRIS lens cannot be used. Memo If the plug of the lens cable is different, connect with a 4 pin plug. For details about the 4 pin plug, consult your JVC dealer. 4 pin plug Pin number DC IRIS lens... -
Page 7: Connection
Do not connect an AC 24 V cable to a commercial power supply. If it is connected by mistake, the internal circuit may be damaged. Sent the camera to the nearest JVC service center for inspection as the internal circuit may be damaged. - Page 8 Connection/Installation Connection (Continued) Do not connect DC 12 V and AC 24 V cables at the same time. Memo When using a DC 12 V power supply, ensure that the polarities of the cable are correct. AC 220 V - AC 240 V (TK-C9201EG/TK-C9301EG) When using this camera, install it near the socket so that power disconnection may be made immediately.
-
Page 9: Mounting The Camera
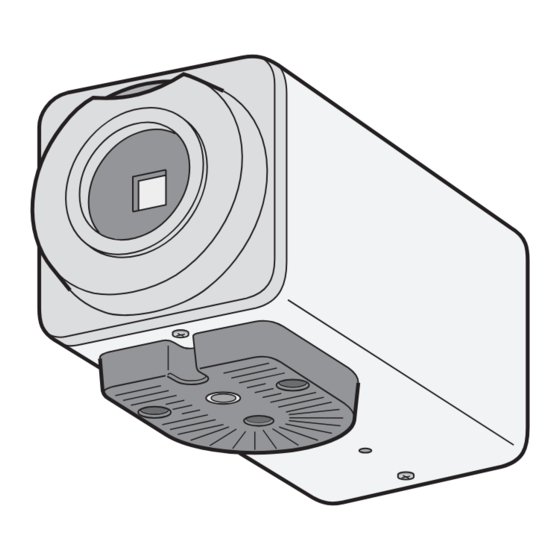
Connection/Installation Mounting the Camera When mounting the camera on a fixer, pan/tilt and the like, use the camera- mounting screw hole located on the camera-mounting bracket. (Length of screw: 7 mm or less) Camera-mounting bracket fastening screws (x2: M2.6 x 6 mm) Camera-mounting screw hole MAX. - Page 10 Connection/Installation Mounting the Camera (Continued) Fall Prevention Special attention is required when installing the camera to the wall or ceiling. You should not engage in the installation work yourself. Ask a professional to do the job, because injuries and accidents may occur if the camera falls. When installing the camera on a fixer, pan/tilt unit and the like, make sure to install it firmly using a rotation-preventive hole to prevent fall.
-
Page 11: Setting/Adjustment
Setting/Adjustment Switch Settings SEE INSTRUCTION SEE INSTRUCTION D/N AUTO D/N AUTO MANUAL MANUAL BLC OFF BLC OFF VIDEO VIDEO WIDE-D OFF AES OFF MONITOR TYPE MONITOR TYPE FOCUS FOCUS ADJUST ADJUST CLASS 2 ONLY CLASS 2 ONLY ( U TYPE ) ( U TYPE ) ISOLATED POWER ISOLATED POWER... -
Page 12: Adjusting The Back Focus
Setting/Adjustment Adjusting the Back Focus This camera is adjusted to an optimum wide range before shipment but readjustment is required when using zoom lens or when the lens focus ring is out of focus. Back focus adjustment ring Lens focus ring Tighten Back focus fastening screw (M2) -
Page 13: Fine-Tuning The Focus
Setting/Adjustment Fine-tuning the Focus When adjusting the focus of the DC IRIS lens, use the Focus Adjust mode for easy focusing as the iris opens and depth of field becomes shallower. (Refer also to the instruction manual of the lens.) Procedure 1 Press and hold the [J] button. -
Page 14: Adjusting The Auto White Balance
Setting/Adjustment Adjusting the Auto White Balance Each light source has its own color temperature. Therefore, when the main light source lighting the subject is changed, adjust the white balance again. 1 Press the [MENU] button. 2 Select [WHITE BALANCE] with the [J/K] button and "AWC" with the [H/I] button, then press the [SET] button. -
Page 15: Others
Others Specifications Video S/N ratio : 52 dB (typical, AGC OFF) Minimum : (TK-C9300U/TK-C9300E/TK-C9301EG) illumination Color mode: 0.05 lx (typical, 50 %, F1.2, AGC HIGH) Black and white mode: 0.002 lx (typical, 50 %, F1.2, AGC HIGH) (TK-C9200U/TK-C9200E/TK-C9201EG) Color mode: 0.05 lx (typical, 50 %、F1.2、AGC HIGH) Black and white mode: 0.03 lx (typical, 50 %, F1.2, AGC HIGH) Lens mount : CS-mount... - Page 16 2012 JVC KENWOOD Corporation LST0984-001B...