Table of Contents
Advertisement
Quick Links
Download this manual
See also:
Service Manual
INSTRUCTION MANUAL
Digital Camera
Important note
This manual explains how to safely operate the VPC-S6.
Please read these instructions carefully before using the camera.
Make sure to read and understand the separate booklet "
Keep this manual in a safe place for later reference.
VPC-S6
SAFETY MANUAL
".
Advertisement
Table of Contents

Related Manuals for Sanyo Xacti VPC-S6


Summary of Contents for Sanyo Xacti VPC-S6
-
Page 1: Digital Camera
INSTRUCTION MANUAL Digital Camera Important note This manual explains how to safely operate the VPC-S6. Please read these instructions carefully before using the camera. Make sure to read and understand the separate booklet “ Keep this manual in a safe place for later reference. - Page 2 Declaration of Conformity Model number: VPC-S6 Trade Name: SANYO Responsible party: SANYO FISHER COMPANY Address: 21605 Plummer Street, Chatsworth, California 91311 Telephone No.: (818) 998-7322 This device complies with Part 15 of the FCC Rules. Operation is subject...
-
Page 3: Symbols Used In This Manual
EU countries and do not apply to countries in other areas of the world. Your SANYO product is designed and manufactured with high quality materials and components which can be recycled and reused. -
Page 4: Getting Up And Running
GETTING UP AND RUNNING Install the battery Open the battery/card cover, and insert the batteries. h The battery/card cover is located on the bottom of the camera. Battery/card cover Press the ON/OFF button to turn the camera on. h The Still Image Shooting Screen appears. English Batteries ON/OFF button... - Page 5 Shooting kStill image photography Press the shutter button. h The image is captured. kVideo clip recording Press the MENU button, and press the [m] button. h The camera changes to the video clip recording mode. Press the MENU button. Press the shutter button. h Recording begins.
- Page 6 Playback kStill image playback Press the playback button [=]. h The display switches to the Playback Screen. h To view other images, press the [l] or [m] button. h If the playback button [=] is pressed, the display returns to the Shooting Screen.
-
Page 7: Quick Search By Operation
QUICK SEARCH BY OPERATION Your camera has an abundance of convenient features and functions. From creating precisely the photo you want, to viewing images using various techniques, you can locate the exact operation for your purposes in the following table. Basic operation Getting started shooting... - Page 8 Basic operation Shoot in bright conditions • “EXPOSURE CORRECTION” on page 39 • “FLASH SETTING” on page 37 • “SCENE SELECT” (night view mode) on page 42 Photographing people • “SCENE SELECT” (portrait mode/night view mode) on page 42 • “SHUTTER OPERATION SETTING” (ID photos) on page 67 •...
- Page 9 Basic operation Getting started viewing images • “Playing back the video clip” on page 33 • “Viewing still images” on page 29 Slideshow playback • “SLIDESHOW PLAYBACK” on page 95 Adjust the LCD monitor brightness • “LCD MONITOR BRIGHTNESS” on page 106 Search for image data •...
-
Page 10: Table Of Contents
CONTENTS GETTING UP AND RUNNING ... iii QUICK SEARCH BY OPERATION ...1 CONTENTS ...4 CHECKING THE INCLUDED ACCESSORIES ...7 GETTING THE MOST OUT OF YOUR CAMERA ...9 SYSTEM MAP ...11 SETUP PARTS NAMES ...12 INSTALLING THE CARD AND BATTERIES ...14 TURNING THE CAMERA ON AND OFF ...17 DATE AND TIME SETTING ...19 BASIC OPERATION... - Page 11 CONTENTS SHOOTING (SHOOTING SETTING SCREEN) ACCESSING THE SHOOTING SETTING SCREEN ... 47 TOUCH SENSOR (TOUCH FOCUS) SETTING ... 57 RESOLUTION SETTING ... 58 FOCUS RANGE ... 59 SELF-TIMER ... 61 SHUTTER OPERATION SETTING ... 63 FOCUS AREA SETTING ... 68 LIGHT-MEASURING MODE SETTING ...
- Page 12 OPTION SETTINGS DISPLAYING THE OPTION SCREEN ...98 OPERATION SOUNDS ...101 HELP DISPLAY ...103 POST-VIEW SETTING ...104 DIGITAL ZOOM SETTING ...105 LCD MONITOR BRIGHTNESS ...106 SCREEN LANGUAGE ...107 POWER SAVE FUNCTION ...108 FILE No. RESET FUNCTION ...110 INITIALIZING THE CARD MEMORY AND INTERNAL MEMORY ...113 RESETTING THE CAMERA SETTINGS ...115 CHECKING THE REMAINING INTERNAL MEMORY AND CARD MEMORY ...116...
-
Page 13: Checking The Included Accessories
(batteries made exclusively to be used as included accessories) i “SAFETY MANUAL” (safety precautions booklet) Please read this booklet carefully before using the digital camera. English i SANYO Software Pack (CD-ROM): 1 i Dedicated USB interface cable: 1 i Quick Guide... -
Page 14: Attaching The Handstrap
What “card” means in this manual i In this manual, SD Memory Cards and Multi Media Cards that can be used in this digital camera are referred to as “card”. i The cards in the illustrations in this manual are SD Memory Cards, but all installation, removal, and formatting procedures are the same for both SD Memory Cards and Multi Media Cards. -
Page 15: Getting The Most Out Of Your Camera
GETTING THE MOST OUT OF YOUR CAMERA Your camera can take still photos and record video clips. It’s loaded with lots of functions that are possible only in a digital camera, including a super-quick focus, an easy-to-understand guidance display on a large screen, a more extensive Scene Select feature, and more. -
Page 16: Mode Select Screen
Mode Select Screen Switch between the still photo shooting and video clip recording modes with a single on-screen action. Accessing the Shooting Setting Screen has never been so fast. PHOTO MOVIE <Still photo shooting <Video clip recording mode> mode> English... -
Page 17: System Map
SYSTEM MAP The included accessories can be used to connect your camera to a computer or printer. By connecting the camera to your computer, you can, for example, copy your photos to the computer’s hard disk. You can connect it to a printer for direct printing of your photos. -
Page 18: Setup
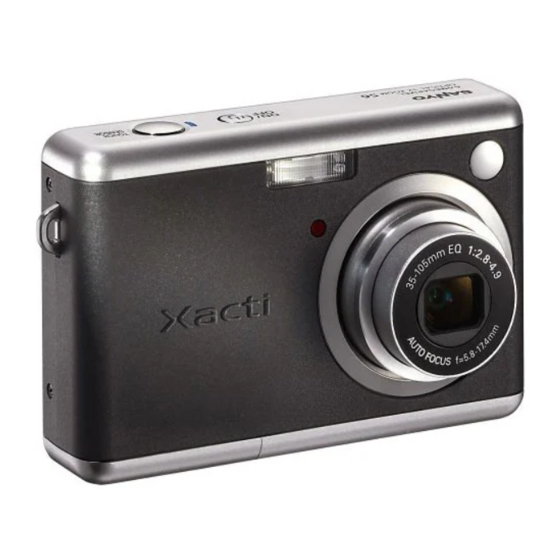
PARTS NAMES Front Self-timer indicator Shutter button Touch sensor indicator ON/OFF button Flash Lens Mirror: Check the camera angle when taking a picture of yourself. USB terminal English... - Page 19 LCD monitor Bottom Battery/card cover English Playback button [=] Zoom switch [W]/[T] Strap holder SET button [o] button Access light [l] button DC IN terminal h Use only the SANYO-specified AC adaptor. Tripod stand hole MENU button [n] button [m] button...
-
Page 20: Installing The Card And Batteries
INSTALLING THE CARD AND BATTERIES Your camera has an internal 15MB memory, when means that you can take photos (record image data) even when no card is installed. By using a card, however, you will be able to take many more photos. The card can be used after it has been formatted with the camera (page 113). - Page 21 INSTALLING THE CARD AND BATTERIES Insert the batteries. h Make sure that the batteries’ polarities (M and N) are correct. Close the battery/card cover. When removing the card... h To remove the card, press it down, and then release. The card will protrude slightly, and you can then pull it out.
- Page 22 Do not open the battery/card cover when the camera is turned on. i If the battery/card cover is opened while the power is on, important data may be lost. Sanyo Electric shall not be held responsible for any losses that result from failure to comply with this warning.
-
Page 23: Turning The Camera On And Off
TURNING THE CAMERA ON AND OFF Turning on the camera In the shooting mode Press the ON/OFF button. h The camera turns on. h The camera turns on in the shooting mode that was active before it was last turned off. In the playback mode Press the playback button [=] for at least one second. - Page 24 Turning on the camera when the power save (sleep) function is active In order to preserve battery power, the power save (sleep) function will automatically turn off the camera after one minute of no use during shooting, or five minutes of no use during playback (factory-preset setting).
-
Page 25: Date And Time Setting
DATE AND TIME SETTING The camera will record the date and time an image is captured so that you can display them during playback. Therefore, before capturing images, make sure the correct date and time are set. Example: To set the clock to 7:30 p.m. on December 24, 2005 Press the ON/OFF button to turn the camera on, and press the MENU button. - Page 26 Set the date. 1 Select “DATE”. 2 Press the SET button. h The Set Date Screen appears. 3 Set the date to “2005/12/24”. h The date is set in the following order: Set the year → Set the month → Set the day. h Press the [l] or [m] button to select the year, month or day.
- Page 27 DATE AND TIME SETTING h If “DISP OFF” is selected, the date the image was captured is not shown during playback. 4 Press the SET button. Select “EXIT”, and press the SET button. h The date and time setting is completed, and you are returned to the Option Screen.
-
Page 28: Basic Operation
BEFORE TAKING PICTURES How to hold the camera Hold the camera securely, keeping your elbows close to your body and making sure the camera is stable. Correct hold Make sure that the lens and flash are not blocked by your fingers or the handstrap. -
Page 29: Using The Autofocus
BEFORE TAKING PICTURES Using the autofocus The autofocus will work in almost all situations; however, there are certain conditions that may cause the autofocus function to not work properly. If the autofocus function is not working properly, set the focus range to capture images (page 59). - Page 30 The following examples are some of the situations where the autofocus function may work, but not as desired. i When both near and far objects are present Use the focus-lock function to lock the focus on an object at the same distance as the desired subject, then reposition the camera to compose the picture.
-
Page 31: How To Switch The Shooting Mode
BEFORE TAKING PICTURES How to switch the shooting mode Your camera can both capture still photos (still image shooting mode) and record video clips (video clip recording mode). When shooting, you can switch the shooting mode on the Mode Select Screen. Press the ON/OFF button to turn the camera on, and press the MENU button. -
Page 32: Hints For Taking Pictures
Hints for taking pictures Muting the operation sounds i The operation sounds that are generated, for example, when the shutter button, MENU button or SET button is pressed, can be muted (page 101). Where is the image data saved? i All the image and sound data is recorded in the camera’s internal memory or on the card installed in the camera. -
Page 33: Capturing And Playing Back Still Images
CAPTURING AND PLAYING BACK STILL IMAGES There are two modes for capturing still images. In the normal still image mode, one image is captured each time the shutter button is pressed. In the sequential shots mode, when you press the shutter button, several successive images are captured. - Page 34 Gently press the shutter button. h Press the shutter button gently, taking care not to move the camera. h The image that was captured appears on the LCD monitor as long as the shutter button is kept pressed (post view). Release your finger from the shutter button.
-
Page 35: Viewing Still Images
CAPTURING AND PLAYING BACK STILL IMAGES Viewing still images The steps for viewing both single shots and sequential shots are the same. Press the playback button [=]. h If the playback button [=] was pressed to turn the camera on, however, press the playback button [=] for at least 1 second. -
Page 36: Image Display Playback
9-image display playback Press the playback button [=]. Press [W] ([P]) on the zoom switch. h The 9-image display appears. Select the image to play back. h Press the arrow buttons to move the orange frame to the desired image, and press the SET button. - Page 37 CAPTURING AND PLAYING BACK STILL IMAGES Magnifying (zooming in) the image Display the image that you want to magnify. Press [T] ([]]) on the zoom switch. h Magnification is enabled. h The image is magnified, and the central portion of image is displayed.
-
Page 38: Video Clip Recording And Playback
VIDEO CLIP RECORDING AND PLAYBACK Recording a video clip Press the ON/OFF button to turn the camera on. Press the MENU button. h The Mode Select Screen appears. Press the [m] button to select “MOVIE”, and press the MENU button. h The Video Clip Recording Screen appears. -
Page 39: Playing Back The Video Clip
VIDEO CLIP RECORDING AND PLAYBACK Playing back the video clip Press the playback button [=]. h If the playback button [=] was pressed to turn the camera on, however, press the playback button [=] for at least 1 second. h The video clip just recorded appears on the LCD monitor. - Page 40 Outline of playback operation To do this... Pause To play back During forward one image playback at a time During reverse (single- playback frame step) During forward playback Slow playback During reverse playback Forward playback accelerate playback Reverse playback Return to normal playback speed When you are finished viewing video clips...
- Page 41 VIDEO CLIP RECORDING AND PLAYBACK HINT Adjusting the LCD monitor brightness i While the Shooting Screen is active, you can quickly access the screen for adjusting the brightness of the LCD monitor by pressing the MENU button for at least 1 second. Display the video clip playback point i During video clip playback, press the MENU button for at least 1 second to display a bar showing the current playback point in the video clip.
-
Page 42: Using The Zoom
USING THE ZOOM Your camera has two zoom functions: optical zoom and digital zoom. You can specify whether or not the digital zoom is enabled (page 105). Point the camera lens at the subject. Press the zoom switch to compose the desired image. [T]: Zoom in on the subject. -
Page 43: Flash Setting
(flash off). J: The digital camera will detect the subject brightness and use the flash only when required. At this time the flash will operate in a manner that reduces the red reflection (“red-eye”) in the subject’s... - Page 44 Press the [n] ([?]) button to set the flash mode. h Each time the [n] ([?]) button is pressed, the flash mode changes. h Display the icon for the desired flash mode. Press the shutter button. h The picture is snapped and the flash operates according to the selected mode.
-
Page 45: Exposure Correction
EXPOSURE CORRECTION When capturing images, you can make the image lighter or darker. Point the camera lens at the subject. h If the Mode Select Screen or a menu screen (Shooting Setting Screen) is active, press the MENU button to exit it. With the Shooting Setting Screen not showing, press the [m] ( button. -
Page 46: Shooting (Easy Setting Mode)
EASY SETTINGS SCREEN With the Easy Settings Screen, it’s a cinch to get beautiful photos every time, simply by selecting the setting that matches your shooting conditions. Press the ON/OFF button to turn the camera on, and press the MENU button. -
Page 47: Overview Of The Easy Settings Screen
OVERVIEW OF THE EASY SETTINGS SCREEN SCENE: FULL AUTO USE AUTO SETTINGS 1 Scene select menu (page 42) .: Full auto photography /: Sports photography 0: Portrait photography 1: Landscape photography 2: Night view photography (Available only when shooting single shots) 3: Fireworks photography (Available only when shooting single shots) -
Page 48: Scene Select
SCENE SELECT You can select from various preset settings (aperture, shutter speed, etc.) for specific shooting conditions. Display the Easy Settings Screen (page 40). Select the scene select menu. .: The camera automatically makes the optimum settings suitable for the surrounding conditions (full auto). - Page 49 SCENE SELECT Select the desired icon from the scene select menu, and press the SET button. h This completes the scene select setting. Take the picture. For video clip recording, see page 32. For still image shooting, see page 27. h To return to normal photography, select .
-
Page 50: Full Auto
Scene select and operation mode The scene select functions that are available depend on the active operation mode (page 63). Full auto . Sports / Portrait 0 Landscape1 Night view Fireworks3 O: Available —: Not available CAUTION i When capturing images using the fireworks 3 or night view 2 setting, use a tripod or other method to stabilize the camera. -
Page 51: Filters
FILTERS The filter feature changes image characteristics such as color tones, to apply unique effects to the photographed image. Display the Easy Settings Screen (page 40). Select the filter menu. 6: No filter is used (none). 7: Skin tones are enhanced in close- up shots (cosmetic filter). - Page 52 Select the desired icon from the filter menu, and press the SET button. h This completes the filter setting. Take the picture. For video clip recording, see page 32. For still image shooting, see page 27. h To return to normal photography, select 6 from the filter menu, and press the SET button.
-
Page 53: Shooting (Shooting Setting Screen)
ACCESSING THE SHOOTING SETTING SCREEN The Shooting Setting Screen is used to adjust the focus range and self-timer settings; to select the single-shot, sequential shots, composite photo, or ID photo operation mode; and to manage various settings such as turning the shutter button touch sensor ON/OFF. -
Page 54: Switching The Page
Switching the page The Shooting Setting Screen consists of two pages: PAGE 1 and PAGE 2. Display the Shooting Setting Screen. Press the [l] button. h The Shooting Setting Screen PAGE changes. h Each time the [l] button pressed, the PAGE changes. TOUCH SENSOR <Shooting Setting Screen: PAGE 1>... - Page 55 ACCESSING THE SHOOTING SETTING SCREEN Overview of the Shooting Setting Screen (still images) PAGE 1 TOUCH SENSOR English...
- Page 56 1 Touch sensor menu (page 57) #: Set the shutter button touch sensor to ON. $: Set the shutter button touch sensor to OFF. 2 Resolution menu (page 58) y: Shoot at 2,816 × 2,112 pixels, low compression k: Shoot at 3,680 × 2,760 resolution x: Shoot at 2,816 ×...
- Page 57 ACCESSING THE SHOOTING SETTING SCREEN PAGE 2 FOCUS METHOD 9-PT AUTOFOCUS English...
- Page 58 1 Focus mode menu (page 68) B: 9-point focus mode C: Spot focus mode 2 Light-measuring mode (EXP MEASURE) menu (page 69) n: Multi-section light- measuring setting W: Center-weighted light- measuring setting Y: Spot light-measuring setting 3 ISO sensitivity menu (page 70) : Sets the ISO sensitivity automatically (corresponds...
- Page 59 ACCESSING THE SHOOTING SETTING SCREEN Overview of the Shooting Setting Screen (video clips) PAGE 1 TOUCH SENSOR English 10:15...
- Page 60 1 Touch sensor menu (page 57) #: Set the shutter button touch sensor to ON. $: Set the shutter button touch sensor to OFF. 2 Video clip mode menu (page 58) 0: Shoot at 320 × 240 pixels (15 frames/second, standard compression) ,: Shoot at 160 ×...
- Page 61 ACCESSING THE SHOOTING SETTING SCREEN PAGE 2 FLICKER REDUCT English 10:15...
- Page 62 1 Flicker-reduction menu (page 73) *: Set the flicker-reduction function to OFF. o: Set the flicker-reduction function to ON. 2 ISO sensitivity menu (page 70) : Sets the ISO sensitivity automatically (corresponds to ISO100 to 400). *: Corresponds to ISO100 u: Corresponds to ISO200 v: Corresponds to ISO400 w: Corresponds to ISO800...
-
Page 63: Touch Sensor (Touch Focus) Setting
TOUCH SENSOR (TOUCH FOCUS) SETTING The touch sensor function, by which the autofocus is activated by a finger- touch on the shutter button, can be set to ON or OFF. When the touch sensor function is set to OFF, the autofocus is activated when you press the shutter button halfway;... -
Page 64: Resolution Setting
RESOLUTION SETTING By setting the image resolution (pixels) to a higher setting, image detail is enhanced for a smoother, finer picture. However, the file size also becomes large and uses more memory. Select the resolution setting that suits your purpose. Display PAGE 1 of the Shooting Setting Screen (page 47). -
Page 65: Focus Range
FOCUS RANGE Display PAGE 1 of the Shooting Setting Screen (page 47). Select the focus range menu. h The focus menu appears. *: The camera automatically focuses on the subject within a range of 10 cm (3.94 in.) (Wide end) or 40 cm (15.75 in.) (Tele end) to infinity (autofocus). -
Page 66: How To Use The Manual Focus
How to use the manual focus Display PAGE 1 of the Shooting Setting Screen (page 47). Select the manual focus icon - from the focus menu, and press the SET button. Press the SET button. h The focus distance adjustment bar appears. -
Page 67: Self-Timer
SELF-TIMER Display PAGE 1 of the Shooting Setting Screen (page 47). Select the self-timer menu. h The self-timer icons are shown. N: Turns off the self-timer function. y: The image is captured about 2 seconds after the shutter button is pressed. x: The image is captured about 10 seconds after the shutter button is pressed. - Page 68 HINT To pause or cancel the self-timer function... i If the shutter button is pressed again before the shutter is released, the self-timer countdown temporarily stops. Press the shutter button one more time to restart the self-timer. i To cancel self-timer photography, set the self-timer setting to off N. i After the self-timer picture is snapped, the self-timer is automatically reset to off N.
-
Page 69: Shutter Operation Setting
SHUTTER OPERATION SETTING Select how the camera operates when the shutter button is pressed. Set the camera to the still image shooting mode, and display PAGE 1 of the Shooting Setting Screen (page 47). Select the operation mode menu. c: When the shutter button is pressed, a single still image is captured (single shot). -
Page 70: Shooting Sequential Shots
Shooting sequential shots When the shutter button is pressed, still images are captured in succession. Select the sequential shots icon P from the operation mode menu, and press the SET button. h If the resolution is set to k, the setting changes automatically to Press the shutter button to start shooting. - Page 71 SHUTTER OPERATION SETTING How to use the auto bracket shots (bracket series) feature Successive still images are captured as the exposure changes (bracket series). Select the bracket series icon I from the operation mode menu, and press the SET button. h If the resolution is set to E, the setting automatically changes to Press the shutter button.
- Page 72 Composite photo Shoot two separate still images, and combine them to create a composite still image. Select the composite icon - from the operation mode menu, and press the SET button. h If the resolution is set to k, the setting changes automatically to Press the SET button again.
- Page 73 SHUTTER OPERATION SETTING ID photos You can create ID photos to use in circulars, ads, and other publications, as well as in identification documents. Select the ID photo icon . from the operation mode menu, and press the SET button. Press the MENU button twice.
-
Page 74: Focus Area Setting
FOCUS AREA SETTING You can choose from the following 2 types of autofocus (still image shooting only): 9-point range finder focus: The correct focus is determined from 9 different Spot focus: Display the Shooting Setting Screen (page 47). Select the focus mode menu. h The focus mode menu appears. -
Page 75: Light-Measuring Mode Setting
LIGHT-MEASURING MODE SETTING You can select from 3 types of light-measuring modes. Multi-section light-measuring: The exposure is adjusted after sampling from multiple areas of the entire shooting screen. Center-weighted light-measuring: The exposure is adjusted after light is measured from the entire image, but with emphasis on the center area. -
Page 76: Iso Sensitivity
ISO SENSITIVITY With the initial settings, the ISO sensitivity is automatically set according to the brightness of the subject. However, the ISO sensitivity can be set to a fixed setting. Display PAGE 2 of the Shooting Setting Screen (page 47). Select the ISO sensitivity menu. -
Page 77: White Balance
WHITE BALANCE This camera automatically adjusts the white balance under most lighting conditions. However, if you want to specify the lighting conditions or change the overall tone of the image, the white balance can be manually set. Display PAGE 2 of the Shooting Setting Screen (page 47). Select the white balance menu. - Page 78 Select the desired icon, and press the SET button. h This completes the white balance setting. h Once the white balance setting is programmed for the ] icon, it is retained even if another white balance setting (>, r, o, p, or q) is selected.
-
Page 79: Flicker-Reduction Setting
FLICKER-REDUCTION SETTING The flicker-reduction setting reduces the flicker phenomenon that results when filming video clips under fluorescent lights and the like where the background lighting pulsates at the frequency of the power supply. The flicker- reduction setting is set for a frequency of 50 Hz. Set the camera to the video clip recording mode, and display PAGE 2 of the Shooting Setting Screen (page 47). -
Page 80: Playback
DISPLAYING THE PLAYBACK SETTING SCREENS The Playback Setting Screens are used to adjust your camera’s playback settings. Press the playback button [=]. h The display changes to the Playback Screen. Press the MENU button. h The Playback Setting Screen appears. To cancel the Playback Setting Screen When the MENU button is pressed, you are returned to the Playback Screen. - Page 81 DISPLAYING THE PLAYBACK SETTING SCREENS Switching the page The Playback Setting Screen consists of two pages: PAGE 1 and PAGE 2. Display a Playback Setting Screen. Press the [l] button. h The Playback Setting Screen changes to the other PAGE. h Each time the [l] button is pressed, the PAGE changes.
- Page 82 Overview of the Playback Setting Screens PAGE 1 1 Protect (page 78) h Protect data from accidental erasure (write protect). 2 Erase (page 80) h Delete images from the card memory. 3 Zoom jump playback (page 82) h Magnify the image for a better view of the details.
- Page 83 DISPLAYING THE PLAYBACK SETTING SCREENS PAGE 2 1 Copy image (page 86) 2 Print settings (page 88) h Specify the print settings. 3 Slideshow (page 95) h Play back the images in a slideshow format. 4 PAGE display (page 75) English COPY IMAGE Copy image...
-
Page 84: Image Protect
IMAGE PROTECT Prevent accidental erasure of data. Display the data that you want to protect from accidental erasure, and display PAGE 1 of the Playback Setting Screen (page 74). Select the protect icon A, and press the SET button. h “LOCK?” appears. h If the protect mode has already been enabled for the data, then “UNLOCK?”... - Page 85 IMAGE PROTECT CAUTION i Even if the protect mode is set for certain data files, they will be erased if the card is reformatted (page 113). HINT To select a different image in steps 2 and 3... i Press the [l] or [m] button. To cancel the protect mode for an image...
-
Page 86: Erasing Data
ERASING DATA You can erase data that is stored on the card if you no longer need it. You can erase the data one at a time, or all at once. To erase data from the card, perform the erase procedure with the card installed in the camera. - Page 87 ERASING DATA Select “YES” and press the SET button. <ONE ERASE> h The currently displayed image is deleted. h To erase other data, select the data, and press the SET button. <ERASE ALL> h The Erase Confirmation Screen again appears. To erase the data, select “YES”, and press the SET button.
-
Page 88: Zoom Jump Playback
ZOOM JUMP PLAYBACK You can magnify a portion of a still image to check the accuracy of the focus. Display a still image to view using zoom jump playback. Press the SET button. h The image is magnified. h If the magnified view appears to be in focus, then the overall image will be in focus. -
Page 89: Changing Image Size (Resize)
CHANGING IMAGE SIZE (RESIZE) The size of a still image that has already been captured at a resolution of t or more can be changed to 1,600 × 1,200 pixels or 640 × 480 pixels. The resized image is saved as a separate image. Display the still image whose size you want to change. -
Page 90: Rotate Image
ROTATE IMAGE Captured still images can be rotated to the correct orientation for viewing. Display the image you wish to rotate, and display PAGE 1 of the Playback Setting Screen (page 74). Select the rotate icon L, and press the SET button. h The Rotate Image Screen appears. -
Page 91: Extracting A Still Image From A Video Clip
EXTRACTING A STILL IMAGE FROM A VIDEO CLIP You can select one image (scene) from a video clip, copy it, and save it as a still image (the original data remains unchanged). Play back a video clip, and pause at the point you wish to copy and save. -
Page 92: Copy Data
COPY DATA Images recorded in the camera’s internal memory can be copied to the card, and likewise from the card to the internal memory. Insert the card in the camera (page 14). Display PAGE 2 of the Playback Setting Screen (page 74). Select the copy image icon S, and press the SET button. - Page 93 COPY DATA Press the SET button. h The screen to select the type of copy appears. h The copy source is shown in the background on the screen. COPY SINGLE: Copy the data for one image. COPY ALL: Copy all the data from the copy source to the copy destination.
-
Page 94: Print Settings
PRINT SETTINGS In addition to using your printer to print out still images captured with your camera, as with conventional film, you can have prints made at shops offering digital print services. Moreover, this camera is DPOF-compatible, so you can use the camera to specify the number of prints, whether or not the date is displayed on the print, and also to specify an index print. - Page 95 PRINT SETTINGS HINT Printing a single frame from a video clip i To print with a printer or have the digital print service shop print out a still image from a video clip, you must first save it (save frame [page 85]) as a still image.
- Page 96 Specifying date imprinting and number of prints You can specify print settings for each individual image (EACH IMAGE), or apply the print settings to all the images on the card (ALL IMAGES). Display the Print Setting Screen (page 88). Select ALL IMAGES or EACH IMAGE. ALL IMAGES: The set print settings are applied to all the still images on the card.
- Page 97 PRINT SETTINGS Specify whether the date is displayed on the print, and the number of prints. <Specifying dated prints> 1 Press the [n] or [o] button to select “DATE”. 2 Press the SET button. h The Print Date Screen appears. 3 Press the [n] or [o] button to select the desired option.
-
Page 98: Index Print
Select “ADD TO PRINT SETTING” and press the SET button. h The Confirm Print Settings Screen appears. If the print settings are correct: Select “EXIT”, and press the SET button. If the print settings were changed: Select “MODIFY PRINT SETTING”, and press the SET button. -
Page 99: Changing The Print Settings
PRINT SETTINGS Press the SET button. h The Index Print Screen appears. YES: Specify an index print copy. EXIT: Discontinue the setting procedure, and return to the Print Setting Screen. Select “YES”, and press the SET button. h This completes the setting for the index print. You are returned to the Print Setting Screen. -
Page 100: Clearing All The Print Settings
Clearing all the print settings Delete the print settings for all images. Display the Print Setting Screen (page 88). Select “ALL CLEAR”. Press the SET button. h The Confirm All Clear Screen appears. YES: Clear the print settings for all images. EXIT: Cancel the clear procedure and return to the Print Setting Screen. -
Page 101: Slideshow Playback
SLIDESHOW PLAYBACK Display PAGE 2 of the Playback Setting Screen (page 74). Select the slideshow icon V, and press the SET button. h The Slideshow Screen appears. TIME: Adjust the transition speed (the period that an image is displayed before it changes to the next image). - Page 102 Select “START”, and press the SET button. h Slideshow playback starts. h To stop slideshow playback, press the SET button or MENU button. English...
-
Page 103: Displaying Image Properties (Information Screen)
DISPLAYING IMAGE PROPERTIES (INFORMATION SCREEN) On the Information Screen you can check what the settings were when an image was captured. Display the desired image (pages 29 and 33). Press and hold the MENU button for at least 2 seconds. h The Information Screen appears. -
Page 104: Option Settings
DISPLAYING THE OPTION SCREEN The Option Screen is used to adjust various camera settings. Display the Shooting Setting Screen or Playback Setting screen. h Shooting Setting Screen, see (page 47) h Playback Setting Screen, see (page 74) Press the [n] or [o] button to select the PAGE indication. - Page 105 DISPLAYING THE OPTION SCREEN Overview of the Option Screen English CLOCK SET OPERATION BEEP HELP DISP POST VIEW DIGITAL ZOOM LCD BRIGHTNESS LANGUAGE POWER SAVE FILE NO. RESET FORMAT RESET SETTINGS...
- Page 106 1 Date and time setting (page 19) h Set the camera’s internal clock. 2 Operation sounds setting (page 101) h Adjust the operation sounds produced when the camera’s buttons are pressed. 3 Help display setting (page 103) h Turn the help display on or off. 4 Post-view (page 104) h Specify how long a still image is displayed on the LCD...
-
Page 107: Operation Sounds
OPERATION SOUNDS This setting allows you to set whether or not a confirming audio signal sounds when the operation buttons (shutter button, SET button, MENU button, etc.) are pressed. Display the Option Screen (page 98). Select the operation beep icon ?, and press the SET button. - Page 108 Select “CHANGE SETTINGS”, and press the SET button. h The screen to select the operation buttons appears. SHUTTER: Set the sound for the shutter button. KEY SW: Set the sounds of the operation buttons (except for the ON/OFF button and shutter button). EXIT: Return to the Operation Sounds Screen.
-
Page 109: Help Display
HELP DISPLAY You can set whether or not the help messages are shown on the LCD monitor. Display the Option Screen (page 98). Select the help display icon r and press the SET button. h The Help Setting Screen appears. The HELP messages are enabled. -
Page 110: Post-View Setting
POST-VIEW SETTING Specify the duration that the captured image appears on the LCD monitor (post-view) after the shutter button is pressed. Display the Option Screen (page 98). Select the post-view icon o, and press the SET button. h The Post-view Screen appears. 1 SEC: The post-view image is displayed for 1 second. -
Page 111: Digital Zoom Setting
DIGITAL ZOOM SETTING Set the digital zoom setting to ON or OFF. If the deterioration of image quality characteristic of the digital zoom function is not to your liking, you may choose to disable the digital zoom (OFF) and shoot using only the optical zoom. Display the Option Screen (page 98). -
Page 112: Lcd Monitor Brightness
LCD MONITOR BRIGHTNESS Adjust the brightness of the camera’s LCD monitor display. Use this adjustment when the monitor image is difficult to view because of ambient lighting. In addition, in very bright surroundings, such as outdoors on a sunny day, you can turn the backlight OFF to preserve battery power. -
Page 113: Screen Language
SCREEN LANGUAGE You can set the LCD monitor of your camera to display the messages in any one of several languages. Display the Option Screen (page 98). Select the language icon z, and press the SET button. h The Language Screen appears. DEUTSCH: ENGLISH: ESPAÑOL:... -
Page 114: Power Save Function
POWER SAVE FUNCTION Your camera has a “power save” function whereby the power automatically turns off after a specified period of inactivity. The power save function works to conserve the battery power when the camera is not being used, or to prevent the batteries from dying if the camera has accidentally been left on. - Page 115 POWER SAVE FUNCTION Select the desired option, and press the SET button. h The Set Standby Time Screen appears. Press the [n] or [o] button to set the standby time. Press the SET button. h The power save function is set. English POWER SAVE BATT/CAM...
-
Page 116: File No. Reset Function
FILE No. RESET FUNCTION If a newly formatted (page 113) card is used, the file name (image number) of the captured image automatically begins from 0001. If the card is subsequently reformatted, or if a different reformatted card is used, the file names again begin from 0001. - Page 117 FILE No. RESET FUNCTION i If Card B already has image data in it when it replaces Card A, file names are assigned as follows. When the highest image number on Card B (before replacing) is lower than the highest image number on Card A: the file name of the next recorded image continues from last file name recorded on Card A.
- Page 118 Display the Option Screen (page 98). Select the file number reset icon Press the SET button. h The File Number Reset Screen appears. The file number reset function is “ON”. OFF: The file number reset function is “OFF”. Select “OFF”, and press the SET button. h The file number reset function was set to OFF.
-
Page 119: Initializing The Card Memory And Internal Memory
After purchasing, when used for the first time, or i If it was formatted using a personal computer or another digital camera. The card cannot be reformatted if the lock switch is set to the “LOCK”... - Page 120 Select the desired format option, and press the SET button. h The Confirm Format Screen appears. Select “YES”. Press the SET button. h Formatting begins. h During formatting, “FORMATTING” and “DO NOT POWER OFF” are shown on the LCD monitor. CAUTION Caution during reformatting i Please do not turn off the camera or insert/remove the card while the card...
-
Page 121: Resetting The Camera Settings
RESETTING THE CAMERA SETTINGS Reset the camera to the factory-preset settings. Display the Option Screen (page 98). Select the reset settings icon 2, and press the SET button. h The Reset Settings Screen appears. YES: Reset to the factory-preset settings. Do not change the settings, and return to the Option Screen. -
Page 122: Checking The Remaining Internal Memory And Card Memory
CHECKING THE REMAINING INTERNAL MEMORY AND CARD MEMORY You can check how many images can be captured on the card. For a table showing the maximum number of images and recording time for the internal memory and for a specific card, please see “Possible No. of Images/Possible Shooting Time”... -
Page 123: Checking The Remaining Battery Charge
CHECKING THE REMAINING BATTERY CHARGE When using batteries, the remaining battery charge can be checked on the LCD monitor. Make sure to check this indicator before capturing an image. For an indication of the possible length of time for battery operation, see page 145. - Page 124 HINT i If any data is present, you can also check the remaining battery charge on the Playback Setting Screen or Information Screen. i Battery life may differ even among batteries of the same type. i Depending on the usage of the camera (such as the number of times the flash is used, etc.) or the ambient temperature (temperatures below 10°C [50°F]) the number of images that can be saved on fully charged batteries will vary greatly.
-
Page 125: Other Devices And Connections
DIRECT PRINTING Your camera supports the PictBridge function. By connecting the camera directly to a PictBridge-enabled printer, the camera’s LCD monitor can be used to select images and initiate printing (PictBridge printing). Print preparations Insert the card containing the images you wish to print in the camera. - Page 126 Select “PictBridge”, and press the SET button. h The Print Settings Screen appears. CAUTION Caution when connecting a printer i If the power to the printer is turned off while it is connected, the camera may not operate correctly. If the camera does not operate correctly, disconnect the USB interface cable, turn off the camera, and then reconnect the cable.
- Page 127 DIRECT PRINTING To select one image and print it (one image) Procedure to select one still image and print it. Complete the printing setup (page 119). Select the one image icon Y, and press the SET button. h The screen to select images for printing appears.
- Page 128 Specify the number of prints. 1 Select “COPIES”, and press the SET button. 2 Press the [n] or [o] button to specify the number of prints. 3 Press the SET button. h “PRINT” is selected. Press the SET button. h Printing begins. HINT To cancel printing 1 During printing, press the [o] button.
- Page 129 DIRECT PRINTING To print all the images (all images) Print all of the images. Complete the printing setup (page 119). Select the all images icon u, and press the SET button. h The Print All Images Screen appears. Select “PRINT”, and press the SET button.
- Page 130 Thumbnail prints (index) Make an index print of all the images. Complete the printing setup (page 119). Select the index print icon [, and press the SET button. h The Index Print Screen appears. Select “PRINT”, and press the SET button.
- Page 131 DIRECT PRINTING To print the images that are set to print (print reserved images) Procedure to print all the images that are set to print. Make the print settings (page 88), and complete the printing setup (page 119). Select the DPOF icon w, and press the SET button.
-
Page 132: To Change The Printer Settings And Print Images
To change the printer settings and print images (change printer settings) Images are printed according to settings specified by the camera, such as paper type, size, layout, printing quality, etc. Complete the printing setup (page 119). Select the printer settings icon v, and press the SET button. - Page 133 DIRECT PRINTING Adjust the printer settings. 1 Press the [n] or [o] button to select a printer setting parameter, and press the SET button. h The screen to set the selected parameter appears. 2 Press the [n] or [o] button to adjust the setting, and press the SET button.
-
Page 134: Appendices
COMMONLY ASKED QUESTIONS If you have a question about the camera operation, you might find the answer in this compilation of commonly asked questions. Question Why doesn’t the power turn on? Why are the batteries consumed so Power quickly? Why does the icon appear? Why doesn’t the touch sensor... - Page 135 COMMONLY ASKED QUESTIONS Question Are the settings retained even after the camera is turned off? Which resolution setting should I use? Shooting What is the difference between the digital zoom and the optical zoom? English Answer Action — All settings except the self-timer and the exposure correction are...
-
Page 136: Manual Focus
Question How can I get the distant view into focus? Shooting The video clip I shot outdoors is completely white. When used in cold weather, why does the image seem to leave traces as it moves? Why does the monitor displayed image contain some red, blue and green... - Page 137 If a bright subject Not a malfunction. is shot in the video clip recording mode, vertical stripes...
- Page 138 Question Why isn’t the magnified image clear? Why isn’t the captured image Viewing clear? images Can I play back image data that I edited using my computer? Why does a message appear Printing during PictBridge printing? Why does the “CARD FULL” or “INTERNAL MEMORY FULL”...
- Page 139 COMMONLY ASKED QUESTIONS Question Can I use my camera abroad? Why does the “SYSTEM ERROR” message appear? Misc. English Answer — If you have questions about using the AC adaptor and power cord abroad, please consult with a dealer near you for advice. A problem has Check the following occurred within...
-
Page 140: Troubleshooting
TROUBLESHOOTING Before taking your camera to the repair shop, check the following table for a possible solution to the problem. CAMERA Problem No power. Power The camera turns off by itself. An image is not captured when the shutter button is pressed. - Page 141 TROUBLESHOOTING Problem An image is not captured when the shut- ter button is pressed. The operation buttons (arrow buttons, MENU button, etc.) do not work. The flash does not operate. Shooting The digital zoom does not work. A warning tone (beep-beep- beep) sounds, and it is not...
- Page 142 Problem When zooming in or out, the zoom movement stops Shooting momentarily. There is noise in the captured image. No playback image monitor appears. The image is too dark. Viewing images Cause Action The optical Not a zoom has malfunction. moved to the Release the maximum...
- Page 143 TROUBLESHOOTING Problem The video clip picture is flickering. The image is too bright. Viewing images The image is not in focus. English Cause Action The video clip Set the flicker- was recorded reduction under setting to on. fluorescent lighting. The forced Select a flash mode is different flash...
- Page 144 Problem The colors of the images captured indoors are not correct. A part of the Viewing image is images missing. “NO IMAGE” is shown. You cannot Image edit or rotate editing an image. “PROTECTED” message appears and the data cannot be erased.
- Page 145 TROUBLESHOOTING Notes regarding the scene select feature and filters During still image shooting English When using a filter, the + focus range setting is not available. The + and ) focus range settings are not available. Focus range: Fixed at ). Flash: Fixed at l.
- Page 146 During video clip recording About the scene select function and focus range settings i The scene select function changes to . when the focus range is set to i Even if you set the focus range to +, ) or -, it changes to * when the scene select function is set to .
-
Page 147: Specifications
Image file format Data storage media Camera effective number of pixels Image sensor English CCD digital camera (recording and playback) Digital recording Still images: JPEG format (DCF, DPOF, Exif 2.2 compliant) Note: Designed mainly by the Japan Electronics and Information Technology... - Page 148 Recording resolution White balance Lens Aperture Exposure control type Light-measuring modes k: 3,680 × 2,760 pixels (single-shot still images only) y: 2,816 × 2,112 pixels (single-shot still images and sequential shots only) x: 2,816 × 2,112 pixels (single-shot still images and sequential shots only) z: 2,288 ×...
- Page 149 SPECIFICATIONS Range Digital zoom Shutter speed Sensitivity LCD monitor English Normal photography: 10 cm (3.94 in.) to (Wide), 40 cm (15.75 in.) to Macro photography: 5 cm (1.97 in.) to 70 cm (27.56 in.) (Wide), 40 cm (15.75 in.) to 70 cm (27.56 in.) (Tele) For shooting: 1x to 4x (except resolution k) For playback: 1x to 57.5x (varies with...
- Page 150 10 to 90% (storage, no condensation) AA-size alkaline batteries × 2 The following batteries can also be used: AA-size Ni-Cd batteries (SANYO N-3UV) × 2 AA-size nickel metal hydride batteries (SANYO HR-3UF) × 2 * AA-size manganese batteries cannot be used.
-
Page 151: Battery Life
SPECIFICATIONS Camera Connector USB/AV (communication/sound and image output) terminal DC IN (external DC power input) terminal Battery life Possible No. of Images* Maximum playback time** * According to the CIPA standard (when using a Matsushita Electric Industrial Co., Ltd. 64MB SD Memory Card). ** With continuous playback when using the LCD monitor. - Page 152 Possible No. of Images/Possible Shooting Time The table shows the possible number of captured images and the possible recording time for the camera’s internal memory (15MB) and for the commercially available 128MB and 1GB SD Memory Cards. Shooting Resolution mode setting setting Single-shot mode/...
- Page 153 SPECIFICATIONS Concerning the access light The camera’s access light will light, flash, or be off, depending on the different camera operations. Access light status — — Slow Flashing Fast Very fast English Camera status Power OFF Connected to a computer or printer Power save mode (sleep) Error or when error...
- Page 154 Sanyo Electric. i Sanyo Electric shall not be held responsible for any losses or loss of revenue resulting from the loss of data caused by the malfunction, or the repairing of a malfunction, of the camera.
-
Page 155: Hints For Taking Pictures
HINTS FOR TAKING PICTURES Taking great pictures in difficult surroundings is easier than you might think. By keeping a few points in mind and choosing the correct settings, you can create photos that you’ll be proud to display and share. If images are blurred even when the autofocus is used Your camera employs an autofocus function. -
Page 156: Photographing A Moving Subject
Photographing a moving subject Situation: You would like to snap an action shot of a moving child or pet. The autofocus is activated, but because the subject is moving, the image may be blurred. In particular, when the distance between the camera and the subject is changing, it is difficult to lock the focus on the subject. - Page 157 HINTS FOR TAKING PICTURES Shooting portraits (portrait mode 0) Points: i Choose a background that doesn’t detract from your subject. i Move in close to your subject. i Pay attention to lighting and how it affects your subject. NOTE i If the background is distracting, it will not show your subject to his best advantage.
- Page 158 Night photography (night view mode 2) Points: i Avoid camera shake. i Increase the ISO sensitivity. NOTE i Camera shutter speed during night photography is considerable slower, so there is a much greater chance that your photographed images will be blurry.
- Page 159 SANYO Electric Co., Ltd.