Table of Contents
Advertisement
Quick Links
Advertisement
Table of Contents

Related Manuals for Doro 6061


Summary of Contents for Doro 6061
- Page 1 Doro 6061 English...
- Page 3 You can obtain additional ac- cessories from your local Doro dealer. The supplied accessories provide the best per- formance with your phone.
-
Page 4: Table Of Contents
English Contents Congratulations on your purchase ..............1 Get started ..................... 1 Insert SIM card, memory card and battery ........... 1 Charge the phone................... 3 Get to know your phone................5 Assistive functions.................. 5 Turn the phone on and off..............5 Start-up wizard.................. - Page 5 English Messages...................... 24 Create and send text message (SMS) ..........24 Create and send picture message (MMS) ........... 25 Create and send voice message............25 Inbox, Outbox and Sent ............... 26 Message settings.................. 27 Camera (take photos) .................. 31 Adjustments ..................32 Camera settings....................
- Page 6 English Troubleshooting ................... 45 Safety instructions..................47 Network services and costs ..............48 Operating environment ............... 48 Medical units..................48 Areas with explosion risk ..............48 Li-Ion battery ..................49 Protect your hearing ................49 Emergency calls..................49 GPS/Location based functions ............. 49 Vehicles ....................
-
Page 7: Congratulations On Your Purchase
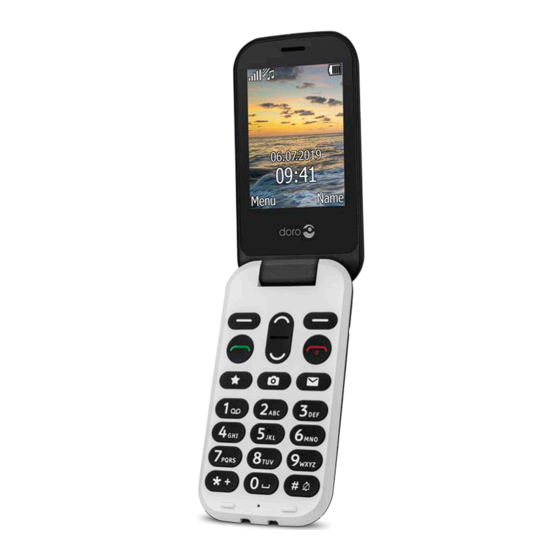
See everything easier and experience effortless calling and texting on a phone that combines a large 2.8" screen with widely separated, high con- trast keys. The Doro 6061 features an external display for quick notifica- tions and Caller ID. It also has an easy to use 3MP camera that makes taking and sending photos to family and friends more fun. - Page 8 English Insert the SIM cards (required) Remove the battery if it is already installed. Locate the SIM card holder and gently slide the card in the holder. See the label right next to the holder for guidance on how to insert the card.
-
Page 9: Charge The Phone
English Tip: Take care not to scratch or bend the contacts on the memory or on the SIM card when inserting them into the card holders. Insert the battery and replace the battery cover Insert the battery by sliding it into the battery compartment with the contacts facing down- wards to the right. - Page 10 English When the battery is running low, is displayed and a warning signal is heard. Connect the mains adapter to a wall socket and to the charging socket The battery charge indicator is animated while charging. It takes ap- proximately 3 hours to fully charge the battery. When the charger is connected to the phone, is displayed briefly, and when it is...
-
Page 11: Get To Know Your Phone
English Save energy When you have fully charged the battery and disconnected the charger from the device, unplug the charger from the wall socket. Get to know your phone Assistive functions Use the symbols below to guide you through supporting sections in the manual. -
Page 12: Phone Indicators
Ok. Example: Press Menu � Phonebook � -New contact- � Add. • To perform the example on your Doro 6061 you should do the following: Press Menu, scroll to Phonebook and press Ok. Select -New contact- and press Add. -
Page 13: Enter Text
English Enter text Enter text manually Select character Press a numerical key repeatedly until the desired character is shown. • Wait a second before entering the next character from same numeri- cal key. Special characters Press * for a list of special characters. Select the desired character with and press Ok to confirm. -
Page 14: Hearing Aid Compatible
English Note! See Predictive text, p.27 for more information. Input mode • Press # to change input mode. The icon on the top left of the display indicates the input mode. Sentence case with predictive text UPPER CASE with predictive text lower case with predictive text Sentence case UPPER CASE... -
Page 15: Phone Settings
English Phone settings Time & date Set the time and date Press Menu � Settings � General � Time & date: Set time to enter the time (HH:MM). • Set date to enter the date (DD/MM/YYYY). • Press Ok to confirm. Tip: You can also set the phone to automatically update the time and date according to the current time zone. - Page 16 English • On to activate the PIN code. You need to enter the PIN code every time the phone is started. • Off to deactivate the PIN code. IMPORTANT! If enabling Off-mode and the SIM card is lost or stolen, it is unprotected.
-
Page 17: Calls
English Whitelist A whitelist works much like a spam filter, once activated, you can only re- ceive incoming calls from contacts saved in the phonebook. People not stored in the phonebook gets a busy signal when trying to call you. Press Menu �... -
Page 18: Call Options
English If you use a hearing aid or have hearing difficulties when using the tele- phone in a noisy environment, you can adjust the phone's audio settings, see Audio setup , p.37. Silent Silent is a fixed profile with Keypad tone, Message tone and Ringtone dis- abled, while Tasks, Daily reminder and Alarm are unchanged. -
Page 19: Sos Calls
English Press SPK on to activate. Speak clearly into the phone microphone at a maximum distance of 1 m. Use to adjust the loudspeaker volume. Press SPK off to return to normal mode. Note! Loud background noises (music, etc.) may interfere with the sound quality. -
Page 20: Call Settings
English Call settings Call timer During a call, the duration of the call is shown. You can check the duration of your calls. Press Menu � Settings � Calls � Call timer: Last call to show the elapsed time of the most recent call. •... - Page 21 English Press Menu � Settings � Calls � Call setup � Call divert: Voice calls to divert all voice calls. • Unreachable to divert incoming calls if the phone is turned off or • out of range. No reply to divert incoming calls if unanswered. •...
-
Page 22: Phonebook
English Fixed dial (FDN) You can limit calls to certain numbers saved on the SIM card. The list of al- lowed numbers is protected by your PIN2-code. Note! The PIN2-code is needed to apply fixed dial. Contact your service provider to get the PIN2-code. Press Menu �... -
Page 23: Manage Phonebook Contacts
English • My pictures to select an existing picture. Press Save. Tip: For international calls, always use + before the country code for best operation. Press * twice for the international prefix +. Manage phonebook contacts Press Menu � Phonebook. Select a contact, then press Options: •... -
Page 24: Phonebook Settings
English • Send by MMS to send the selected phonebook contact as a vCard via picture message. See Create and send picture mes- sage (MMS), p.25. Send by Bluetooth to send the selected phonebook contact • ® ® as a vCard via Bluetooth . - Page 25 English To edit or delete an existing entry, select it and press Options � Edit or Delete. Call voice mail Press and hold shortcut button 1 . • Speed dial Use 0 and 2 – 9 to speed dial an entry from standby. •...
-
Page 26: Ice (In Case Of Emergency)
English Enter name and number, see Enter text , p.7. When done, press Ok. ICE (In Case of Emergency) First responders can access additional information such as medical infor- mation from the victim's phone in case of emergency. In the event of a trauma, it is critical to have this information as early as possible to in- crease the chances of survival. -
Page 27: Assistance Button
English When done, press Save. Assistance button CAUTION When an assistance call is activated the phone is pre-set to handsfree/ speakerphone mode. Do not hold the device near your ear when the handsfree mode is in use, because the volume may be extremely loud. The assistance button allows easy access to contact your predefined help numbers (Number list) should you need help. -
Page 28: Activation
English IMPORTANT! Information to the recipient of an assistance call, when Confirm with "0" is activated. After receiving the assistance message, each number in the Number • list is called sequentially. • To confirm the assistance call, the recipient needs to press 0 . If the recipient doesn’t press 0 within 60 seconds (after •... -
Page 29: Activate Text Messages (Sms)
This function sends a text message with the users position to the recipients in Number list when an assistance call occurs. The message contains date, time, and the positioning information of the Doro user. The message is not editable. If no position can be found the message contains the latest known position. -
Page 30: Signal Type
English or answering service. If the recipient doesn’t press 0 within 60 seconds the call will be disconnected and the next number in the sequence will be called. If the recipient presses 0 within 60 seconds, the call is confirmed and no further call attempts will be made (assistance sequence interrupted). -
Page 31: Create And Send Picture Message (Mms)
English Note! If you choose to add multiple recipients, you will be charged for each recipient (maximum 10). For international calls, always use + before the country code for best operation. Press * twice for the international prefix Create and send picture message (MMS) A picture message can contain text and media objects such as pictures and sound recordings. -
Page 32: Inbox, Outbox And Sent
English Press the shortcut button or press Menu � Messages. Select Create new � Voice message. Recording starts immediately. Press Stop when done and press Yes to save. Select recipient from Phonebook. Alternatively, select Enter number to add recipient manually and press Done. -
Page 33: Message Settings
English • Details to view details of the message. Delete all to delete all. Press Yes to delete or No to return. • Press Ok to confirm. Message settings Predictive text Press Menu � Settings � Messages � Predictive text. Select On to enable, or Off (default) to disable. - Page 34 English SMS centre From SMS settings, select SMS centre � Edit. Enter the service centre number. Press Clear to delete. Press Ok to confirm. Cell broadcast You can receive messages on various topics from your service provider, such as weather or traffic conditions in a particular region. For available channels and relevant channel settings, contact your service provider.
- Page 35 English Memory status From MMS settings, select Memory status to display the memory space used on the memory card (if inserted) and in the phone memory. Press Back to return. Storage Picture messages are saved by default in the phone memory. When the memory becomes full you will need to either delete a picture message (see Inbox, Outbox and Sent, p.26) or select to save your picture messages to the memory card.
- Page 36 English • Homepage to add homepage. Connection type use the buttons * and # to select connection • enter HTTP or WAP. • Use proxy use the buttons * and # to select Yes or No. • Proxy address to add proxy address. Proxy port to add proxy port.
-
Page 37: Camera (Take Photos)
English Reminder The reminder alerts you once if you haven't checked your messages or lis- tened to your voice mail within 10 minutes from receipt. When notified, press to end the notification and no more reminder is heard. Press Menu � Settings � Messages � Reminder. Select On to enable, or Off to disable. -
Page 38: Adjustments
English Press shortcut button Alternatively press Menu � Camera. Press to take the photo. Press Options: Send � Send by MMS, see Create and send picture message • (MMS), p.25. Send � Send by Bluetooth, see Bluetooth ® , p.34. •... -
Page 39: Image Viewer
Note! With higher quality, less pictures can be stored in the internal memory. If you insert a compatible external memory (micro SD) card into your Doro 6061, you can change the default storage location. This allows you to save more files on your device. Image viewer View your saved pictures Press Menu �... -
Page 40: Connectivity
Note! To prevent other devices from finding your device, select Off. Even if you select Off, paired devices can still detect your device. Device name Press Menu � Settings � Bluetooth � Device name. Enter the name your Doro 6061 should appear with for other Blue- ® tooth devices. -
Page 41: Network Setup
English • Rename to change the name of the device. Delete to delete the device from the list. • Delete all to delete all devices from the list. • Press Ok to confirm. Audio path Press Menu � Settings � Bluetooth � Audio path: •... -
Page 42: Connect The Phone To A Computer
English • View (photos/images) for single view. Send � Send by MMS to send as picture message or Send by • Bluetooth to send to a Bluetooth device. • Use as ringtone to use as ringtone. • Details to view detailed information about the file, e.g. date, size, copyright protection. -
Page 43: Sound & Display
English Note! You can transfer files using a USB cable on most devices and operating systems supporting a USB Mass Storage interface. Disconnect the USB cable safely Make sure to enable the hardware to be safely removed. Disconnect the USB cable. Note! Computer instructions may vary depending on your operating system. -
Page 44: Ringtone Volume
English Ringtone volume Press Menu � Settings � Sound � Volume. Use the navigation keys to change the ringtone volume. Press Ok to confirm. Silent Press Menu � Settings � Sound � Silent. Select On to enable, or Off to disable. Press Ok to confirm. -
Page 45: Wallpaper
English Press Ok to confirm. Wallpaper Press Menu � Settings � Display � Wallpaper: System to select predefined images. • User to select user defined images, see File manager, p.35. • to display available wallpapers. Press Ok to confirm. Text size You can adjust the text size for the menu and messages. -
Page 46: Additional Functions
English Additional functions Alarm Press Menu � Alarm � On. Enter the alarm time using the keypad and press Ok to confirm. • Select Single to set one single alarm. • Select Repeated to repeat the same alarm time several days. Scroll through the list of days and press On to enable or Off to disable the alarm for each day. -
Page 47: Calculator
English • Select View to show tasks for the selected date or View all to see all tasks. Press Options � Edit, Delete or Delete all. • Select Jump to date and enter the date. Press Ok to confirm. Note! The calendar reminders will work even when the phone is powered off. -
Page 48: Fm Radio
English FM radio FM radio has a frequency range from 87.5 to 108.0 MHz and 9 pre-set channels. To listen to the radio, you need to connect a compatible headset which acts as an antenna. Turning the radio on Connect a headset to the headset socket Press Menu �... -
Page 49: Torch
English • Edit to edit the channel name, then press to edit the fre- quency, use # to enter the decimal point. When done, press Ok. Press Ok to confirm. Manual input (changing search mode) Press Menu � FM radio � Options � Manual input: Fine tune to tune manually with •... -
Page 50: Display Status Symbols
English Display status symbols Signal strength No network coverage Ring only Voice mail message received Ring + vibration Alarm active Vibration only Battery level Silent Call divert activated Bluetooth on, visible to Roaming (in other network) others Bluetooth on, invisible to Missed call others Headset connected... -
Page 51: Reset Settings
English Assistance button call Call on-hold vCard message Outgoing SOS call Processing, please wait Volume control Reset settings Press Menu � Settings � Security. Select Reset settings to reset the phone settings. All the changes that you have made to the phone settings will be reset to default settings. Enter the phone code and press Ok to reset. - Page 52 English Failure to charge the battery Battery or charger Check the battery and charger. damaged Improve the charging environment. Battery should only be charged in temperatures between 0 °C and 40 °C Check the charger connections. Charger incorrectly con- nected to phone or power socket Standby time decreases Install a new battery.
-
Page 53: Safety Instructions
English Weak signal Try again from another location. Too far from base station Try calling at a later time. Network congestion Echo or noise Hang up and redial. This may switch to another Regional problem from network relay. bad network relay Sound Ensure that you do not cover the built-in Others cannot hear you... -
Page 54: Network Services And Costs
English Network services and costs Your device is approved for use on the GSM 900/1800/1900 MHz networks. To use the de- vice, you need a subscription with a service provider. Using network services may result in traffic costs. Some product features require support from the network, and you may need to subscribe to them. -
Page 55: Li-Ion Battery
English Follow the restrictions that apply to the use of radio equipment near places where fuel is stored and sold, chemical factories and places where blasting is in progress. Areas with risk for explosion are often – but not always – clearly marked. This also applies to below decks on ships;... -
Page 56: Vehicles
English uninterrupted or error free and may additionally be dependent on network service avail- ability. Please note that functionality may be reduced or prevented in certain environ- ments such as building interiors or areas adjacent to buildings. CAUTION Do not use GPS functionality in a manner which causes distraction from driving. Vehicles Radio signals can affect electronic systems in motor vehicles (for example, electronic fuel injection, ABS brakes, automatic cruise control, air bag systems) that have been incorrectly... -
Page 57: Care And Maintenance
English Do not visit untrusted websites. • Delete suspicious messages or email from unknown senders. • Set a password and change it regularly. • Deactivate wireless features, such as Bluetooth, when not in use. • • If the device behaves abnormally, run an antivirus program to check for infection. •... -
Page 58: Warranty
Doro reserves the right to revise this document or withdraw it at any time without prior notice. -
Page 59: Content Copyright
Doro does not provide a warranty for or take any responsibility for the functionality, con- tent, or end-user support of third-party apps provided with your device. By using an app, you acknowledge that the app is provided as is. -
Page 60: Hearing Aid Compatibility
English Hearing aid compatibility Note! For hearing aid compatibility, turn off Bluetooth connectivity. This phone is hearing aid compatible. Hearing aid compatibility is not a guarantee that a specific hearing aid will work with a specific phone. Mobile phones contain radio transmit- ters that may interfere with hearing aid performance. -
Page 61: Correct Disposal Of Batteries In This Product
Declaration of Conformity Hereby, Doro declares that the radio equipment type DFC-0250 (Doro 6061) is in compli- ance with Directives: 2014/53/EU and 2011/65/EU including delegated Directive (EU) 2015/863 amending Annex II. - Page 62 DFC-0250 (Doro 6061) (3021,3051,4021,4051,5011) English Version 2.1 ©2019 Doro AB. All rights reserved. www.doro.com REV 19802 — STR 20190521...