Table of Contents
Advertisement
Quick Links
Even though the MP3 disc that you purchased contains the 'MP3' mark on its cover,
the disc not written data by the format of MPEG1 LAYER3(file extension name: .MP3)
VIDEO-CD/CD/MP3 DISC PLAYER
Before operating the unit, please
read this manual thoroughly, and
retain for future reference.
This player does not apply to business use
and CD-ROM/CD graphic discs
cannot be played with this player.
can not be played back normally.
OWNER'S
INSTRUCTIONS
Z-100M/Z-10M
Z-100Me/Z-10Me
Last Memory
Key Control
COMPACT
COMPACT
DIGITAL VIDEO
DIGITAL AUDIO
Power
Repeat
Sound
Open/Close
Select
Return
Next
Previous
Mic1
Mic2
MicVol.
Digital Echo
MIN
MAX
MIN
MAX
Power
1
2
3
4
5
6
7
8
9
+10/0
PROGRAM SOUND
REPEAT
SLOW
PAL/NTSC
AI SLEEP
DISC VIEW
ZOOM
SELECT
PREV
NEXT
TIME
SEARCH
STOP
Advertisement
Table of Contents

Related Manuals for Samsung Z-100M


Summary of Contents for Samsung Z-100M
- Page 1 Even though the MP3 disc that you purchased contains the ‘MP3’ mark on its cover, the disc not written data by the format of MPEG1 LAYER3(file extension name: .MP3) OWNER'S INSTRUCTIONS Z-100M/Z-10M Z-100Me/Z-10Me Before operating the unit, please read this manual thoroughly, and retain for future reference.
-
Page 2: Safety Precautions
SAFETY PRECAU- SAFETY PRECAUTIONS CAUTION RISK OF ELECTRIC SHOCK DO NOT OPEN CAUTION TO REDUCE THE RISK OF ELECTRIC SHOCK, DO NOT REMOVE TOP COVER, NO USER SERVICEABLE PARTS INSIDE, REFER SERVICING TO QUALIFIED SERVICE PERSONNEL. DANGER This symbol is intended to alert you to the presence of dangerous voltage within the product. -
Page 3: Table Of Contents
SAFETY INSTRUCTIONS SAFETY INSTRUCTIONS • Do not damage the power cord. Damage to the power cord may cause a fire or shock hazard. • When unplugging the power cord, please hold by the plug and remove it carefully in standby mode. •... - Page 4 SAFETY INSTRUCTIONS READ INSTRUCTIONS • All the safety and operating instructions should be read before the appliance is operated. RETAIN INSTRUCTIONS • The safety and operating instructions should be retained for future reference. HEED WARNINGS • All warnings on the appliance and in the operating instructions should be adhered to.
- Page 5 OUTDOOR ANTENNA GROUNDING • If an outside antenna is connected to the antenna terminal, be sure the antenna system is grounded so as to provide some protection against voltage surges and built-up static charges. • In the U.S.A section 810 of the National Electrical Code, ANSI/NFPA No.
-
Page 6: Controls And Components
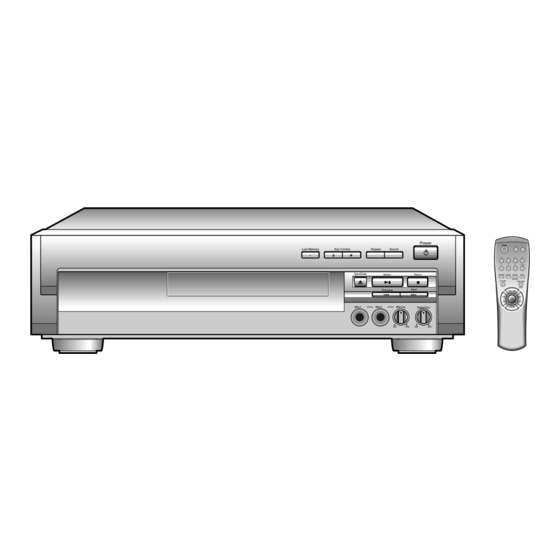
CONTROLS AND COMPONENTS FRONT PANEL 1. Last Memory button 2. Key Control button 3. Key Control button 4. Repeat button 5. Sound button 6. Power (Standby/On) button 7. Select(Play/Pause) button Last Memory Key Control Repeat Open/Close Select Previous Mic1 Mic2 8. - Page 7 CONTROLS AND COMPONENTS REAR PANEL 1. VIDEO OUTPUT - Connect to the VIDEO IN of your TV set. ACCESSORIES REMOTE CONTROL 2. AUDIO OUTPUT (AMP) 3. AUDIO OUTPUT (TV) VIDEO CABLE AUDIO CABLE CHANNEL RF OUTPUT (TO TV) ADJUST VIDEO AUDIO AUDIO OUT 1...
-
Page 8: Remote Control
REMOTE CONTROL POWER PROGRAM SOUND REPEAT PAL/NTSC AI SLEEP DISC VIEW ZOOM SELECT PREV NEXT TIME SEARCH STOP TO INSERT BATTERIES Open the battery compartment cover. +10/0 SLOW Install two "AAA" batteries observing the correct polarity as shown in compartment. 1. -
Page 9: System Connections
SYSTEM CONNECTIONS VCD AND CDP + TV 1. Connect AUDIO OUT2 jack of the VCD and CDP to AUDIO IN jack of the TV. 2. Connect VIDEO OUT jack of the VCD and CDP to VIDEO IN jack of the TV. VCD AND CDP + TV + AMPLIFIER 1. -
Page 10: Mp3 Disc Playback
MP3-DISC PLAYBACK HOW TO PLAYBACK MP3 DISC directly After inserting MP3 Disc in the Set, Press the select button or Number button after Reading. You can see the information of Disc on the TV. TOTAL: 150 PAGE 003/030 TR : 017 016 PBAY 017 DON’T FOR Track No... -
Page 11: Video-Cd Playback
VIDEO-CD PLAYBACK HOW TO PLAYBACK VIDEO-CD version 2.0 • Turn on the Power button. Press the Open/Close button. • The tray is ejected. Insert a VIDEO-CD disc and press the Open/Close button. Press the SELECT (PLAY/PAUSE) button. • In version 1.1 disc menu is not displayed and play function is operated. -
Page 12: Slow Motion
SLOW MOTION Press the SLOW button on the remote control when the play function is on -Voices do not come out when the SLOW button is pressed -Slow playing is 1/2 of the normal playing speed at 1st press. -Slow playing is 1/4 of the normal playing speed at 2nd press. -
Page 13: Disc View Function
DISC VIEW FUNCTION Desired music or video display can be used directly without by menu functions (VER 2.0 • Mode). This function is possible in Ver 1.1 and Ver 2.0 menu off mode. TRACK VIEW • This function is performed in the STOP mode. •... -
Page 14: Repeat Function
DISC VIEW FUNCTION INDEX VIEW • This function acts as displaying the track in playing sequently by time and so it's convenient for searching desired video. Press the PLAY button to playback. SELECT Press the DISC VIEW button. • The display as dividing into nine equal parts in displayed together with relevant sound. -
Page 15: Program Function
PROGRAM FUNCTION This function can program up to 30 tracks during STOP mode. • ex) To program No.4 track. Press the PROGRAM button. PROGRAM PROGRAM P : 01 000 PROGRAM Press the track number to be programmed. • Press the digit buttons. Ex) Select track 4 PROGRAM P : 01 004... -
Page 16: Zoom Function
ZOOM FUNCTION This function works only in the VCD play mode. • Press the DISC VIEW/ZOOM key for 1 sec or longer to change the screen to 2 x ZOOM. While in the 2 x ZOOM screen, press the DISC VIEW/ZOOM key for 1 sec or longer again to change the screen to 4 x ZOOM. -
Page 17: Searching Functions
SEARCHING FUNCTIONS Turn on the TV. • Load and play the disc. • HIGH SPEED SEARCH • This function is used to searching disc for desired location. Press and hold down the Search button during the play. • Hold down the Previous/Next button on the front panel more than one second. - Page 18 SEARCHING FUNCTIONS TIME SEARCH Press the TIME button. Enter the time by pressing the DIGIT button. TIME Press the SELECT SELECT NOTE 1. If entering the time is greater than total time of the disc, it will not be entered. 2.
-
Page 19: Karaoke Function
KARAOKE FUNCTION • Turn on the TV. • Load and play a disc. Connect the MIC. • The key control will be displayed on the screen. Load a disc and select a desired track. • Eject the tray by pressing the Open/Close button, load a disc and close the tray. - Page 20 KARAOKE FUNCTION Adjust the Digital Echo. - This will add an echo to your voice, giving you the feeling of singing on stage, Adjust it as desired. Digital Echo To decrease echo effect (SET) To decrease or increase the volume of the Microphone: •...
-
Page 21: Trouble Shooting
TROUBLE SHOOTING SYMPTOM Tray is not ejected. The unit does not play Tray is ejected. Video or audio is muted, or tray is ejected after 2-5 seconds. Picture appears late when SELECT(PLAY/PAUSE) button is pressed. Does not have video although disc is turned. -
Page 22: When Video Is Displayed Through Set
WHEN VIDEO IS DISPLAYED THROUGH SET -Source : VIDEO-CD DISC -Display :TV monitor SET MODE TV SYSTEM DISC NTSC NTSC NTSC NTSC NTSC NTSC NTSC * Color or sync is in trouble according to TV set. GENERAL INFORMATION ABOUT THE DISC GENERAL INFORMATION ABOUT THE DISC Compact Disc Digital Audio (Max. -
Page 23: Specifications
CARE OF PLAYER AND DISCS Cleaning the Player - Use soft cloth or the dusting attachment of your vacuum cleaner to dust the exposed surface of the player. Use the vacuum cleaner attachment to remove dust from the ventilation holes on the top, back, sides, and bottom of the cabinet. - Page 24 In case the need for Servicing arises Don't hesitate to call any nearby AS center with your name, address and telephone number when anything wrong with your product occurs. ELECTRONICS REV.:01 AH68-00583B...