Advertisement
IMPORTANT SAFEGUARDS
When using electrical appliances, basic safety precautions should always be followed including the following:
- Read all instructions.
- Do not touch hot surfaces. Use the handles or knobs to avoid any injuries.
- To protect against electrical shock do not immerse cord, plugs, or this appliance in water or other liquid.
- Not intended for use by children. Close supervision is necessary for any appliance being used near children.
- Unplug from outlet when not in use and before cleaning. Allow to cool before putting on or taking off parts.
- When the appliance is not in use, always check that nothing is pushing the Toasting levers (C) down.
- Do not operate any appliance with a damaged cord or plug or after the appliance malfunctions, or has been damaged in any manner. Return appliance to the nearest authorized service facility for examination, repair or adjustment.
- The use of accessory attachments, not recommended by the appliance manufacturer, may cause injuries.
- Do not use outdoors.
- Do not let cord hang over edge of table or counter, or touch hot surfaces.
- Do not place on or near a hot gas or electric burner, or in a heated oven.
- To shut down your appliance press the CANCEL button (D), then unplug from wall outlet.
- Do not use appliance for other than intended use.
- Oversize foods, metal foil packages, or utensils must not be inserted in toaster as they may involve a risk of fire or electric shock.
- A fire may occur if toasters are covering or touching flammable material, including curtains, draperies, walls, and the like, when in operation.
- Do not attempt to dislodge food when toaster is plugged in.
![]()
To prevent electric shock, unplug before cleaning.- Do not operate unattended.
- When heating toaster pastries, always use the lightest toast color setting.
FOR HOUSEHOLD USE ONLY

SAVE THESE INSTRUCTIONS

- The toaster must always be used in the upright position (not on its side or tilted forward or back) Fig. 13.
![]()
- Before each use, make sure that the crumb tray is in its proper location.
- Regularly remove crumbs from crumb tray.
- The toasting lever must be in the raised position before plugging in or unplugging from an outlet.
- If bread jams in the slots after toasting, the unit will automatically shut off. Unplug immediately from the outlet and wait for the toaster to cool before attempting to remove.

DO NOT
- Never leave the toaster unattended during operation.
- Do not touch the metal parts or hot surfaces of the appliance when it is working.
- Do not try to toast bread with ingredients that melt or drip in the toaster (frozen breads or stuffed breads) and do not toast very small pieces of bread or croutons as this may damage the appliance or cause a fire.
- Do not toast bread thicker than 1 inch in the toasting slots.
- Bread can burn; do not cover this appliance while in use and do not use this appliance near any flammable materials such as curtains, under shelving or cabinets, etc. It should be attended when in use.
- Do not put paper towels, cardboard or plastic in, on or under the toaster.
- If flames were to arise from parts of the toaster, never attempt to extinguish them with water. Unplug the appliance and smother the flames with a damp cloth.
- Do not use this appliance as a source of heating or drying.
- Do not use the toaster for cooking, grilling or defrosting frozen food other than bread products.
- Do not unplug appliance by pulling on cord. Instead grasp plug and pull to disconnect.
- Never wrap cord around toaster. Use cord storage on the underside of unit.
- Never use the appliance with the cord on top of the toaster as it could melt. Fig. 14.
![]()
- This product has been designed for household use only. Any professional use, inappropriate use or failure to comply with the instructions will void the warranty.

CAUTION
- Do not immerse toaster in water or run water into the toaster Fig. 15.
![]()
- Do not operate toaster under or around any flammable materials Fig. 16.
![]()
- Do not insert objects into the toaster Fig. 17.
![]()
- Do not place the toaster in the dishwasher Fig. 18.
![]()
- Do not cover toast chambers when in use Fig. 19.
![]()
- Do not transport the toaster by grabbing the bread slots Fig. 20.
![]()
- Do not put your hands in the bread slots Fig. 20.
- Do not cover the top of the toaster with any bread or other food. Fig. 21
![]()


SAFETY INSTRUCTIONS
- For your safety, this appliance complies with applicable technical rules and norms.
- Use a stable work surface, away from any contact with water and never in a built-in kitchen alcove.
- Do not move the appliance when it is in use.
POLARIZED PLUGS
This appliance has a polarized plug (one blade is wider than the other). To reduce the risk of electric shock, this plug is intended to fit into a polarized outlet only one way. If the plug does not fit fully into the outlet, reverse the plug. If it still does not fit, contact a qualified electrician. Do not attempt to modify the plug in any way.
Short Cord Instruction
- A short power-supply cord (or detachable power-supply cord) should be used to reduce the risk resulting from becoming entangled in or tripping over a longer cord.
- Longer detachable power-supply cords or extension cords are available and may be used if care is exercised in their use.
- If a longer detachable power-supply cord or extension cord is used:
- The marked electrical rating of the cord set or extension cord should be at least as great as the electrical rating of the appliance;
- The cord should be arranged so that it will not drape over the countertop or tabletop where it can be pulled on by children or tripped over unintentionally; and
- If the appliance is of the grounded type, the cord set or extension cord should be a grounding-type 3-wire cord.
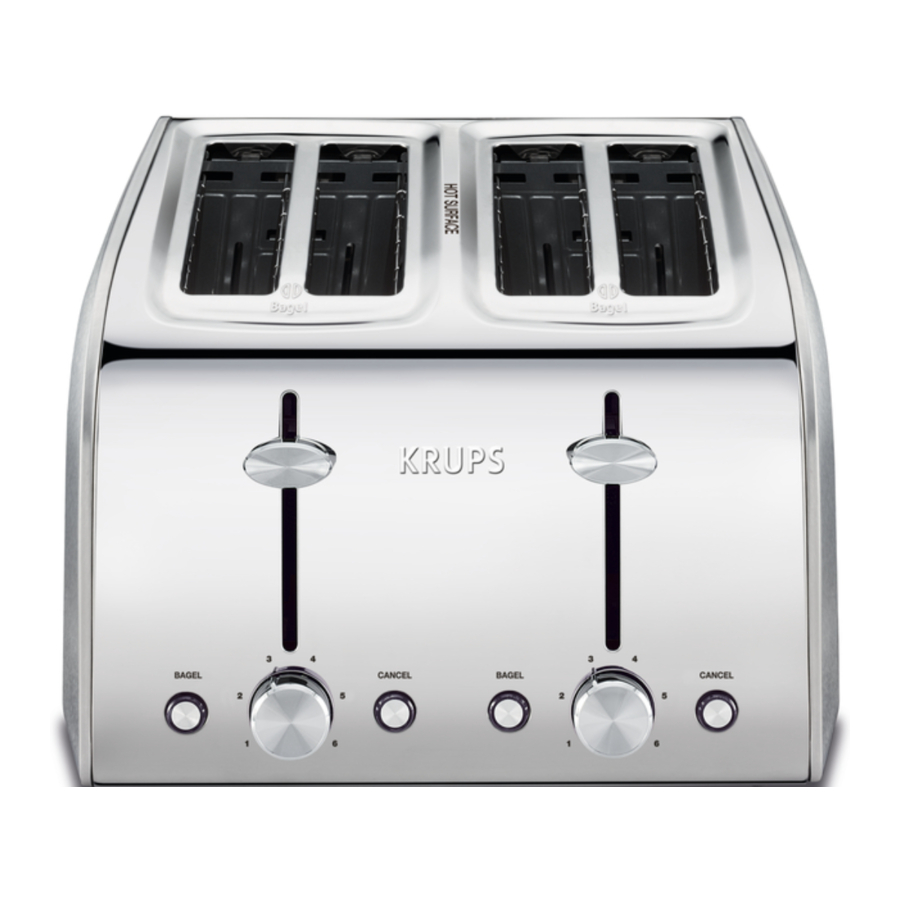
DESCRIPTION

- Crumb tray
- Toasting slots
- Toasting lever
- CANCEL button
- BAGEL button
- Browning control
- Cord storage area
BEFORE FIRST USE
- Remove any stickers and wipe the body of the toaster with a damp cloth.
- Before you use the appliance for the fi rst time, we advise you to complete a few toasting cycles without bread on the highest browning setting in a properly ventilated room.
- This burns off any dust that may have accumulated on the heating elements and prevents unpleasant smells when toasting bread.
TOASTING BREAD
- Put the appliance on a stable and fl at surface, away from curtains and other combustible materials. Plug the appliance into the wall.
- To adjust the length of the cord, wrap part of it around the brackets located on the base of the appliance (Fig. 1).
![]()

 Never let the toaster operate unattended.
- Put one or two slices (2-slice model) or one to four slices (4-slice model) of bread in the toaster (Fig. 2 or Fig. 3.).

- Select the desired browning setting (Fig. 4).
![]()
- Select a low setting (1-2) for lightly toasted bread and a higher setting (5-6) for darker toasted bread.
- 4 slice model: If you are only toasting one or two slices of bread, select the desired browning setting for the side where you put the bread. If you are toasting three or four slices of bread, select the desired browning settings for both sides of the appliance.
- Push down the toasting lever to begin the toasting process (Fig. 5).
![]()
- 4 slice model: If you are only toasting one or two slices of bread, push down the toasting lever on the side where you put the bread. If you are toasting three or four slices of bread, push down both toasting levers.
- The toasting lever only stays down when the appliance is plugged in and bread is being toasted.
- After pressing down the lever to start toasting, the cancel button will light up. (Fig. 6).
![]()
![]()
The metal parts of the toaster will become hot during toasting. Do not touch them. ![warning]() Note: You can stop the toasting process and pop up the bread at any time by pressing the CANCEL button on the toaster.
Note: You can stop the toasting process and pop up the bread at any time by pressing the CANCEL button on the toaster.- To adjust the browning setting during toasting, turn the browning control.
- When the toast is ready, it pops up and the toaster switches off.
- Remove the toasted bread. To remove smaller items, move the toasting lever upwards a little further.
- If bread gets stuck inside the toaster, remove the plug from the wall socket, let the appliance cool down completely and carefully remove the bread from the toaster.
![]()
Do not use a knife or another sharp metal tool to remove bread from the toaster and do not touch the metal internal parts as well as heating elements of the toaster.
- If bread gets stuck inside the toaster, remove the plug from the wall socket, let the appliance cool down completely and carefully remove the bread from the toaster.


BAGEL FUNCTION
The toaster has a preprogrammed BAGEL function that toasts the BAGEL on the cut sides and warms it on the outside.
- Insert the BAGEL as shown (Fig. 7 or Fig. 8.), with the cut sides facing inwards.

- Select the desired browning setting and push down on the toasting lever (see section 'Toasting bread').
- Press the BAGEL button (Fig. 9).
![]()
- The BAGEL button will light up.


CLEANING
- Unplug the appliance and let it cool down (Fig. 10).
![]()
- To remove crumbs from the appliance, gently slide the crumb tray out from the appliance and empty it (Fig. 11).
![]()
![]()
Do not hold the appliance upside down and do not shake it to remove the crumbs.- Clean the body of the appliance with a damp cloth (Fig. 12).
![]()


Never immerse the appliance in water.
Never use scouring pads, abrasive cleaning agents or aggressive liquids such as petrol or acetone to clean the appliance.
Any other servicing should be performed by an authorized service representative.
TROUBLESHOOTING
| PROBLEM SOLUTION | SOLUTION |
| The toaster does not work. | Make sure the plug is properly inserted into the wall. |
| If the toaster still does not work, take it to a service center authorized by KRUPS for examination. | |
| Bread gets stuck in the appliance. | Unplug the appliance and let it cool down. Carefully remove the bread from the toaster. Take care not to damage the heating elements when you remove the bread. Never use a metal object for this purpose. |
| The toast is too dark/too light. | Check the browning setting selected for toasting. Select a lower setting next time if your toast is too dark and a higher setting if your toast is too light. |
| The bread pops up almost immediately without having been toasted. | Make sure you push down the toasting lever all the way. If the bread still does not stay down, take the appliance to a service center authorized by KRUPS for examination. |
| Smoke comes out of the toaster. | You may have choosen a browing setting too high. Push the CANCEL button to stop the toasting process. |
| The cord is damaged. | If the cord to this appliance is damaged, it must always be replaced by a service center authorized by KRUPS. |
DISPOSING OF YOUR APPLIANCE

 Your appliance contains valuable materials which can be recovered or recycled.
 Leave it at a local civic waste collection point or at an approved service center.

Documents / ResourcesDownload manual
Here you can download full pdf version of manual, it may contain additional safety instructions, warranty information, FCC rules, etc.
Download KRUPS KH250, KH251 - Toaster 2-Slice & 4-Slice Manual
Advertisement
Thank you! Your question has been received!


Need Assistance?
Do you have a question about the KH250 that isn't answered in the manual? Leave your question here.