Advertisement
IMPORTANT SAFEGUARDS
Operation, maintenance and product installation: for your safety, please refer to the different sections of this manual or the corresponding icons.
When using electric appliances, basic safety precautions should always be followed, including the following:
- Read all instructions before using.
- Do not touch hot surfaces. Always use handles or knobs.
- To protect against electric shock, do not immerse or partially immerse cord, plugs, or appliance in water or other liquid.
- Not intended for use by children. Close supervision is necessary when any appliance is used by or near children.
- Unplug from outlet when not in use and before cleaning. Allow to cool before putting on or taking off parts, and before cleaning the appliance.
- Do not operate the appliance with a damaged cord or plug or after the appliance malfunctions, or has been damaged in any manner. Return the appliance to the nearest authorized service facility for examination, repair or adjustment.
- The use of accessory attachments not recommended by the appliance manufacturer may cause injuries.
- Do not use outdoors.
- Do not let cord hang over the edge of table or counter, or touch hot surfaces.
- Do not place on or near a hot gas or electric burner, or in a heated oven.
- Do not use appliance for other than intended use.
- Extreme caution must be used when moving an appliance containing hot oil or other hot liquids.
- Check that the electrical installation is compatible with the wattage and voltage stated on the bottom of the appliance.
![]()
To ensure continued protection against risk of electric shock, connect to properly grounded outlets only.- Always attach plug to appliance first, then plug cord into the wall outlet. To disconnect, turn any control to "off", then remove plug from wall outlet.
![]()
Do not heat or pre-heat without the 2 cooking plates on the grill.


Safety instructions
- „Never leave the appliance unattended when in use.
- „To prevent the appliance from overheating, do not place it in a corner or against a wall.
- „Never leave the appliance plugged in when not in use.
- „Do not place the hot plate under water or on a fragile surface.
- „If you have any problems, contact the authorized after-sales service center or the internet address www.krups.com.
Short Cord instructions
A short power-supply cord is provided to reduce the risk resulting from becoming entangled in or tripping over a longer cord.
Extension cords are available and may be used if care is exercised in their use.
If an extension cord is used:
- The marked electrical rating of the extension cord should be at least as great as the electrical rating of the appliance;
- If the appliance is of the grounded type, the extension cord should be a grounding-type 3-wire cord; and
- The longer cord should be arranged so that it does not drape over the countertop or table top where it can be pulled on by children or tripped over unintentionally.
THIS APPLIANCE IS INTENDED FOR HOUSEHOLD USE ONLY.
Thank you for buying this appliance. Read the instructions in this leaflet carefully and keep them within reach. Any commercial use, inappropriate use or failure to comply with the instructions, the manufacturer accepts no responsibility and the guarantee will not apply.
For your safety, this product conforms to all applicable standards and regulations (Electric Safety, Food Compliant Materials...).
Our company has an ongoing policy of research and development and may modify these products without prior notice.
- „Do not consume food that comes into contact with the parts marked with
![]() logo.
logo. - „Only use parts or accessories provided with the appliance or bought from an Approved-Service Center. Do not use them for other appliances or intention.
- „To avoid harming your product, do not use flambé recipes with it at any time.
- „This appliance is not intended to be used in the following applications, and the guarantee will not apply for:
- staff kitchen areas in shops, offices and other working environments;
- farm houses;
- by clients in hotels, motels and other residential type environments;
- bed and breakfast type environments.
- „If an accident occurs, rinse the burn immediately with cold water and call a doctor if necessary.
- „When using for the first time, wash the plate(s), pour a little cooking oil on the plate then wipe it with an absorbent kitchen towel.
- „To avoid damaging the non-stick coating of the cooking plate(s) always use plastic or wooden utensils.
- „Do not use aluminum foil or other objects between the plates and the food being cooked.
- „Do not place cooking utensils on the cooking surfaces of the appliance. „ Do not cook food in aluminium foil.
- Do not remove the drip tray while cooking. If the drip tray becomes full when cooking, let the appliance cool down before emptying.
- On first use, there may be a slight odor and a little smoke during the first few minutes. In these cases open the window and wait until there is no more smoke or odor.
Prevention of accidents at home
- This appliance is not intended for use by persons (including children) with reduced physical, sensory or mental capabilities, or lack of experience and knowledge, unless they have been given supervision or instruction concerning use of the appliance by an adult responsible for their safety. Children should be supervised to ensure that they do not play with the appliance.
- Accessible surface temperatures can be high when the appliance is operating.
- Never touch the hot surfaces of the appliance, always use the handles.
- Cooking fumes may be dangerous for animals which have a particularly sensitive respiratory system, such as birds. We advise bird owners to keep them away from the cooking area.

Environment protection first!
 The packaging of your product is made of recyclable materials. Don't throw it in your usual trash can, take it to a nearby separated waste collection center.
![]() Please take your used appliance to a recycling depot in your area. Thank you for being environmentally friendly.
Please take your used appliance to a recycling depot in your area. Thank you for being environmentally friendly.
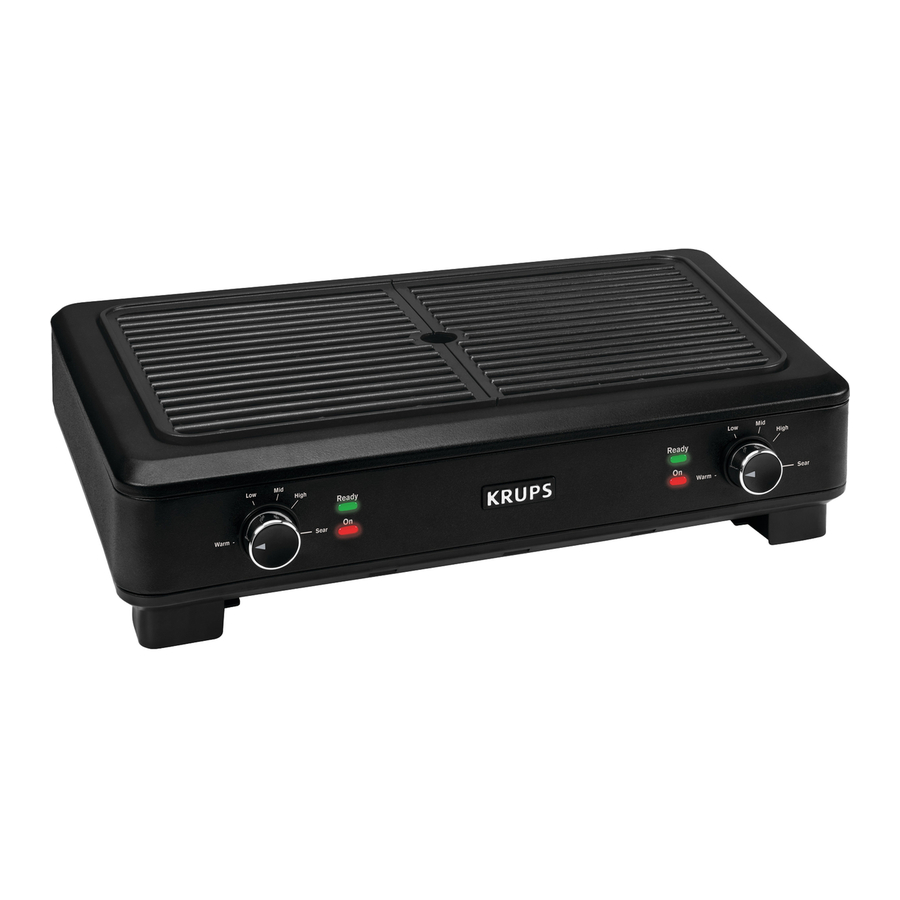
DESCRIPTION

 „
„
- Removable grill plates
- Ready LED indicator
- On LED indicator
- Thermostat control dials
- Drip tray
BEFORE USE
- Remove all packaging materials, stickers and accessories from the inside and the outside of the appliance (fig 1).
![]()
- „Before using for the first time, thoroughly clean the plates with warm water and a little dishwashing liquid, rinse and dry thoroughly (fig 2).
![]()
- „The grill is made up of two independent removable plates (a) that can be used either separately or together. When you install the plates, make sure that they are well placed. It is necessary that both plates are installed on the appliance, even if you only intend to use one (fig 3).
![]()
- „Make sure the drip tray (e) is in position (fig 4).
![]()


PREHEATING
- „Unwind the cord completely (fig 5).
![]()
- „Do not touch the metal parts of the appliance while it is preheating or being used because they are very hot.
- „Make sure the thermostat controls (d) are at the minimum position and then plug the cord into a wall outlet.
- „The ON lights (c) will turn on and remain on to indicate that the cord is plugged in (fig 6).
![]()
- „Preheat the grill(s) by adjusting the thermostat controller(s) in the desired position until the READY LED (b) indicator lights turn-on (fig 7 & 8).

Note: You can set each thermostat at different temperatures if needed depending on what you are cooking. - „You are now ready to start cooking, place your food on the cooking plates (fig 9 & 10).

- „The READY LED indicator will intermittently turn on and off while the appliance is in use to indicate that the temperature is being maintained.


Cooking tips
- „Increase or decrease the cooking temperature according to your taste and to the nature of the food being prepared (quantity, thickness, etc.)
- „Wait for the READY LED indicator to turn on: This indicates that the grill has reached the desired cooking temperature.
- „For best results and to keep the food from sticking, always make sure to cook on a clean surface.
| WARM | LOW | MEDIUM | HIGH | SEAR | |
| Temperature | 212°F/100°C | 302°F/150°C | 356°F/180°C | 392°F/200°C | 446°F/230°C |
| Food | Temperature settings | Time |
| Steak | Sear | 15-20 minutes |
| Cutlet (meat, chicken, turkey) | Sear | 12-15 minutes |
| Sausages | Sear | 10-15 minutes |
| Bacon | Sear | 4 minutes |
| Mushrooms | High | 6-8 minutes |
| Vegetables | High | 8-12 minutes |
RECIPES
Grilled Kansas City Strip Steak
with Tarragon Butter
Ingredients
For the Tarragon Butter
- „1 stick (8 tablespoons) salted butter at room „ „
- „ 1/4 cup fresh tarragon leaves, finely chopped
- Finely grated zest from 1 lemon temperature
- Fresh black pepper (to taste)
For the Steaks „
- 4 beef strip steaks
- „4 tablespoons of tarragon butter
- „Sea salt and fresh ground black pepper
For the Corn Salad with Grape Tomatoes and Basil
- „4 ears of corn, kernels removed „
- „2 tablespoons light cream (or half and half) „
- „1 pint fresh grape tomatoes, sliced in half
- Fresh basil for garnish
- Salt and pepper
Directions
For the tarragon butter:
Place the softened butter, tarragon, lemon zest and pepper in a small bowl. Thoroughly mix until it is light and fluffy.
After creaming the butter, place it on a sheet of plastic wrap and roll it up into a round cylinder, about 5 inches long. Twist ends to seal. Refrigerate until firm.
Remove from refrigerator 30 minutes prior to grilling the meat.
For the steaks:
Remove the steaks from the refrigerator about 20 minutes prior to grilling. Pat the steaks dry with a paper towel. Season both sides of the steak with the sea salt and pepper.
Turn the grill to HIGH and wait until the preheating phase is complete, the READY LED will turn on. Place the steaks on the cooking plates.
Cook for 3-4 minutes, depending on the thickness of the steaks and the temperature of the grill. About halfway through cooking the first side, rotate the steaks 45 to 60 degrees to give them the classic crosshatched grill marks.
Use a pair of tongs to flip the steaks, and cook them for another 3-4 minutes. You can test for doneness by pressing the center of the steaks with your thumb. For medium rare, the steak should spring back without feeling overly firm.
Remove the steaks from the grill, cover them with foil and let them rest, in a warm place, for five minutes. Top each steak with one tablespoon of tarragon butter.
For the salad:
Place the corn kernels in a microwave safe dish. Add the cream, cover with plastic wrap and microwave on high for 2 minutes. Remove the plastic wrap, add the grape tomatoes and season to taste with salt and pepper. Garnish with fresh sliced basil leaves.
Serve with the grilled strip steaks.
This simple and delicious steak reaches another level of flavor when topped with a round of tarragon flavored butter.
Grilled Hamburgers |
with Portobello Mushrooms and Swiss Cheese
Ingredients
For the Hamburgers
- 13/4 lb. ground Angus beef
- 3/4 cup finely chopped Portobello mushrooms
- 3/4 cup Swiss cheese, grated
- 4 hamburger buns or rolls of your choice
- 2 tablespoons melted butter
- Sea salt and fresh ground pepper
To Serve
Choose any of the suggested toppings below, or any toppings of your choice:
- „Boston lettuce
- „Red or yellow tomato, sliced
- „Red or white onion, sliced
- „Mayonnaise or condiment of your choice
Directions
Place the ground beef, the chopped mushrooms and the grated cheese in a bowl and use your hands to thoroughly combine, then divide the meat preparation into 4 equal portions. Shape each portion into a thick patty and season with sea salt and pepper. Burgers may be prepared ahead, covered with plastic wrap and refrigerated.
When ready to cook, turn the grill to HIGH until the preheating phase is complete, it will be indicated by the READY LED turning on.
Place the burgers on the cooking plate and let it cook for about 3 minutes on each side for medium rare plus.
While the burgers are grilling, brush the rolls with the melted butter and set aside to toast on the grill after the burgers have finished cooking.
When the burgers are cooked, transfer the burgers to a plate to rest for 1 minute while the buns are toasting.
Serve the grilled burgers with the toppings and condiments of your choice.
Portobello mushrooms and Swiss cheese are often thought of as 'toppings' for a grilled burger. Instead, we combine the mushrooms and cheese within the ground beef prior to grilling, and the result is a delicious, moist burger. Every bite delivers a balanced flavor of the beef, mushroom and Swiss.
Grilled Asparagus
with Fresh Mozzarella
Ingredients
- „1 pound asparagus, tough ends trimmed (choose stalks of even thickness for even grilling)
- „ 1/2 pound fresh mozzarella, cut into thin slices
- „ 2 tablespoons olive oil (plus more for garnish)
- „ 1/4 teaspoon garlic salt
- „Fresh ground black pepper
- „Fresh chives, chopped for garnish
Directions
Drizzle the asparagus with the olive oil and toss to evenly coat. Season with the garlic salt and toss again to evenly distribute.
Turn the grill to sear and start the preheating process. When your grill is ready for cooking, the READY LED will turn on. You can now add the asparagus to the grill.
Cook the asparagus for 3 to 5 minutes or until tender with nicely browned grilled marks. Remove from the grill and place 4-6 grilled spears on individual serving plates.
Serve with a slice or two of fresh mozzarella on top of the asparagus. Season with fresh black pepper and garnish with the fresh chives.
Perfectly grilled asparagus topped with fresh mozzarella cheese easily turns into a beautiful luncheon dish, an accompaniment to an entrée, or simply served with grilled fresh bread as a delicious Sunday dinner.
Grilled Romaine Hearts
with Blue Cheese Dressing and Bacon
Ingredients
For the Salad
- „2 hearts of romaine lettuce, bases trimmed and „halved lengthwise
- „2 tablespoons extra-virgin olive oil
- Sea salt and fresh ground black pepper
- „4 slices Applewood smoked bacon
For the Dressing
- „1/2 cup mayonnaise „
- „1/4 cup sour cream „
- „2 tablespoons half & half „
(can substitute whole milk) „ - 1/2 teaspoon salt
- 1 tablespoon red wine vinegar
- 3 oz. blue cheese, crumbled
- Fresh black pepper to taste
Directions
For the dressing:
In a small bowl, whisk together the mayonnaise, sour cream, half & half, salt and red wine vinegar. Add the blue cheese and thoroughly combine. Season with black pepper. Refrigerate until ready to use.
For the salad:
Start by cooking the smoked bacon. Turn the Grill to Sear and wait until the READY LED turns on; the preheating phase is complete. Place the slices of bacon on the cooking plates and let sit for 1-2 minutes on each side. We recommend cooking the bacon to WELL DONE.
When the bacon has reached your desired cooking level, transfer to a plate.
Let the grill cool down for a few minutes, then quickly wipe down its plates to remove the bacon grease.
Turn the grill on again to SEAR. While the grill is preheating, baste the inside of the romaine hearts with 2 tablespoons olive oil and season with salt and pepper. When the desired temperature is reached, the READY LED will turn on. You can now add the romaine to the grill with the cut side down and lower the lid.
Cook for 3 to 5 minutes, or until the outer leaves are charred and the romaine is warm and tender.
To serve, place a romaine half, cut side up, on each plate. Top with 2 tablespoons of the blue cheese dressing or more if you like, and garnish with the precooked crumbled bacon.
CLEANING AND MAINTENANCE
When you are finished cooking
- „Put the thermostat control(s) (d) in the minimum position (fig 11).
![]()
- „Unplug the cord from the wall outlet and let the appliance cool down completely before handling (fig 12-13).
![]()
![]()
- „The plates can be washed in warm soapy water or in the dishwasher. Never use an abrasive cleanser or harsh pad on the non-stick coating (fig 14-15).

- „To clean the inner reflector (housing), remove the cooking plates and lift the appliance to access it from underneath (fig 16).
![]()
- „Do not immerse the body of the grill in water or any other liquid (fig 17).
![]()


TROUBLESHOOTING
| Problems | Possible solutions |
| No indicator light on. | Check the connection to the wall socket. If the problem persists try connecting the unit to a different outlet. |
| The ready indicator light is off. | The ready indicator light switches on when the appliance reaches the selected temperature, this can take 6 to 10 minutes. Check that there are no obstructions when you close the unit. |
| Your food is not cooked properly. | Ensure that the ready indicator light is on when you add food. Put the thermostat control on the maximum position (sear), if this is not already the case. |
| Your KRUPS Smoke-less grill is producing more smoke than usual. | The amount of smoke depends on the fattiness or oil content of the ingredients you are cooking. To prevent excessive smoke during cooking, you can:
|
Tips
Especially for meat: The cooking results may vary depending on origin, cut and quality of the food being cooked, the programs have been set and tested for high quality food. Similarly, the thickness of the meat has to be taken into account during cooking; food that is thicker than 1.5 inches cannot be prepared on this product.
Does your appliance still not work? Please contact an authorized service center (see the list in the service booklet).

Documents / Resources
References
Download manual
Here you can download full pdf version of manual, it may contain additional safety instructions, warranty information, FCC rules, etc.
Download KRUPS PG760851 - Smokeless Indoor Electric Grill Manual
Advertisement
Thank you! Your question has been received!


Need Assistance?
Do you have a question about the PG760851 that isn't answered in the manual? Leave your question here.