Table of Contents
Advertisement
Available languages
Available languages
Quick Links
Operator's Manual
3000 PSI MAX
2.7 GPM MAX
PRESSURE WASHER
Model No. 580.752271
PRESSURE WASHER
CUSTOMER HELPLINE
1-800-222-3136
HOURS: Mon. - Fri. 8 a.m. to 5 p.m. (CT)
WARNING
Before using this product, read this
manual and follow all Safety Rules
and Operating Instructions.
This pressure washer is rated in accordance to the Pressure Washer Manufacturers Association
(PWMA) standard PW101 (Testing and Rating Performance of Pressure Washers).
Esta limpiadora a presión está clasificada conforme a la norma PW101 (comprobación y clasificación de rendimiento de limpiadoras
a presión) de la Asociación de fabricantes de bombas a presión (Pressure Washer Manufacturers Association, PWMA).
Sears, Roebuck and Co., Hoffman Estates, IL 60179 U.S.A.
Visit our Craftsman website: www.craftsman.com
Part No. 208818GS Draft A (03/04/2009)
ADVERTENCIA
Antes de utilizar el producto, lea este
manual y siga todas las Reglas de
Seguridad e Instrucciones de Uso.
• Safety
• Assembly
• Operation
• Maintenance
• Parts
• Español, p. 36
Advertisement
Chapters
Table of Contents

Related Manuals for Craftsman 580.752271


Summary of Contents for Craftsman 580.752271
- Page 1 Esta limpiadora a presión está clasificada conforme a la norma PW101 (comprobación y clasificación de rendimiento de limpiadoras a presión) de la Asociación de fabricantes de bombas a presión (Pressure Washer Manufacturers Association, PWMA). Sears, Roebuck and Co., Hoffman Estates, IL 60179 U.S.A. Visit our Craftsman website: www.craftsman.com Part No. 208818GS Draft A (03/04/2009)
-
Page 2: Table Of Contents
CRAFTSMAN FULL WARRANTY If this Craftsman product fails due to a defect in material or workmanship within two years from the date of purchase, return it to any Sears store, Sears Parts & Repair Service Center, or other Craftsman outlet in the United States for free repair (or replacement if repair proves impossible). -
Page 3: Safety Rules
SAFETY RULES Read this manual carefully and become familiar WARNING The engine exhaust from this product with your pressure washer. Know its applications, contains chemicals known to the State of California to its limitations, and any hazards involved. cause cancer, birth defects, or other reproductive harm. Important Safety Information WARNING This product contains lead and lead Safety Symbols and Meanings... - Page 4 WARNING Starter cord kickback (rapid retraction) can WARNING Fuel and its vapors are extremely result in bodily injury. Kickback will pull hand and flammable and explosive. arm toward engine faster than you can let go. Fire or explosion can cause severe burns Broken bones, fractures, bruises, or sprains or death.
- Page 5 WARNING Use of pressure washer can create WARNING Risk of eye injury. puddles and slippery surfaces. Spray can splash back or propel objects. Kickback from spray gun can cause you to fall. • Always wear indirect vented (chemical splash) safety goggles •...
-
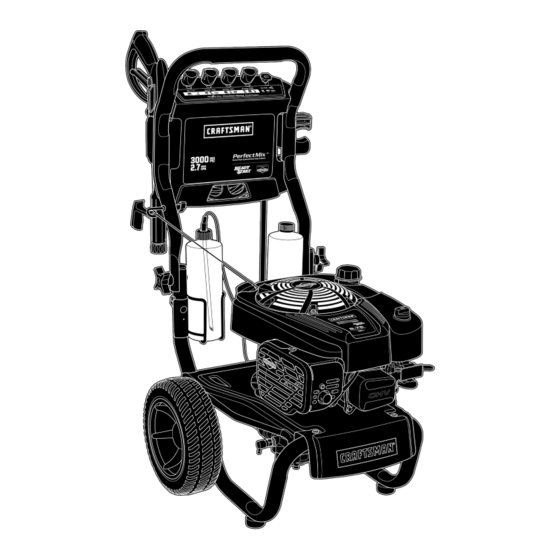
Page 6: Features And Controls
FEATURES AND CONTROLS KNOW YOUR PRESSURE WASHER Read the Operator’s Manual and safety rules before operating your pressure washer. Compare the illustrations with your pressure washer to familiarize yourself with the locations of various controls and adjustments. Save this manual for future reference. A - Spray Gun —... -
Page 7: Assembly
6. If any parts are missing or damaged, call the pressure washer helpline at 1-800-222-3136. ASSEMBLING PRESSURE WASHER Your Craftsman pressure washer will need assembly before operation: 4. Insert multi–colored PrecisionSpray™ nozzles and other Fill out and send in registration card. - Page 8 Attach rope guide (A) through handle with plastic knob Standard Siphon Tube (B). Tighten by hand. Route engine recoil rope through Clear tube with filter: guide. When using the clear siphon tube, dilute 1 part PerfectMix™ Extreme Concentrate to 16 parts water (4 oz of concentrate makes 1/2 gallon of mix.) Attach Project Pro®...
- Page 9 Add Fuel CAUTION! Alcohol-blended fuels (called gasohol, ethanol or methanol) can attract moisture, which leads to separation and Fuel must meet these requirements: formation of acids during storage. Acidic gas can damage the fuel system of an engine while in storage. •...
- Page 10 Connect Hose and Water Supply to Pump Run water through garden hose for 30 seconds to flush it of debris. Turn off water. IMPORTANT: DO NOT siphon standing water for the water NOTICE DO NOT run the pump without the water supply supply.
-
Page 11: Operation
OPERATION HOW TO USE YOUR PRESSURE WASHER To Start Your Pressure Washer To start your engine-powered pressure washer for the first If you have any problems operating your pressure washer, time, follow these instructions step-by-step. This information please call the pressure washer helpline at 1-800-222-3136. also applies whenever you start the engine after you have let Pressure Washer Location the pressure washer sit idle for at least a day. - Page 12 IMPORTANT: Before starting the pressure washer, be sure WARNING The high pressure stream of water that you are wearing safety goggles as described below. this equipment produces can cut through skin and its underlying tissues, leading to serious WARNING Risk of eye injury. injury and possible amputation.
- Page 13 IMPORTANT: Spray gun traps high water pressure, even Select desired PrecisionSpray™ nozzle: when engine is stopped and water is disconnected. • Select orange general PrecisionSpray™ nozzle for all purpose cleaning. Cleans vinyl siding, brick patios, How to Use Accessory Tray concrete driveways and other surfaces.
- Page 14 NOTICE You must attach all hoses before you start the • Select black fan soap PrecisionSpray™ nozzle for engine. general cleaning. Great for applying soap to • Starting the engine without all the hoses connected and without vehicles, boats, driveways, decks, and patios. the water turned ON will damage the pump.
- Page 15 Start engine following instructions How to Start Your Cleaning Detergent Siphoning Tube Pressure Washer. If you used the clear detergent siphoning tube, you must Apply detergent to a dry surface, starting at lower flush it with clean water before stopping the engine. portion of area to be washed and work upward, using Place detergent siphoning tube/filter in a bucket full of long, even, overlapping strokes.
-
Page 16: Specifications
SPECIFICATIONS ENGINE TECHNICAL INFORMATION PRODUCT SPECIFICATIONS This is a single cylinder, overhead valve (OHV), air cooled Pressure Washer Specifications engine. It is a low emissions engine. Max Outlet Pressure ..... . . 3,000 PSI In the State of California, Model 120000 engines are certified Max Flow Rate . -
Page 17: Maintenance
MAINTENANCE OWNER’S RESPONSIBILITIES Emissions Control Maintenance, replacement, or repair of the emissions Follow the hourly or calendar intervals, whichever occurs control devices and systems may be performed by any non- first. More frequent service is required when operating in road engine repair establishment or individual. However, adverse conditions noted below. - Page 18 Check Gun and Nozzle Extension O–Ring Maintenance Examine hose connection to spray gun and make sure it is Purchase an O–Ring Repair Kit at your local Sears or by calling secure. Test trigger by pressing it and making sure it springs 1-800-4-MY-HOME (469-4663) or online at www.sears.com.
- Page 19 Checking Oil Level Tip your pressure washer to drain oil from oil fill into a suitable container making sure you tip your unit away Make sure pressure washer is on a level surface. from spark plug. When crankcase is empty, return Remove oil dipstick and wipe dipstick with clean cloth.
- Page 20 4. Check electrode gap with wire feeler gauge and reset AFTER EACH USE spark plug gap to recommended gap if necessary (see Water should not remain in the unit for long periods of time. Specifications). Sediments or minerals can deposit on pump parts and “freeze”...
-
Page 21: Storage
STORAGE WINTER STORAGE Change Oil While engine is still warm, drain oil from crankcase. Refill with recommended grade. See Changing Engine Oil. NOTICE You must protect your unit from freezing temperatures. Protect Pump • Failure to do so will permanently damage your pump and render To protect the pump from damage caused by mineral your unit inoperable. -
Page 22: Troubleshooting
TROUBLESHOOTING Problem Cause Correction 1. Low pressure nozzle installed. 1. Replace with high pressure nozzle. 2. Water inlet is blocked. 2. Clear inlet. 3. Inadequate water supply. 3. Provide adequate water flow. 4. Inlet hose is kinked or leaking. 4. Straighten inlet hose, patch leak. Pump has following problems: 5. -
Page 23: Replacement Parts
PARTS CRAFTSMAN 3000 PSI Pressure Washer 580.752271 Main Unit — Exploded View and Parts List Item Part # Description Item Part # Description 205961GS BASE, w/Vib Mounts 23 192310GS KIT, Vibration Mount B204257GS HANDLE 24 75246GS HHS, Trilobular, 3/8 - 16 x 1-1/4 209267GS KIT, Billboard w/Clips &... - Page 24 ENGINE, Briggs & Stratton, 121S12 – Exploded View...
- Page 25 ENGINE, Briggs & Stratton, 121S12 – Exploded View...
- Page 26 ENGINE, Briggs & Stratton, 121S12 – Exploded View...
- Page 27 ENGINE, Briggs & Stratton, 121S12 – Exploded View...
- Page 28 ENGINE, Briggs & Stratton, 121S12 – Exploded View...
- Page 29 ENGINE, Briggs & Stratton, 121S12 – Exploded View...
- Page 30 ENGINE, Briggs & Stratton, 121S12 – Exploded View...
- Page 31 ENGINE, Briggs & Stratton, 121S12 – Exploded View...
- Page 32 ENGINE, Briggs & Stratton, 121S12 – Exploded View...
- Page 33 ENGINE, Briggs & Stratton, 121S12 – Parts List Item Part # Description Item Part # Description 796509 Cylinder Assembly 333 796500 Armature-Magneto 299819S Seal-Oil 334 793454 Screw 498983 Sump-Engine 337 692051 Plug-Spark 796471 Head-Cylinder 347 698338 Switch-Rocker 796475 Gasket-Cylinder Head 356 692602 Wire-Stop 796478...
-
Page 34: Emission Control Warranty
EMISSION CONTROL SYSTEM WARRANTY California, U.S. EPA, and Sears Emissions Sears Emissions Control Warranty Provisions Control Warranty Statement The following are specific provisions relative to your Emissions Control Warranty Coverage. It is in addition to the Your Warranty Rights And Obligations Sears engine warranty for non-regulated engines found in the Operator’s Manual. - Page 35 The warranty on emissions-related parts is as follows: Look For Relevant Emissions Durability Period and Air Index Information On Your Engine Emissions Label • Any warranted part that is not scheduled for replacement as required maintenance in the owner’s Engines that are certified to meet the California Air Resources manual supplied, is warranted for the warranty period Board (CARB) Emissions Standard must display information stated above.
-
Page 36: Español
GARANTÍA COMPLETA DE CRAFTSMAN Si este producto de Craftsman falla debido a defectos de materiales o mano de obra en el plazo de dos años a partir de la fecha de compra, devuélvalo a cualquier almacén Sears, centro de reparación y repuestos Sears, u otro punto de venta de Craftsman de los Estados Unidos para su reparación gratuita o, en caso de que ésta no sea posible, para su sustitución. -
Page 37: Reglas De Seguridad
REGLAS DE SEGURIDAD Lea este manual minuciosamente y conozca a fondo las ADVERTENCIA El escape del motor de este producto partes y el funcionamiento de su máquina limpiadora a contiene elementos químicos reconocidos en el Estado de presión. Conozca sus aplicaciones, sus limitaciones y los California por producir cáncer, defectos de nacimiento u peligros involucrados. - Page 38 ADVERTENCIA El retroceso (repliegue rápido) del ADVERTENCIA La gasolina y sus vapores son cable del arrancador puede producir lesiones. El extremadamente inflamables y retroceso impedirá que el usuario suelte el cable a explosivos. tiempo y tirará de su mano y brazo hacia el motor. El fuego o una explosión pueden causar Como resultado, podrían producirse fracturas, quemaduras severas e inclusive la muerte.
- Page 39 AVISO El rociado de alta presión puede dañar elementos ADVERTENCIA El chorro de agua a alta presión que frágiles, incluyendo el vidrio. este equipo produce, puede atravesar la piel y • NO dirija la pistola rociadora hacia un cristal cuando utilice la los tejidos subcutáneos, provocando lesiones de boquilla MAX (punta de alfiler).
-
Page 40: Características Y Controles
CARACTERÍSTICAS Y CONTROLES CONOZCA SU MAQUINA SISTEMA DE LIMPIEZA Lea el Manual del Operario y las reglas de seguridad antes de poner en marcha su sistema de limpieza. Compare las ilustraciones con su sistema de limpieza para familiarizarse con las ubicaciones de los diferentes controles y ajustes. Guarde este manual para referencias futuras. -
Page 41: Montaje
MONTAJE Su sistema de limpieza requiere de cierto ensamble y estará lista Conecte manguera a alta presión a pistola rociadora y a bomba. para ser usado únicamente después de haber depositado el Conecte el suministro de agua a bomba. combustible y el aceite recomendado. Conecte boquilla la extensión al pistola rociadora. - Page 42 Fije la guía de la cuerda (A) al asa con el pomo de plástico Tubo de inyección estándar transparente negro (B). Apriete a mano. Pase la cuerda del arrancador por el Tubo transparente con filtro: fijador. Cuando utilice el tubo de inyección transparente, diluya 1 parte de concentrado por 16 partes de agua.
- Page 43 Agregue Gasolina ¡PRECAUCIÓN! Los combustibles con mezcla de alcohol (gasohol, etanol o metanol) pueden atraer la humedad y provocar la El combustible debe reunir los siguientes requisitos: separación y formación de ácidos durante el almacenamiento. Los gases ácidos pueden dañar el circuito de combustible y el motor •...
- Page 44 Conecte la Manguera y el Suministro de Agua a Haga correr el agua a través de la manguera de su jardín por la Bomba 30 segundos para limpiar cualquier escombro que se encuentre en ella. Desconecte el agua. AVISO NO haga funcionar la bomba si no tiene el IMPORTANTE: Hace NO agua de parar de siphon para el abastecimiento de agua.
-
Page 45: Operacion
OPERACION COMO USAR SU SISTEMA DE LIMPIEZA Para Poner en Marcha el Sistema de Limpieza Para darle arranque a su sistema de limpieza movido a motor por Si tiene problemas con el funcionamiento de su máquina limpiadora primera vez, siga estas instrucciones paso a paso. Esta información a presión, por favor llame a la línea de ayuda de la máquina acerca de la puesta en marcha inicial también es válida para cuando limpiadora a presión al 1-800-222-3136. - Page 46 IMPORTANTE: Antes de arrancar la limpiadora a presión, asegúrese ADVERTENCIA El chorro de agua a alta presión que de ponerse gafas de seguridad como se describe a continuación. este equipo produce, puede atravesar la piel y ADVERTENCIA Riesgo de lesiones oculares. los tejidos subcutáneos, provocando lesiones de El agua rociada puede salpicar o propulsar gravedad que podrían dar lugar a la amputación...
- Page 47 ADVERTENCIA El chorro de agua a alta presión que ADVERTENCIA El chorro de agua a alta presión que este equipo produce, puede atravesar la piel y este equipo produce, puede atravesar la piel y los tejidos subcutáneos, provocando lesiones de los tejidos subcutáneos, provocando lesiones de gravedad que podrían dar lugar a la amputación gravedad que podrían dar lugar a la amputación...
- Page 48 • Seleccione la boquilla negra PrecisionSpray™ de jabón en Asegúrese de que la manguera del jardín está conectada a la abanico para limpieza general. Es idónea para aplicar entrada de agua. Compruebe que la manguera de alta presión jabón a vehículos, barcos, caminos, cubiertas y patios. está...
- Page 49 Arranque el motor conforme a las instrucciones de Puesta en Limpieza del tubo de inyección de detergente funcionamiento de la limpiadora a presión. Si usó el tubo, debe lavarlo con agua limpia antes de parar el motor. Aplique el detergente sobre la superficie seca, comenzando en Coloque el filtro y la inyección de detergente en un balde lleno la parte inferior del área y dirigiéndose hacia arriba, utilizando de agua limpia.
-
Page 50: Especificaciones
ESPECIFICACIONES INFORMACIÓN TÉCNICA SOBRE EL MOTOR ESPECIFICACIONES DEL PRODUCTO El motor es de uno cilindros, de válvulas en cabeza (OHV), Especificaciones de la Máquina Limpiadora a refrigerado por aire y de baja emisión. Presión En el Estado de California, los motores de la serie 120000 han Presión de salida máxima . -
Page 51: Mantenimiento
MANTENIMIENTO RECOMENDACIONES GENERALES Recomendaciones generales El mantenimiento periódico mejorará el rendimiento y prolongará la Plan de mantenimiento vida útil del limpiadora a presión. Si necesita asistencia, consulte Siga los intervalos de horas o de calendario, los que sucedan antes. con un distribuidor de Sears o con otro distribuidor cualificado. Si opera en condiciones adversas (señaladas más abajo) es La garantía de la máquina limpiadora a presión NO cubre los necesario un mantenimiento más frecuente. - Page 52 MANTENIMIENTO DE LA MAQUINA ADVERTENCIA El chorro de agua a alta presión que este equipo produce, puede atravesar la piel y LIMPIADORA A PRESIÓN los tejidos subcutáneos, provocando lesiones de Limpie los Residuos gravedad que podrían dar lugar a la amputación de un miembro.
- Page 53 MANTENIMIENTO DEL MOTOR Comprobación del nivel de aceite Compruebe el nivel de aceite antes de cada uso o cada 8 horas de ADVERTENCIA Chispear involuntario puede tener funcionamiento, como mínimo. Rellene si es necesario. como resultado el fuego o el golpe Coloque el limpiadora a presión sobre una superficie nivelada.
- Page 54 Cambie el aceite cuando el motor siga estando caliente después Remplace la Bujía de haber funcionado: Cambie la bujía ayudará a su motor a arrancar más fácilmente y Drene el tanque del combustible haciendo funcionar la funcionar mejor. máquina limpiadora a presión hasta que el tanque esté vacío. Limpie el área alrededor de la bujía y retírela.
- Page 55 Sistema de Refrigeración de Aire DESPUES DE CADA USO Con el tiempo, se pueden acumular residuos en las aletas de No deberá haber agua en la unidad por largos períodos de tiempo. refrigeración del cilindro y pasar inadvertidos mientras no se Los sedimentos de minerales se pueden depositar en partes de la desmonte parcialmente el motor.
-
Page 56: Almacenamiento
ALMACENAMIENTO ALMACENAMIENTO PARA INVIERNO Cambio de aceite Con el motor todavía caliente, drene el aceite de la caja del cigüeñal. AVISO Usted deberá proteger su unidad de las Vuelva a llenarlo con el grado de aceite recomendado. Vea Cambio de Aceite del Motor en la sección Mantenimiento del Motor. temperaturas de congelamiento. -
Page 57: Reparacion De Daños Repuestos
REPARACION DE DAÑOS Problema Causa Solución Está usando la boquilla de baja presión Cambie la boquilla a una de la boquilla de alta (negra). presión. La entrada de agua está bloqueada. Limpie la entrada. Suministro de agua inadecuado. Proporcione flujo de agua adecuado. La manguera de entrada está... -
Page 58: Garantia Del Control De Emisiones
GARANTIA DEL SISTEMA DE CONTROL DE EMISIONES Garantía de control de emisiones de California, Disposiciones de la garantía contra defectos del sistema de control de emisiones de Sears U.S. EPA y Sears A continuación se detallan las disposiciones concretas Derechos y obligaciones de la garantía relativas a la Cobertura de la garantía contra defectos del sistema de control de emisiones. - Page 59 La garantía de los componentes relacionados con las Sears. Sears no será responsable de la cobertura de la emisiones es la siguiente: garantía de fallos de componentes relacionados con el sistema de emisiones cubiertos por la garantía • Los fallos de todo componente cubierto por la garantía provocados por el uso de componentes que no se deba sustituir como parte del plan de complementarios o modificados.