Advertisement
Quick Links
FM1D20/50 Series 24-Hour/7-Day Time Switch Operation and User Instructions
WARNING
Risk of Fire or Electric Shock
• Disconnect power prior to installation.
• Connect FM1D20/50 wiring in accordance with all applicable national and local
electrical code requirements.
Specifications
Input
12 VCD-24 VAC and VDC, 50/60 Hz (FM1D20-LV, FM1D50-LV)
120-277 VAC, 50/60 Hz (FM1D20-AV, FM1D50-AV)
Output
NO Contact
General Purpose: 15 A, 277 VAC
Tungsten: 1000 W, 120 VAC
Ballast : 8 A, 277 VAC
Pilot Duty: B300
Electronic Ballast: 4.9 A, 120 VAC
Motor: 10 FLA, 60 LRA @ 250 VAC; ½ HP,
120 VAC; 1 HP, 250 VAC
Operating Temperature: 5˚ F to 135˚ F (-15˚ C to 55˚ C)
Carry-over: 2500 hours fully charged
Description
This manual provides installation and
programming instructions for the
FM1D20/50 series timer.
Mounting the FM1D20/50 Series Timer
The standard FM1D20/50 timer can be surface mounted inside a panel or
flush mounted. Mount the timer as required. Refer to the dimension drawing
in Figure 2.
2.36 in.
[60 mm]
2.13 in.
[54 mm]
2.36 in.
[60 mm]
.14 in
[3.56 mm]
Connecting the FM1D20/50 Series Timer Wiring
Follow this procedure to connect the FM1D20/50 timer wiring.
1. Make sure supply power is disconnected.
2. Check input and output ratings marked on timer to verify the product is
suitable for your supply voltage, load, and application.
3. Connect the FM1D20/50 wiring. See Figure 3 for reference.
NC Contact
General Purpose: 15 A, 277 VAC
Resistive: 12 A, 24 VDC
Ballast : 8 A, 120 VAC
Motor: 10 FLA, 60 LRA @ 250 VAC; ½ HP,
120/240 VAC
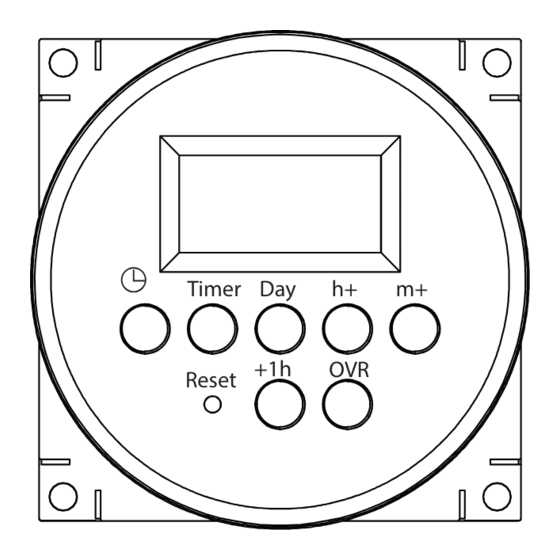
Timer Day
h+
+1h
OVR
Reset
Figure 1. FM1D20/50 Timer
1.26 in.
1
2
3
4
5
[32 mm]
.14 in
[3.56 mm]
Figure 2. FM1D20/50 Timer Dimensions
M
1
L1
L2/N
Typical Wiring (12 VDC Application)
+
M
1
12 VDC
(+)
Figure 3. Connect FM1D20/50 Wiring (Front View Shown).
Setting the Time of Day
Follow this procedure to set the time of day and day of the week.
1. Press and release the Reset button with a blunt object to reset the unit.
The timer screen flashes.
2. Press and hold
screen.
3. Take one of these actions.
If...
m+
Your time zone currently is in
Daylight Saving Time,
Your time zone is not in
Daylight Saving Time,
4. Press and hold
current hour.
5. Press and hold
current minute.
6. Press and hold
current day.
Programming Events
To set ON/OFF event pair, set ON event and
then repeat procedure to set OFF event.
The timer enables up to 10 ON/OFF event
pairs for the FM1D20 and 25 ON/OFF pairs
for the FM1D50.
1. Press the Timer button. PROG appears
in the display. Pressing Timer again and
dashed lines appear to indicate no event
is set for event 1.
2. Press Day to select the days of the
week for the ON event.
NOTE: To set the ON event:
ON a Specific Day
Every Day of Week
Every Weekday:
Every Weekend:
Monday through Saturday
Monday, Wednesday, Friday Select: MO, WE, FR
M
COM
NO
NC
2
3
4
5
1
NO
(Dry Contact)
24-277
VAC
NC
L1
L2/N
(Dry Contact)
Typical Wiring (24 VDC Application)
-
+
M
COM
NO
NC
2
3
4
5
1
LOAD
24 VDC
(-)
(+)
and h+ simultaneously to access the 12:00 AM
Then...
Press the +1h button.
Go to step 4.
Go to step 4 to set the
current time.
and press h+ repeatedly until you advance to the
and press m+ repeatedly until you advance to the
and press Day repeatedly until you advance to the
Select: The desired day
Select: MO, TU, WE, TH, FR,
SA, SU
Select: MO, TU, WE, TH, FR
Select: SA, SU
Select: MO through SAT
Typical Wiring (24-277 VAC Application)
COM
NO
NC
2
3
4
5
LOAD
-
COM
NO
NC
2
3
4
5
LOAD
(-)
MO TU WE TH FR SA SU
ON
158--02541
Advertisement

Related Manuals for Intermatic FM1D20/50 Series


Summary of Contents for Intermatic FM1D20/50 Series
- Page 1 FM1D20/50 Series 24-Hour/7-Day Time Switch Operation and User Instructions Typical Wiring (24-277 VAC Application) WARNING Risk of Fire or Electric Shock • Disconnect power prior to installation. • Connect FM1D20/50 wiring in accordance with all applicable national and local electrical code requirements.
- Page 2 LIMITED WARRANTY Warranty service is available by either (a) returning the product to the dealer from whom the unit was purchased or (b) completing a warranty claim online at www.intermatic.com. This warranty is made by: Intermatic Incorporated, 1950 Innovation Way, Suite 300, Libertyville, IL 60048. For additional product or warranty information go to: http://www.Intermatic.com or call 815-675-7000..