Oregon Scientific RTGR328N - Wireless Outdoor Sensor Manual
- User manual (2 pages)
Advertisement
ABOUT THIS GUIDE
Congratulations on your selection of the RTGR328N, Oregon ScientificTM Wireless Outdoor Temperature, Humidity, and RF clock sensor. This can be used with new Oregon Scientific receiver units, for example:
- BAR998HG
- BAR321HG
- AWS888
 NOTE The RTGR328N works as an RF clock receiver for the models listed above or newer, but it does not work for previous models.
If you want to purchase additional remote sensors, select a model that does not include the RF clock sensor:
- THGR228N / THGR238N (3-channel sensor)
- THGR328N (5-channel sensor)
Keep this manual handy as you use your new product. It contains practical step-by-step instructions, as well as technical specifications and warnings you should know.
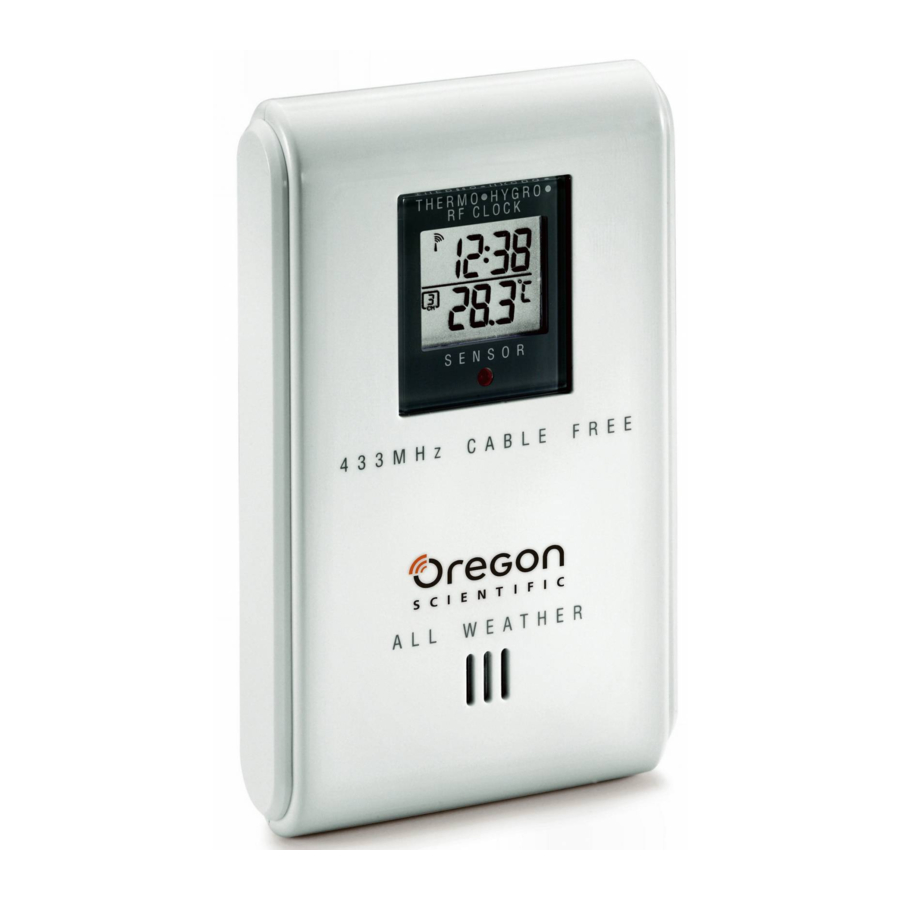
PRODUCT OVERVIEW
FRONT VIEW

- LCD display
- LED status indicator
- Ventilation duct
LCD

- Reception
- Channel no.
- Low battery indicator
- Time
- Temperature (°C or °F)
- Relative humidity
- Temperature / Humidity reading
BACK VIEW

- Wall mount (recess hole)
- Channel switch
- Reset
- °C/°F switch
- Search button
- EU / UK radio signal format switch
- Battery compartment
- Fold-out stand
FOLD-OUT STAND

- Fold-out the stand
- Lock it into place
GETTING STARTED
This product can receive and transmit radio-controlled clock signals, outdoor temperature and humidity then relay it back to the main (indoor) unit.
It can be used with up to 4 other remote thermo-hygro units to transmit data to the main unit. The measurement unit (°C or °F) and channel number (1,2,3,4 or 5) switches are located in the battery compartment, and should be set prior to installation.
NOTE: Additional remote units that measure temperature and humidity are sold separately. If you are using more than one remote unit, be sure to select a different channel number for each unit.
SET UP
- Place remote unit as close as possible to the main unit.
- Remove the battery compartment lid by using a Philips screwdriver to loosen the screws.
- Assign a channel number. If you are using more than one remote unit, select a different channel number for each unit.
- Set the radio signal format for the automatic clock set feature.
- Insert the batteries. Match the polarity, as shown in the battery compartment.
- Press RESET with the point of a blunt object (such as a ball point pen).
- Set the measurement unit.
- Replace the battery compartment lid. Secure.
- Position the remote unit using either the recess hole on the back of the unit or the included stand. For best results:
- Place the unit away from electrical or mechanical objects.
- Place the unit out of direct sunlight and moisture.
- Do not place the remote unit more than 100 metres (328 feet) from themain (indoor) unit.
- Position the unit so that it faces the main (indoor) unit. Minimize obstructionssuch as doors, walls, and furniture.
You may need to experiment with various locations to get the best reception.
- Once the batteries are in place, the sensor will transmit signals every 1 minute. The readings shown on the main unit depend on which remote sensor (1,2,3,4 or 5) is selected. Refer to the Main Unit user manual for more information.
NOTE: The sensor range is 100 metres (328 feet) with no obstructions, but if the main unit has a shorter range than the sensor, you may have to move the sensor closer for reception.
CLOCK
This remote unit can automatically synchronize the date and time with official time-keeping organizations in Frankfurt (Germany) and Rugby (England). When the unit is within 1500 km (932 miles) of a RF signal, the reception icon will blink during reception.
SET RADIO SIGNAL FORMAT
The RADIO SIGNAL FORMAT switch is located inside the battery compartment. Select EU (DCF) or UK (MSF). Press RESET.
Reception takes 2 - 10 minutes to complete. Once complete, the icon will stop blinking. If the RF signal is weak, it can take up to 24 hours to get a valid RF signal reception.
| STRONG SIGNAL | WEAK SIGNAL | NO SIGNAL |
 |  |  |
NOTE: For best results, place it away from metallic or electrical objects, and in a location with a clear view to the sky.
Press SEARCH to manually activate search for radio-controlled clock signal. The tower icon will blink until the clock signal is found or the search period times out.
CHANGE CHANNEL
Repeat the Set Up procedure. In Step 3, select a different channel number.
LOW BATTERY WARNING
The low battery indicator is shown on the main unit when the battery is low for the selected remote unit. Replace the batteries whenever the low battery signal  shows.
NOTE: Do not use rechargeable batteries. Properly dispose used batteries by taking them to an authorized disposal station.
RESET SYSTEM
The RESET button is located in the battery compartment. Press it whenever you change the batteries, or whenever performance is not behaving as expected (e.g., unable to establish radio frequency link with main unit). Refer to the User Manual of the main unit for more information.
SAFETY AND CARE
Wash the unit with a slightly damp cloth and mild detergent. Avoid dropping the unit or placing it in a high-traffic location.
Do not expose the unit to direct sunlight since this may affect the accuracy of measurements.
WARNINGS
This product is designed to give you years of service if handled properly. Observe the following guidelines:
- Never immerse the unit in water. This can cause electrical shock and damage the unit.
- Do not subject the main unit to extreme force, shock, or fluctuations in temperature or humidity.
- Do not tamper with the internal components.
- Do not mix new and old batteries or batteries of different types. Do not use rechargeable batteries with this product.
- Remove the batteries if storing this product for a long period of time.
- Do not scratch the LCD display.
- Do not make any changes or modifications to this product. Unauthorized changes may void your right to use the product.
- The contents of this user manual are subject to change without notice.
- Images not drawn to scale.
TROUBLESHOOTING
Check here before contacting our customer service department.
| PROBLEM | SYMPTOM | REMEDY |
| Temp | Main unit shows | Temperature is out of range |
| Remote unit | Cannot locate main unit | Check batteries |
| Check location | ||
| Clock | Cannot auto-sync | Manually activate auto- |
SPECIFICATIONS
| Dimensions | |
| L x W x H | 70 x 24.5 x 116mm (2.76 x 0.96 x 4.57 inches) |
| Weight | 156 grams (0.34lb.) with battery |
| Temperature | |
| Unit | °C or °F |
| Range | -20°C to 60°C (-4°F to 140°F) |
| Resolution | 0.1°C (0.2°F) |
| Relative humidity | |
| Range | 25% to 95% |
| Resolution | 1% |
| Frequency | |
| RF frequency | 433 MHz |
| Range | Up to 100 metres (328 feet) with no obstructions |
| Transmission | Approx. 1 minute |
| Channel No. | 1,2,3,4 or 5 |
| Unit | °C or °F |
| Power | 2 X UM-3 (AA) 1.5V alkaline batteries |

Documents / ResourcesDownload manual
Here you can download full pdf version of manual, it may contain additional safety instructions, warranty information, FCC rules, etc.
Download Oregon Scientific RTGR328N - Wireless Outdoor Sensor Manual
Advertisement
Thank you! Your question has been received!


Need Assistance?
Do you have a question about the RTGR328N that isn't answered in the manual? Leave your question here.