Motorola TALKABOUT KEM-ML36100 - MC Series Manual
- User manual (2 pages)
Advertisement
- 1 Control Buttons
- 2 Display Screen Guide
-
3
Getting Started
- 3.1 Installing the Batteries
- 3.2 Installing NiMH Rechargeable Battery Pack
- 3.3 Installing the Three AA Alkaline Batteries
- 3.4 Radio Battery Meter
- 3.5 Removing the NiMH Battery Pack (Optional Accessory)
- 3.6 Removing the Three AA Batteries
- 3.7 Using the Battery Charger
- 3.8 Attaching and Removing the Belt Clip
- 3.9 Turning Your Radio On and Off
- 3.10 Setting the Volume
- 4 Talking and Listening
- 5 Menu Options
- 6 Special Features
- 7 Channels and Frequencies
- 8 Documents / Resources
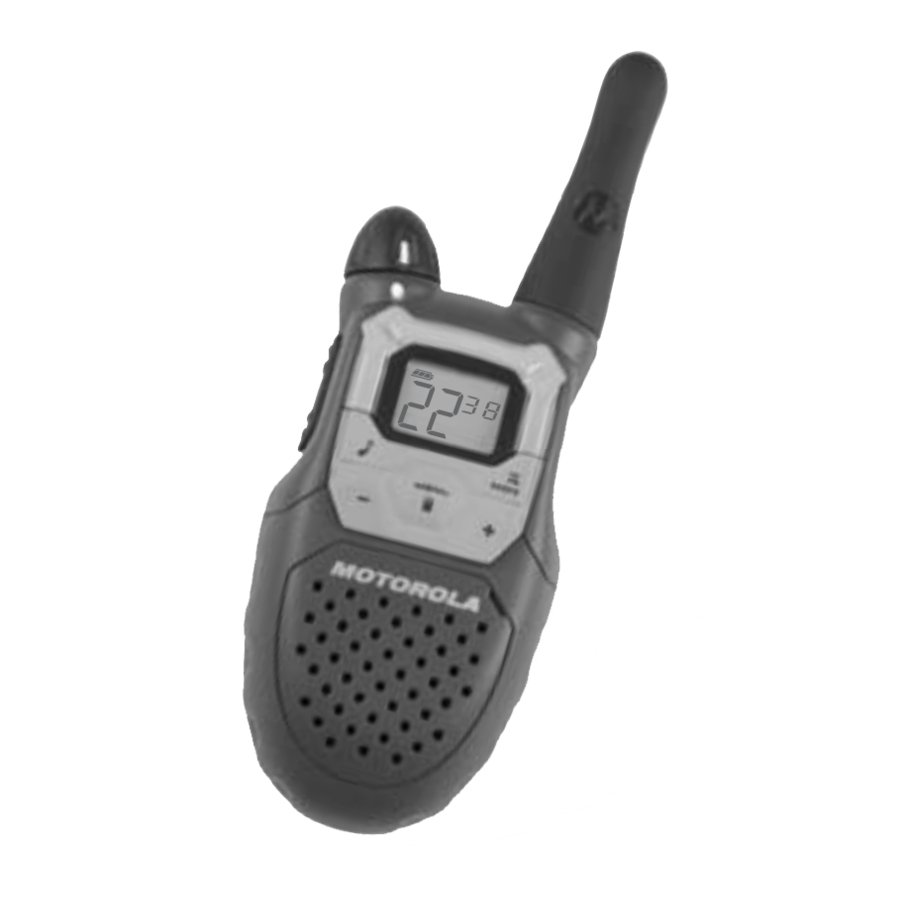
Control Buttons

Display Screen Guide

 - Battery Meter
 - Noise Filtering
 - Channel Power Indicator
 - Hands-Free (VOX)
 - Lock
 - Talk Confirmation Tone (Roger Beep)
 - Scan
Getting Started
Installing the Batteries
Each radio can use either 1 NiMH rechargeable battery pack or 3 AA alkaline batteries and beeps when the batteries are low.
Installing NiMH Rechargeable Battery Pack
- Turn the radio off.
- With the back of the radio facing you, lift the battery cover latch up and remove the cover.
- Remove the battery pack from the clear plastic bag (do not disassemble or unwrap the battery pack).
- Insert the NiMH battery pack with the diagram facing you.
- Reposition the battery cover and press down to secure.
Installing the Three AA Alkaline Batteries
- Turn the radio off.
- With the back of the radio facing you, lift the battery cover latch up and remove the cover.
- Insert the three AA alkaline batteries with + and - polarity as shown inside.
- Reposition the battery cover and press down to secure.
Radio Battery Meter
The radio battery icon shows the battery charge level, from full  to empty
  . When the radio has one segment left, the radio chirps periodically or after releasing
  (Low Battery Alert).
Removing the NiMH Battery Pack (Optional Accessory)
- Turn the radio off.
- With the back of the radio facing you, lift the battery latch up to release the battery cover and remove the cover.
- Gently remove the NiMH battery.
- Reposition the battery cover and press down to secure.
Removing the Three AA Batteries
- Turn the radio off.
- With the back of the radio facing you, lift the battery latch up to release the battery cover and remove the cover.
- Gently remove each battery by easing each battery out individually.
- Reposition the battery cover and press down to secure.
Notes
- Exercise care when removing NiMH or AA batteries. Do not use sharp or conductive tools to remove either of these batteries.
- Remove the batteries before storing your radio for extended periods of time. Batteries corrode over time and may cause permanent damage to your radio.
Using the Battery Charger
The battery charger provides drop-in charging convenience for NiMH batteries and can be placed on any flat surface, such as a desk or workbench. Charge the NiMH battery overnight (at least 16 hours) before using it for the first time. After the initial charge, an empty battery is fully charged within 14 hours.
- Follow the steps above to install a NiMH Battery Pack.
- Plug the AC power supply cord into the jack on the desk stand.
- Plug the AC power supply into a standard wall outlet.
- With a radio facing forward, slide it into one of the charging pockets.
- When charging the battery charger, the red light on the charger base will glow continuously.
Notes
- The light will remain red after the NiMH battery pack is fully charged.
- When moving between hot and cold temperatures, do not charge the NiMH battery pack until the battery temperature acclimates (usually about 20 minutes).
- For optimal battery life, remove the radio or battery from the charger within 16 hours. Do not store the radio while connected to the charger.
- Turn radio off while in charging tray.
Attaching and Removing the Belt Clip
- Attach belt clip to pocket or belt strap.
- Align the belt clip post with the hole in the back of the radio.
- Gently push until the clip clicks in place.
To Remove
- Push down on the release tab at the top of the belt clip to release the catch.
- Pull the belt clip away from the back of the radio.
Turning Your Radio On and Off
Turn  clockwise to turn the radio on and counterclockwise to turn the radio off.
- In the ON position, the radio chirps and briefly shows all feature icons available on the radio.
- The display screen then shows the current channel, code and all features that are enabled.
Setting the Volume
Press and hold  for three seconds while rotating until you reach a comfortable listening level.
- Rotate
![]() clockwise to increase the volume.
clockwise to increase the volume. - Rotate
![]() counterclockwise to decrease the volume.
counterclockwise to decrease the volume.
Do not hold the radio close to your ear. If the volume is set to an uncomfortable level, it could hurt your ear.
Talking and Listening
To communicate, all radios in your group must be set to the same channel and Interference Eliminator Code.
- To talk, press and hold
![]() .
. - When you are finished talking, release
![]() .
.
For maximum clarity, hold the radio two to three inches away from your mouth and speak directly into the microphone. Do not cover the microphone while talking.
Talk Range
Your radio is designed to maximize performance and improve transmission range. Do not use the radios closer than five feet apart.
Monitor Button
Pressing and holding for three seconds allows you to listen to the volume level of the radio when you are not receiving. This allows you to adjust the volume, if necessary. You can also press to check for activity on the current channel before you talk.
Push-to-Talk Timeout Timer
To prevent accidental transmissions and save battery life, the radio emits a continuous warning tone and stops transmitting if you press for 60 continuous seconds.
Menu Options
Selecting the Channel
Your radio has 22 channels. The channel is the frequency the radio uses to transmit. Channels 8-14 are FRS 0.5 watt only and all other channels are GMRS. (See the "Channels and Frequencies" table for details.)
- With the radio on, press
![]() . When the radio is on a 0.5 watt channel,
. When the radio is on a 0.5 watt channel, ![]() displays. When the radio is on a 1 watt channel,
displays. When the radio is on a 1 watt channel, ![]() displays. The current channel flashes.
displays. The current channel flashes. - Press
![]() or
or ![]() and select an unused or quiet channel.
and select an unused or quiet channel. - Press
![]() to save the channel setting or
to save the channel setting or ![]() to continue set up.
to continue set up.
 displays. When the radio is on a 1 watt channel,
 Selecting the Interference Eliminator Code
Interference Eliminator Codes help minimize interference by blocking transmissions from unknown sources. Codes 1 – 38 are the standard analog codes that appear on other FRS/GMRS radios. 0 is the off position, no codes are enabled.
To set the code for a channel
- Press
![]() until the code starts to flash.
until the code starts to flash. - Press
![]() or
or ![]() to select the code.
to select the code. - Press
![]() to save the code setting or
to save the code setting or ![]() to continue set up.
to continue set up.
You can set a different code for each channel using this procedure.
An extended press of  or
or  allows you to scroll through the Interference Codes rapidly so you can quickly reach the code you want.
Note: You must set the Interference Eliminator Code to 0 on a radio that uses Interference Eliminator Codes to communicate with radios that do not have Interference Eliminator Codes. Select 0 for "no tone, no code" and OFF will flash on your radio's display.
Setting and Transmitting Call Tones
Your radio can transmit different call tones to other radios in your group so you can alert them that you want to talk. Your radio has 5 call tones.
To set a call tone
- With the radio on, press
![]() three times until the current call tone setting (0 - 5 ) flashes and CA displays.
three times until the current call tone setting (0 - 5 ) flashes and CA displays. - Press
![]() or
or ![]() to change and hear the call tone.
to change and hear the call tone. - Press
![]() to set the new call tone or
to set the new call tone or ![]() to continue set up.
to continue set up.
To transmit your call tone to other radios set to the same channel and Interference Eliminator Code as your radio, press  .
.
Note: Setting the call to 0 disables the call tone feature.
QT Noise Filtering
The QT noise-filtering feature helps to ensure uninterrupted communication with other Motorola radios that have this feature. This feature also filters out unwanted transmissions from other radios. This is useful in places where there is heavy radio traffic, such as amusement parks or ski resorts.
Note: QT noise filtering is not available when the radio is scanning.
To turn QT noise filtering on or off
- Press
![]() until
until ![]() displays.
displays. - Press
![]() or
or ![]() until Y displays to turn noise filtering on, or until – displays to turn noise filtering off.
until Y displays to turn noise filtering on, or until – displays to turn noise filtering off. - Press
![]() to confirm your selection.
to confirm your selection.
To transmit to a radio that has QT noise filtering turned on
- Select the same channel and Interference Eliminator Code as the other radio.
- Press
![]() to send a call tone. This allows your voice to pass through the QT noise filter on the receiving radio.
to send a call tone. This allows your voice to pass through the QT noise filter on the receiving radio. - Press
![]() and speak normally.
and speak normally.
Note: If you skip step 2, the beginning of your message may not be heard on the receiving radio. For a 30-second period, starting after the last transmission, all transmissions received on the selected channel and code will pass through the QT noise filter.
Transmitting a Talk Confirmation Tone
Your radio will transmit a unique tone when you finish transmitting. It is like saying "Roger" or "Over" to let others know you are finished talking.
- To turn Talk Confirmation off, press and hold
![]() while you turn your radio on. The Talk Confirmation call tone
while you turn your radio on. The Talk Confirmation call tone ![]() will not display.
will not display. - To turn Talk Confirmation back on, turn your radio off and then back on while pressing and holding
![]() . The Talk Confirmation call tone
. The Talk Confirmation call tone ![]() will be displayed.
will be displayed.
Use With Accessories (PTT)
You can use optional headset accessories. MC Series radios are compatible with PTT accessories. VOX headsets will require use of the radios button to talk.
Many accessories (sold separately) are available for your radio. For more information, visit our Web site at www.motorola.com or shop.giantintl.com.
Special Features
Keypad Lock
To avoid accidentally changing your radio settings:
- Press
![]() and hold until
and hold until ![]() displays.
displays. - When in lock mode, you can turn the radio on and off, adjust the volume, receive, transmit, send a call tone, and monitor channels. All other functions are locked.
To unlock the radio, press and hold  until is no longer displayed.
Scanning Channels
Use scan to search the 22 channels for transmissions from unknown parties, to find someone in your group who has accidentally changed channels, or to quickly find unused channels for your own use.
To start Scanning
- Briefly press the
![]() key. The scan
key. The scan ![]() will appear in the display, and the radio will begin to scroll through the channel and code combinations.
will appear in the display, and the radio will begin to scroll through the channel and code combinations. - When the radio detects channel activity matching the channel and code combination, it stops scrolling and you can hear the transmission.
- To respond and talk to the person transmitting, press
![]() within five seconds after the end of the transmission.
within five seconds after the end of the transmission. - The radio will resume scrolling through the channels five seconds after the end of any received activity.
- To stop scanning, briefly press the
![]() key.
key.
Scanning Notes:
- If you press
![]() while the radio is scrolling through inactive channels, the transmission will be on the "home channel", that is, the channel (and Interference Eliminator Code) your radio was set to when you started the scan. Scanning will resume five seconds after the end of your transmission. You may press the
while the radio is scrolling through inactive channels, the transmission will be on the "home channel", that is, the channel (and Interference Eliminator Code) your radio was set to when you started the scan. Scanning will resume five seconds after the end of your transmission. You may press the ![]() key to stop scanning at any time.
key to stop scanning at any time. - If the radio stops on an undesired transmission, you may immediately resume the scan by briefly pressing
![]() or
or ![]() .
. - If the radio repeatedly stops on an undesired transmission, you may temporarily remove that channel from the scan list by pressing and holding
![]() or
or ![]() for three seconds. You may remove more than one channel in this way.
for three seconds. You may remove more than one channel in this way. - To restore the removed channel(s) to the scan list, turn the radio off and then back on, or exit and re-enter the scanning mode by pressing
![]() .
. - You cannot remove the home channel from the scan list.
- In Advanced Scan, the detected code will only be used for one transmission. You must note the code, exit scan, and set that detected code on that channel to permanently use the detected code.
Channels and Frequencies


Documents / Resources
References

Download manual
Here you can download full pdf version of manual, it may contain additional safety instructions, warranty information, FCC rules, etc.
Advertisement
Thank you! Your question has been received!


Need Assistance?
Do you have a question about the TALKABOUT KEM-ML36100 that isn't answered in the manual? Leave your question here.