Table of Contents
Advertisement
Quick Links
Advertisement
Table of Contents

Related Manuals for Nanometrics Trillium Compact

Summary of Contents for Nanometrics Trillium Compact
- Page 1 User Guide November 12, 2020 Strategic Intelligence Fueled by Science...
- Page 2 120 second, 300 m, Polar Environment The information in this document has been carefully reviewed and is believed to be reliable. Nanometrics Inc. reserves the right to make changes at any time without notice to improve the reliability and function of the product.
- Page 3 Added content for Polar Environment product model TC20-PH2-XC. See "About the Trillium Compact" on page 9 Modernized instructions for "Installing a Trillium Compact Posthole Seismometer" on page 18 Updated available accessories listing including a new lifting cable kit and compact holelock kits. See "Cables and Accessories"...
-
Page 4: Table Of Contents
2.6 Verifying connection with the Centaur digital recorder 2.7 Installing a Trillium Compact Posthole Seismometer 2.7.1 Installing a Trillium Compact Posthole in an Uncased Hole (Direct Burial) 2.7.2 Installing a Trillium Compact Posthole in a Cased Hole 2.7.3 Lowering the Seismometer into a Deep Cased Hole 2.8 Aligning a Trillium Compact Posthole to North... - Page 5 3.5.1 Choosing the Right Concrete 3.5.2 Decoupling the Pier and Vault Walls 3.6 Alignment, Leveling, and Placement Features 3.7 Aligning and Leveling a Trillium Compact in a Vault Installation 3.8 Theory and Practice of Insulation 3.9 Insulation Options 3.9.1 Insulating a Trillium Compact Vault with the Insulating Cover 3.9.2 Installing a Trillium Compact Vault in the Insulating Cover...
- Page 6 5.4 Calibration Input Signal 5.5 State-of-Health Output Signal 5.6 Power Consumption Chapter 6 - Configuring Your System 6.1 Configuring the Centaur for the Trillium Compact 6.2 Seismometer System Sensitivity Guidelines Chapter 7 - Configuring Serial Communications 7.1 About Serial Communications 7.2 Connecting through a Nanometrics Digitizer...
- Page 7 12.1 Trillium Compact - models TC120-SV1 and TC20-SV1 12.2 Trillium Compact Posthole - models TC120-PH2, TC120-PH2-XC, TC20-PH2 and TC20-PH2-XC 12.3 Trillium Compact Features and Dimensions - Optional 70 mm spikes Appendix A - Site Record Appendix B - Grounding guidelines Appendix C - Carrying Case C.1 Transporting a Trillium Compact in the Carrying Case...
-
Page 8: Part 1 - Installation
Part 1 - Installation Part 1 - Installation Getting Started Installing a Trillium Compact Posthole Seismometer Installing a Trillium Compact Vault Seismometer Post-Installation Activities 16889R10 • 2020-11-12 Page 8... -
Page 9: Chapter 1 - Getting Started
Extended operating temperature range for Polar Environment models TC20-PH2-XC and TC120-PH2-XC Trillium Compact seismometers are available with 20 s or 120 s low corner period. The 20 s variants have a wide operational tilt range of ±10° and are suitable for down-hole installations where the seismometer cannot be leveled, or for rapid deployments where a quick settling time is needed. - Page 10 "Leveling Cradle and Spike Kit" on page 96 for more information. The Trillium Compact has an integrated Web server that is accessible using a standard Web browser and the RS-232 serial interface available on the connector. A desktop computer with a...
-
Page 11: Unpacking And Handling A Trillium Compact Seismometer
Trillium Compact seismometers do not require any mass lock mechanisms or mass centering. These seismometers are ready to operate right out of the box and can withstand shocks of up to 100 g with no degradation in performance or service life. -
Page 12: Cables And Accessories
1.3 Cables and Accessories Nanometrics offers optional equipment, that can be purchased separately, that add convenience to the installation and use of your Trillium Compact seismometer. This section describes a number of these options. Table 1-1 - List of cables and accessories... - Page 13 16978–2M A cable that provides serial communications and communications and power power to the Trillium Compact. The cable has a cable, molded Trillium Compact connector on one end and splits into two 2 m lengths. One end of the cable...
- Page 14 Cable –Trillium Compact 17768-10M A cable with a molded neoprene connector on Posthole to Nanometrics one end that connects to the Trillium Compact 17768-30M Digitizer, Molded Posthole connector and a connector on the other end for connecting to a Nanometrics digitizer.
- Page 15 Part number Descriptions Compact Holelock Kit (T- 18884-01 To adapt the Trillium Compact Posthole for CHL2) installation in a 132 mm to 174 mm borehole. Kit includes holelock assembly for 132 mm to 174 mm borehole, adapter plate and mounting screws.
-
Page 16: Technical Support And Maintenance
"Contact Technical Support " on page 103. When servicing the Trillium Compact, be aware that if the unit has failed in a buried or underwater environment there is a small possibility that water may have leaked in under pressure, compressing the air inside. If the unit has been submerged beyond its rated depth of 10 m there is some risk of hazardous trapped pressure. -
Page 17: Recording Your Serial Number And Ip Address
Chapter 1 - Getting Started 1.4.1 Recording Your Serial Number and IP Address Before installing your Trillium Compact seismometer, it is important to record both the serial number and the IP address of the unit. Both numbers are located on the label. -
Page 18: Chapter 2 - Installing A Trillium Compact Posthole Seismometer
"Installing a Trillium Compact Posthole in a Cased Hole" on page 24 Once you have completed the installation of your Trillium Compact Posthole, you can proceed to configure the digital recorder. Refer to the Centaur User Guide (17935). 2.2 Selecting a Site for a Trillium Compact Posthole seismometer There is no substitute for a geological survey when it comes to site selection. -
Page 19: Pre-Installation Preparation
A laptop or mobile device with software and cables required to connect to and communicate with the digitizer. To save time during installation, the Trillium Compact and the Nanometrics digital recorder can be pre-configured for deployment. See "Configuring Your System" on page 58. -
Page 20: Connecting The Centaur Digital Recorder And The Trillium Compact
Trillium Compact making sure that the guides on the cable connector align with the notches on the Trillium Compact. 4. Attach the other end of the cable to the digital recorder, making sure that the guides on... -
Page 21: Verifying Connection With The Centaur Digital Recorder
2.7 Installing a Trillium Compact Posthole Seismometer A Trillium Compact Posthole seismometer may be installed in an uncased or cased hole, to a maximum depth of 300 m. Units will self-level as long as the seismometer is within ±2.5° of vertical for the 120 s model or within ±10°... -
Page 22: Installing A Trillium Compact Posthole In An Uncased Hole (Direct Burial)
In general, greater depth produces better results with all other things being equal. Use the following steps to install a Trillium Compact Posthole seismometer in an uncased hole: Ensure that the bottom of the hole is sufficiently level for your application. For best results, the Trillium Compact Posthole seismometer should be as level as possible. - Page 23 1. The recommended practices for aligning a Trillium Compact Posthole vary based on the depth of the hole where the unit is installed. 2. For recommendations on aligning a Trillium Compact Posthole in a shallow hole of 2 m or less, see "Aligning the Trillium Compact Posthole using a Surface Line"...
-
Page 24: Installing A Trillium Compact Posthole In A Cased Hole
2.7.2 Installing a Trillium Compact Posthole in a Cased Hole Use the following steps to install a Trillium Compact Posthole in a cased hole: For best results, make sure that the cased hole is dry and the bottom is sealed. If you are using an existing cased hole, make sure that the hole is not flooded. -
Page 25: Lowering The Seismometer Into A Deep Cased Hole
Chapter 2 - Installing a Trillium Compact Posthole Seismometer that it will flow easily and not leave any air spaces. 3. Pour 1 liter of sand down the hole to provide a base for the sensor. 4. Lower the sensor until it reaches the bottom of the hole. A winch is required for deep holes. - Page 26 Chapter 2 - Installing a Trillium Compact Posthole Seismometer The winch should only be operated by persons who are suitably trained to do so and who are familiar with any local regulations for this type of a device. The stall force of the winch must be less than the rated load of the tripod and lifting wire rope to prevent breakage if the equipment becomes jammed or snagged during lifting.
-
Page 27: Aligning A Trillium Compact Posthole To North
2.8.1 Aligning the Trillium Compact Posthole using a Surface Line If you are installing the Trillium Compact Posthole in a shallow hole (usually 2 m or less) where the top of the seismometer pressure vessel is visible and the unit can be turned by hand after being lowered into the hole, you can use the surface line method to align the instrument. -
Page 28: Aligning The Trillium Compact Posthole Using A Surface Seismometer
You can use a seismometer installed at the surface to determine the orientation of the horizontal (X and Y) components of the Trillium Compact Posthole once installed in the hole. This method involves comparing the recorded output of both seismometers and computing the relative direction of seismic wave motion to determine the relative azimuth of the down- hole Trillium Compact Posthole compared to the surface seismometer. -
Page 29: Installation Checklist For The Trillium Compact Posthole Seismometer
If alignment was accomplished using the surface seismometer method, ensure that Orientation Correction values have been entered on the Centaur. Cable is connected to the Trillium Compact Posthole and the digitizer. Cable is clamped at the wellhead. System is correctly grounded according to guidelines in grounding section. -
Page 30: Chapter 3 - Installing A Trillium Compact Vault Seismometer
Accessories" on page 12. 3.1 Installing a Trillium Compact surface vault seismometer The following steps for installing a Trillium Compact in a vault are described throughout this guide: "Preparing for a Vault Installation" below "Selecting a Site for the Trillium Compact Vault " on the next page "Preparing the Site for a Vault Installation"... -
Page 31: Selecting A Site For The Trillium Compact Vault
Site for a Vault Installation" on the next page. Select your insulation method. You can thermally insulate your Trillium Compact Vault seismometer with the insulating cover (recommended) or make a free-standing cover out of rigid plastic foam. Determine which method you will use before your installation so that you have the necessary materials on-site. -
Page 32: Preparing The Site For A Vault Installation
Chapter 3 - Installing a Trillium Compact Vault Seismometer Use the worksheet "Site Record" on page 87 to record information about the structure, cultural environs, and climatic conditions of the site; as well as information about the type and length of the installation. - Page 33 "Cables and Accessories" on page 12 for a description of these items. See also "Insulating a Trillium Compact Vault with a Rigid Foam Box" on page 45 another method of insulating the seismometer. "Performing a Vault Installation" on the next page. Temporary deployment on rock Installations on rock are at the surface level and the seismometer must be in a sealed, insulated enclosure to protect it from the elements or other environmental disturbances.
-
Page 34: Performing A Vault Installation
Chapter 3 - Installing a Trillium Compact Vault Seismometer See also "Aligning and Leveling a Trillium Compact in a Vault Installation" on page 39 "Insulating a Trillium Compact Vault with a Rigid Foam Box" on page 45 for other methods of leveling and insulating the seismometer. -
Page 35: Recommendations For Pier Construction
6. Place the insulating cover over the seismometer, fitting the cable exit slot over the cable. See "Installing a Trillium Compact Vault in the Insulating Cover" on page 43. If the fit around the seismometer is too tight, remove the inner layer of foam from the insulating cover. -
Page 36: Decoupling The Pier And Vault Walls
These signals are mostly long period, so vault wall decoupling is critical for quiet site long period studies. 3.6 Alignment, Leveling, and Placement Features To aid in the proper alignment of your seismometer, each Trillium Compact Vault has: Vertically-scribed marks on the north-south axis. A north-south guide on the top of the case. - Page 37 A spike kit for the leveling cradle that facilitates installations in sediment, soil, gravel, or sand. (See "Leveling Cradle and Spike Kit" on page 96.) Figure 3-1 shows the north scribe line on a Trillium Compact aligned with a line drawn on the installation surface that is parallel to north-south. 16889R10 • 2020-11-12 Page 37...
- Page 38 Chapter 3 - Installing a Trillium Compact Vault Seismometer Figure 3-1 - Example of seismometer alignment using vertically scribed marks Figure 3-2 shows the case-top north-south guide with a dashed line indicating where a straight-edge, staked line, or laser level line would fall.
-
Page 39: Aligning And Leveling A Trillium Compact In A Vault Installation
Trillium Compact. 2. When you are ready to remove the Trillium Compact Vault from the box, gently place it on the installation surface in an approximate north-south alignment. -
Page 40: Theory And Practice Of Insulation
5. After aligning the seismometer, verify that it is still level. It may need to be adjusted due to unevenness of the installation surface. 6. If you re-leveled the Trillium Compact Vault and you are leveling it with the adjustable feet, ensure the feet are locked when finished. - Page 41 The apparent ground-motion power spectral density is, therefore, inversely proportional to the square of frequency. For seismometers that are well temperature-compensated, such as the Trillium Compact Vault, but are improperly installed, thermally induced tilt on the horizontal channels will be more significant than direct thermal sensitivity on the vertical channel.
-
Page 42: Insulation Options
Not touch the seismometer or the cable. The insulation is subject to temperature expansion and can exert measurable forces on the seismometer. 3.9 Insulation Options There are two options for insulating a Trillium Compact Vault: Recommended method. Use the Nanometrics Trillium Compact Carrying Case/ (Nanometrics part number 16862). See also "Insulating a Trillium Compact Vault with... -
Page 43: Installing A Trillium Compact Vault In The Insulating Cover
Made of rigid plastic and lined with insulating foam, the insulating cover is a rugged, form- fitting cover that creates a close fit around a Trillium Compact without touching any part of the seismometer or the cable. When fitted over a Trillium Compact, the cover creates a small air gap between itself and the seismometer. - Page 44 Chapter 3 - Installing a Trillium Compact Vault Seismometer Use the following steps to install a Trillium Compact in the Carrying Case / Insulating Cover for insulating purposes at the installation site: 1. Prepare a flat installation surface. 2. Secure the cable to the side of the seismometer with a tie wrap (see Figure 3-4 below).
-
Page 45: Insulating A Trillium Compact Vault With A Rigid Foam Box
Use the following recommendations as a guide when constructing the box: When installing a Trillium Compact Vault in a rigid foam insulating box, follow the best practices for aligning and leveling the seismometer that are outlined in "Aligning and... -
Page 46: Connecting The Centaur Digital Recorder And The Trillium Compact
Trillium Compact making sure that the guides on the cable connector align with the notches on the Trillium Compact. 4. Attach the other end of the cable to the digital recorder, making sure that the guides on the cable connector align with the notches on the digital recorder 16889R10 •... -
Page 47: Verifying Connection With The Centaur Digital Recorder
Chapter 3 - Installing a Trillium Compact Vault Seismometer Once powered up, the digital recorder will provide pass-through power to the seismometer as well as feedback regarding seismometer operation. 3.11 Verifying connection with the Centaur digital recorder Use the guidelines in this section to verify that the connection between the Centaur digital recorder and the Trillium Compact was successful. -
Page 48: Installation Checklist For The Trillium Compact Vault Seismometer
Use the following checklist to help you verify that you have completed all of the necessary steps in the installation of your Trillium Compact Vault in a vault. Installation surface is clear of debris. Trillium Compact Vault is level. -
Page 49: Chapter 4 - Post-Installation Activities
Chapter 4 - Post-Installation Activities 4.1 Troubleshooting Your Installation It is normal to see noise spikes in the horizontal channels of a Trillium Compact seismometer as the instrument settles after installation. However, if these spikes do not diminish after a few days, there may be a problem with the installation and the site should be visited to determine the cause of the spikes. - Page 50 When a Trillium Compact is left powered while not level, it can velocity outputs has an offset on take as long as a few hours for the unit to recover after leveling.
- Page 51 The Trillium Compact is powered and not level. but slowly trending towards zero, When a Trillium Compact is left powered while not level, it can and one or more of the main take as long as a few hours for the unit to recover after leveling.
-
Page 52: Part 2 - Operation
Part 2 - Operation Part 2 - Operation Input & Output Signals Configuring Your System Configuring Serial Communications Using the Web Interface 16889R10 • 2020-11-12 Page 52... -
Page 53: Chapter 5 - Input & Output Signals
Chapter 5 - Input & Output Signals 5.1 UVW and XYZ Output Signals The Trillium Compact can be configured to output either XYZ or UVW signals. The “natural” output is UVW where the outputs represent the motions in the direction of sensitivity of the three sensor components. -
Page 54: Serial Rs-232 Communications
DGND serves as the ground reference for the serial link. The Trillium Compact automatically senses when valid serial communication on the Rx line is being received, and turns on the Tx line to transmit. The Rx and Tx signals share pins with the CTRL and UVW control inputs. -
Page 55: Digital Control Input Signals
5.4 Calibration Input Signal The Calibration Input Signal is provided to allow for relative calibration of the Trillium Compact seismometer across frequency and over time. Since the Trillium Compact is a symmetric triaxial seismometer, calibration is best performed on the individual axes (UVW) rather than the horizontal and vertical outputs (XYZ). -
Page 56: State-Of-Health Output Signal
±4 V, with an optimal output of 0 V. A maximum mass position output signal greater than ±3.5 V indicates that the Trillium Compact is no longer sufficiently level and may not be providing useful seismic signals. Should this occur, visit the installation site as soon as possible to level the unit. - Page 57 Chapter 5 - Input & Output Signals largely independent of mass position, providing the unit does not shift so that the seismometer is no longer sufficiently level For a unit that is settled and level, a seismic signal that approaches the maximum clip level of the seismometer may draw as much as 0.8 W peak (The average power consumption would be much lower.) 16889R10 •...
-
Page 58: Chapter 6 - Configuring Your System
2. Expand the Sensor Library menu item and click on the appropriate default sensor type (Trillium Compact - Default). If your Sensor Library does not include the sensor definitions for the Trillium Compact, upgrade your Centaur firmware to the latest version, or contact Nanometrics for further assistance. - Page 59 (typically 1 Hz) and the lower corner period. The exact nominal sensor sensitivity for a particular type of Trillium Compact seismometer can be taken from the appropriate table in "Frequency Response for 120 s and 20 s models" on page 72.
-
Page 60: Chapter 7 - Configuring Serial Communications
RS-232 serial interface. The sensor web page can be used to retrieve sensor information, access state-of-health information and control features, and to configure the sensor. The simplest way to connect to the sensor’s web page is to use a Nanometrics digitizer, such as Centaur (see "Connecting through a Nanometrics Digitizer"... -
Page 61: Calculating The Ip Address
The IP address of the Trillium Compact is 2.23.x.y, where x and y are calculated from the serial number of the unit. To calculate the values for x and y in the serial number: x = SerialNumber / 256 Use the resulting whole number for the value of x and discard any decimal amounts. -
Page 62: Chapter 8 - Using The Web Interface
Ensure that the proxy server is disabled when using a Web browser with a Trillium Compact seismometer. If you are not using a Centaur digitizer, you will need to acquire a Nanometrics appliance that converts Ethernet to Serial Line Internet Protocol (SLIP) or build your own SLIP device. For more information, see "About Serial Communications"... -
Page 63: Accessing Trillium Compact Web
Chapter 8 - Using the Web Interface 8.2 Accessing Trillium Compact Web pages Proceed as follows to access the Trillium Compact Web pages through the Centaur digitizer: You can connect two sensors to the 6-channel Centaur. Each sensor is accessed from one of the Serial radio buttons. -
Page 64: Viewing Seismometer Control
For mass position readings under ±2.5 V, the table cell is green, for readings from ±2.5 V to ±3.5 V, the cell is yellow, and for readings above ±3.5 V, the cell is red. Together these values provide the health of the Trillium Compact seismometer. 8.4 Viewing Seismometer Control The Seismometer Control page allows you to enable or disable calibration, change the XYZ/UVW output mode, and to change the long/short period mode for the seismometer. -
Page 65: Control Lines
Use the seismometer Control Lines page to reconfigure the function of the CTRL/RX pin on the Trillium Compact serial connector and main connector (referred to as Connector PIN D on the Web page). When set to a positive voltage level (default), the CTRL/RX pin enables calibration. -
Page 66: Hardware Information
The Hardware Information link displays a page that lists detailed factory information, such as the unit model, serial number, and subcomponent versions and serial numbers. This information can be exported to a text file (.txt) for record keeping or for transmitting to Nanometrics for technical support purposes. 16889R10 • 2020-11-12 Page 66... -
Page 67: Part 3 - Reference
Part 3 - Reference Part 3 - Reference Specifications Performance Connectors and Cables Features and Dimensions Site Record Grounding guidelines Carrying Case Leveling Cradle and Spike Kit Open Source Attributions Glossary 16889R10 • 2020-11-12 Page 67... -
Page 68: Chapter 9 - Specifications
Chapter 9 - Specifications Chapter 9 - Specifications Table 9-1 - Technology specifications Topology Symmetric triaxial Feedback Force balance with capacitive transducer Mass centering Not required Table 9-2 - Leveling and alignment specifications Bubble level Removable and can be protected by optional cover. This is an optional accessory for models TC120-PH2, TC20-PH2, TC120- PH2-XC and TC20-PH2-XC. - Page 69 For 120 s models: greater than 159 dB @ 1 Hz For 20 s models: greater than 152 dB @ 1 Hz Table 9-4 - Hardware interface specifications Main Connector For Trillium Compact surface vault models TC120-SV1 and TC20-SV1 14-pin connector Shell size 12...
- Page 70 Chapter 9 - Specifications Table 9-5 - Digital command and control interface specifications (Continued) Commands XYZ/UVW mode switching Calibration channel selection (off, enable all, U, V, or W) Short period/long period mode switching Firmware updates State-of-health display Upload user calibration data Data outputs Independent mass position values Instrument temperature...
- Page 71 Chapter 9 - Specifications Table 9-8 - Physical specifications for models TC120-SV1 and TC20-SV1 Diameter 90 mm Height 113 mm – body and connector 128 mm – with leveling feet fully retracted 135 mm – with leveling feet fully extended Weight 1.2 kg Housing...
-
Page 72: Chapter 10 - Performance
Chapter 10 - Performance Chapter 10 - Performance 10.1 Frequency Response for 120 s and 20 s models The following sections provide frequency response information for Trillium Compact seismometers. You can obtain response files from the following sources: From Nanometrics' customer support site at http://support.nanometrics.ca. - Page 73 Chapter 10 - Performance Figure 10-1 - Bode plot for 120 s and 20 s models Table 10-1 provides the ground motion response nominal parameters for 120 s and 20 s models. The ground motion sensitivity at f assumes an infinite input impedance at the digitizer.
- Page 74 Chapter 10 - Performance Table 10-1 - Ground motion response nominal parameters for 120 s and 20 s models Symbol Parameter Nominal Values Nominal Values Units (120 s model) (20 s model) Zeros rad/s -392 -392 -1960 -1960 -1490 ±1740i -1490 ±1740i Poles –0.03691...
-
Page 75: Self-Noise
10.2 Self-Noise Figure 10-2 Figure 10-3 plot typical self-noise for Trillium Compact seismometers. Three curves are included for reference: Peterson’s new low-noise model (NLNM) and new high-noise model (NHNM), and McNamara and Buland’s probability density function (PDF) mode low noise model (MLNM). - Page 76 Chapter 10 - Performance Figure 10-2 - Noise floor figure for 120 s models 16889R10 • 2020-11-12 Page 76...
- Page 77 Chapter 10 - Performance Figure 10-3 - Noise floor figure for 20 s models To determine the dynamic range at frequencies of interest for your application, compare the noise floor to the Trillium Compact seismometer clip level using Figure 10-4. For the purpose...
- Page 78 Chapter 10 - Performance Figure 10-4 - Trillium Compact seismometer performance 16889R10 • 2020-11-12 Page 78...
-
Page 79: Chapter 11 - Connectors And Cables
Chapter 11 - Connectors and Cables Chapter 11 - Connectors and Cables 11.1 Pin-out for 14-Pin Trillium Compact Connector Trillium Compact model numbers TC120-SV1, TC20-SV1 (surface vault) are equipped with a 14-pin male military circular type hermetic connector. Table 11-1 provides the connector pinout. -
Page 80: Pin-Out For 16-Pin Trillium Compact Connector
Chapter 11 - Connectors and Cables 11.2 Pin-out for 16-Pin Trillium Compact Connector Trillium Compact model numbers TC120-PH2 and TC20-PH2 (posthole seismometers) are equipped with a 16-pin male neoprene molded waterproof connector. Table 11-2 provides the connector pinout. Table 11-2 - Pinout for 16-pin Trillium Compact connector... -
Page 81: Cable Design Guidelines
Ensure the cable length is sufficient to allow for strain relief. Ensure that the peak current requirement of the Trillium Compact does not result in a voltage drop along the cable which takes the power supply voltage below the minimum required at the Trillium Compact. -
Page 82: Chapter 12 - Features And Dimensions
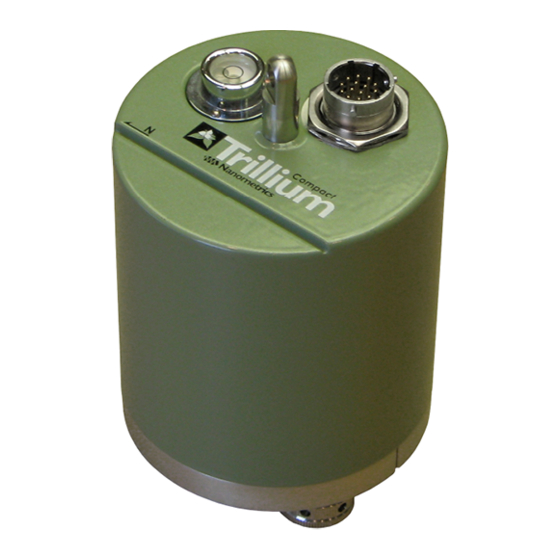
Chapter 12 - Features and Dimensions Chapter 12 - Features and Dimensions 12.1 Trillium Compact - models TC120-SV1 and TC20-SV1 All dimensions are in millimeters unless otherwise stated. Figure 12-1 - Top view 16889R10 • 2020-11-12 Page 82... - Page 83 Chapter 12 - Features and Dimensions Figure 12-2 - Bottom view Figure 12-3 - Side view 16889R10 • 2020-11-12 Page 83...
-
Page 84: Trillium Compact Posthole - Models Tc120-Ph2, Tc120-Ph2-Xc, Tc20-Ph2 And Tc20-Ph2-Xc
Chapter 12 - Features and Dimensions 12.2 Trillium Compact Posthole - models TC120-PH2, TC120- PH2-XC, TC20-PH2 and TC20-PH2-XC All dimensions are in millimeters unless otherwise stated. Figure 12-4 - Top view Figure 12-5 - Bottom view 16889R10 • 2020-11-12 Page 84... - Page 85 Chapter 12 - Features and Dimensions Figure 12-6 - Side view 16889R10 • 2020-11-12 Page 85...
-
Page 86: Trillium Compact Features And Dimensions - Optional 70 Mm Spikes
Chapter 12 - Features and Dimensions 12.3 Trillium Compact Features and Dimensions - Optional 70 mm spikes Figure 12-7 - Side view (available for posthole models only) 16889R10 • 2020-11-12 Page 86... -
Page 87: Appendix A - Site Record
Appendix A - Site Record Appendix A - Site Record Use the following table to record information about the installation and site, including its structure, cultural environs, and climatic conditions. This information will be helpful in identifying changes to the site over time. Site Record Site name (full name / station code / Latitude:... - Page 88 Appendix A - Site Record Site Record Ground surface type (for example, soil, Distance to potential noise sources sand, clay, other): (km): __________ Airport or air traffic __________ Coastline Seasonal temperature ranges (°C): __________ Railway _____________ January 1 to March 31 __________ Roads _____________ April 1 to June 30 __________ Tall structures _____ Height (m)
-
Page 89: Appendix B - Grounding Guidelines
Trillium Compact seismometers and Centaur digitizers are designed for high immunity to ground voltages, with isolated power inputs, differential signalling for noise immunity, and internal surge protection circuitry. - Page 90 For safety reasons, equipment should be connected to earth ground wherever possible. B.2 Grounding the Sensor in a Direct Burial Installation Use the guidelines in this section to ground a Trillium Compact Posthole that is installed in an uncased hole.
- Page 91 Figure B-1 - System grounding for burial in uncased hole (direct burial) B.3 Grounding the Sensor in a Metal-cased Hole Installation Use the guidelines in this section to ground a Trillium Compact Posthole seismometer that is installed in a metal-cased hole.
- Page 92 Appendix B - Grounding guidelines frequency horizontal noise effects. However a plastic casing may be used in special circumstances, for example if the site includes highly saline groundwater that would attack steel, or if there is a weight limit for transporting materials to the site. In these instances, a separate earth ground should be constructed via a suitable ground stake or buried screen.
- Page 93 Appendix B - Grounding guidelines B.4 Grounding the Sensor in a Vault or Test Lab Installation Use the guidelines in this section to ground a Trillium Compact Vault that is installed in a vault or in a test lab. In a vault installation, connect the case of the digitizer to a suitable earth ground such as a ground stake or buried screen.
-
Page 94: Appendix C - Carrying Case
The recommended method for transporting your Trillium Compact is in its specially designed Carrying Case / Insulating Cover (Nanometrics part number 16862). This enclosure functions as both a carrying case for transporting your Trillium Compact and as an insulating cover at the installation site. - Page 95 Appendix C - Carrying Case Figure C-1 - Cut-away illustration of a packed carrying case 16889R10 • 2020-11-12 Page 95...
-
Page 96: Appendix D - Leveling Cradle And Spike Kit
Section D.2 on page 97) use the shallow bowl of the cradle to hold the Trillium Compact. The supports on the deep side of the cradle are designed to act as feet when the spike kit is not in use. -
Page 97: Using The Leveling Cradle And Spike Kit
Long spike: One spike for use in rocky or frozen soil or ice. If more support is required, you can use the three thin spikes with the long spike. Figure D-2 shows four views of a Trillium Compact mounted on a leveling cradle with the various spike configurations. 16889R10 • 2020-11-12... - Page 98 3. Place the Trillium Compact on the cradle, aligning it to your alignment line (see "Aligning and Leveling a Trillium Compact in a Vault Installation" on page 39). 4. Level the Trillium Compact by adjusting it on the cradle until the leveling bubble is centered in the black ring. 16889R10 • 2020-11-12 Page 98...
- Page 99 Appendix D - Leveling Cradle and Spike Kit 5. Test the stability of the cradle by gently pressing down on a corner of the leveling cradle. It should remain stable and the leveling bubble should not move. 16889R10 • 2020-11-12 Page 99...
-
Page 100: Appendix E - Open Source Attributions
Appendix E - Open Source Attributions Appendix E - Open Source Attributions Discrete portions of the Nanometrics software product may include open source software code. Please see the attribution notices below. Contiki Copyright (c) 2017, X. All rights reserved. Redistribution and use in source and binary forms, with or without modification, are permitted provided that the following conditions are met: 1. -
Page 101: Glossary
Glossary Glossary AGND Analog Ground American Wire Gauge CHGND Chassis Ground DGND Digital Ground Electromagnetic Interference Global Positioning System MLNM Mode Low Noise Model NHNM New High-Noise Model NLNM New Low-Noise Model Probability Density Function Power Return Merchandise Authorization Root Mean Squared SLIP Serial-Over-IP TCP/IP... -
Page 102: Unit Abbreviations And Symbols
Unit Abbreviations and Symbols Unit Abbreviations and Symbols Abbreviation or Abbreviation or Definition Definition Symbol Symbol ° degree lb pound Ø diameter m meter µ micro m/s meter per second Ω ohm meter per second, squared A ampere mA milliampere AC alternating current MB megabyte b bit... -
Page 103: About Us
Web: www.nanometrics.ca Contact Technical Support If you need technical support please submit a request on the Nanometrics technical support site or by email or fax. Include a full explanation of the problem and related information such as log files. Support site: http://support.nanometrics.ca/...