Table of Contents
Advertisement
Quick Links
Advertisement
Table of Contents

Related Manuals for Pioneer AVH-Z5190BT


Summary of Contents for Pioneer AVH-Z5190BT
- Page 1 AVH-Z5190BT AVH-Z2190BT MONITOR RDS AV RECEIVER Owner’s Manual...
-
Page 2: Table Of Contents
........28 and Android Auto.... 47 ■ Connecting your iPod ..........28 Error messages ............47 Bluetooth ......10 Thank you for buying this Pioneer Basic operation ............28 ■ Detailed information regarding connected iPod product. Bluetooth connection ..........10 AUX ........ -
Page 3: Precaution
• If you notice smoke, a strange noise or odour from this product, or any other abnormal signs on the LCD screen, turn off the power immediately and consult your dealer or the nearest authorised Pioneer Service Station. Using this product in this condition may result in permanent damage to the system. -
Page 4: To Ensure Safe Driving
If you attempt to watch video image while driving, the warning “Viewing of front seat • Pioneer cannot guarantee compatibility with all USB mass storage devices and assumes no responsibility for any loss of data on media players, iPhone, smartphone, or other devices while using video source while driving is strictly prohibited.”... -
Page 5: Visit Our Website
• Pioneer regularly provides software updates to further improve it’s products. Please Z5190BT check the support section of the Pioneer website for all available software updates. Protecting the LCD panel and screen • Do not expose the LCD screen to direct sunlight when this product is not used. This may result in LCD screen malfunction due to the resulting high temperatures. -
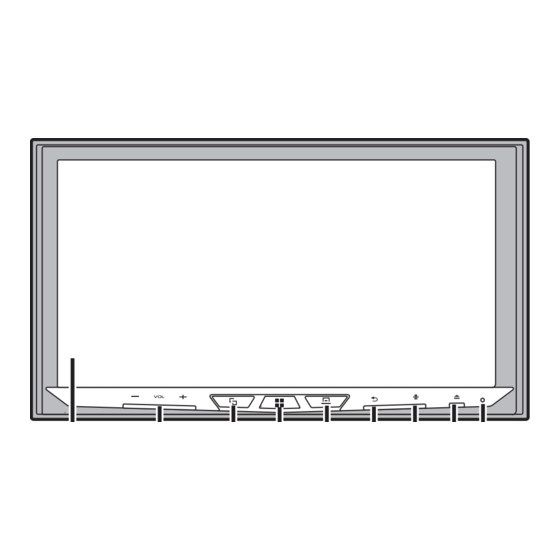
Page 6: Remote Control
LCD screen Thumb pad Use to select a menu on the DVD menu. VOL (+/ MUTE Press to switch between the Application screen and the AV operation screen. AUDIO Press to change the audio language, subtitle language or viewing angle Press and hold to switch to the camera view mode. -
Page 7: Basic Operation
Preparing the remote control Basic operation Remove the insulation sheet before use. Notes on using the LCD panel How to replace the battery Z5190BT WARNING • Keep hands and fingers clear of this product when opening, closing, or adjusting the LCD panel. Be especially cautious of children’s hands and fingers. -
Page 8: Starting Up The Unit
NOTE NOTE The remote control may not function properly in direct sunlight. To protect the LCD screen from damage, be sure to touch the screen only with your finger gently. Important Common touch panel keys • Do not store the remote control in high temperatures or direct sunlight. •... -
Page 9: Top Menu Screen
Favourite source icons Operating the menu bar TIPS Press • When you connect the external navigation system to this unit, the navigation The menu bar pops up on the screen. mode key is displayed at the middle of the right side of the display. •... -
Page 10: Bluetooth
Bluetooth CAUTION Never turn this product off and disconnect the device while the Bluetooth setting operation is being processed. Menu Item Description Bluetooth connection [Connection] Connect, disconnect, or delete registered Bluetooth device manually. Touch to delete registered device. Turn on the Bluetooth function on the device. To connect a registered Bluetooth device manually, touch Press the name of the device. -
Page 11: Hands-Free Phoning
registered devices are already connected, you can connect the remaining third device The following items are displayed. to use the audio function only from the switch devices key on the audio source screen. • Name of the current mobile phone •... - Page 12 Touch Press Touch Touch On the [Phone Book] screen, touch the desired name to display the contact’s phone Touch number. The voice recognition function launches and the voice control screen appears. Touch TIPS ▶Dialling from the preset dial list • You can also launch the voice recognition function by pressing •...
-
Page 13: Bluetooth Audio
▶The received call and dialled number histories Touch to turn private mode on or off. • You cannot make a call to the entry of an unknown user (no phone number) in the NOTES received call history. • If two mobile phones are connected to this product and the first phone is set to private mode, you •... -
Page 14: Appradio Mode
, you can also perform fast reverse or fast forwards. • Pioneer is not liable for any issues that may arise from incorrect or flawed app-based content. • The content and functionality of the supported applications are the responsibility of the App Sets a repeat play range. -
Page 15: Using The Keyboard
• If you connect your device to this product while an AppRadio Mode + compatible application is For smartphone (Android) users already running, the application operation screen will appear on this product. • The desired application is launched, and the application operation screen appears. NOTES •... -
Page 16: Av Source
The audio mix menu will be displayed on the screen. AV source Supported AV source You can play or use the following sources with this product. • Radio • CD • ROM (compressed audio or video files on discs) • DVD-Video •... -
Page 17: Selecting A Source
Selecting a source Adjusting the range of favourite source icons area NOTE This function is available only when you stop your vehicle in a safe place and apply the handbrake. Source on the AV source selection screen Press Press then touch Touch and hold Touch the source icon. -
Page 18: Ipod/Iphone Or Smartphone Connection For Av Source
Connecting via Bluetooth iPod/iPhone or The following sources are available when an iPod/iPhone is connected to the unit via Bluetooth. smartphone connection • iPod • Bluetooth audio for AV source Connect an iPod/iPhone with this product via Bluetooth (page 10). Press then touch Touch compatible desired source. -
Page 19: Smartphone (Android™ Device)
Connect a smartphone with this product via Bluetooth (page 10). You can connect and control an iPhone compatible with this product by using separately sold Press then touch connector cables. Touch compatible desired source. Connecting via Bluetooth The following sources are available when an iPhone is connected to the unit via Connecting via CD-MU200 Bluetooth. -
Page 20: Radio
Manual tuning Radio Seek tuning or non stop seek tuning Releasing the key in a few seconds skips to the nearest station from the current frequency. Keep holding the key for long seconds to perform, performs non stop seek tuning. Starting procedure Searches for a broadcast by PTY information (page 20). -
Page 21: Radio Settings
Menu Item Description To cancel the storage process [Alarm Interrupt]* The alarm broadcast can be received from the Touch [Cancel]. [On] [Off] last selected frequency, interrupting the other sources. [TA Interrupt]* Receives the traffic announcement from the last Radio settings [On] [Off] selected frequency, interrupting the other sources. -
Page 22: Disc
Press Disc Basic operation TIPS Inserting and ejecting a disc • By pressing then touch , you can also skip files/chapters forwards or backwards. • By pressing then touch and hold , you can also perform fast reverse or fast forwards. You can play a normal music CD, Video-CD, or DVD-Video using the built-in drive of this •... - Page 23 Displays the hidden function bar. Video source CAUTION You can also display the hidden function bar by flicking the bar from the right to the left. For safety reasons, video images cannot be viewed while your vehicle is in motion. To view video Searches for the part you want to play.
-
Page 24: Compressed Files
Displays the DVD menu keypad. Compressed files If items on the DVD menu appear, the touch panel keys may overlay them. If so, select an item using these touch panel keys. Touch , or to select the menu item then touch NOTE Inserting and ejecting media The way to display the menu differs depending on the disc. -
Page 25: Starting Procedure
Press For USB Press then touch Plugging a USB storage device Plug the USB storage device into the USB cable (page 25). Pull out the plug from the USB port of the USB cable. Touch [USB]. Plug a USB storage device into the USB cable. Playback is performed in order of folder numbers. - Page 26 Skips files forwards or backwards. Displays the hidden function bar. Sets a repeat play range for all files/the current folder/the current file. You can also display the hidden function bar by flicking the bar from the left to the right. Selects the previous folder or the next folder.
- Page 27 Selects a file from the list. Video source screen (Example: Disc) Touch a file on the list to playback. Touching a folder on the list shows its contents. You can play a file on the list by touching it. Skips files forwards or backwards. Still image source TIPS •...
-
Page 28: Ipod
Saves the current images as the wallpaper. iPod Touch the following items then touch [Yes] to overwrite the image. [As AV Screen]: Saves the image as the wallpaper for the AV screen. [As HomeScreen]: Saves the image as the wallpaper for the top menu screen. [As Both]: Saves the image as the wallpaper for both the AV screen and top menu screen. - Page 29 Displays the link search screen. Audio source screen 2 Select a song from the list related to the song currently playing. If you touch the artwork, the list of songs in the album is displayed. NOTE This function is not available while playing Apple Music Radio. Switches between playback and pause.
-
Page 30: Aux
Displays the pop-up menu for Apple Music Radio. • Touch [Play More Like This] to play back songs similar to the current song. • Touch [Play Less Like This] to set it not to play back the current song again. •... -
Page 31: Av Input
Hides the touch panel keys. AV input To display the keys again, touch anywhere on the screen. You can set the screen size for the video image (page 43). You can display the video image output by the device connected to video input. For Switches between the video input and audio input. -
Page 32: Mixtrax
MIXTRAX settings MIXTRAX Press MIXTRAX is an original technology for creating non-stop mixes of selections from your Touch then audio library, complete with DJ effects. The system setting screen appears. Touch [AV Source Settings]. MIXTRAX EZ operation Touch [MIXTRAX Settings]. You can use this unit to play USB audio files. -
Page 33: Settings
[Auto Mix] Settings Menu Item Description [Auto Mix] Select whether to perform mixing the sound output from You can adjust various settings in the main menu. [On] [Off] AppRadio Mode + and AV source sound automatically. Displaying the setting screen [Input/Output settings] Press Menu Item... - Page 34 Description CAUTION [Parking Assist Guide Adjusting the guidelines by dragging or touching Pioneer recommends the use of a camera which outputs mirror reversed images, otherwise the screen image may appear reversed. Adjust] on the screen. • Immediately verify whether the display changes to the rear view camera image when the gearstick is Touch [Default] to reset the settings.
- Page 35 Service Station. Touch two corners of the screen along the arrows then • Please use a PIONEER wiring harness for each car model when touch the centres of the two [+] marks at the same [With Adapter] mode is engaged, otherwise select [W/o time twice.
- Page 36 Menu Item Description Menu Item Description [Day] Turns the dimmer function to off. [Temperature] Adjust the colour temperature, resulting in a better white [-3] to [+3] balance. [Night] Turns the dimmer function to on. [Dimmer Duration] Adjust the time that the dimmer is turned on or off by * With some pictures, you cannot adjust [Hue] and [Colour].
-
Page 37: Theme Settings
Menu Item Description Audio settings [Licence] Displaying the open source licence. The menu items vary according to the source. Some of the menu items become unavailable when the volume is set to mute. Theme settings Menu Item Description The menu items vary according to the source. [Graphic EQ] Select or customise the equaliser curve. - Page 38 Menu Item Description Menu Item Description [Source Level Adjuster] Adjust the volume level of each source to prevent radical [Time Alignment] Select or customise the time alignment settings to reflect [-4] to [+4] changes in volume when switching between sources other [On] [Off] the distance between the listener’s position and each than FM.
- Page 39 ▶Before operating the Auto EQ function Menu Item Description • Perform Auto EQ in a quiet place with the vehicle engine and air conditioning [Automatic Level Control] Corrects automatically the audio level difference between switched off. Also, cut the power of car phones or mobile phones in the vehicle, or the music files or the sources.
-
Page 40: Video Settings
Disconnect the iPhone or smartphone device. NOTE [Subwoofer Settings] is available only when [Subwoofer] is [On]. Turn on the ignition switch (ACC ON). Press If the vehicle’s air conditioner or heater is turned on, turn it off. Touch then Switch the AV source to [Source OFF] (page 17). Touch [Crossover] or [Subwoofer Settings]. - Page 41 Menu Item Description Menu Item Description [TV Aspect] Set the aspect ratio suitable for your rear display 16:9 (wide [Parental] Set restrictions so that children cannot watch violent or screen display) or 4:3 (regular display). (We recommend adult-oriented scenes. You can set the parental lock level in use of this function only when you want to fit the aspect steps as desired.
-
Page 42: Favourite Menu
[Video Signal Setting] Favourite menu Menu Item Description [AV] Select the suitable video signal setting when you connect Registering your favourite menu items in shortcuts allows you to quickly jump to the [Auto] [PAL] [NTSC] [PAL- this product to an AV equipment. registered menu screen by a simple touch on the [Favourites] screen. -
Page 43: Other Functions
[Zoom] Displays the images enlarging them vertically. Other functions [Normal] Displays images without changing the 4:3 aspect ratio. NOTES • For USB sources, 4:3 aspect ratio may not be displayed. • Devices connected with USB MTP are not supported. Setting the time and date [Trimming] An image is displayed across the entire screen with the horizontal-to-vertical ratio left as is. -
Page 44: Apple Carplay
Apple CarPlay is turned on during a call on a mobile phone other than an Apple CarPlay compatible • PIONEER IS NOT RESPONSIBLE AND DISCLAIMS LIABILITY FOR THIRD PARTY (NON-PIONEER) APPS device, the Bluetooth connection will be terminated after the call ends. -
Page 45: Android Auto
• Android Auto allows access to applications other than those listed that are subject to limitations while driving. • PIONEER IS NOT RESPONSIBLE AND DISCLAIMS LIABILITY FOR THIRD PARTY (NON-PIONEER) APPS AND CONTENT, INCLUDING WITHOUT LIMITATION ANY INACCURACIES OR INCOMPLETE INFORMATION. -
Page 46: Starting Procedure
The system setting screen appears. Touch [Driving Position]. Touch the item. [Left] Select for a left-hand drive vehicle. [Right] Touch to mute. Touch again to cancel mute. Select for a right-hand drive vehicle. Touch [+]/[-] to adjust the guidance volume. Starting procedure Displays the main sound volume. -
Page 47: Appendix For Apple Carplay And Android Auto
CarPlay and Android Auto the U.S. and other countries. devices Lightning • Pioneer accepts no responsibility for data lost from an iPod, even if that data is lost Lightning is a trademark of Apple Inc. – Check if the device is compatible with Error messages while using this product. -
Page 48: Connection
Do not allow any bare • Pioneer is not liable for any issues that features, including airbags, hazard lamp wiring to remain exposed. may arise from incorrect or flawed app- buttons, or •... -
Page 49: Before Installing This Product
• Make sure that the cables and wires will *Please refer to connection for a unused speaker leads, which if left Rear output (STD)/Middle range output not interfere with or become caught in connection method. uncovered may cause a short circuit. (NW) any of the vehicle’s moving parts, •... -
Page 50: Speaker Leads
whether the car is moving forwards or Rear speaker (STD) Power amp (sold backwards. Middle range speaker (NW) Yellow/black separately) To Front output (STD) If you use an equipment with Mute To high range output (NW) function, wire this lead to the Audio Front speaker (STD) Mute lead on that equipment. -
Page 51: Ipod/Iphone With Lightning Connector
iPhone with 30-pin connector • Some appropriate settings are required iPod/iPhone with WARNING to use rear view cameras. For details, refer USE INPUT ONLY FOR REVERSE OR MIRROR Lightning connector to [Camera settings] (page 33). Smartphone IMAGE REAR VIEW CAMERA. OTHER USE MAY RESULT IN INJURY OR DAMAGE. -
Page 52: Installation
To Yellow Installation To Red, white To video output To audio outputs External video component (sold separately) Precautions before Before installing NOTE installation • Consult with your nearest dealer if The appropriate setting is required to use installation requires drilling holes or the external video component. -
Page 53: Installation Using The Screw Holes On The Side Of This Product
you leave ample space behind the rear Mounting on the sun Installation on the panel and wrap any loose cables so they are not blocking the vents. visor steering column Fit the microphone lead into the Detach the microphone base from the 5 cm groove. -
Page 54: Adjusting The Microphone Angle
– Park your vehicle in a safe place and here, contact your dealer or the nearest apply the handbrake. authorised Pioneer service facility. No video output from the connected Common problems equipment. → The [AV Input] or [AUX Input] setting is incorrect. -
Page 55: Error Messages
→ The parental lock is on. check the screen on the smartphone. – Connect the cables correctly. dealer or your nearest Pioneer service – Turn the parental lock off or change centre. The screen is displayed, but operation the level. - Page 56 Pioneer Service Station. DRM. operating limits. – Disconnect the USB storage device – Replace the USB storage device. and do not use it. Turn the ignition...
-
Page 57: Handling And Care Of Discs
• Despite our careful design of the product, Handling and care of Detailed information Playing DualDisc small scratches that do not affect actual discs operation may appear on the disc surface for playable media • DualDiscs are two-sided discs that have a as a result of mechanical wear, ambient recordable CD for audio on one side and conditions for use or handling of the disc. - Page 58 characteristics, scratches or dirt on the • You cannot connect a USB storage device • Maximum playback time of audio file DivX subtitle files disc, or dirt, scratches or condensation on to this product via a USB hub. stored on an USB storage device: 7.5 h •...
- Page 59 WMA compatibility without video data, DivX files encoded .avi • Files may not be able to be played back with LPCM (Linear PCM) audio codec depending on the bit rate. Format: MPEG-4/DivX/H.264/H.263 • This product is not compatible with the •...
-
Page 60: Bluetooth
Bluetooth and extensions differ depending on the WARRANTIES OF MERCHANTABILITY AND SIG, Inc. and any use of such marks by PIONEER application which is used to encode. This FITNESS FOR A PARTICULAR PURPOSE ARE CORPORATION is under license. Other unit plays back AAC files encoded by “Made for iPod”... - Page 61 Remember that use of this system for LCD screen to prevent disruption of the • When the LCD screen is subjected to • Latest version of the Pioneer compatible commercial or public viewing purposes video in the form of disturbances such as...
- Page 62 0 to 140 step (2.5 cm/step) +10 dB to -24 dB (1 dB/step) visible. In that case, please consult your TFT Active matrix driving Bass boost: dealer or the nearest authorised Pioneer DVD drive Colour system: Gain: +12 dB to 0 dB Service Station.
- Page 63 Video: JPEG decoding format (MSC Mode only): AM tuner 1.0 V p-p/75 Ω (±0.2 V) .jpeg, .jpg, .jpe Frequency range: Number of channels: 2 (stereo) Pixel Sampling: 4:2:2, 4:2:0 530 kHz to 1 640 kHz (10 kHz) MP3 decoding format: Decode Size: Frequency range: MPEG-1 &...
- Page 64 © 2017 PIONEER CORPORATION. All rights reserved. <QRB3739-A> ID...