Table of Contents
Advertisement
Available languages
Available languages
Advertisement
Chapters
Table of Contents

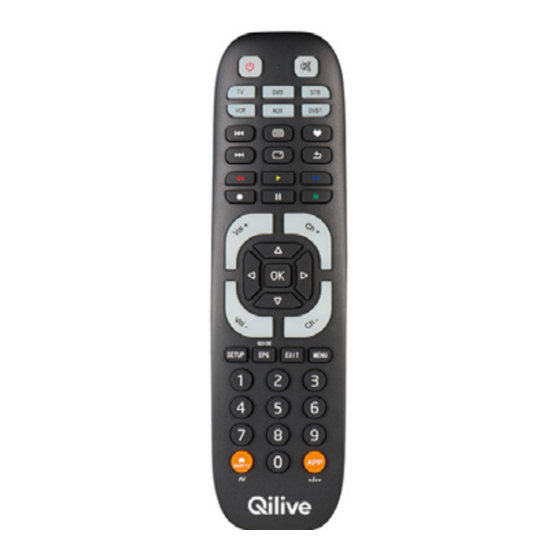
Summary of Contents for Qilive Q.1660
- Page 1 Universal Remote Control 6-in-1 Q.1660 Télécommande Universelle 6-en-1 Mando a distancia universal 6 en 1 Comando remoto Universal 6-em-1 Pilot uniwersalny 6 w 1 Univerzális távirányító 6 az 1-ben Telecomandă universală 6 în 1...
- Page 2 User manual P. 04 Manuel d’utilisation P. 15 Manual de instrucciones p. 27 Manual de utilização P. 39 Instrukcja obsługi S. 51 Használati utasítás O. 63 Manual de instrucţiuni P. 75...
-
Page 4: Table Of Contents
TABLE OF CONTENTS: 1. SAFETY GUIDELINES P. 04-06 2. PRODUCT DESCRIPTION P. 06 3. SET-UP P. 06 4. DEVICE FUNCTIONS P. 07-08 5. SPECIAL FUNCTIONS P. 08-12 6. MAINTENANCE P. 12 7. TROUBLESHOOTING P. 12-13 8. GUARANTEES P. 13-14 1. SAFETY GUIDELINES Before using this remote control, please read the instructions below and keep them for future reference: 1. - Page 5 14. Do not try to repair the product yourself or attempt to carry out maintenance work. Delegate any repair or maintenance work to qualified technicians. 15. Use the item in moderate weather conditions only. This marking indicates that this product must not be disposed of with other household waste within the European Union.
-
Page 6: Product Description
event of an emergency). 27. Do not short-circuit the batteries. 28. Do not try to recharge the batteries. 29. Do not throw the batteries onto flames. 30. Keep the batteries out of reach of children. 31. Do not try to open up the batteries, take care not to damage them, do not dispose of them into the environment and make sure that young children do not swallow them. -
Page 7: Device Functions
blinks 5 times after you’ve pressed a button, this means that the battery level is low and the batteries should be replaced soon. 4. DEVICE FUNCTIONS Notes before use: • To ensure the infrared transmission is working properly, always hold the remote If you don’t enter anything in 30 seconds, the SETUP mode (Settings) will automatically end. -
Page 8: Special Functions
or that not all functions are available. In this case, try the code for the selected type/brand of device in the list. • A valid code is automatically remembered. • If an invalid code is entered, the Status LED (2) will blink 3 times then stay solidly lit. - Page 9 device currently controlled and change the channel on a second device. All other commands aren’t affected. To activate the Channel Punch-Through function: Simultaneously press on the [MUTE] (22) and [Vol+] (6) buttons for approximately 3 seconds until the Status LED (2) comes on and stays solid.
- Page 10 Press the [Vol+] button (6). The setting is activated when the Status LED (2) blinks 3 times then goes off. The [Vol+] (6), [Vol-] (8) and [MUTE] (22) buttons have then been successfully transferred. Unlocking the volume control - Volume unlock Simultaneously press the [SETUP] (9) button for approximately 3 seconds until the Status LED (2) comes on solidly.
- Page 11 lit. A new code can then be entered. • Setup mode is automatically closed approximately 30 seconds if no button is used. The Status LED (2) will blink 3 times then go off. 5.4. Learning Function This remote control has a learning function. This enables you to transfer the functions of your original remote control to this universal remote control.
-
Page 12: Maintenance
When replacing the batteries in the universal remote control, the button functions learned are retained. 5.5. DELETING LEARNED FUNCTIONS Deleting a learned function Simultaneously press the [MUTE] (22) and [VOL+] (6) buttons until the Status LED (2) lights up solidly. Select the device for which you want to delete a programmed function (e.g. -
Page 13: Guarantees
Issue Solution My universal remote control isn't working 1. Check the audiovisual device If the main switch for the device is switched off, the universal remote control cannot control the device. 2. Check that the batteries have been inserted properly, respecting the polarity. 3. - Page 14 (e.g. sales receipt), the product and the accessories it came with, and its original packaging, for all countries other than France. It is important to have the date of purchase, the model and the serial number or IMEI number to hand (this information is usually indicated on the product, packaging, or on your proof of purchase).
- Page 15 TABLE DES MATIÈRES : 1. CONSIGNES DE SÉCURITÉ P. 15-17 2. DESCRIPTION DU PRODUIT P. 17 3. INSTALLATION P. 17 4. FONCTIONS DE L’APPAREIL P. 17-20 5. FONCTIONS SPECIALES P. 20-24 6. ENTRETIEN P. 24 7. DEPANNAGE P. 24-25 8. GARANTIES P.
- Page 16 14. Ne tentez pas de réparer le produit vous-même ni d’effectuer des travaux d’entretien. Déléguez tous travaux d’entretien à des techniciens qualifiés. 15. Utilisez l’article dans des conditions climatiques modérées uniquement. Ce marquage indique que ce produit ne doit pas être jeté...
-
Page 17: Description Du Produit
neuves ou des piles de différents types. 26. Retirez les piles des produits que vous ne comptez pas utiliser pendant un certain temps (à l’exception de ceux qui peuvent être utilisés en cas d’urgence). 27. Ne court-circuitez pas les piles. 28. -
Page 18: Fonctions De L'appareil
NB : • Des piles alcalines sont recommandées. Utilisez deux piles de type “AAA” (LR 03/Micro). • Cette télécommande mémorise les réglages même en cas de remplacement de la pile. • La télécommande s’éteint automatiquement dès qu’une touche est maintenue enfoncée pendant plus de 15 secondes. - Page 19 4.2. Saisie directe des codes Avec la télécommande universelle, vous trouverez une liste de codes. La liste de codes contient des codes à quatre chiffres permettant de paramétrer la télécommande sur la plupart des fabricants d’équipements audiovisuels. Pour une identification plus aisée, les codes sont d’abord classés par type d’appareil (TV, DVD, etc.), puis dans le type d’appareil, par ordre alphabétique de marque.
-
Page 20: Fonctions Speciales
• Si aucune sélection d’appareil n’est effectuée, la dernière sélection d’appareil effectuée est automatiquement utilisée. • Jusqu’à 350 codes d’appareils les plus courants peuvent être mémorisés dans la mémoire interne. En raison d’un grand nombre d’appareils audiovisuels disponibles sur le marché, il se peut que seules les fonctions principales les plus courantes soient disponibles. - Page 21 ensuite allumée de façon fixe. Appuyez sur la touche [Ch-] (16). La LED d’état(1) (2) clignote une fois puis s’allume de façon fixe. Appuyez sur la touche de sélection d’appareil souhaitée (par ex. [STB]). Le réglage est désactivé lorsque la LED d’état(1) (2) clignote 3 fois puis s’éteint.
- Page 22 Appuyez simultanément sur les touches [MUTE] (22) et [Vol+] (6) pendant environ 3 secondes jusqu’à ce que la LED d’état(1) (2) s’allume de façon fixe. Sélectionnez, à l’aide de la touche, l’appareil que vous souhaitez enregistrer sur votre télécommande (par ex. [TV]). Une sélection réussie est indiquée par le fait que la LED d’état(1) (2) clignote une fois, puis s’allume de façon fixe.
- Page 23 et ainsi entraver le processus d’apprentissage. • La distance entre les deux télécommandes et la source de lumière la plus proche doit être d’au moins 1 mètre. • Le processus d’apprentissage se termine sans sauvegarde si aucune touche n’est actionnée pendant 30 secondes ou si aucun signal n’est reçu pendant le mode d’apprentissage activé.
-
Page 24: Entretien
sélection conforme. Entrez le code [9] [8] [1], la LED d’état(1) (2) clignote 2 fois puis reste de nouveau allumée de façon fixe. Appuyez sur la touche que vous voulez supprimer. La LED d’état(1) (2) clignote 4 fois et la fonction souhaitée est supprimée. Suppression de toutes les fonctions apprises Appuyez simultanément sur les touches [MUTE] (22) et [VOL+] (6) pendant environ 3 secondes jusqu’à... -
Page 25: Garanties
Problème Résolution plusieurs codes d’appareil sont Pour déterminer le bon code pour répertoriés pour la marque de mon l’appareil audiovisuel, essayez les codes appareil audiovisuel, comment puis-je les uns après les autres jusqu’à ce que sélectionner le bon code d’appareil ? la plupart des touches fonctionnent correctement. - Page 26 • Échanger le produit retourné avec un produit qui a au moins les mêmes fonctionnalités et qui est équivalent en termes de performance. • Rembourser le produit au prix d’achat mentionné sur la preuve d’achat. Les produits réparés ou remplacés peuvent inclure des composants et des équipements nouveaux et/ou reconditionnés.
-
Page 27: Precauciones De Seguridad
ÍNDICE DE CONTENIDOS: 1. PRECAUCIONES DE SEGURIDAD P. 27-29 2. DESCRIPCIÓN DEL PRODUCTO P. 29 3. INSTALACIÓN P. 29-30 4. FUNCIONES DEL APARATO P. 30-32 5. FUNCIONES ESPECIALES P. 32-36 6. MANTENIMIENTO P. 36 7. REPARACIÓN P. 36-37 8. GARANTÍAS P. - Page 28 en las características técnicas. 13. En caso de rotura o deterioro, no intentar abrir el producto y dejar de utilizarlo. 14. No intentar reparar el producto ni efectuar operaciones de mantenimiento. Delegar todo tipo de reparación a técnicos profesionales. 15. Utilizar el artículo únicamente en condiciones climáticas moderadas.
-
Page 29: Descripción Del Producto
25. No mezclar pilas usadas con pilas nuevas ni tampoco pilas de diferentes tipos. 26. Retirar las pilas de productos que no se vayan a utilizar durante cierto tiempo (excepto aquellos productos que se puedan utilizar en caso de emergencia). 27. -
Page 30: Funciones Del Aparato
NOTA: • Se recomienda utilizar pilas alcalinas. Utilizar dos pilas de tipo «AAA» (LR03/ Micro). • Este mando a distancia memoriza los ajustes incluso cuando se sustituyen las pilas. • El mando a distancia se apaga automáticamente cuando se mantiene pulsada una de sus teclas durante más de 15 segundos. - Page 31 4.2. Introducción directa de códigos El mando a distancia universal incluye una lista de códigos. La lista de códigos contiene códigos de cuatro cifras que permiten configurar el mando a distancia con la mayoría de los fabricantes de equipos audiovisuales. Para identificar los códigos más fácilmente, los códigos están clasificados por tipo de aparato (TV, DVD, etc.) y, en cada tipo de aparato, por orden alfabético de marca.
-
Page 32: Funciones Especiales
• Cuando no se selecciona ningún aparato, se utiliza automáticamente la última selección de aparato. • En la memoria interna se pueden memorizar hasta 350 códigos de los aparatos más comunes. Debido a la gran cantidad de aparatos audiovisuales existentes en el mercado, es posible que solo estén disponibles las funciones principales más comunes. - Page 33 y se quedará iluminado. Pulsar en la tecla [CH-] (16). El LED de estado (2) parpadea una vez y se queda iluminado. Pulsar en la tecla de selección del aparato deseado (por ejemplo, [STB]). El ajuste queda desactivado cuando el LED de estado (2) parpadea 3 veces y se apaga.
- Page 34 Para activar la función Macro Power Pulsar simultáneamente en las teclas [MUTE] (22) y [Vol+] (6) durante unos 3 segundos, hasta que el LED de estado (2) se quede iluminado. Con la tecla correspondiente, seleccionar el aparato que se quiera registrar en el mando a distancia (por ejemplo, [TV]).
- Page 35 • La distancia entre los mandos y la fuente de luz más cercana debe ser superior a un metro. • El proceso de aprendizaje se termina sin guardarse cuando no se acciona ninguna tecla durante 30 segundos o bien si no se recibe ninguna señal mientras esté...
-
Page 36: Mantenimiento
Introducir el código [9] [8] [1] y el LED de estado (2) parpadeará 2 veces y se quedará iluminado. Pulsar en la tecla cuya función se quiera eliminar. El LED de estado (2) parpadeará 4 veces y se eliminará la función en cuestión. Eliminación de todas las funciones aprendidas Pulsar simultáneamente en las teclas [MUTE] (22) y [VOL+] (6) durante unos 3 segundos, hasta que el LED de estado (2) se quede iluminado. -
Page 37: Garantías
Problema Resolución Si hay varios códigos guardados para la Para determinar el código adecuado marca de un aparato audiovisual, ¿cuál de un aparato audiovisual, hay que ir es el código adecuado? probando los diferentes códigos hasta que la mayoría de las teclas funcione correctamente. - Page 38 servicio posventa podrá, dentro de los límites de la legislación local, sea: • Reparar o reemplazar las piezas defectuosas. • Cambiar el producto devuelto por uno que tenga, al menos, las mismas funciones y que sea equivalente en cuanto a sus prestaciones. •...
- Page 39 SUMÁRIO: 1. INFORMAÇÕES DE SEGURANÇA P. 39-41 2. DESCRIÇÃO DO PRODUTO P. 41 3. INSTALAÇÃO P. 41-42 4. FUNÇÕES DO APARELHO P. 42-44 5. FUNÇÕES ESPECIAIS P. 44-48 6. MANUTENÇÃO P. 48 7. RESOLUÇÃO DE AVARIAS P. 48-49 8. GARANTIAS P.
- Page 40 14. Não tente proceder à reparação do produto nem efetue trabalhos de manutenção. Delegue todos os trabalhos de manutenção aos técnicos qualificados. 15. Utilize o artigo unicamente em condições climatéricas moderadas. Esta marcação indica que este produto não deve ser eliminado com outros resíduos domésticos dentro da União europeia.
- Page 41 26. Retire as pilhas dos produtos que conta não utilizar durante um certo tempo (exceto aquelas que poderão ser utilizadas em cado de urgência). 27. Não provoque um curto-circuito das pilhas. 28. Não tente recarregar as pilhas 29. Não deite as pilhas para o fogo. 30.
- Page 42 Micro). • Este comando remoto memoriza os ajustes mesmo em caso de substituição das pilhas. • O comando remoto apaga-se automaticamente quando uma tecla é premida durante mais de 15 segundos. Isto permite prolongar a duração de vida das pilhas caso o comando remoto se encontre num local onde as teclas podem permanecer premidas de maneira duradoura, por ex.
- Page 43 Com o comando remoto universal, encontrará uma lista de códigos. A lista de códigos contém códigos de quatro algarismos que permitem configurar o comando remoto na maioria dos fabricantes de equipamentos audiovisuais. Para uma identificação mais fácil, os códigos são primeiro classificados por tipo de aparelho (TV, DVD, etc.), e dentro do tipo de aparelho, por ordem alfabética de marca.
- Page 44 principais mais comuns. Se for o caso, repita as etapas 1 a 5 para encontrar um código mais compatível. Para certos modelos específicos de aparelhos, poderá acontecer que não existam códigos disponíveis. 4.4. Reconhecimento dos códigos O reconhecimento dos códigos permite-lhe determinar um código já memorizado. Prima a tecla “SETUP”...
- Page 45 Se for inserido um código não válido, o LED de estado (2) pisca 3 vezes e permanece aceso de forma fixa. Pode então ser inserido um novo código 5.2. Punch-Through do volume sonoro/Bloquear/Desbloquear o som - Volume Lock and Unlock Com a função Punch-Through do volume, os comandos [Vol+] (6) ou [Vol-] (8), [MUTE] (22) podem ignorar o aparelho atualmente comandado e mudar os canais de um segundo aparelho.
- Page 46 aparelho a gravar no seu comando remoto (por exemplo, [STB]), que deverá futuramente ser colocado em funcionamento. Uma seleção bem- sucedida é indicada pelo facto de que o LED de estado (2) pisca uma vez e depois fica fixa. Prima a tecla [OK] (17). O ajuste foi ativado com êxito quando o LED de estado (2) pisca 3 vezes e depois apaga.
- Page 47 Ativação do modo de memorização Prima simultaneamente as teclas [MUTE] (22) e [VOL+] (6) durante cerca de 3 segundos até que o LED de estado (2) se acenda de forma fixa. Utilize a tecla de seleção do aparelho para selecionar o aparelho (por exemplo, [TV]) para o qual foi memorizada uma nova função.
- Page 48 Selecione o aparelho para o qual pretende eliminar todas as funções programadas ([TV], etc. ) com a ajuda da tecla do aparelho. A intermitência do LED de estado (2), e depois o facto de acender de forma contínua indica uma seleção conforme. Insira o código [9] [8] [2], o LED de estado (2) pisca 2 vezes e permanece de novo aceso de forma fixa.
- Page 49 Problema Resolução A marca do meu aparelho audiovisual Neste caso, efetue pesquisa não está mencionada na lista de códigos. do código manual (secção 4.2) ou automática (secção 4.3). Para pesquisa de códigos, todos os códigos para um tipo de aparelho são testados em todos os fabricantes, por exemplo, todos os códigos para os recetores SAT, independentemente do fabricante.
- Page 50 Exclusão da garantia comercial: • Danos ou problemas causados pela utilização incorreta, acidentes, alteração ou ligação elétrica com corrente ou tensão incorreta. • Utilização ou armazenamento prejudicial à boa conservação do dispositivo (oxidação, corrosão), utilização de energia, utilização ou instalação não conforme as instruções do fabricante, ou negligência ou utilização de periféricos, software ou consumíveis inadequados.
- Page 51 SPIS TREŚCI: 1. WSKAZÓWKI BEZPIECZEŃSTWA STR. 51-53 2. OPIS PRODUKTU STR. 53 3. INSTALACJA STR. 53-54 4. SPECYFIKACJE URZĄDZENIA STR. 54-56 5. FUNKCJE SPECJALNE STR. 56-60 6. KONSERWACJA STR. 60 7. ROZWIĄZYWANIE PROBLEMÓW STR. 60-61 8. GWARANCJA STR. 61-62 1. WSKAZÓWKI BEZPIECZEŃSTWA Instrukcje należy przeczytać...
- Page 52 14. Nie próbować samodzielnie naprawiać produktu przeprowadzać żadnych prac konserwacyjnych. W tym celu należy przekazać urządzenie wykwalifikowanym technikom. 15. Korzystać z produktu wyłącznie w umiarkowanych warunkach pogodowych. To oznaczenie na produkcie wskazuje, że na terenie całej Unii Europejskiej nie należy go wyrzucać z innymi odpadami komunalnymi.
- Page 53 należy wyjąć z niego baterie (nie usuwać, jeśli urządzenie może być stosowane w nagłych wypadkach). 27. Nie zwierać baterii. 28. Nie próbować ładować baterii. 29. Nie wrzucać baterii do ognia. 30. Baterie powinny być przechowywane w miejscu niedostępnym dla dzieci. 31.
- Page 54 w miejscu, w którym przyciski zostaną wciśnięte na stałe, np. między poduszkami w kanapie. • Pilot ten wskazuje niski poziom baterii. Jeśli Dioda LED stanu (2) mignie 5 razy po naciśnięciu klawisza, oznacza to, że baterie są rozładowane i należy je szybko wymienić.
- Page 55 Wybrać przyciskiem urządzenie, które ma zostać zarejestrowane na pilocie (np. TV). Jeśli pomyślnie dokonano wyboru, Dioda LED stanu (2) mignie jeden raz, a następnie będzie świecił światłem stałym. Na liście kodów należy wyszukać kod odpowiadający danemu urządzeniu. Wprowadzić odpowiedni czterocyfrowy kod za pomocą klawiszy numerycznych od 0 do 9.
- Page 56 pilocie (np. TV). Jeśli pomyślnie dokonano wyboru, Dioda LED stanu (2) mignie jeden raz, a następnie będzie świecił światłem stałym. Nacisnąć przycisk „SETUP” (9). Dioda LED stanu (2) mignie jeden raz, a następnie będzie świecić światłem stałym. Aby wyszukać pierwszą cyfrę, cisnąć jeden z klawiszy od 0 do 9 (11). Dioda LED stanu (2) mignie raz dla pierwszej cyfry czterocyfrowego kodu.
- Page 57 drugiego urządzenia. Wszystkie pozostałe urządzenia pozostaną bez zmian. WAŻNE: W przypadku niektórych urządzeń przyciski [Vol+] (6), [Vol-] (8) oraz [MUTE] (22) nie działają. W takim przypadku pilot automatycznie prześle polecenia do zaprogramowanego telewizora. Przesyłanie ustawień głośności - Blokowanie dźwięku Naciskać jednocześnie przycisk [SETUP] (9) przez około 3 sekundy, aż Dioda LED stanu (2) zacznie się...
- Page 58 Aby wyłączyć funkcję zasilania Macro Nacisnąć jednocześnie przyciski [MUTE] (22) i [VOL+] (6) przez około 3 sekundy, aż Dioda LED stanu (2) będzie świecić światłem stałym. Wybrać przyciskiem urządzenie, które ma zostać zarejestrowane na pilocie (np. [TV]). Pomyślny wybór można stwierdzić, gdy Dioda LED stanu (2) mignie jeden raz, a następnie będzie świecił...
- Page 59 będzie świecić światłem stałym. Pilot uniwersalny znajduje się teraz w trybie uczenia się. Uwaga: • Jeśli Dioda LED stanu (2) mignie 8 razy i automatycznie wyłączy się tryb uczenia się, oznacza to, że zbyt wiele przycisków ma już przypisane funkcje i dostępna pamięć...
- Page 60 Przywracanie ustawień fabrycznych Naciskać jednocześnie przycisk [SETUP] (9) przez około 3 sekundy, aż Dioda LED stanu (2) zacznie się świecić światłem stałym. Wcisnąć przycisk [MUTE] (22). Dioda LED stanu (2) mignie jeden raz, a następnie będzie świecić światłem stałym. Wcisnąć przycisk [0]. Gdy Dioda LED stanu (2) mignie 4 razy, oznacza to pomyślny reset do wartości domyślnych.
- Page 61 Problem Rozwiązanie Wypróbowano wszystkie możliwe W takim przypadku należy wyszukać kod kody odpowiadające marce mojego ręcznie (część 4.2) lub automatycznie urządzenia i znajdujące się na liście, (część 4.3). wyszukać kody, niestety żaden figurujący tam kod nie można przetestować wszystkie kody działa.
- Page 62 • Profesjonalne lub zbiorowe, przemysłowe lub komercyjne wykorzystanie produktu. • Przeprowadzenie modyfikacji urządzeń, których plomba gwarancyjna lub numer seryjny zostały uszkodzone, naruszone, usunięte lub uległy oksydacji. • W przypadku baterii przeznaczonych do wymiany i akcesoriów okres gwarancji wynosi 6 miesięcy. •...
- Page 63 TARTALOMJEGYZÉK: 1. BIZTONSÁGI ELŐÍRÁSOK o. 63-65 2. A TERMÉK LEÍRÁSA o. 65 3. ELHELYEZÉS o. 65-66 4. A KÉSZÜLÉK FUNKCIÓI o. 66-68 5. SPECIÁLIS FUNKCIÓK o. 68-72 6. KARBANTARTÁS o. 72 7. HIBAELHÁRÍTÁS o. 72 8. JÓTÁLLÁS o. 73-74 1. BIZTONSÁGI ELŐÍRÁSOK A távirányító...
- Page 64 tovább. 14. Ne próbálja meg saját maga megjavítani a terméket, vagy karbantartást végezni rajta. Minden karbantartási munkát bízzon képzett szakemberekre. 15. A terméket csak mérsékelt éghajlati viszonyok között használja. Ez a jelölés azt jelzi, hogy ezt a terméket az Európai Unió...
- Page 65 25. Ne használjon egyszerre használt és új elemeket, vagy különböző típusú elemeket. 26. Vegye ki az elemeket azokból a termékekből, amelyeket egy ideig nem kíván használni (kivéve azokat, amelyek vészhelyzetben használhatók). 27. Ne zárja rövidre az akkumulátorokat. 28. Ne próbálja meg újratölteni az elemeket. 29.
- Page 66 MEGJEGYZÉS: • Alkalikus elemek használata ajánlott. Két „AAA” típusú elemet (LR 03/micro) használjon. • Ez a távirányító megjegyzi a beállításokat akkor is, ha az elemet kicserélik. • A távirányító automatikusan kikapcsol, ha egy gombot 15 másodpercnél tovább tart lenyomva. Ez meghosszabbítja az akkumulátor élettartamát, ha a távirányító beszorul olyan helyre, ahol a gombok hosszú...
- Page 67 amelyekkel a távirányító beállítható a legtöbb audiovizuális berendezésgyártóra. A könnyebb azonosítás érdekében a kódok először a készülék típusa (TV, DVD stb.), majd a készüléktípuson belül a márka szerint betűrendben vannak felsorolva. Kapcsolja be a távirányítón rögzíteni kívánt készüléket. Nyomja meg a “SETUP” gombot (9) addig, amíg a Állapot LED (2) folyamatosan nem világít.
- Page 68 előfordulhat, hogy nem áll rendelkezésre kód. 4.4. Kódfelismerés A kódfelismerés lehetővé teszi egy már tárolt kód meghatározását. Nyomja meg a “SETUP” gombot (9) addig, amíg a Állapot LED (2) folyamatosan nem világít. A gombbal válassza ki a távirányítón rögzíteni kívánt eszközt (pl. TV). Ha a kiválasztás sikeres, a Állapot LED (2) egyszer felvillan, majd folyamatosan világít.
- Page 69 5.2. A hangerő átváltása/rögzítése/feloldása (punch-through) - Volu- men Lock and Unlock A hangerő átváltása funkcióval (punch - through) a [Vol+] (6) vagy [Vol-] (8), [MUTE] (22) parancsok figyelmen kívül hagyhatják az éppen vezérelt eszközt és módosíthatják egy másik készülék hangerejét. Az összes többi parancsra ez nem vonatkozik. MEGJEGYZÉS: Egyes készülékeken a [Vol+] (6), [Vol-] (8) és [MUTE] (22) gomboknak nincs szerepük.
- Page 70 Nyomja meg a [OK] (17) gombot. A beállítás aktiválása sikerült, ha a Állapot LED (2) 3-szor villog, majd kialszik. A Macro Power funkció kikapcsolásához Nyomja meg egyszerre a [MUTE] (22) és a [VOL+] (6) gombokat körülbelül 3 másodpercig, amíg a Állapot LED (2) folyamatosan nem világít.
- Page 71 LED (2) egyszeri felvillanása, majd folyamatos világítása jelzi. Vigye be a [9] [8] [0] kódot, a Állapot LED (2) 2-szer felvillan, majd folyamatosan világít. Az univerzális távirányító most tanulási üzemmódban van. Megjegyzés: • Ha a Állapot LED (2) 8-szor felvillan és a tanulás mód automatikusan befejeződik, azt jelzi, hogy a gombok már megtanulták a funkciókat és a rendelkezésre álló...
- Page 72 Nyomja meg a [SETUP] gombot (2), a Állapot LED 4-szer villog, és az összes megtanult funkció törlődik. Az alapértelmezett értékek visszaállítása Nyomja meg egyszerre a [SETUP] (9) gombot körülbelül 3 másodpercig, amíg a Állapot LED (2) folyamatosan nem világít. Nyomja meg a [MUTE] (22) gombot. A Állapot LED (2) egyszer felvillan, majd folyamatosan világít.
- Page 73 Probléma Megoldás Kipróbáltam a listában rendelkezésre Ebben az esetben végezzen manuális álló összes kódot az én audiovizuális (4.2. szakasz) vagy automatikus (4.3. eszközömhöz, de a felsorolt kódok szakasz) kódkeresést. A kódkeresés egyike sem működik. során készüléktípus összes kódját tesztelték az összes gyártóra vonatkozóan, pl.
- Page 74 • Módosított termékek, amelyeknek jótállási címkéje vagy sorozatszáma sérült, megváltozott, eltávolították vagy rozsdás. • A cserélhető akkumulátorokra és tartozékokra 6 hónap jótállás vonatkozik. • Az akkumulátor meghibásodására, ha a túl hosszú töltés, vagy az útmutatóban leírt biztonsági előírások figyelmen kívül hagyása miatt következett be •...
- Page 75 CUPRINS: 1. RECOMANDĂRI DE SIGURANŢĂ P.75-77 2. DESCRIEREA PRODUSULUI P. 77 3. INSTALAREA P. 77-78 4. FUNCŢIILE APARATULUI P. 78-80 5. FUNCŢII SPECIALE P. 80-84 6. ÎNTREŢINEREA P. 84 7. DEPANAREA P. 84-85 8. GARANŢII P. 85-86 1. RECOMANDĂRI DE SIGURANŢĂ Înainte de a utiliza această...
- Page 76 avarii, ci încetați să-l mai utilizați. 14. Nu încercați să reparați produsul dumneavoastră înșivă, nici să efectuați operațiuni de întreținere. Apelați la serviciile unui tehnician calificat pentru operațiunile de întreținere. 15. Utilizați articolul doar în condiții climaterice moderate. Acest marcaj indică faptul că acest produs nu trebuie să...
- Page 77 de tipuri diferite. 26. Scoateți bateriile din produse atunci când considerați că le utilizați de o anumită perioadă de timp (cu excepția celor care pot fi utilizate în cazuri de urgență). 27. Nu scurtcircuitați bateriile. 28. Nu încercați să reîncărcați bateriile. 29.
- Page 78 • Sunt recomandate bateriile alcaline. Utilizați doar baterii de tipul “AAA” (LR 03/ Micro). • Această telecomandă memorează setările chiar şi atunci când a fost schimbată bateria. • Telecomanda se închide, în mod automat, atunci când o tastă este menținută apăsată...
- Page 79 4.2. Introducerea directă a codurilor Folosind telecomanda universală, veți găsi o listă a codurilor. Lista codurilor conține coduri de patru cifre ce permit parametrarea telecomenzii pentru majoritatea producătorilor de echipamente audiovizuale. Pentru o identificare mai specifică, codurile sunt mai întâi clasate după tipul aparatului (TV, DVD, etc.), apoi în funcție de tipul aparatului, în ordinea alfabetică...
- Page 80 este posibil ca doar funcțiile principale cele mai curente să fie disponibile. Dacă aceasta este situația, parcurgeți din nou etapele de la 1 la 5, pentru a găsi un cod mai compatibil. Pentru unele modele specifice ale aparatelor, este posibil ca niciun cod să...
- Page 81 Dacă un cod invalid este introdus, LED de stare (2) clipește de 3 ori, apoi rămâne aprins permanent. Un nou cod poate fi atunci introdus. 5.2. Funcția Punch-Through a volumului/Blocarea/Deblocarea sunetu- lui Blocarea şi deblocarea sunetului Cu funcția Punch-Through a volumului, comenzile [Vol+] (6) sau [Vol-] (8), [MUTE] (22) pot ignora aparatul telecomandat în prezent şi schimba volumul la un alt doilea aparat.
- Page 82 Utilizați tasta de selecție a aparatului pentru a selecta al doilea aparat ce trebuie înregistrat pe telecomandă (de exemplu, [STB]), care va trebui să fie pus în funcțiune ulterior. O selecție reușită este confirmată de faptul că LED de stare (2) clipește o dată, apoi rămâne aprins permanent. Apăsați pe tasta [OK] (17).
- Page 83 Activarea modului de învățare Apăsați simultan pe tastele [MUTE] (22) şi [VOL+] (6) , timp de aproximativ 3 secunde, până ce LED de stare (2) rămâne aprins permanent. Utilizați tasta de selecție a aparatului pentru a selecta aparatul (de exemplu, [TV]) pentru care o nouă funcție trebuie să fie învățată. O selecție reușită...
- Page 84 ([TV], etc. ) cu ajutorul tastei aparatului. Dacă LED de stare (2) clipește, apoi este aprins permanent, atunci selecția este conformă. Introduceți codul [9] [8] [2], LED de stare (2) clipește de 2 ori, apoi rămâne aprins permanent. Apăsați pe tasta [SETUP] (Setare), LED de stare (2) clipește de 4 ori şi toate funcțiile învățate sunt șterse.
- Page 85 Problemă Soluție Marca aparatului meu audiovizual nu În acest caz, efectuați căutare este menționată în lista codurilor. manuală a codurilor (secțiunea 4.2) sau automată (secțiunea 4.3). Pentru căutarea codurilor, toate codurile pentru un tip de aparat sunt testate la producători, de exemplu toate codurile pentru receptoarele SAT, indiferent de producător.
- Page 86 Excluderea garanției comerciale: • Daunele sau problemele provocate de o utilizare incorectă, un accident, o avariere sau o conectare la o sursă electrică de intensitate sau de tensiune necorespunzătoare. • Utilizarea sau depozitarea neconforme cu buna conservare a dispozitivului (oxidare, coroziune), utilizarea energiei, utilizarea sau instalarea neconformă...
- Page 88 600108720 00040074...