NAD M50.2 - Digital Music Player Manual
- Owner's manual (13 pages) ,
- Service manual (26 pages)
Advertisement
IMPORTANT SAFETY INSTRUCTIONS
SAVE THESE INSTRUCTIONS FOR LATER USE.
FOLLOW ALL WARNINGS AND INSTRUCTIONS MARKED ON THE AUDIO EQUIPMENT.
- Read instructions - All the safety and operating instructions should be read before the product is operated.
- Retain instructions - The safety and operating instructions should be retained for future reference.
- Heed Warnings - All warnings on the product and in the operating instructions should be adhered to.
- Follow Instructions - All operating and use instructions should be followed.
- Cleaning - Unplug this product from the wall outlet before cleaning. Do not use liquid cleaners or aerosol cleaners. Use a damp cloth for cleaning.
- Attachments - Do not use attachments not recommended by the product manufacturer as they may cause hazards.
- Water and Moisture - Do not use this product near water-for example, near a bath tub, wash bowl, kitchen sink, or laundry tub; in a wet basement; or near a swimming pool; and the like.
- Accessories - Do not place this product on an unstable cart, stand, tripod, bracket, or table. The product may fall, causing serious injury to a child or adult, and serious damage to the product. Use only with a cart, stand, tripod, bracket, or table recommended by the manufacturer, or sold with the product. Any mounting of the product should follow the manufacturer's instructions, and should use a mounting accessory recommended by the manufacturer.
![]()
A product and cart combination should be moved with care. Quick stops, excessive force, and uneven surfaces may cause the product and cart combination to overturn.- Ventilation - Slots and openings in the cabinet are provided for ventilation and to ensure reliable operation of the product and to protect it from overheating, and these openings must not be blocked or covered. The openings should never be blocked by placing the product on a bed, sofa, rug, or other similar surface. This product should not be placed in a built-in installation such as a bookcase or rack unless proper ventilation is provided or the manufacturer's instructions have been adhered to.
- Power Sources - This product should be operated only from the type of power source indicated on the marking label. If you are not sure of the type of power supply to your home, consult your product dealer or local power company. The primary method of isolating the amplifier from the mains supply is to disconnect the mains plug. Ensure that the mains plug remains accessible at all times. Unplug the AC power cord from the AC outlet if the unit will not be used for several months or more.
- Grounding or Polarization - This product may be equipped with a polarized alternating-current line plug (a plug having one blade wider than the other). This plug will fit into the power outlet only one way. This is a safety feature. If you are unable to insert the plug fully into the outlet, try reversing the plug. If the plug should still fail to fit, contact your electrician to replace your obsolete outlet. Do not defeat the safety purpose of the polarized plug.
- Power Cord Protection - Power-supply cords should be routed so that they are not likely to be walked on or pinched by items placed upon or against them, paying particular attention to cords at plugs, convenience receptacles, and the point where they exit from the product.
- Outdoor Antenna Grounding - If an outside antenna or cable system is connected to the product, be sure the antenna or cable system is grounded so as to provide some protection against voltage surges and built-up static charges. Article 810 of the National Electrical Code, ANSI/NFPA 70, provides information with regard to proper grounding of the mast and supporting structure, grounding of the lead-in wire to an antenna discharge unit, size of grounding conductors, location of antenna discharge unit, connection to grounding electrodes, and requirements for the grounding electrode.

NOTE TO CATV SYSTEM INSTALLER
This reminder is provided to call the CATV system installer's attention to Section 820-40 of the NEC which provides guidelines for proper grounding and, in particular, specifies that the cable ground shall be connected to the grounding system of the building, as close to the point of cable entry as practical.

OPTIONAL ANTENNA GROUNDING ELECTRODE.
DRIVEN 8 FEET (2.44M) INTO THE EARTH IF REQUIRED BY LOCAL CODES, SEE NEC SECTION 810.21(f).
- Lightning - For added protection for this product during a lightning storm, or when it is left unattended and unused for long periods of time, unplug it from the wall outlet and disconnect the antenna or cable system. This will prevent damage to the product due to lightning and power line surges.
- Power Lines - An outside antenna system should not be located in the vicinity of overhead power lines or other electric light or power circuits, or where it can fall into such power lines or circuits. When installing an outside antenna system, extreme care should be taken to keep from touching such power lines or circuits as contact with them might be fatal.
![burn hazard]()
![shock hazard]()
Overloading - Do not overload wall outlets, extension cords, or integral convenience receptacles as this can result in a risk of fire or electric shock.![burn hazard]()
![shock hazard]()
Object and Liquid Entry - Never push objects of any kind into this product through openings as they may touch dangerous voltage points or short out parts that could result in a fire or electric shock. Never spill liquid of any kind on the product.

THE APPARATUS SHOULD NOT BE EXPOSED TO DRIPPING OR SPLASHING, AND OBJECTS FILLED WITH LIQUIDS, SUCH AS VASES, SHOULD NOT BE PLACED ON THE APPARATUS. AS WITH ANY ELECTRONIC PRODUCTS, USE CARE NOT TO SPILL LIQUIDS INTO ANY PART OF THE SYSTEM. LIQUIDS CAN CAUSE A FAILURE AND/OR A FIRE HAZARD.
- Damage Requiring Service - Unplug this product from the wall outlet and refer servicing to qualified service personnel under the following conditions:
- When the power supply cord or plug is damaged.
- If liquid has been spilled, or objects have fallen into the product.
- If the product has been exposed to rain or water.
- If the product does not operate normally by following the operating instructions. Adjust only those controls that are covered by the operating instructions as an improper adjustment of other controls may result in damage and will often require extensive work by a qualified technician to restore the product to its normal operation.
- If the product has been dropped or damaged in any way.
- when the product exhibits a distinct change in performance-this indicates a need for service.
![burn hazard]()
![shock hazard]()
Replacement Parts - When replacement parts are required, be sure the service technician has used replacement parts specified by the manufacturer or have the same characteristics as the original part. Unauthorized substitutions may result in fire, electric shock, or other hazards.- Safety Check - Upon completion of any service or repairs to this product, ask the service technician to perform safety checks to determine that the product is in proper operating condition.
- Heat - The product should be situated away from heat sources such as radiators, heat registers, stoves or other products (including amplifiers) that produce heat.
 Battery must not be exposed to excessive heat such as sunshine, fire or the like.

TO REDUCE THE RISK OF FIRE OR ELECTRIC SHOCK, DO NOT EXPOSE THIS PRODUCT TO RAIN OR MOISTURE.

TO PREVENT ELECTRIC SHOCK, MATCH WIDE BLADE OF PLUG TO WIDE SLOT, FULLY INSERT.
 THE LIGHTNING FLASH WITH ARROWHEAD SYMBOL, WITHIN AN EQUILATERAL TRIANGLE, IS INTENDED TO ALERT THE USER TO THE PRESENCE OF UNINSULATED "DANGEROUS VOLTAGE" WITHIN THE PRODUCT'S ENCLOSURE THAT MAYBE OF SUFFICIENT MAGNITUDE TO CONSTITUTE A RISK OF ELECTRIC SHOCK TO PERSONS.
 THE EXCLAMATION POINT WITHIN AN EQUILATERAL TRIANGLE IS INTENDED TO ALERT THE USER TO THE PRESENCE OF IMPORTANT OPERATING AND MAINTENANCE (SERVICING) INSTRUCTIONS IN THE LITERATURE ACCOMPANYING THE APPLIANCE.
RISK OF ELECTRIC SHOCK
DO NOT OPEN
TO REDUCE THE RISK OF ELECTRIC SHOCK, DO NOT REMOVE COVER (OR BACK), NO USER SERVICEABLE PARTS INSIDE REFER SERVICING TO QUALIFIED SERVICE PERSONNEL

This equipment employs a Laser System. To ensure proper use of this product, please read the complete owner's manual, available online at www.nadelectronics.com/support, and retain for future reference. Should the unit require maintenance, contact an authorized service location. Use of controls, adjustments or the performance of procedures other than those specified may result in exposure to laser radiation. To prevent direct exposure to laser beam, do not try to open the enclosure. Visible laser radiation when the enclosure is opened.
DO NOT STARE INTO BEAM
CLASS 1 LASER PRODUCT
CAUTION REGARDING PLACEMENT
To maintain proper ventilation, be sure to leave a space around the unit (from the largest outer dimensions including projections) that is equal to or greater than shown below.
Left and Right Panels: 10 cm
Rear Panel: 10 cm
Top Panel: 10 cm

If this product is used at 240VAC, a suitable attachment plug should be used.
EUROPEAN UNION NOTICE FOR WIRELESS PRODUCT
Products bearing the CE marking comply with the R&TTE Directive (1999/5/EC), EMC Directive (2004/108/EC) and the Low Directive (2006/95/EC) issued by the Commission of the European Community. Indoor use only.

NOTES ON ENVIRONMENTAL PROTECTION

At the end of its useful life, this product must not be disposed of with regular household waste but must be returned to a collection point for the recycling of electrical and electronic equipment. The symbol on the product, user's manual and packaging, point this out.
The materials can be reused in accordance with their markings. Through re-use, recycling of raw materials or other forms of recycling of old products, you are making an important contribution to the protection of our environment. Your local administrative office can advise you of the responsible waste disposal point.
RECORD YOUR MODEL NUMBER (NOW, WHILE YOU CAN SEE IT)
The model and serial number of your new M50.2 are located on the back of the cabinet. For your future convenience, we suggest that you record these numbers here:
INTRODUCTION
WHAT'S IN THE BOX
Packed with your M50.2 you will find
- Two detachable mains power cord
- Four magnetic feet
- Two wireless antenna
- Cleaning cloth
- USB flash drive
- Quick Setup Guide
SAVE THE PACKAGING
Please save the box and the packaging that came with the M50.2. Should you move or need to transport your M50.2, this is the safest container to use. We've seen too many otherwise perfect components damaged in transit for lack of a proper shipping carton. So please, save that box!
FEET INSTALLATION
The supplied magnetic feet can be easily installed by aligning and attaching them to their corresponding foot shoe. Refer to illustration below.

QUICK SETUP GUIDE
This simple guide will help you get started with your M50.2.
CONNECT!
- Follow the enclosed M50.2 Digital Music Player Quick Setup Guide for connecting input and output devices and the Wi-Fi and Bluetooth antennas.
- The connectors used in the setup connection are not supplied with the M50.2 package.
CONNECT TO NETWORK
- Using an Ethernet cable (not supplied), connect one end to M50.2's LAN port and the other end directly to your Wired home network or router.
- Alternatively, the M50.2 can also be connected by Wireless connection. Refer to section below about "CONNECT TO Wi-Fi".
CONNECT TO POWER
The M50.2 comes supplied with two separate AC power cords. Select the AC power cord appropriate for your region.
- Before connecting the AC power cord's plug to the wall outlet, connect firmly first the other end of the AC power cord to M50.2's AC Mains input socket.
- Set the POWER switch at the rear panel to ON and then press Standby button on the top side of the front panel to power up the M50.2.
CONNECT TO WI-FI
- On your tablet or smartphone, look for the Wi-Fi network (hotspot) matching your M50.2's unique network ID, and join it. The network ID is listed as the product name (i.e. M50.2) immediately followed by the last four digits in the MAC (Machine Access Control address (example: M50.2-001A).
- Open a web browser on your tablet or smartphone, enter http://10.1.2.3 and press "Go" or ENTER.
- A Control Panel page should appear. Select "Configure WiFi" and you will be redirected to "Configure Wireless" page.
- Select your home network or applicable wireless network name (SSID) from the "Configure wireless" drop down menu
- Enter your home network's Wireless Password (Passphrase, WEP/WAP key as applicable) in the field "Enter password or key (if protected)".
The Password (Passphrase, WEP/WAP key as applicable) is the same Password that was setup or generated during the configuration of your home router or gateway. An incorrect password entered in the "Configure wireless" menu screen will simply cause the unit to timeout and return to Hotspot Mode.
Trying multiple passwords will not damage the device in any way. If you are not sure what is your Password, login to your router and locate the Password in the applicable setup screen for Wireless Configuration section. Refer to your router's documentation for further information.
- Select a "Player name" from the drop down list or use the on-screen keyboard to create a customized room name in the field "Custom name".
- Press "Update" and wait for the Status indicator to turn solid blue. This indicates successful connection to your home Wi-Fi network.
- Reselect your home Wi-Fi network from your tablet or smartphone's main network settings.
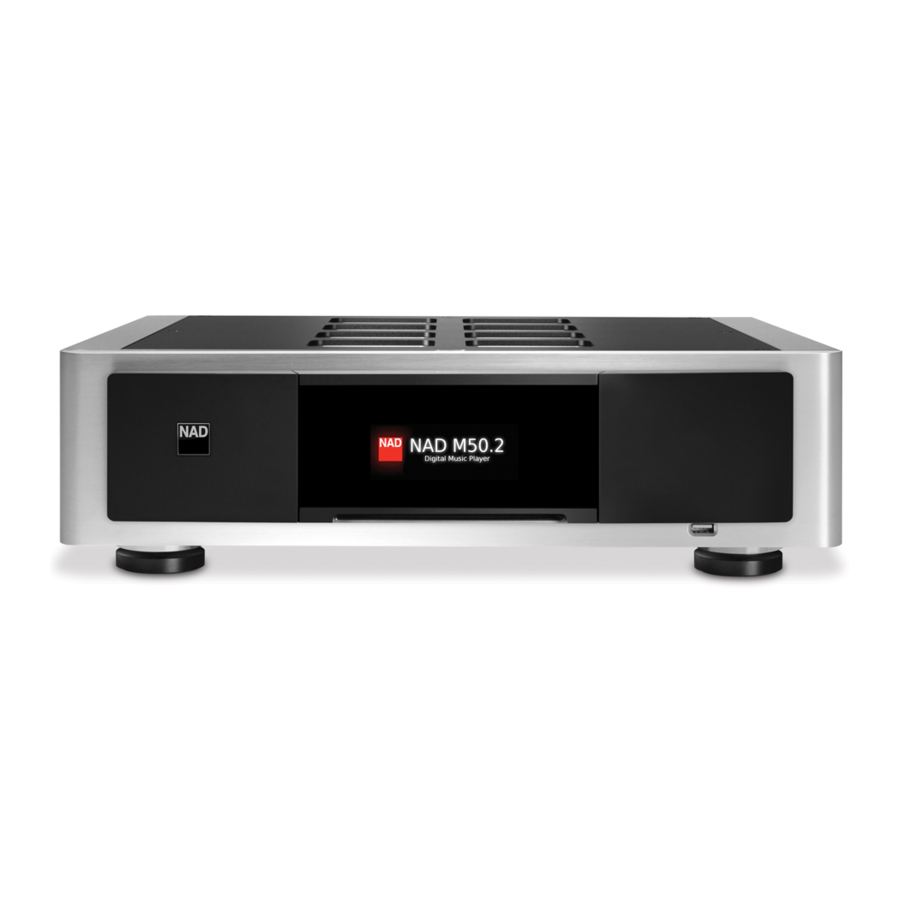
IDENTIFICATION OF CONTROLS
FRONT PANEL

![]() (STANDBY) BUTTON
(STANDBY) BUTTON
- Touch the
![]() (Standby) button on top side of the front panel to switch ON the M50.2 from standby mode. Press and hold
(Standby) button on top side of the front panel to switch ON the M50.2 from standby mode. Press and hold ![]() (Standby) button until M50.2 switches back to standby mode.
(Standby) button until M50.2 switches back to standby mode. - One press or touch of the
![]() (Standby) button will not switch the M50.2 to standby mode. This is intended to avoid unintentionally setting the M50.2 to standby mode if one happens to just touch or press the o (Standby) button at operating mode.
(Standby) button will not switch the M50.2 to standby mode. This is intended to avoid unintentionally setting the M50.2 to standby mode if one happens to just touch or press the o (Standby) button at operating mode. - The Status indicator will change to amber color at standby mode.

For the  (Standby) button to activate, the following must occur:
- The supplied power cord from the M50.2 must be plugged in to a power source.
- The rear panel POWER switch must be set to ON.
- STATUS INDICATOR
This is an indicator of network connectivity. Below is a table of the LED blink codes and their corresponding descriptions.
| LED BLINK CODE | DESCRIPTION |
| Alternate flashing red and green | Upgrade mode |
| Red | Powering up, rebooting |
| Solid green | Hotspot mode |
| Solid red | Booting up |
| Solid red | Cannot boot up; drive error |
| Solid white | Indexing |
| Solid blue | Connected to network – ready to use with BluOS App |
- DISPLAY (TOUCH PANEL DISPLAY)
- Display visual information about current music or media source.
- Touch control functions are also displayed depending upon the source or media.
SAMPLE DISPLAY SCREEN
- Large Album Artwork Display (Now Playing)

- New screen is opened showing Main Menu options (refer to Main Menu display below).
- Large album art cover.
- Internal hard drive indicator.
- Disc loaded in the disc slot is ejected.
- Information about album, artist and music name.
- Logo or icon for music service provider or media source input (analog, optical, coaxial, audio, Bluetooth, USB)
- Playback controls for applicable media (song, title, file, music station and others).
![]() Skip to next media.
Skip to next media.
![]() Play or pause current media.
Play or pause current media.
![]() Skip back to previous media.
Skip back to previous media.
- Main Menu

Touch item to display applicable option.- Screen is returned to "Now Playing" display.
- "Now Playing" screen is displayed.
- A new screen is opened showing "Settings" option (below).
- Settings


 Skip to next media.
 Play or pause current media.
 Skip back to previous media.

Large Artwork (ON/OFF)
ON: "Now Playing" screen is displayed with large album artwork cover.
OFF: "Now Playing" screen is displayed with minimized album artwork cover.
Reboot (Yes/Cancel)
Yes: M50.2 will power off and restart again.
Cancel: Current condition is retained.
Factory Reset
Yes: M50.2 will be restored to its factory default settings.
Cancel: Current condition is retained.
Firmware Version
Current firmware version is shown.
- Minimized Album Artwork Display (Now Playing)

- Minimized album artwork cover.
- In addition to item 7 above, Repeat and Random controls are available for selection.
- Elapsed time and remaining time of current music.

- DISC SLOT
- Insert CD or audio disc face down into this slot.
- Select "Audio Disc" from the BluOS Controller App's navigation drawer to select the loaded disc for playback or ripping.
- Depending upon Rip/Play options settings, the loaded disc will "Always Rip", "Always Play CD" or "Prompt for Rip or Play".
- Refer also to "Ripping" menu under "Settings" option in the BluOS Controller App's navigation.
- FRONT USB
- Connect to this input a USB mass storage device with music files. Typical USB mass storage devices compatible with M50.2 include portable flash memory devices and external hard drives (FAT32formatted).
REAR PANEL

- ANALOG AUDIO INPUT
- Input for line level sources such as CD player, tuner or any compatible devices. Use a twin RCA-to-RCA lead to connect the source device's left and right "Audio Output" to this input. The source will appear as an Analog Input in the navigation drawer of the BluOS Controller App.
- WIFI ANTENNA TERMINAL
- Connect supplied wireless antenna to this WIFI antenna terminal.
- DIGITAL AUDIO
COAXIAL IN, OPTICAL IN
- Connect to corresponding optical or coaxial digital audio output of sources such as CD or BD/DVD players, digital cable box, digital tuners and other applicable components. The source will appear as an Optical Input or Coaxial Input in the navigation drawer of the BluOS Controller App.
COAXIAL OUT, OPTICAL OUT
- Connect to corresponding optical or coaxial digital audio input of compatible devices such as receivers, computer soundcards or other digital processors.
- HDMI OUT
- Connect to compatible devices with HDMI input.
- Connected display device will show similar image or information reflected in the touch panel display.
HDMI OUT does not support I2S DACs.
- RS 232
- Use an RS232 straight through serial cable (not supplied) to interface this port to the corresponding RS232 port of another equipment like the NAD M12, NAD M32 or any compatible NAD models. Through this RS232 connection, the VOLUME slider in the App can be adjusted to increase or decrease the audio output level of the M50.2.
- USB 1, USB 2 (Type A)
- Connect USB mass storage device to any or both of these USB Type A input terminals.
- Typical USB mass storage device compatible with M50.2 include portable flash memory devices and external hard drives (FAT32 recommended).
- A notification will be shown in BluOS Controller App if a USB device is inserted. Click on USB in the navigation drawer to browse content.
- LAN
LAN connection must be setup for wired connection to be established. Set up a Wired Ethernet broadband router with broadband internet connection. Your router or home network should have a built-in DHCP server to consummate the connection.
- Using a standard straight-through Ethernet cable (not supplied), connect one end of the Ethernet cable to the LAN port of your wired Ethernet broadband router and the other end to M50.2's LAN port.
- SERVICE/USB
- This is not for consumer use. Only authorized service personnel can access this USB port and SERVICE button.
- USB (Type B) port and SERVICE button are for servicing purposes only.
- BT (BLUETOOTH) ANTENNA TERMINAL
- Connect supplied wireless antenna to this BT antenna terminal.
- +12V TRIGGER
+12V TRIGGER OUT
The +12V TRIGGER OUT is used for controlling external equipment equipped with a +12V trigger input.
- Connect this +12V TRIGGER OUT to the other equipment's corresponding +12V DC input jack using a mono cable with 3.5mm male plug.
- This output will be 12V when the M50.2 is ON and 0V when it is either OFF or in standby mode.
+12V TRIGGER IN
With this input triggered by a 12V DC supply, the M50.2 can be switched ON remotely from Standby Mode by compatible devices such as amplifiers, preamplifiers, receivers, etc. If the 12V DC supply is cut off, the M50.2 will return to standby mode.
- Connect this +12V Trigger input to the remote device's corresponding +12V DC output jack using a mono cable with 3.5mm male plug. The controlling device must be equipped with a +12V trigger output to use this feature.
- IR IN
- This input is connected to the output of an IR (infrared) repeater (Xantech or similar) or the IR output of another component to allow control of the M50.2 from a remote location.
- To program IR Remote commands into your M50.2 via IR IN, go to the Settings Menu, select Player, IR remote. Simply select the function desired from the IR Remote Menu, point an IR remote control at the IR repeater and press the button to perform that function. Once programmed, a check-mark will appear in the Configure IR Trigger function list.
- AC MAINS INPUT
- The M50.2 comes supplied with two separate mains power cords. Select the mains power cord appropriate for your region.
- Before connecting the plug to the mains power source, ensure that it is firmly connected to the M50.2's AC Mains input socket.
- Always disconnect the mains power plug from the mains power source before disconnecting the cable from the M50.2's AC Mains input socket.
- POWER
- The POWER switch supplies the master AC mains power for the M50.2.
- When the POWER switch is set to ON position, the M50.2 goes to standby mode as shown by the amber status condition of the front panel Status indicator.
- If you do not intend to use the M50.2 for long periods of time (such as when on vacation), switch off the POWER switch.
- FUSE HOLDER
- Only qualified NAD service technicians can have access to this fuse holder. Opening this fuse holder may cause damage thus voiding the warranty of your M50.2.
OPERATION
MAKING THE MOST OF YOUR DEVICE
Download the BluOS Controller App from the respective App stores of Apple iOS devices (iPad, iPhone and iPod), Android devices, Kindle Fire and Windows or Mac desktops.


Launch the BluOS Controller App and explore everything from your streaming music services, internet radio stations, networked music collections and favorites with quick and easy single-search discovery.
Visit https://support.bluesound.com for more information about setup and operation guidelines of your M50.2.
SPECIFICATIONS
| AUDIO | |
| Rated distortion | ≤0.01% |
| Signal-to-noise ratio | >80dB |
| Sample rate | 32 - 192 kHz |
| Bit depth | 16-24 bit |
| Supported file formats | MP3, AAC, WMA, OGG, WMA-L, FLAC, ALAC, WAV, AIFF, MQA |
| Supported Cloud Services | WiMP, Slacker Radio, Qobuz, HighResAudio, JUKE, Deezer, Murfie, HDTracks, Spotify, TIDAL, Napster |
| Free Internet Radio | TuneIn Radio, iHeartRadio, Calm Radio, Radio Paradise |
| CONNECTIVITY | |
| Input | RCA Stereo: Analog SPDIF: Coaxial, Optical (TOSLINK) USB: 2 x Type A (for USB memory stick and supported peripherals - FAT32 formatted) Type B mini (for servicing purposes only) IR IN 3.5 mm jack +12V Trigger IN RS232 |
| Output | SPDIF: Coaxial, Optical (TOSLINK) HDMI AES +12V Trigger OUT |
| Network | Ethernet/LAN: Ethernet RJ45, GigE |
| Bluetooth | aptX |
| User Interface | Free BluOS Controller App available for download from the respective App stores of Apple iOS devices (iPad, iPhone and iPod), Android devices, Kindle Fire and Windows or Mac desktops. |
| Supported Operating Systems | Music playback from network shares on the following desktop operating systems: Windows - XP, Vista, 7, 8 and later Mac OS X - 10.6 and later |
| GENERAL | |
| AC power supply | 100 - 240V 50/60 Hz |
| Standby power | <0.5W |
| Unit dimensions (W x H x D) | 435 x 133 x 380 mm 17 1/8 x 5 1/4 x 15 inches |
| Shipping weight | 16.5 kg (36.4 lbs) |
TheM50.2 specifications may be subject to change without prior notice. Check out www.nadelectronics.com for the latest specifications and features of the M50.2.

Documents / Resources
References
![www.nadelectronics.com]() Index of /wp1.nadelectronics.com/support
Index of /wp1.nadelectronics.com/support![www.apple.com]() App Store - Apple
App Store - Apple![play.google.com]() Google Play
Google Play![www.nadelectronics.com]() NAD Electronics | High Performance Hi-Fi and Home Theatre
NAD Electronics | High Performance Hi-Fi and Home Theatre
Download manual
Here you can download full pdf version of manual, it may contain additional safety instructions, warranty information, FCC rules, etc.
Advertisement
Thank you! Your question has been received!


Need Assistance?
Do you have a question about the M50.2 that isn't answered in the manual? Leave your question here.