Table of Contents
Advertisement
Quick Links
Advertisement
Table of Contents

Related Manuals for Lorex ACH20-1B


Summary of Contents for Lorex ACH20-1B
- Page 1 Instruction Manual ACH20–1B Thermal Monocular Camera...
- Page 3 Instruction Manual ACH20–1B Thermal Monocular Camera #LX400125; r. 1.0/60326/60326; en-US...
- Page 4 Thank you for purchasing this product. Lorex Technology Inc. is committed to providing our customers with a high quality, reliable security solution. This manual refers to the following models: ACH20–1B For the latest online manual, downloads and product updates, and to learn about our complete line of accessory products, please visit our website at: www.lorextechnology.com...
-
Page 5: Table Of Contents
Table of contents Introduction ..................1 Important Safeguards and Warnings ............2 Symbol Conventions..............2 Safety Instructions ..............2 2.2.1 Transportation..............2 2.2.2 Operation ..............2 2.2.3 Charging ............... 3 2.2.4 Cleaning ............... 3 2.2.5 Storage ................. 4 Privacy Protection Notice .............. 4 Disclaimers................ - Page 6 Table of contents 8.3.1 Wi-Fi ................30 8.3.2 Sleep Mode (Suspend Mode) ..........30 8.3.3 Automatic Sleep Timer (Auto Suspend)........31 8.3.4 Automatic Shutdown............32 8.3.5 USB Mode..............33 8.3.6 FFC (Flat-Field Correction) Mode ........35 8.3.7 DPC (Defective Pixel Correction).........36 8.3.8 Screen Brightness............37 8.3.9 Status Bar ..............38 8.3.10 Language Settings ............40 8.3.11 System Information ............41...
-
Page 7: Introduction
Introduction Thermal imaging, or thermography, is a way to improve the visibility of objects in complete darkness, haze, or tough conditions. Your Thermal Monocular Camera uses infrared sensors to detect heat given off by a person, animal, or other object and can capture the temperature ranges of objects around us. -
Page 8: Important Safeguards And Warnings
Important Safeguards and Warnings Follow all instructions for safe use and handling of your camera. 2.1 Symbol Conventions The symbols found in this document are defined as follows. Symbol & Name Meaning Indicates a potentially hazardous situation which, if not avoided, can result in minor to moderate injury, or serious damage to the CAUTION product. -
Page 9: Charging
Important Safeguards and Warnings • DO NOT expose your camera to moisture. Contact with water could cause permanent damage to the internal components. In case of liquid entering the camera, quickly turn off your cam- era and contact your local technical support center for further instructions. •... -
Page 10: Storage
2.4 Disclaimers • This manual is for reference only. • Lorex will not be held liable for any damages resulting from the use of this product. • This manual will be updated according to the latest laws and regulations of related jurisdictions. -
Page 11: What's Included
What’s Included The following accessories are packaged with your camera. Check that all accessories are included. Name Quantity Thermal Monocular Camera Micro-USB Cable Universal Power Adapter Plug Adapter* Camera Bag Legal and Regulatory Information QSG and Warranty Card *Different international plug adapters included. Use the plug specific to your region. #LX400125;... -
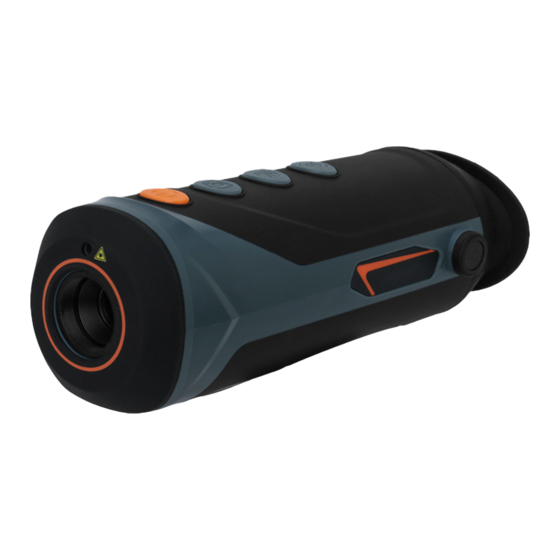
Page 12: Camera Overview
Camera Overview Review the names and functions of working parts that belong to your camera. 4.1 Camera Overview Name Function Screen Displays your camera’s menu and the image to be taken. Only visible when you hold your cam- era to your eye or when you connect through the app. -
Page 13: Camera Buttons
Camera Overview Laser Pointer Emits an intense beam of light to highlight or point out certain things. Technical specification for the laser pointer: • Wavelength: 650 nm • Beam diameter < 15 x 20 mm (10 m) • Maximum average output power: 0.9 mW LASER RADIATION Exposure to laser light can cause significant damage to the eyes. -
Page 14: Camera Screen
Camera Overview Mode • Press and hold to enter the menu. • Press to select the color palette (Colorization). Zoom • Press and hold to manually adjust the shutter. • Press to use digital zoom. Keep pressing to zoom in and out. •... -
Page 15: Getting Started
Getting Started To ensure proper use of your camera, be sure to read the 2 Important Safeguards and Warnings, page 2. 5.1 Turn Your Camera On 1. Charge your camera before using it for the first time. Open the sealing cap covering the USB port, then connect the micro-USB cable to your camera for charging. - Page 16 Getting Started Button Navigation Enter the menu Press and hold Move up Press Move down Press Confirm Press Exit Press #LX400125; r. 1.0/60326/60326; en-US...
-
Page 17: Connecting To The App
Connecting to the App Follow the steps below to connect your camera to the app. NOTE The frequency bands and transmitting power (radiated and/or conducted) nominal limits applicable to this radio equipment are as follows: Wi-Fi 2.4 GHz (2.4 GHz to 2.4835 GHz) 20 dBm. 6.1 Download the App Scan the QR code to download your camera’s mobile app, Thermal_Connection. -
Page 18: Connect To The App
Connecting to the App 6. Press to exit the menu. 6.3 Connect to the App 1. Open the app. 2. Tap Switch WIFI. 3. Tap on your Wi-Fi settings, and then tap your camera’s name. NOTE • Wi-Fi Name: Your camera’s Serial Number (S/N) •... - Page 19 Connecting to the App 4. In the app, tap Connect WIFI. 5. Enter your camera’s Wi-Fi password, and then tap Next. You will now be able to view your camera from the app and make some minor setting adjust- ments. For more details see 7 Using the App, page 14. #LX400125;...
-
Page 20: Using The App
Using the App Take some time to learn about using your camera through the companion app. 7.1 Live View Settings The Live View is the first screen you will see when your camera connects to the app. It includes the following features: 1. - Page 21 Using the App 1. From Live View, tap #LX400125; r. 1.0/60326/60326; en-US...
- Page 22 Using the App 2. Tap on one of the following color palettes: • Whitehot: The most used palette, Whitehot displays warmer objects in white and then cooler objects in black, and everything in between in a shade of gray. • Ironrow: This is a general-purpose palette that uses a variety of colors to showcase heat distribution.
- Page 23 Using the App • RainBow: Best suited for scenes with minimal heat change, RainBow uses different col- ors to display slight temperature changes despite low-contrast conditions. • Warning: Based off Whitehot, Warning showcases warmer objects in a white color with heat indicated by a vibrant red. This palette was designed to quickly detect body heat.
-
Page 24: Record Images & Videos
Using the App 7.1.3 Record Images & Videos Record images and videos onto your camera’s microSD card. 1. From Live View, tap 2. Tap the screen to display the capture and record icons. 3. To capture images: Tap 4. To start or stop recording videos: Tap NOTE A blinking red dot next to a recording timer appears on the left of the screen to indicate that your camera is recording. -
Page 25: Laser Pointer
Using the App 7.2.1 Laser Pointer Use the laser pointer to illuminate a point of interest with a bright spot of colored light. LASER RADIATION Exposure to laser light can cause significant damage to the eyes. Never look into the laser beam directly or through a piece of optical equipment. -
Page 26: Track Hot & Cold Points
Using the App 1. Tap Function. 2. Tap Fire Detection. 3. Tap on one of the options: • Off: Fire detection is turned off. • High, Middle, or Low Sensitivity: Your camera will detect fires based on the sensitivity level. 4. -
Page 27: Automatic Shutdown
Using the App 4. Tap on one of the options: • Off: Automatic sleep mode is turned off. • 10 Mins, 5 Mins, 3 Mins, 1 Min: Your camera will automatically go into sleep mode after the selected time. Shorter times preserve your camera’s battery life. 5. -
Page 28: Using Your Camera
Using Your Camera 8.1 Basic Operations This section covers the basic operations for getting started with your camera. 8.1.1 Turn On or Off To turn your camera on or off: Press and hold 8.1.2 Digital Zoom Zoom in on a certain part of your camera’s image to magnify details. To switch the zoom range: Press . - Page 29 Using Your Camera • Iron Red: This is a general-purpose palette that uses a variety of colors to showcase heat dis- tribution. Red indicates the highest temperature, with an array of colors cooling off to blue as the temperature in the image decreases. •...
-
Page 30: Laser Pointer
Using Your Camera • Alarm: Based off White Hot, Alarm showcases warmer objects in a white color with heat in- dicated by a vibrant red. This palette was designed to quickly detect body heat. NOTE Not all color palettes are suited for every situation. Select the option that best shows the thermal differences for your specific application. -
Page 31: Detection & Tracking Settings
Using Your Camera NOTE Your camera cannot record images or videos while the menu is open or when it is connected to a computer. • To capture images: Press • To start or stop recording videos: Press and hold for 3 seconds. A blinking red dot next to a recording timer appears on the left of the screen to indicate that your camera is recording. - Page 32 Using Your Camera 1. Press and hold to open the menu. 2. Press to navigate to Ranging Mode. 3. Press to open the setting. #LX400125; r. 1.0/60326/60326; en-US...
-
Page 33: Track Hot & Cold Points (Hot Point)
Using Your Camera 4. Press to select one of the modes: • Wolf: Measure your distance from a wolf, with a pre-set height of 1.2m. • Customize: Enter a custom height to measure your distance from your target. • Wild Boar: Measure your distance from a boar, with a pre-set height of 0.9m. •... -
Page 34: Fire Detection (Fire Warning)
Using Your Camera 6. Press to exit the menu. 8.2.3 Fire Detection (Fire Warning) Detect fires in your camera’s image with a red box surrounding the source. If enabled, you can set the fire detection sensitivity from high to low. 1. -
Page 35: Standard Or Search (Scene Mode)
Using Your Camera NOTE The fire detection alarm works only when your camera has fire detection enabled on either High, Middle, or Low. For full instructions, see 8.2.3 Fire Detection (Fire Warning), page 28. 1. Press and hold to open the menu. 2. -
Page 36: General Camera Settings
Using Your Camera 5. Press to confirm your setting. 6. Press to exit the menu. 8.3 General Camera Settings This section covers how to use the general camera settings. 8.3.1 Wi-Fi Connect your camera to the app using the hotspot-enabled Wi-Fi. 1. -
Page 37: Automatic Sleep Timer (Auto Suspend)
Using Your Camera 1. Press and hold to open the menu. 2. Press to navigate to Suspend Mode. 3. Press to open the setting. 4. Press to select one of the modes: • Smart: The built-in distance sensor can detect whether your camera is being used; if no one is within a certain distance for a set period, the screen turns off. -
Page 38: Automatic Shutdown
Using Your Camera 1. Press and hold to open the menu. 2. Press to navigate to Auto Suspend. 3. Press to open the setting. 4. Press to select one of the options: • Off: The automatic sleep timer is off. •... -
Page 39: Usb Mode
Using Your Camera 1. Press and hold to open the menu. 2. Press to navigate to Auto Shutdown. 3. Press to open the setting. 4. Press to select one of the options: • Off: The automatic shutdown is off. • 60 Mins, 30 Mins, 10 Mins, 5 Mins: Your camera will automatically shutdown after the selected time. - Page 40 Using Your Camera 1. Press and hold to open the menu. 2. Press to navigate to USB Mode. 3. Press to open the setting. 4. Press to select one of the modes: • Off: Turn the USB mode off when charging your camera. •...
-
Page 41: Ffc (Flat-Field Correction) Mode
Using Your Camera 1. Press and hold to open the menu. 2. Press to navigate to USB Mode. 3. Press to open the setting. 4. Press to select Mass Storage. 5. Press to confirm your setting. 6. Connect the micro-USB cable into your camera’s USB port and the other end into an avail- able USB port on your computer. -
Page 42: Dpc (Defective Pixel Correction)
Using Your Camera 1. Press and hold to open the menu. 2. Press to navigate to FFC. 3. Press to open the setting. 4. Press to select one of the options: • Auto: (Default) Your camera periodically performs automatic FFC in response to typical FFC conditions. -
Page 43: Screen Brightness
Using Your Camera 1. Press and hold to open the menu. 2. Press to navigate to DPC. 3. Press to open the setting. 4. Press to select one of the options: • Auto: (Default) Your camera automatically calibrates defective pixels. ◦... -
Page 44: Status Bar
Using Your Camera 1. Press and hold to open the menu. 2. Press to navigate to Brightness. 3. Press to open the setting. 4. Press to select one of the options: • Low (Default), Middle, or High: Select the lowest to highest screen brightness level. A lower brightness level preserves your camera’s battery life. - Page 45 Using Your Camera Name Function Wi-Fi Displays when there is a Wi-Fi connection. MicroSD Card • White Icon: Installed • Red Icon: Memory Full • Red Icon with “X”: Not Installed • Red Icon with “!”: Error — follow the for- matting prompts Digital Zoom Supports x1, x2, x3 and x4 digital zoom.
-
Page 46: Language Settings
Using Your Camera To display or hide the status bar: 1. Press and hold to open the menu. 2. Press to navigate to Status Bar. 3. Press to open the setting. 4. Press to select one of the options: • On: (Default) Shows the status bar. •... -
Page 47: System Information
Using Your Camera 1. Press and hold to open the menu. 2. Press to navigate to Language. 3. Press to open the setting. 4. Press to select your preferred language. 5. Press to confirm your setting. 6. Press to exit the menu. NOTE This will only change the language in your camera’s menu, not the app. - Page 48 Using Your Camera 1. Press and hold to open the menu. 2. Press to navigate to 3. Press to open your camera’s system information. 4. Press to exit the menu. #LX400125; r. 1.0/60326/60326; en-US...
-
Page 49: Charging Your Camera
Charging Your Camera The battery icon in your camera’s status bar will indicate when your camera’s battery level is low and needs charging. 1. Insert the adapter plug for your region into the back of the universal power adapter. 2. Open the sealing cap covering your camera’s USB port. 3. -
Page 50: Updating Your Camera
Updating Your Camera Update your camera through the microSD card. NOTE To download the latest firmware update for your camera, contact the Technical Support team. 1. Insert a microSD card into your camera’s microSD card slot. 2. Press and hold to open the menu. -
Page 51: Troubleshooting
Troubleshooting The following chapter provides some troubleshooting tips for using your camera. 1. Camera’s image/screen is blurry. Adjust your camera’s diopter to your eyesight. For full instructions, see 5.2 Adjust the Diop- ter, page 9. 2. Camera Wi-Fi hotspot is not showing. •... - Page 52 Troubleshooting 11. Camera’s image has lots of graininess or scratches. • Turn your camera off, attach the lens cap, and allow it to rest for a few hours before using again. • To improve your camera’s image quality set the FFC Mode to Auto. For full instructions, see 8.3.6 FFC (Flat-Field Correction) Mode, page 35.
-
Page 53: Frequently Asked Questions
Frequently Asked Questions The following FAQ answers many of the general questions about your camera. 1. Does my thermal camera only work at night? No, although thermal imaging cameras are most commonly used for nighttime vision, they can also be useful in daylight. The detection of heat radiation and the high contrast of ther- mal imaging cameras allow you to see the outlines of (warm-blooded) animals that camou- flage well in their environments. - Page 54 Frequently Asked Questions 15. How do I record images and videos? • To capture images: Press • To start or stop recording videos: Press and hold for 3 seconds. A blinking red dot next to a recording timer appears on the left of the screen to indicate that your camera is recording.
- Page 55 Frequently Asked Questions 29. How do I restore my camera’s settings to default? To restore your camera’s settings to default, open the app and navigate to System > Restore the Default. 30. How do I update my camera to the latest firmware? For full instructions on updating your camera’s firmware, see 10 Updating Your Camera, page 44.
-
Page 56: Technical Specifications
Technical Specifications 13.1 General Appearance Thermal Monocular Camera Type Monitor 13.2 Thermal Detector Type Vanadium oxide uncooled focal plane detector Effective Pixels 256 x 192 12 μm Pixel Pitch Spectral Range 8 μm–14 μm Sensitivity (NETD) ≤40 mK@f/1.0 Focal Length 7.5 mm;... -
Page 57: Display
Technical Specifications Focal DRI Detection Distance Detection Recognition Identifica- Lengt- Distance Distance tion Distance • Vehicle: • Vehicle: • Vehicle: 777 m 194 m 97 m (2,549.21 (636.48 (318.24 • Human: • Human: • Human: 291 m 75 m 37 m (954.72 (246.06 (121.39... -
Page 58: Power
Technical Specifications 13.7 Power Power Supply 5 VDC, 0.3 A or built–in battery Battery Capacity Display Power Consumption <1.5 W Battery Life 9 h (Wi-Fi hotspot off, @25°C) Charging Time <3 h 13.8 Environment Operating Temperature –20 °C to +55 °C (–4 °F to +131 °F) Operating Humidity ≤90% Storage Temperature... -
Page 59: Notices
Notices The thermal product series may be subject to export controls in various countries or regions, in- cluding but not limited to, the United States, European Union, United Kingdom and/or other member countries of the Wassenaar Arrangement. Please consult your professional legal, com- pliance expert, or local government authorities for any necessary export license requirements if you intend to transfer, export, re-export the thermal product series between different countries. - Page 60 #LX400125; r. 1.0/60326/60326; en-US...
- Page 62 Legal disclaimer As our product is subject to continuous improvement, Lorex Corporation & subsidiaries reserve the right to modify product design, specifications & prices without notice and without incurring any obligation.E&OE.