Advertisement
Quick Links
Instruction Symbols/ Definitions
Denotes warnings that may lead to
!
serious physical injury or vehicle
damage.
Denotes cautions to be taken to avoid
physical injury or electronic component
damage.
Denotes cautions to be taken to avoid
vehicle and component damage.
Basic Required Hand Tools
1/4" Drive Ratchet
10 mm Socket
Phillips
Screwdriver
Pliers
Trim Tool
Wire Cutter
For Authorized Dealers - (800) 421-3209
Hours: 9:00 a.m. - 7:00 p.m. EST Monday - Friday
FMVSS 110
COMPLIANCE
INFORMATION
ACCESSORY WEIGHT
1.22 kg
2.68 lbs
HYUNDAI Genuine Accessories
Vehicle Model
Model Year
HMA Part No.
Note: Difficulty stated above reflects the minimum level of expertise required to install the accessory
Ensure vehicle is equipped with automatic transmission, power door locks and power
windows. If the vehicle is not equipped with these options, do not proceed. Ensure
vehicle does NOT have SMART KEY.
N
O
T
E
13 mm Socket
Alcohol Cleaner
1/4" Drive Torque
Wrench
Technical Support
9:00 a.m. - 5:00 p.m. EST Saturday
All dealers must determine if the weight they have added in the form of all options or accessories, when
added to the weight of all Port Installed options or accessories, exceeds the lesser of 1.5% of GVWR or
100 lbs. If the additional weight does exceed the lesser of the indicated thresholds, a "Load Carrying
Capacity Reduced" label must be installed. A black, fine-point, indelible marker must be used to write
by hand onto the label, the reduced carrying capacity in kilograms or pounds, which is the total weight
of all added options and accessories. Load Label Part Number NP070-09003
Elantra (Key Start)
2011~
3X056 ADU00
( A ) Customer
( B ) Dealer Technician
Denotes quality processes to be
checked prior to moving to the
next step.
Denotes specific tools that are necessary
to complete the step.
Denotes instructional steps
necessary to complete the
process.
1/4" Drive 6"
Extension
Revision Date
5/2/2012
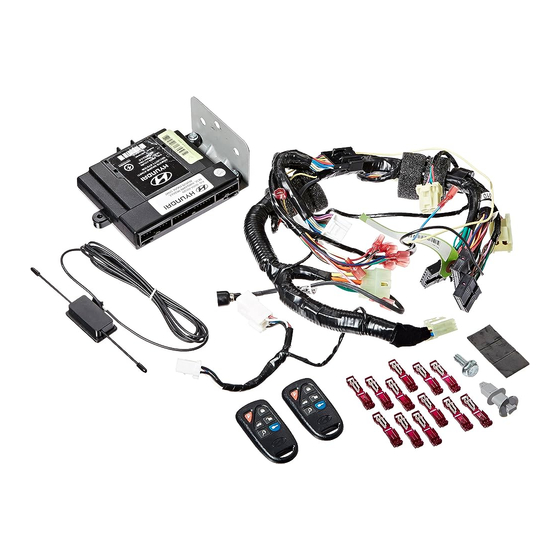
Accessory
Remote Engine Start
Difficulty
( C ) Master Technician
Denotes safety equipment required to be
used such as a mask, goggles, rubber
gloves, and hearing protection.
Mask
Rubber Gloves
Notes to the Installer:
Read the entire installation manual prior to
beginning the installation of the accessory.
Factory wire harness colors are subject to
change, please use the specified pin # in the
harness connector to identify the correct wire
for T-Tap installation.
Ensure that the vehicle is properly protected in
the area that the accessory is to be installed.
To prevent vehicle damage, never place tools on
top of painted surfaces, seats, dash pad,
console or floor carpet / mat.
Always wear appropriate safety gear to include
gloves and eye protection when required.
Prior to disconnecting the negative lead to the
battery, note the AM/FM and satellite set
frequencies on the inspection page, if
applicable.
To prevent stress on the remote start wire
harness, ensure the tilt/telescopic steering
column is fully extended, if equipped.
Ensure the transportation fuse is properly
installed before performing the function check
on page 18.
( B )
Goggles
Hearing Protection
P/N: 4280343, Rev. A
Page 1 of 29
Advertisement

Related Manuals for Hyundai 3X056 ADU00


Summary of Contents for Hyundai 3X056 ADU00
- Page 1 HYUNDAI Genuine Accessories Vehicle Model Elantra (Key Start) Accessory Remote Engine Start Model Year Difficulty 2011~ ( B ) HMA Part No. 3X056 ADU00 Note: Difficulty stated above reflects the minimum level of expertise required to install the accessory ( A ) Customer...
- Page 2 The original transmitters must not be used to operate the locks on a vehicle equipped with the Hyundai Remote Start System. The original transmitters can cause the vehicle’s alarm system to falsely activate.”...
- Page 3 HYUNDAI Genuine Accessories (General Procedures) Spade Terminal Spade Terminal T-Tap Installation Procedure Pointed UP Pointed DOWN Factory wire harness colors are subject to change, please use the specified pin # in the harness connector to identify the correct wire for T-Tap installation.
- Page 4 HYUNDAI Genuine Accessories (Vehicle Disassembly) Vehicle Preparation *Clean hands. *Set the parking brake and open driver’s door window. *Record radio station presets, if applicable. *Vehicle should be at room temperature. *Ensure vehicle is equipped with automatic transmission, power door locks and power windows. If the vehicle is not equipped with these options, do not proceed.
- Page 5 HYUNDAI Genuine Accessories (Vehicle Disassembly) Phillips Screws Pressure Clips Phillips Screws Pressure Clips Retaining Tabs Phillips Screwdriver, Trim Tool *Remove the (2) phillips screws from the side and (1) from underneath of the lower dash finish panel, as shown above.
- Page 6 HYUNDAI Genuine Accessories (Vehicle Disassembly) 10 mm Nuts 10 mm Bolt 1/4” Drive Ratchet, 10 mm Socket *Remove the (2) 10 mm nuts and (1) 10 mm bolt securing the fuse panel to the metal dash brace. Phillips Pull Here to...
- Page 7 HYUNDAI Genuine Accessories (Vehicle Disassembly) Pressure Clip Tether Clip Cut Here Weatherstrip Pressure Clip Pressure Clip Wire Cutter *Carefully pull the weatherstrip away from the driver’s side “A” pillar. *Starting at the top, partially remove the driver’s side “A” pillar trim panel by carefully pulling inward to release the (1) Tether Clip and the (2) Pressure Clips.
- Page 8 HYUNDAI Genuine Accessories (Installation) Alcohol / Cleaner *Clean the area of the windshield where the antenna will be mounted with an alcohol-based glass cleaning solution. Ensure the glass surface is completely dry. *Mount the dipole antenna to the windshield approximately 0.5” below the mirror’s lowest attachment point and/or any wind- shield electronic gridwork, as shown above.
- Page 9 HYUNDAI Genuine Accessories (Installation) After Relocation Plastic Harness Before Relocation Protector MDPS Control Module MDPS Control Module Slide relay assembly toward the center of the vehicle to remove from the plastic wire harness protector. GE07 Factory Ground Location Large Wire Tie Note: Relay may not be mounted in this location on some vehicles.
- Page 10 HYUNDAI Genuine Accessories (Installation) *Ensure connector is fully engaged and locked into the ignition switch. Tilt Steering Wheel Release Lever Wire Cutter *Route the remote start harness 6-pin male and female connectors under the steering column to the factory M03 ignition switch connector.
- Page 11 HYUNDAI Genuine Accessories (Installation) Remote Start Harness Female Brake Switch Connector Wire Tie Factory Male E18 Connector Wire Cutter *Route the remote start harness 4-pin male and female connectors to the factory E18 brake switch connector. *Disconnect the factory male 4-pin E18 brake switch connector and plug in the corresponding remote start harness connectors.
- Page 12 HYUNDAI Genuine Accessories (Installation) *Unplug connector, if necessary, to identify proper pin location. I/P-E Connector Sedan Models Parking Light (Left) Wire Orange Wire (“5” VIN-Code) TERMINAL END VIEW I/P-E Connector Red/Orange Wire (“K” VIN-Code) Rear Defrost Wire Pin 29 Black Wire...
- Page 13 HYUNDAI Genuine Accessories (Installation) *Unplug connector, if necessary, to identify proper pin location. Coupe Models TERMINAL END VIEW I/P-E Connector Rear Defrost Wire Black Wire I/P-E Connector Parking Light (Left) Wire Pin 5 Red/Orange Wire I/P-E Connector Pin 29 Horn Wire...
- Page 14 HYUNDAI Genuine Accessories (Installation) **Unplug connector, if necessary, to identify proper pin location. I/P-B Connector Red Wire Pin 38 TERMINAL END VIEW Pliers *Refer to Page 3 for T-Tap Installation Procedure. *Using pliers, crimp a T-Tap on the Red wire located in pin #38 of the 39-pin I/P-B male connector, located at the front of the fuse panel.
- Page 15 HYUNDAI Genuine Accessories (Installation) ** Unplug connector, if necessary, to identify proper pin location Wire Tie TERMINAL END VIEW EM11 Connector Tachometer Wire Blue Wire Pin 25 Pliers, Wire Cutter *Refer to Page 3 for T-Tap Installation Procedure. *Route the remote start harness Blue (Tachometer Input), Yellow (Dome Light Output) and the Black with ring terminal (Ground) wires to the driver’s kick panel area.
- Page 16 HYUNDAI Genuine Accessories (Installation) GE07 Factory Ground Wire Tie Yellow Wire (Dome Light Output) 1/4” Drive Ratchet, 10 mm Socket, 1/4” Drive Torque Wrench, Wire Cutter *Locate the factory GE07, 10 mm ground bolt in the driver’s kick panel area, near the vehicle dash wall.
- Page 17 HYUNDAI Genuine Accessories (Installation) Pliers, Wire Cutter Sedan Models Sedan Models: MR11 Connector MR11 Connector Yellow Wire Yellow Wire *Refer to Page 3 for T-Tap Installation Procedure. Pin 6 Pin 5 “5” VIN-Code Vehicles *Observe the 1st character of the Vehicle Identification Number “K”...
- Page 18 HYUNDAI Genuine Accessories (Installation) Fuse Panel Wire Ties Dash Wall Grommet Wire Ties Wire Cutter *Connect the disarm / programming button to the corresponding remote start module connector (if disconnected). *Route the disarm / programming button along the remote start harness, toward the remote start module.
- Page 19 HYUNDAI Genuine Accessories (Function Check) Ensure the transportation fuse is properly installed before performing the function check. If the transmitters fail to operate, refer to Page 26 (Transmitter Programming and Battery Test Procedure). Items To Be Checked Results Of The Check...
- Page 20 HYUNDAI Genuine Accessories (Function Check) Items To Be Checked Results Of The Check Rear Defrost - Close the trunk and activate the remote The parking lights will flash one time. Locate the rear defroster engine start. Press the remote start button on the switch and verify that the indicator portion of the switch is transmitter a second time after the vehicle has started.
- Page 21 HYUNDAI Genuine Accessories (Vehicle Reassembly) Pressure Clip Tether Clip Weatherstrip Pressure Clip *Install (1) Tether Clip, in the closed position, into the “A” pillar trim panel. Rotate clockwise until it locks into place. *Reinstall the driver’s side “A” pillar trim panel by carefully engaging the (1) Tether Clip and the (2) Pressure Clips.
- Page 22 HYUNDAI Genuine Accessories (Vehicle Reassembly) 10 mm Bolts Sedan Knee Bolster Pictured 10 mm Nut (Sedan, VIN starts with “5”) 10 mm Bolt (Coupe and Sedan, VIN starts with “K”) 1/4” Drive Ratchet, 10 mm Socket *Reinstall the (4) 10 mm bolts and (1) 10 mm nut (Sedan, VIN starts with “5”) or (5) 10 mm bolts (Coupe and Sedan, VIN starts with “K”) securing the metal knee bolster panel.
- Page 23 The original transmitters must not be used to operate the locks on a vehicle equipped with the Hyundai Remote Start System. The original transmitters can cause the vehicle’s alarm system to falsely activate.”...
-
Page 24: Security Features
HYUNDAI Genuine Accessories (Troubleshooting) SECURITY FEATURES Results Of The Check Item In Question Instruction Ref. *Verify that the 24-pin connector at the fuse panel is connected Security system does not trigger Step 8 properly (Step 8). when armed and a door is opened. -
Page 25: Convenience Features
HYUNDAI Genuine Accessories (Troubleshooting) CONVENIENCE FEATURES Item In Question Results Of The Check Instruction Ref. *Verify that the 24-pin connector at the fuse panel is connected properly (Step 8). Vehicle will not lock using the Step 8 *Verify proper DNA installation. -
Page 26: Remote Start Features
HYUNDAI Genuine Accessories (Troubleshooting) CONVENIENCE FEATURES Item In Question Results Of The Check Instruction Ref. *Verify that the antenna is mounted and routed in the correct Poor operating range. Step 1, 2 & 4 location (Step 1 & 2). (Installation... - Page 27 *Press the Panic button one time, the horn will beep one * Turn OFF vehicle ignition. time indicating that the transmitter code has been learned. *Repeat this process for each additional transmitter. HYUNDAI Genuine Accessories (Transmitter Battery Test Procedure) The (+) sign must face upward on...
- Page 28 Revision Date 5/2/2012 Page 28 of 29...
- Page 29 Revision Date 5/2/2012 Page 29 of 29...