Behringer EUROPOWER PMP2000D - Powered Mixer Quick Start Guide
- Quick start manual (14 pages)
Advertisement
Important Safety Instructions

 Terminals marked with this symbol carry electrical current of suffi cient magnitude to constitute risk of electric shock. Use only high-quality professional speaker cables with ¼" TS or twist-locking plugs pre-installed. All other installation or modifi cation should be performed only by qualifi ed personnel.
This symbol, wherever it appears, alerts you to the presence of uninsulated dangerous voltage inside the enclosure - voltage that may be suffi cient to constitute a risk of shock.
 This symbol, wherever it appears, alerts you to important operating and maintenance instructions in the accompanying literature. Please read the manual.

To reduce the risk of electric shock, do not remove the top cover (or the rear section). No user serviceable parts inside. Refer servicing to qualifi ed personnel.
To reduce the risk of fi re or electric shock, do not expose this appliance to rain and moisture. The apparatus shall not be exposed to dripping or splashing liquids and no objects fi lled with liquids, such as vases, shall be placed on the apparatus.

These service instructions are for use by qualifi ed service personnel only. To reduce the risk of electric shock do not perform any servicing other than that contained in the operation instructions. Repairs have to be performed by qualifi ed service personnel.
- Read these instructions.
- Keep these instructions.
- Heed all warnings.
- Follow all instructions.
- Do not use this apparatus near water.
- Clean only with dry cloth.
- Do not block any ventilation openings. Install in accordance with the manufacturer' s instructions.
- Do not install near any heat sources such as radiators, heat registers, stoves, or other apparatus (including amplifi ers) that produce heat.
- Do not defeat the safety purpose of the polarized or grounding-type plug. A polarized plug has two blades with one wider than the other. A grounding-type plug has two blades and a third grounding prong. The wide blade or the third prong are provided for your safety. If the provided plug does not fi t into your outlet, consult an electrician for replacement of the obsolete outlet.
- Protect the power cord from being walked on or pinched particularly at plugs, convenience receptacles, and the point where they exit from the apparatus.
- Use only attachments/accessories specifi ed by the manufacturer.
- Use only with the cart, stand, tripod, bracket, or table specifi ed by the manufacturer, or sold with the apparatus. When a cart is used, use caution when moving the cart/apparatus combination to avoid injury from tip-over.
![]()
- Unplug this apparatus during lightning storms or when unused for long periods of time.
- Refer all servicing to qualifi ed service personnel. Servicing is required when the apparatus has been damaged in any way, such as power supply cord or plug is damaged, liquid has been spilled or objects have fallen into the apparatus, the apparatus has been exposed to rain or moisture, does not operate normally, or has been dropped.
- The apparatus shall be connected to a MAINS socket outlet with a protective earthing connection.
- Where the MAINS plug or an appliance coupler is used as the disconnect device, the disconnect device shall remain readily operable.
- Correct disposal of this product: This symbol indicates that this product must not be disposed of with household waste, according to the WEEE Directive (2012/19/EU) and your national law. This product should be taken to a collection center licensed for the recycling of waste electrical and electronic equipment (EEE). The mishandling of this type of waste could have a possible negative impact on the environment and human health due to potentially hazardous substances that are generally associated with EEE. At the same time, your cooperation in the correct disposal of this product will contribute to the effi cient use of natural resources. For more information about where you can take your waste equipment for recycling, please contact your local city offi ce, or your household waste collection service.
![]()


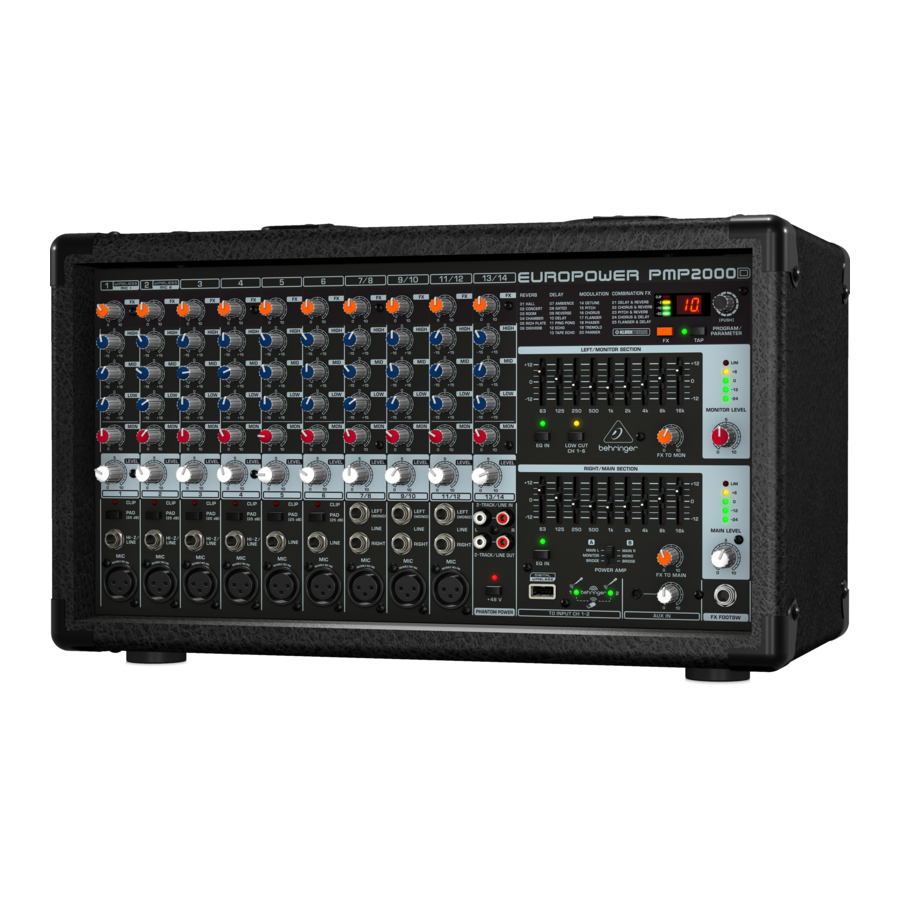
EUROPOWER PMP2000D Controls


- The FX control determines the signal level that is routed from the respective channel to the built-in eff ects processor.
- The HIGH control in the EQ section governs the high frequencies of the respective channel.
- Use the MID control to boost/cut the mid range.
- The LOW control allows you to raise or lower the bass frequencies.
- The MON control determines the channel's volume assigned to the monitor mix.
- Use the LEVEL control to set the volume level of the respective channel.
- Use the CLIP LED to ensure that the input gain is set properly. The CLIP LED should light up only with peak signals, but never all the time.
- The PAD button reduces the channel input sensitivity by 25 dB. Thus, you can also connect high-level line signals to the respective channel input.
- This HI-Z/LINE input can be used to connect line level signal sources, such as keyboards, electric and bass guitars.
- This is the channel's balanced XLR microphone input.
- The stereo line input of channels 7 - 12 can be used to connect, for example, keyboards with stereo outputs or a stereo drum computer.
- The 2-TRACK/LINE IN RCA input of channel 13/14 allows you to feed in external stereo signals from your CD player or tape deck, for example.
- The 2-TRACK/LINE OUT RCA output provides the stereo main mix signal of your PMP2000D and can be routed to, say, a recording machine.
- The phantom power supply provides the voltage necessary for the operation of condenser microphones. Use the PHANTOM POWER switch to activate the supply together for channels 1 - 12 (XLR connector). The LED above the switch is lit when phantom power is on.
- This is the PMP2000D's graphic stereo equalizer, which comprises two units and can be used to adapt the sound to the room acoustics.
- Use the EQ IN buttons to switch the two equalizer units on or off.
- Press the LOW CUT button to activate the low-cut fi lter of channels 1 - 6. This fi lter eliminates unpleasant bass frequencies (e.g. microphone pop noise).
- The FX TO MON control determines the eff ects intensity of the multi-eff ects processor as part of the monitor mix. Turn the control fully counter-clockwise to add no eff ect to the monitor mix.
- The MONITOR LEVEL control adjusts the volume of the monitor mix.
- Use the MONITOR LEVEL display to control the monitor signal level. The upper LED (LIM) lights up when the built-in limiter is activated, thus protecting against overload.
- POWER AMP switch determines whether the PMP2000D works as a stereo amplifi er (MAIN L/MAIN R), a dual amplifi er with the left channel dedicated to monitoring (MONITOR/MONO) or a single mono amplifi er with both channels dedicated solely to front-of-house sound reinforcement (BRIDGE/BRIDGE). In BRIDGE/BRIDGE mode, please use a single 2-pole speaker cable with pins 1+ and 2+ of OUTPUT B only.
- The MAIN LEVEL control governs the overall volume of the PMP2000D.
- The MAIN LEVEL display reads the output level of the PMP2000D. The upper LED (LIM) lights up when the built-in limiter is activated, thus protecting against signal peaks.
- The FX TO MAIN control functions as FX return for the built-in eff ects processor. Use this control to add the desired eff ect signal to the main mix. No eff ect signal is added when the FX TO MAIN is set fully counter-clockwise.
- DIGITAL WIRELESS USB input accepts the optional BEHRINGER wireless microphone receiver. The LEDs indicate wireless microphone signal input. WIRELESS MIC 1/MIC 2 input signals are routed to channel 1 and channel 2.
- AUX IN section accepts audio signals from external devices using 1⁄8" TRS stereo connectors. The AUX IN knob controls the input level.
- Use the FX FOOTSW(itch) jack to connect any commercially available foot controller. It allows you to bypass the eff ects unit.
- Here, you will fi nd a list of all multi-eff ect presets available.
- This is the LED level meter of the eff ects processor. Please make sure that the clip LED lights up with signal peaks only. If it is lit constantly, this indicates that the eff ects processor is overdriven, which can lead to unpleasant distortion.
- The Eff ect display reads the currently selected preset.
- Turn the PROGRAM/PARAMETER [PUSH] control to select the eff ect presets. Press the control briefl y to confi rm your selection. PUSH and TURN the button to adjust one parameter of the currently chosen eff ect.
- FX button activates the eff ects processor when pressed.
- TAP button allows you to program time-based eff ects (such as delay) by pressing the button repeatedly in time with the desired tempo. The TAP LED fl ashes rhythmically to show the current tempo.
- The mains connection is on a standard IEC receptacle. An appropriate power cord is supplied with the unit.
- Use the POWER switch to put your PMP2000D into operation. The POWER switch should always be in the "Off " position when you are about to connect your unit to the mains.
- SERIAL NUMBER.
- OUTPUT A uses pins 1+ and 1- to send out the left (LEFT) speaker channel over a single 2-pole speaker cable. As an option, you may also connect a single 4-pole speaker to OUTPUT A to carry both the left and right speaker outputs, in which case the left channel output will use OUTPUT A pins 1+ and 1-, while the right channel uses OUTPUT A pins 2+ and 2-. When the POWER OUTPUT switch is set to BRIDGE/BRIDGE mode, the bridged mono output uses pins 1+ and 2+ of OUTPUT B only (using a single 2-pole speaker cable), and you should therefore NOT connect any speaker cable to OUTPUT A.
- OUTPUT B uses pins 1+ and 1- to send out the right (RIGHT) speaker channel over a single 2-pole speaker cable. When the POWER OUTPUT switch is set to BRIDGE/BRIDGE mode, the bridged mono output uses pins 1+ and 2+ of OUTPUT B only (using a single 2-pole speaker cable), and you should therefore NOT connect any speaker cable to OUTPUT A.
Specifications
| Mic Inputs | |
| Type | 9 x XLR, electronically balanced discrete input circuit, channels 1 - 12 |
| Mic E.I.N. (20 Hz to 20 kHz) | |
| @ 0 Ω source resistance | -108 dB / -110 dB A-weighted |
| @ 50 Ω source resistance | -108 dB / -110 dB A-weighted |
| @ 150 Ω source resistance | -106 dB / -107 dB A-weighted |
| Frequency response (-1 dB) | <20 Hz to 22 kHz (-1 dB) |
| Frequency response (-3 dB) | <20 Hz to 35 kHz (-3 dB) |
| Max. input level | +13 dBu with PAD |
| Impedance | 1.5 kΩ, balanced |
| Signal-to-noise ratio | 98 dB / 100 dB A-weighted (-15 dBu In @ +35 dB gain) |
| Distortion (THD+N) | 0.002%, A-weighted |
| Pad | -25 dB, channels 1 - 6 |
| Phantom power | +48 V, switchable |
| Hi-Z / Line Inputs | |
| Type | 4 x ¼ " TRS, balanced, channels 1 - 4 |
| Impedance | 1.8 MΩ balanced, 1 MΩ unbalanced |
| Max. input level | +22 dBu |
| Wireless Input | |
| USB dongle (not included) | USB socket accepts signals from max. 2 BEHRINGER ULM microphones |
| Signal indicator LED | 2 (green) |
| Mono Line Inputs | |
| Type | 2 x ¼ " TRS, balanced, channels 5 and 6 |
| Impedance | 20 kΩ balanced, 10 kΩ unbalanced |
| Max. input level | +22 dBu |
| Stereo Line Inputs | |
| Type | 6 x ¼ " TRS connector, balanced channels 7 - 12 |
| Impedance | 20 kΩ balanced, 10 kΩ unbalanced |
| Max. input level | +22 dBu |
| 2-Track / Line In | |
| Type | 2 x RCA, unbalanced, channels 13 and 14 |
| Impedance | 20 kΩ unbalanced |
| Gain range | -∞ dB to +20 dB |
| Max. input level | +22 dBu |
| Channel EQ | |
| Low | ±15 dB @ 60 Hz |
| Mid | ±15 dB @ 700 Hz |
| High | ±15 dB @ 6 kHz |
| Aux In | |
| Type | 1⁄8" TRS connector, unbalanced |
| Impedance | 10 kΩ |
| Gain range | -∞ dB to +20 dB |
| 2-Track / Line Out | |
| Type | 2 x RCA, unbalanced |
| Impedance | 2.4 kΩ |
| Max. output level | +9 dBu |
| Graphic Equalizers | |
| Type | analog 9-band equalizer |
| Frequency range | 20 Hz to 20 kHz in 9 1-octave bands (ISO frequencies) |
| Bandwidth | 1 octave |
| Control range | ±12 dB |
| Low Cut | |
| Type | 18 dB/oct., Butterworth, channels 1 – 6 |
| Frequency | 100 Hz |
| Main Mix System Data (Noise) | |
| Main mix @ -∞, channel fader @ -∞ | -59 dBu / -59 dBu A-weighted |
| Main mix @ 0 dB, channel fader @ -∞ | -56 dBu / -56 dBu A-weighted |
| Main mix @ 0 dB, channel fader @ 0 dB | -56 dBu / -56 dBu A-weighted |
| Power Amp Specifi cations | |
| Maximum output power | |
| Both channels driven | |
| 8 Ω per channel | 500 W* |
| 4 Ω per channel | 1000 W* |
| Bridged mode | |
| 8 Ω | 2000 W* |
| Loudspeaker Connections | |
| Connectors | 2 x professional twist-locking speaker connectors |
| Load Impedance | |
| Left / monitor | Min. 4 Ω |
| Right / mono | Min. 4 Ω |
| Bridge | Min. 8 Ω |
| Power Supply / Voltage (Fuses) | |
| USA / Canada | 120 V~, 50/60 Hz (T 8 A H 250 V) |
| Japan | 100 V~, 50/60 Hz, 8 A (T 8 A H 250 V) |
| UK / Australia / Europe/Korea / China | 220-240 V~, 50/60 Hz (T 5 A H 250 V) |
| Power consumption @ 4 Ω, 1/8 rated power | 180 W |
| Mains connection | Standard IEC receptacle |
| Dimensions / Weight | |
| Dimensions (H x W x D) | 276 x 455 x 250 mm (10.9 x 17.9 x 9.8") |
| Weight | 9.0 kg (19.8 lbs) |
LEGAL DISCLAIMER
MUSIC Group accepts no liability for any loss which may be suff ered by any person who relies either wholly or in part upon any description, photograph, or statement contained herein. Technical specifi cations, appearances and other information are subject to change without notice. All trademarks are the property of their respective owners. MIDAS, KLARK TEKNIK, TURBOSOUND, BEHRINGER, BUGERA and DDA are trademarks or registered trademarks of MUSIC Group IP Ltd.
© MUSIC Group IP Ltd. 201 All rights reserved.
LIMITED WARRANTY
For the applicable warranty terms and conditions and additional information regarding MUSIC Group' s Limited Warranty, please see complete details online at music-group.com/warranty.

Documents / ResourcesDownload manual
Here you can download full pdf version of manual, it may contain additional safety instructions, warranty information, FCC rules, etc.
Download Behringer EUROPOWER PMP2000D - Powered Mixer Quick Start Guide
Advertisement
Thank you! Your question has been received!


Need Assistance?
Do you have a question about the EUROPOWER PMP2000D that isn't answered in the manual? Leave your question here.