Behringer U-PHORIA UMC1820 - USB Audio/MIDI Quick Start Guide
- Quick start manual (15 pages)
Advertisement
Important Safety Instructions

RISK OF ELECTRIC SHOCK!
DO NOT OPEN!
 Terminals marked with this symbol carry electrical current of sufficient magnitude to constitute risk of electric shock.
Use only high-quality professional speaker cables with ¼" TS or twist-locking plugs pre-installed. All other installation or modification should be performed only by qualified personnel.
This symbol, wherever it appears, alerts you to the presence of uninsulated dangerous voltage inside the enclosure - voltage that may be sufficient to constitute a risk of shock.
This symbol, wherever it appears, alerts you to important operating and maintenance instructions in the accompanying literature. Please read the manual.
To reduce the risk of electric shock, do not remove the top cover (or the rear section). No user serviceable parts inside. Refer servicing to qualified personnel.

To reduce the risk of fire or electric shock, do not expose this appliance to rain and moisture. The apparatus shall not be exposed to dripping or splashing liquids and no objects filled with liquids, such as vases, shall be placed on the apparatus.
These service instructions are for use by qualified service personnel only. To reduce the risk of electric shock do not perform any servicing other than that contained in the operation instructions. Repairs have to be performed by qualified service personnel.
- Read these instructions.
- Keep these instructions.
- Heed all warnings.
- Follow all instructions.
- Do not use this apparatus near water.
- Clean only with dry cloth.
- Do not block any ventilation openings. Install in accordance with the manufacturer's instructions.
- Do not install near any heat sources such as radiators, heat registers, stoves, or other apparatus (including amplifiers) that produce heat.
- Do not defeat the safety purpose of the polarized or grounding-type plug. A polarized plug has two blades with one wider than the other. A grounding-type plug has two blades and a third grounding prong. The wide blade or the third prong are provided for your safety. If the provided plug does not fit into your outlet, consult an electrician for replacement of the obsolete outlet.
- Protect the power cord from being walked on or pinched particularly at plugs, convenience receptacles, and the point where they exit from the apparatus.
- Use only attachments/accessories specified by the manufacturer.
- Use only with the cart, stand, tripod, bracket, or table specified by the manufacturer, or sold with the apparatus. When a cart is used, use caution when moving the cart/apparatus combination to avoid injury from tip-over.
![]()
- Unplug this apparatus during lightning storms or when unused for long periods of time.
- Refer all servicing to qualified service personnel. Servicing is required when the apparatus has been damaged in any way, such as power supply cord or plug is damaged, liquid has been spilled or objects have fallen into the apparatus, the apparatus has been exposed to rain or moisture, does not operate normally, or has been dropped.
- The apparatus shall be connected to a MAINS socket outlet with a protective earthing connection.
- Where the MAINS plug or an appliance coupler is used as the disconnect device, the disconnect device shall remain readily operable.
- Correct disposal of this product: This symbol indicates that this product must not be disposed of with household waste, according to the WEEE Directive (2012/19/EU) and your national law. This product should be taken to a collection center licensed for the recycling of waste electrical and electronic equipment (EEE). The mishandling of this type of waste could have a possible negative impact on the environment and human health due to potentially hazardous substances that are generally associated with EEE. At the same time, your cooperation in the correct disposal of this product will contribute to the efficient use of natural resources. For more information about where you can take your waste equipment for recycling, please contact your local city office, or your household waste collection service.
![]()
- Do not install in a confined space, such as a book case or similar unit.
- Do not place naked flame sources, such as lighted candles, on the apparatus.
- Please keep the environmental aspects of battery disposal in mind. Batteries must be disposed-of at a battery collection point.
- Use this apparatus in tropical and/or moderate climates.


LEGAL DISCLAIMER
MUSIC Group accepts no liability for any loss which may be suff ered by any person who relies either wholly or in part upon any description, photograph, or statement contained herein. Technical specifications, appearances and other information are subject to change without notice. All trademarks are the property of their respective owners. MIDAS, KLARK TEKNIK, LAB GRUPPEN, LAKE, TANNOY, TURBOSOUND, TC ELECTRONIC, TC HELICON, BEHRINGER, BUGERA and DDA are trademarks or registered trademarks of MUSIC Group IP Ltd. © MUSIC Group IP Ltd. 2016 All rights reserved.
Hook-up


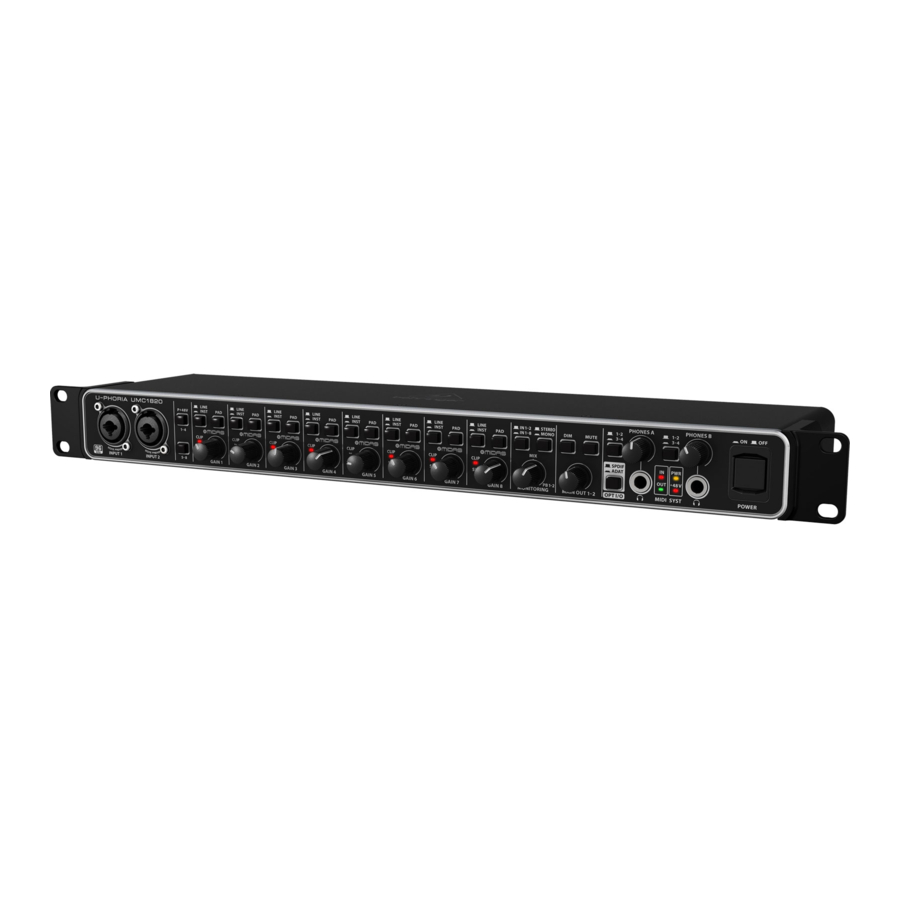
Controls

- INPUTS accept XLR or ¼ " connections from microphones, instruments, or line level audio sources.
- P+48V switches turn on +48 Volt Phantom Power to XLR inputs 1 to 4, and 5 to 8. Carefully read your microphone's documentation before turning on phantom power, as it can damage some microphones.
- LINE / INST selects line level or instrument level input source at the ¼ " connector.
Select INST when connecting a guitar directly. - PAD reduces the level of input signals from the XLR and ¼ " inputs. For example, this is useful if the XLR input is not from a microphone.
- SIG LED indicates an audio signal is present.
The CLIP LED turns on if the audio input signal is too high. - GAIN knob adjusts the input level. Adjust so the CLIP LED does not turn on, even during the highest peaks.
- IN 1-2 or 1-8 selects direct analog input sources 1-2 or 1-8 for monitoring.
- STEREO/MONO selects stereo or mono monitoring.
- MONITORING knob adjusts the mix between the direct inputs and computer playback:
IN: only direct inputs (0 ms latency)
MIX: 50/50 mix of inputs and playback from computer
PB 1-2: only playback from computer - DIM switch reduces the MAIN OUT output level.
- MUTE switch cuts the MAIN OUT signal.
- MAIN OUT knob controls the MAIN OUT output level.
- OPT I/O selects the operation of the rear panel optical and coaxial RCA I/O ports: SPDIF: Optical input S/PDIF 9-10, Optical output S/PDIF 11-12. Coaxial input off, Coaxial output S/PDIF 11-12.
ADAT:
(@ 96 or 88.2 kHz) Optical input S/MUX 11-14, optical output S/MUX 13-16. Coaxial input S/PDIF 9-10, Coaxial output S/PDIF 11-12.
(@ 48 or 44.1 kHz) Optical input ADAT 11-18, optical output ADAT 13-20. Coaxial input S/PDIF 9-10, Coaxial output S/PDIF 11-12.
![]()
Do not change between S/PDIF and ADAT modes while operating your DAW/ music program, because the UMC1820 does a quick re-boot. Close all applications before changing modes, and then wait until the unit has been recognized again by your operating system before restarting your music application. - PHONES source selector switch:
1-2: Listen to the stereo MIX signal channels 1-2 from the monitoring section.
3-4: Listen to the playback signal from computer output channels 3-4. - PHONES level adjustment. Start at minimum and then turn up to a comfortable and safe listening level.
- PHONES ¼ " TRS stereo headphone outputs.
- MIDI I/O LEDs indicates MIDI activity.
- POWER LED is on if the power switch is pressed in and the unit is powered via the supplied power adaptor.
+48V LED is on if either phantom power switch (1-4 / 5-8) is on. - POWER switch. Press in to turn on the unit.
The POWER LED will turn on.

Rear Panel
- POWER IN connect to the supplied power adaptor only. Connect the power adaptor to an AC mains supply that is properly confi gured for the unit. A cable holder above the input prevents the power connection from being accidentally pulled out.
- USB type B connector. Connect to a computer USB port with the supplied USB cable.
- MIDI IN/OUT connect to external MIDI controllers and modules.
- ADAT or S/PDIF Optical I/O ports support S/PDIF, ADAT, S/MUX. Input channels are 11 to 18, outputs are 13 to 20. The front panel OPT I/O-switch (13) selects the operation of these ports.
- S/PDIF I/O ports: RCA coaxial S/PDIF inputs come in from external sources as input channels 9 to 10. S/PDIF output channels are 11 and 12.
- LINE OUT 3-10 balanced ¼ " TRS outputs for additional monitoring and recording.
The output signals come directly from the computer after being converted to analog by the UMC1820. The output levels are only controlled by the DAW. - MAIN OUT balanced ¼ " TRS outputs connect to powered studio monitors for playback and mixing. Adjust the source using the front panel MONITORING controls, and adjust the level using the front panel MAIN OUT controls.
Getting started
- Windows* users: Please visit behringer.com and download the latest UMC1820 USB driver. Unzip the file, double-click the setup.exe and follow the on-screen instructions. Mac* users: For OS X*, no drivers are needed.
- Connect instruments and audio sources to the UMC1820. Connect to a computer via the provided USB cable. Connect a
- MIDI keyboard, controller, or other MIDI device via the MIDI ports on the rear panel. Connect a pair of studio monitors to the MAIN OUTPUTS. Connect a pair of studio headphones to monitor input levels and playback from your audio software.
- Start with the GAIN, MONITORING, and PHONES level at minimum.
- Turn on the UMC1820 first, followed by any other external equipment.
- Check to see if any of your microphones require Phantom Power.
- Make sure your DAW software recognizes the UMC1820 as the audio and MIDI input and output device. While playing a source, such as a guitar, or singing into a microphone, adjust the GAIN of each analog input. You can first make it clip, and then turn the GAIN down just enough so the CLIP LED does not come on, even during the highest peaks.
- Listen to your playing in the headphones or studio monitors, and adjust the PHONES or MAIN OUT volume controls to a comfortable and safe listening level.
- On your DAW, make sure that all input and MIDI channels are working correctly, with audio and MIDI present. Play each channel one at a time to confirm it is present in your DAW.
- Verify that the playback from your DAW is reaching the UMC1820. Adjust the MIX knob in the monitoring section to hear the playback. Note that the volume level of the other outputs 3 - 10 and the digital outputs is adjusted only by the DAW.
- Enjoy playing along and making recordings on your DAW.
Playback and listen in your studio monitors or headphones. Adjust the monitoring MIX control as desired.
*Mac and OS X are trademarks of Apple Inc. Windows is either a registered trademark or trademark of Microsoft Corporation in the United States and/or other countries.
Specifications
| Input | |
| Preamps | 8 x MIDAS-designed |
| Type | XLR / TRS combo connector (Mic/Line/Instrument), 2 front / 6 rear |
| Input level attenuation | 8 x pad switch |
| Frequency response | 10 Hz – 85 kHz (+0/-3 dB) / direct monitor |
| Impedance | Mic in: 3 kΩ / Instrument in: 1 MΩ |
| Max. input level | Mic: 11 dBu / Line: 11 dBu / Instrument: 18 dBu |
| Phantom power | +48 V switchable inputs 1-4 and 5-8 |
| Output | |
| Type | 8 x ¼ " TRS, line outputs 2 x ¼ " TRS, main outputs 2 x ¼ " TRS stereo, headphone outputs |
| Frequency response | 10 Hz – 85 kHz (+0/-3 dB) / direct monitor |
| Max. output level | +16 dBu line outputs +16 dBu main outputs +21.5 dBu headphone outputs |
| System Data | |
| Dynamic range | 106 dB, A-weighted |
| Frequency response | 10 Hz – 40 kHz (+0/-3 dB) @ 96 kHz sampling rate |
| Digital Audio I/O | |
| Type | Coaxial: RCA – 1 In, 1 Out Optical: TOSLINK – 1 In, 1 Out |
| Supported formats | ADAT, S/PDIF, S/MUX |
| MIDI I/O | |
| Type | 5-pin DIN, 1 in / 1 out |
| Monitoring | |
| Direct monitor control | Mix control (inputs/playback 1-2) Source select (analog inputs 1-2/1-8) Stereo/Mono select |
| Main L/R control | Output Level 1/L – 2/R control, dim and mute switch |
| Headphones DJ cueing | Monitor switches (monitor mix 1-2 / playback out 3-4) |
| Digital Processing | |
| Converter resolution | 24-bit |
| Supported sample rates | 44.1, 48, 88.2, 96 kHz |
| Digital I/O Routing | |
| S/PDIF selected (OPT I/O switch out) | RCA In = off Optical In = S/PDIF (ch. 9-10) RCA Out + Optical Out = S/PDIF (ch. 11-12) |
| ADAT selected (OPT I/O switch in) | RCA In = S/PDIF (ch. 9-10) RCA Out = S/PDIF (ch. 11-12) |
| Computer Bus Connectivity | |
| Type | USB 2.0, type B |
| Software Support | |
| Operating systems | Fully compatible with Windows XP or higher 10.8 (Mountain Lion) + 10.7 (Lion): After changing the "OPT I/O" mode with the front panel switch, you must refresh the OS X Audio-Midi-Setup window to get the correct I/O channel numbers indicated. 10.6 (Snow Leopard): The UMC1820 can only be used in S/PDIF mode ("OPT I/O" switch not pressed in). 10.5 + earlier versions are not supported |
| Drivers | Mac: No driver required (CoreAudio/CoreMIDI compliant) Windows: 2 drivers are available: one driver for Windows XP or Windows Vista one driver for Windows 7 to 10 Download the correct driver for your system from behringer.com |
| Power Supply / Voltage | |
| Voltage | 12 V DC (from supplied AC/DC adapter) |
| Power consumption | 20 W |
| Dimensions / Weight | |
| Dimensions (H x W x D) | 46 x 483 x 130 mm (1.8 x 19 x 5.1") |
| Weight | 1.8 kg (4.0 lbs) |
Other Important Information
- Register online. Please register your new MUSIC Group equipment right after you purchase it by visiting behringer.com. Registering your purchase using our simple online form helps us to process your repair claims more quickly and efficiently. Also, read the terms and conditions of our warranty, if applicable.
- Malfunction. Should your MUSIC Group Authorized Reseller not be located in your vicinity, you may contact the MUSIC Group Authorized Fulfiller for your country listed under "Support" at behringer.com.
Should your country not be listed, please check if your problem can be dealt with by our "Online Support" which may also be found under "Support" at behringer.com.
Alternatively, please submit an online warranty claim at behringer.com BEFORE returning the product. - Power Connections. Before plugging the unit into a power socket, please make sure you are using the correct mains voltage for your particular model.
Faulty fuses must be replaced with fuses of the same type and rating without exception.
LIMITED WARRANTY
For the applicable warranty terms and conditions and additional information regarding MUSIC Group's Limited Warranty, please see complete details online at music-group.com/warranty.
FEDERAL COMMUNICATIONS COMMISSION COMPLIANCE INFORMATION
Responsible Party Name: MUSIC Group Services NV Inc.
Address: 5270 Procyon Street Las Vegas, NV 89118 USA
Phone Number: +1 702 800 8290
This device complies with Part 15 of the FCC rules. Operation is subject to the following two conditions:
- this device may not cause harmful interference, and
- this device must accept any interference received, including interference that may cause undesired operation.

Documents / Resources
References
Download manual
Here you can download full pdf version of manual, it may contain additional safety instructions, warranty information, FCC rules, etc.
Download Behringer U-PHORIA UMC1820 - USB Audio/MIDI Quick Start Guide
Advertisement
Thank you! Your question has been received!


Need Assistance?
Do you have a question about the U-PHORIA UMC1820 that isn't answered in the manual? Leave your question here.