Advertisement
Quick Links
IMPORTANT SAFETY
2. This appliance should not be used by, on,
or near children or individuals with certain
INSTRUCTIONS
disabilities.
3. Use appliance only for its intended use
When using electrical appliances, especial-
as described in this manual. Only use
ly when children are present, basic safety
attachments
recommended
by
precautions should always be taken,
manufacturer. Do not use an extension cord to
including the following:
operate the appliance.
4. Never operate the appliance if it has a
READ ALL INSTRUCTIONS
damaged cord or plug, is not working
properly, has been dropped or damaged, or
BEFORE USING
dropped into water. Return the appliance
to a Conair service center for examination
KEEP AWAY FROM WATER
and repair.
DANGER–
5. Keep the appliance cord away from
heated surfaces.
Any appliance is electri-
6. Do not pull, twist or wrap the cord around
cally live, even when the switch is off.
the appliance.
To reduce the risk of death or injury by
7. Never drop or insert any object into any
electric shock:
opening of the appliance.
1. Always unplug appliance from electrical
8. Do not place the appliance on any
outlet immediately after using (except when
surface while it is operating.
charging unit).
9. Never operate the appliance with the air
2. Do not place or store appliance where it
openings blocked or place appliance on a soft
could fall or be pulled into a tub or sink.
surface, such as a bed or couch, where the air
3. Do not use appliance while bathing or in
openings may be blocked. Keep the air open-
the shower.
ings free of lint, hair, an the like.
4. Do not place appliance in, or drop into, water
10. Do not use the appliance with a
or other liquid.
damaged or broken comb or with teeth missing
5. If appliance has fallen into water, do not
from the blades, as injury may result. Before
reach for it. Unplug immediately.
each use, make certain the blades are aligned
DO NOT REACH
properly and oiled.
INTO THE WATER
11. Do not use the appliance outdoors or
where aerosol (spray) products are being used
WARNING –
or oxygen is being administered.
To reduce the
risk of burns, electric shock, fire, or injury to
persons:
1. Never leave a plugged-in appliance
unattended.
SAVE THESE
the blades, then turn the trimmer off and wipe
away the excess oil with a soft cloth.
INSTRUCTIONS
Be careful not to use too much oil and don't oil
your trimmer more than necessary, as this could
damage the motor. (Never attempt to oil the
FOR HOUSEHOLD USE ONLY
the
motor bearing, as it is permanently lubricated.)
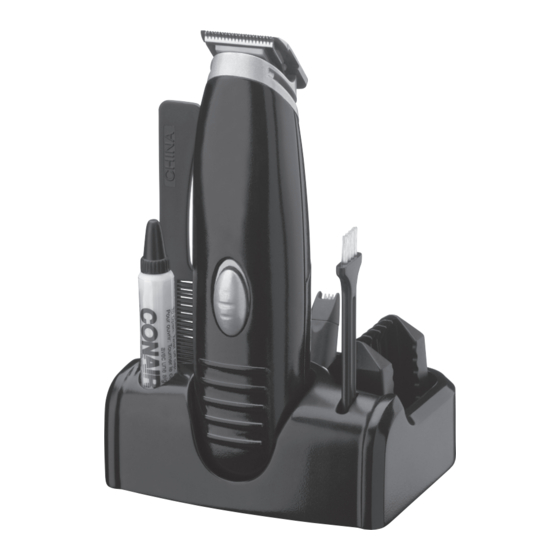
OPERATING INSTRUCTIONS:
After oiling the blades, return the trimmer and
1. Remove the battery compartment cover by
oil packet to the trimmer storage base. KEEP OIL
pushing in and down toward the bottom of the
OUT OF REACH OF CHILDREN.
trimmer.
ON/OFF SWITCH
2. Align the AA batteries with the positive and
To operate, simply push slide toward blade;
negative positions indicated inside the battery
to stop, push slide away from blade.
compartment. Being careful not to bend the
clips, insert the negative end of each battery
Battery Position
first so it will slip easily into position.
3. Return the battery cover to its original position
by pushing it in and up until you hear a small
click as it locks into place.
4. To use your trimmer, push ON/OFF switch
upwards to ON position.
*Requires 2 AA batteries (not included). We recommend using
alkaline batteries in your trimmer because they last longer.
5. After you finish using your trimmer, push
down on the ON/OFF switch to turn the
BLADE CARE
Because the trimmer blades are precision-
trimmer off.
made for a very special use, they should
6. For your convenience, the trimmer comes
always be handled with care. Each time you
with a storage base to hold the trimmer and
finish using the trimmer, take the cleaning
accessories.
brush provided and brush away any loose
USER MAINTENANCE
hair that has collected in the blades. Then
store the trimmer in its storage base to pro-
INSTRUCTIONS
tect the blades until the next use.
Be especially careful when changing or
adjusting blades. When you have your trim-
TAKING CARE OF YOUR TRIMMER
mer serviced, be sure that both blades are
OILING THE BLADES
sharpened or replaced at the same time.
About once a month you should oil the trimmer
To promote the long life of the appliance,
blades with the oil provided in your kit. It is best
use your trimmer only for the purpose
to do this over a piece of newspaper. Turn the
intended by the manufacturer – to trim
trimmer on and hold it so that the blades are
your beard and mustache.
pointed downward. Spread one drop of oil across
REMOVING BLADE SET
This trimmer comes with a detachable
blade set; which makes maintenance and
replacement easy.
To remove the blade set:
• Make sure the trimmer is in the OFF
position
GROWING A BEARD AND MUSTACHE
• With the power switch facing you, press
There are three key factors that will deter-
the blade on the teeth and in direction away
mine which beard or mustache style is best
from you until they pop out of the housing
for you:
To replace the blade set:
• Make sure the taper control is set to the
1. The shape and dimensions of your face.
longest #1position.
2. The natural growth of your beard/mustache.
• Looking at the trimmer from above you
3. The thickness of your beard/mustache. If you
will see a notch at the back of the trimmer.
are unsure about the type of beard or mustache
• There is a tab on the blade set on the bot-
that would most suit your face, speak with a
tom, opposite the blades
professional hair stylist and ask for an opinion
Position that tab so that it fits into the notch
on what style would be best. Once your beard
inside the trimmer head
or mustache has been styled, it is essential that
Push the blade set down onto the trimmer
you maintain its appearance. To do this, use your
head until it snaps into place.
trimmer to trim your beard/mustache weekly.
THREE POSITION TAPER CONTROL
For the best trimming results, your beard should
The Conair trimmer taper control switch is
be slightly damp (NOT WET) when using your
positioned at the back of the unit. You can
trimmer. This will prevent the trimmer from
hold the trimmer in your hand and adjust
removing more hair than desired.
the switch as needed. The taper control
TYPES OF BEARDS/MUSTACHES
eliminates the need in some situations for an
attachment comb because it lets you gradual-
ly adjust the closeness of the cut. For closest
cut and shortest hair, push switch all the way
to level #3. To increase the cutting length,
slowly push control down to level #2 or #1 for
longer cut. Note that too much clipped hair on
the clipper can slow down its operation. To
remove it without removing the blades simply
use the enclosed cleaning brush and gently
sweep away the clipped hair from cutting sur-
faces. The taper control has no function when
using the nose and ear attachment.
GETTING STARTED:
OUTLINING YOUR BEARD
1. It is always best to begin
with a clean, slightly damp
beard.
2. After you have combed
through your beard in the
direction it grows naturally, you will want to
outline the desired shape, beginning under
your jawline.
3. Begin defining your beard's shape under
your chin and work upward on each side
of your face toward your ears. Then define
the upper outline of your beard across your
cheeks, past your sideburns, and toward
your hairline.
NOW YOU'RE READY TO TRIM
YOUR BEARD
1. Your trimmer adjusts to five positions so
you can have a beard length from 1/8" (short-
est) to 5/8" (longest).
2. To use the 5-position comb, slide the unit
over the trimmer blades and snap it down
into position. At first, until you become familiar
with the adjustments, use the longest trim
setting (5/8").
(You can always go back and make your beard
a little shorter.)
3. Begin trimming your beard using smooth,
even strokes. Start with your sideburns
Advertisement

Related Manuals for Conair GMT170QCS


Summary of Contents for Conair GMT170QCS
- Page 1 2. Align the AA batteries with the positive and dropped into water. Return the appliance negative positions indicated inside the battery to a Conair service center for examination compartment. Being careful not to bend the KEEP AWAY FROM WATER and repair.
- Page 2 $5.50 BLD-170W Incluya un cheque o giro postal a la orden de Conair (no podemos aceptar dinero en efectivo, estampillas, ni pedidos con pago con entrega). Los residentes de CT, IL, AZ y PA deben sumar al subtotal el impuesto estatal a las ventas que corresponda. Pedido mínimo de $10,00US o de lo contrario se sumará...