Advertisement
Available languages
Available languages
Quick Links
77886
Diagram 1
Installation & Operating Instructions for the
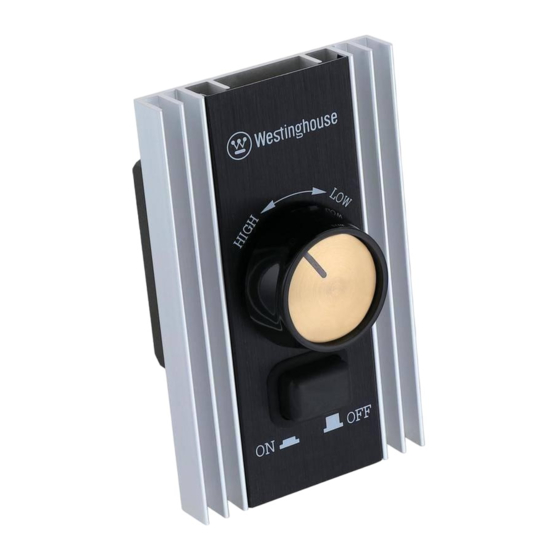
Westinghouse Jax fan Wall Control
WARNING: SHUT POWER OFF AT
FUSE OR CIRCUIT BREAKER
• 2-Wire • Infinitely Variable
• 8 Amps • Faceplate Included
SAFETY PRECAUTIONS:
WARNINGS:
• To avoid fire, shock, and serious personal injury, follow all instructions
carefully. all instructions carefully before installation. Save this Owner's
Manual for future reference.
• Before servicing or cleaning the ceiling fan, switch power off at service
panel and lock service panel disconnecting means to prevent power
from being switched on accidentally. When the service disconnecting
means cannot be locked, securely fasten a warning device such as a
tag, to the service panel.
• WARNING: Do not install or use this unit if any part is damaged or
missing.
• Fans operated with this control must be suitable for use with solid-state
speed controls. Refer to the ceiling fan owner's manual to confirm if
your fans are permitted to use solid-state speed controls.
• WARNING: Use of this control with some ceiling fans could result in
fire, shock and serious personal injury. Use this speed control only with
Westinghouse 78003, 78127, 78614 and 78409 series ceiling fans that
are suitable for use with solid-state speed controls.
ADDITIONAL SAFETY INSTRUCTIONS FOR
INSTALLATION & NOTICE:
1. To avoid possible electrical shock, be sure electricity is turned off at the main fuse
or circuit breaker box before wiring.
2. Make certain no bare wires are exposed outside the wire connectors.
3. All wiring must conform to National and Local Electrical Codes.
4. This wall control is rated for Max. 8 Amps fan load at 120 volts.
5. All wiring must conform to National and Local Electrical Codes. If
you feel that you do not have enough electrical wiring knowledge or
experience, have your fan control installed by a licensed electrician.
Any electrical work not described in this manual should be performed
by a licensed electrician.
6. Use of this control with some ceiling fans could result in fire, shock, and seri-
ous personal injury. Use this fan control only with capacitor speed controlled
ceiling fans only.
7. The WHITE neutral wires inside the electrical box must be connected together
for proper operation of the wall control. NEVER connect the WHITE neu-
tral wires to the Westinghouse Jax Fan Wall Control.
8. Warning! Do not connect any neutral (WHITE) wire to this control.
Incorrect wiring WILL damage this control.
Westinghouse Lighting, Philadelphia, PA 19154-1029, U.S.A. www.westinghouselighting.com
and Westingouse are trademarks of Westinghouse Electric Corporation.
MAKING THE ELECTRICAL CONNECTIONS
AND INSTALLATION:
NOTE: Installation of this control requires that the three-conductor cable
with ground wire be run between the control wall box and the ceiling fan
outlet.
1. Verify proper operation of the ceiling fan wall control before installation.
Improper wiring can damage the control and will void the warranty.
2. Disconnect power to the ceiling fan at the main electric panel. Remove
the fuse or switch the circuit breaker to the OFF position.
Warning! Turning off wall switch is not sufficient. To avoid
possible electrical shock, be sure electricity is turned off at
the main fuse or circuit breaker box before wiring. All wiring
must be in accordance with National and Local codes and
the ceiling fan must be properly grounded as a precaution
against possible electrical shock.
3. Carefully remove the rotary speeds knob and on/off switch knob from
the control (Refer to the diagram 1).
4. The front cover is installed by positioning the cover over the ON/OFF
button with the four protrusions inserted into the groove provided on
the extrusion ribs, gently push the cover upwards so that the two pro-
trusions on top of the cover are higher than the extrusion ribs, take out
the top half of the cover and then push it downwards to make the other
two protrusions come out the extrusion ribs, take out the entire cover.
(Refer to diagram 2).
5. According to the wiring diagram 1 for wiring and installation of the wall
control to outlet box use the screws supplied. Refer to below detail for
wiring. NOTE: Refer to the diagram on the back of the wall control.
• Connect the black wire marked with "TO MOTOR L" from the wall
control to the BLACK wire from the fan.
• Connect the black wire marked with "AC IN L" from the wall control to
the AC 120V HOT wire.
• Use the wire connectors provided to secure the connections
• Connect the GREEN/Ground wire from wall control to the ground
wire from wall box.
• Secure the wall control to the wall box using the two #6-32" x 3/4"
screws provided.
Warning! Do not connect any neutral (WHITE) wire to this
control. Incorrect wiring WILL damage this control.
6. Reinstall the front cover, engage the two protrusions on bottom of the
cover into the groove provided on the extrusion ribs, gently push the
cover upwards so that the two protrusions on the front cover are higher
than extrusion ribs, press the cover owards the wall and push it down-
wards so that the two protrusions on top of the cover are inserted into
the groove provided on the extrusion ribs. Install the ON/OFF button, be
sure the ON/OFF button is free to operate without interference from the
cover, install the rotary speed switch button.
Warning! Check to see that all connections are tight, including
ground, and that no bare wire is visible at the wire connectors,
except for the ground wire.
7. With the wall control set to the off position, restore electricity to the
circuit from the circuit breaker panel or fuse box.
Used under license by Westinghouse Lighting.
Diagram 2
Diagram 3
Adjustment Screw
HOW TO OPERATE YOUR WALL CONTROL:
1. Turn the wall control "ON" using the push button on Westinghouse Jax Fan
Wall Control. Set the fan to "High" speed and allow the fan to run for 30
minutes to normalize the motor temperature.
2. It is recommended that the fans rotate at a minimum of 60 RPM on low speed
to avoid stalling the motor. To adjust the fan RPM, locate the adjustment
screw on the control's front panel (Refer to diagram 3). With a small flat
blade screw driver, slowly turn the adjustment screw clockwise to decrease
RPM and counter-clockwise to increase RPM. Turn the adjustment screw in
small increments and allow the fan to speed up or slow down before making
the next adjustment.
3. Turn the fan(s) off using the Westinghouse Jax Fan Wall Control ON/OFF button.
4. Turn the control knob to the High position and depress the ON/OFF button
and release. Adjust the fans speed to the desired comfort level by rotating
between the low and high positions. To turn the fans off, depress ON/OFF
button and release.
5. NOTE: Turning the speed control knob to high speed during start-up will
assist starting the fans and avoid stalling conditions.
6. The Westinghouse Jax fan wall control is designed to operate multiple fans
without light kits. The Westinghouse Jax fan wall contorl is rated for 8.0
amps 120V full load. It is recommended the Westinghouse Jax fan wall
control shall have a minimum load of 4.0 amps with fans at high speed.
All ceiling fans must be completely installed before installation of the
Westinghouse Jax wall control. Your new control will require a grounded
electrical supply line of 120 volts AC, 60 Hz,15amp circuit.
WARNING!
To reduce the risk of fire or electric shock or damage the fan
do not use this wall control together with any other additional
solid state fan speed control device, or variable speed control.
TROUBLESHOOTING GUIDE
PROBLEM: WALL CONTROL FAILS TO OPERATE
Check:
• Is there power to the control unit?
• Is the control unit wired correctly?
• Are the fan and light switches set on the highest position?
LIMITED WARRANTY
The Westinghouse universal Jax fan wall control offers a limited warranty of
one year from the date of purchase to the original owner against defects in material
and workmanship. All spare parts are covered for ninety days only. This warranty
is in lieu of all other warranties expressed or implied.
Westinghouse will repair or replace this universal Jax fan wall control if it is
defective due to faulty materials or workmanship. This warranty does not cover
service charges, defects resulting from accidents, damages caused through abuse
or alterations or by affixing any attachment not provided with the product, improper
installation or maintenance, failure of supporting devices not supplied as original
mounting hardware, exposures to extremes of heat or humidity, incorrect voltage,
surges in current, unauthorized repair, or failures caused by modifications of the
product or the acts of third parties. See remote manual for proper installation.
If this product fails for any reason covered by this warranty, please contact
us at www.westinghouselighting.com/contact-us.
All Rights Reserved.
Made in China
77886
For use with 78003, 78127,
78614 and 78409
Advertisement

Related Manuals for Westinghouse 77886

Summary of Contents for Westinghouse 77886
- Page 1 FUSE OR CIRCUIT BREAKER 1. Verify proper operation of the ceiling fan wall control before installation. 1. Turn the wall control “ON” using the push button on Westinghouse Jax Fan Improper wiring can damage the control and will void the warranty.
- Page 2 • ADVERTENCIA: No instale ni use esta unidad si falta alguna pieza o si toda la tapa (véase el diagrama 2). 6. El control de pared para ventilador Jax de Westinghouse se ha diseñado para hay alguna pieza dañada. controlar varios ventiladores sin juegos de luces. El control de pared para 5.